TIBCO ActiveMatrix Service Grid Composite Development
Software Release 3.2.0
August 2012
Important Information
SOME TIBCO SOFTWARE EMBEDS OR BUNDLES OTHER TIBCO SOFTWARE. USE OF SUCH EMBEDDED OR BUNDLED TIBCO SOFTWARE IS SOLELY TO ENABLE THE FUNCTIONALITY (OR PROVIDE LIMITED ADD-ON FUNCTIONALITY) OF THE LICENSED TIBCO SOFTWARE. THE EMBEDDED OR BUNDLED SOFTWARE IS NOT LICENSED TO BE USED OR ACCESSED BY ANY OTHER TIBCO SOFTWARE OR FOR ANY OTHER PURPOSE.
USE OF TIBCO SOFTWARE AND THIS DOCUMENT IS SUBJECT TO THE TERMS AND CONDITIONS OF A LICENSE AGREEMENT FOUND IN EITHER A SEPARATELY EXECUTED SOFTWARE LICENSE AGREEMENT, OR, IF THERE IS NO SUCH SEPARATE AGREEMENT, THE CLICKWRAP END USER LICENSE AGREEMENT WHICH IS DISPLAYED DURING DOWNLOAD OR INSTALLATION OF THE SOFTWARE (AND WHICH IS DUPLICATED IN THE LICENSE FILE) OR IF THERE IS NO SUCH SOFTWARE LICENSE AGREEMENT OR CLICKWRAP END USER LICENSE AGREEMENT, THE LICENSE(S) LOCATED IN THE “LICENSE” FILE(S) OF THE SOFTWARE. USE OF THIS DOCUMENT IS SUBJECT TO THOSE TERMS AND CONDITIONS, AND YOUR USE HEREOF SHALL CONSTITUTE ACCEPTANCE OF AND AN AGREEMENT TO BE BOUND BY THE SAME.
This document contains confidential information that is subject to U.S. and international copyright laws and treaties.
No part of this document may be reproduced in any form without the written authorization of TIBCO Software Inc.
TIBCO, The Power of Now, TIBCO ActiveMatrix, and TIBCO Enterprise Message Service are either registered trademarks or trademarks of TIBCO Software Inc. in the United States and/or other countries.
EJB, Java EE, J2EE, and all Java-based trademarks and logos are trademarks or registered trademarks of Sun Microsystems, Inc. in the U.S. and other countries.
All other product and company names and marks mentioned in this document are the property of their respective owners and are mentioned for identification purposes only.
THIS SOFTWARE MAY BE AVAILABLE ON MULTIPLE OPERATING SYSTEMS. HOWEVER, NOT ALL OPERATING SYSTEM PLATFORMS FOR A SPECIFIC SOFTWARE VERSION ARE RELEASED AT THE SAME TIME. SEE THE README FILE FOR THE AVAILABILITY OF THIS SOFTWARE VERSION ON A SPECIFIC OPERATING SYSTEM PLATFORM.
THIS DOCUMENT IS PROVIDED “AS IS” WITHOUT WARRANTY OF ANY KIND, EITHER EXPRESS OR IMPLIED, INCLUDING, BUT NOT LIMITED TO, THE IMPLIED WARRANTIES OF MERCHANTABILITY, FITNESS FOR A PARTICULAR PURPOSE, OR NON-INFRINGEMENT.
THIS DOCUMENT COULD INCLUDE TECHNICAL INACCURACIES OR TYPOGRAPHICAL ERRORS. CHANGES ARE PERIODICALLYADDED TO THE INFORMATION HEREIN; THESE CHANGES WILL BE INCORPORATED IN NEW EDITIONS OF THIS DOCUMENT. TIBCO SOFTWARE INC. MAY MAKE IMPROVEMENTS AND/OR CHANGES IN THE PRODUCT(S) AND/OR THE PROGRAM(S) DESCRIBED IN THIS DOCUMENT AT ANY TIME.
THE CONTENTS OF THIS DOCUMENT MAY BE MODIFIED AND/OR QUALIFIED, DIRECTLY OR INDIRECTLY, BY OTHER DOCUMENTATION WHICH ACCOMPANIES THIS SOFTWARE, INCLUDING BUT NOT LIMITED TO ANY RELEASE NOTES AND "READ ME" FILES.
Copyright (c) 2005-2012 TIBCO Software Inc. ALL RIGHTS RESERVED.
TIBCO Software Inc. Confidential Information
Contents
Preface...11
Changes from the Previous Release of this Guide...12
TIBCO Product Documentation...13
Other TIBCO Product Documentation...14
Typographical Conventions...15
Connecting with TIBCO Resources...18
Chapter 1 TIBCO Business Studio...19
TIBCO Business Studio Configuration...20
Target Platforms...20
Platform Installation...21
Starting TIBCO Business Studio...23
Chapter 2 SOA Projects...25
Special Folders...26
Enabling and Disabling Special Folders...26
Versions...27
WSDL Files...28
Renaming a Port Type...28
Validation...29
Validating WSDL and Schema Files Referenced by a Composite...30
Disabling Validation...30
Resolving Validation Rule Violations...31
Creating an Empty SOA Project...32
Creating a Basic SOA Project...33
Creating an SOA Project from WSDL Files...34
Creating an SOA Project from an Implementation...36
Legacy Projects...37
Migrating Legacy Projects...37
Migration Reference...38
Chapter 3 Composites...43
Creating a Composite...45
Setting Composite Diagram Preferences...46
Adding An Element to a Composite...47
Popup Toolbars...47
Palette...47
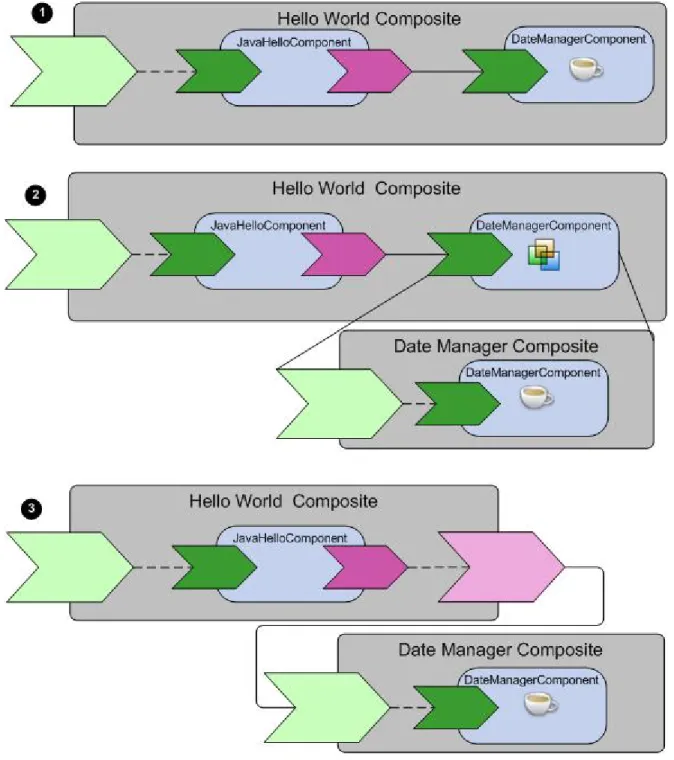
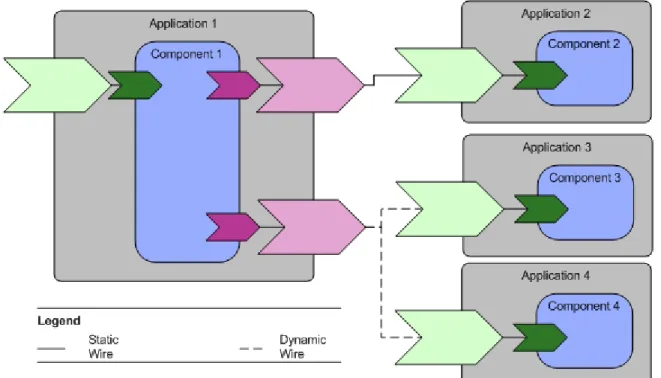
Application Modularization...49
Running and Debugging a Composite...52
Creating a Run Configuration...52
Running a Composite...53
Run Configuration Reference...54
Creating a Debug Configuration...55
Debugging a Composite...56
Debug Configuration Reference...59
Terminating a Configuration...60
Composite Reference...62
Chapter 4 Components...65
Creating a Component...66
Changing the Implementation Type of a Component...67
Configuring a Component's External Custom Feature...68
Component Reference...69
Chapter 5 Services and References...73
Interfaces...74
Adding a Service or Reference to a Component...75
Adding a Service or Reference to a Composite...76
Promoting a Component Service or Reference...77
Static and Dynamic Wiring...78
Creating a Static Wire Between a Service and a Reference...78
Configuring a Reference for Dynamic Wiring...79
Service Reference...80
Reference Reference...82
Chapter 6 Bindings...85
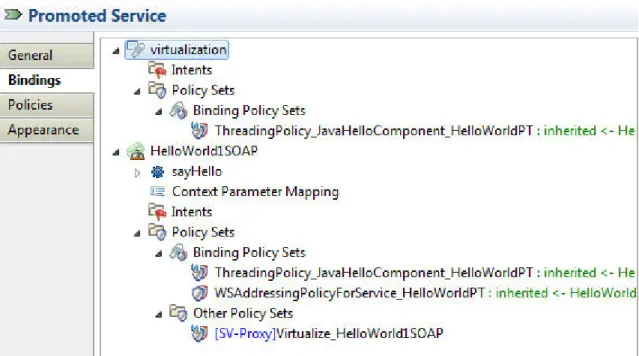
Viewing Service and Reference Bindings...87
Adding a Binding to a Service or Reference...88
SOAP Bindings...89
SOAP Binding Reference...89
Fault Messages...92
WS-Addressing...94
Generating a Concrete WSDL File...98
Generating a SOAP Request...99
WS-Reliable Messaging...101
JMS Bindings...104
JMS Binding Reference...105
Context Parameters...116
Creating Context Parameters...117
Mapping Context Parameters to Header Fields...118
Context Parameter Reference...118
Enabling Transactions in SOAP and JMS Bindings...120
Chapter 7 Policy Management...125
Policies...126
Governed Objects...127
Intents...128
Configuring Intents...128
Intents Reference...129
At Least Once Intents...130
At Most Once Intents...130
Authorization Intents...131
Client Authentication Intents...131
Consumer Confidentiality Intents...132
Consumer Integrity Intents...132
Credential Mapping Intents...133
Managed Transaction Intents...133
Prepare Before Undeploy Intents...134
Provider Confidentiality Intents...134
Provider Integrity Intents...134
Secure Virtualization Intents...135
Start Services First Intents...135
Transacted OneWay Intents...136
Policy Sets...137
Displaying the Policy Sets Picker...138
Configuring Policy Sets...138
Editing Embedded Policy Sets...139
Creating an External Policy Set...139
Configuring External Policy Sets with XML...140
Embedded Policy Sets Reference...140
Policy Templates Reference...150
Chapter 8 Transactions...155
Managed Global Transactions...156
Transacted OneWay Transactions...158
Non-Managed Transactions...160
Chapter 9 Resource Templates...161
Resource Instances...162
Creating a Resource Template...163
Opening a Resource Template...164
Finding References to a Resource Template...165
Renaming a Resource Template...166
Resource Templates Reference...167
Hibernate...168
HTTP Client...171
JDBC...174
Configuring Third-Party JDBC Drivers...178
JMS Resource Templates...179
Configuring Third-Party JMS Drivers...179
JMS Connection Factory...180
JMS Connection Factory Configuration...181
JMS Destination...182
JMS Destination Configuration...182
JNDI Connection Configuration...183
LDAP Connection...186
Security Resource Templates...189
Identity Provider...189
Kerberos Identity Provider...190
Keystore Provider...191
SSL Client Provider...193
SMTP...197
Thread Pool...199
Teneo...201
Chapter 10 Properties...205
Creating a Property...207
Promoting a Component Property...208
Setting the Value of a Binding Property...209
Setting the Value of a Composite Property...210
Setting the Value of a Component Property...212
Setting the Value of a Resource Template Property...214
Creating an Obfuscated Password...215
Properties Reference...216
Chapter 11 Substitution Variables...217
Creating a Substitution Variable...218
Creating a Substitution Variable File...219
Finding References to a Substitution Variable...220
Renaming a Substitution Variable...221
Chapter 12 Custom Features...223
Creating a Custom Feature...224
Opening a Custom Feature...225
Finding References to a Custom Feature...226
Renaming a Custom Feature...227
Configuring Plug-ins...228
Configuring Feature Dependencies...229
Configuring Excluded Custom Feature Dependencies...230
Custom Feature Reference...231
Chapter 13 Shared Libraries...233
Bundles and Plug-in Projects...234
Creating a Library Plug-in Project...236
Chapter 14 Distributed Application Archives...239
Packaging a Composite in a DAA...240
Packaging a Custom Feature in a DAA...241
Regenerating a Distributed Application Archive Containing a Composite...242
Generating and Verifying Derived DAAs...243
Configuring TIBCO Business Studio to Mark DAAs as Derived...243
Verifying That a DAA is Marked as Derived...243
Distributed Application Archive Specifications...244
Qualifier Replacement...245
Chapter 15 Distributions...247
Creating a Distribution...248
Editing a Distribution...250
Creating a Distribution Template...251
Chapter 16 Applications...253
Creating, Deploying, and Starting an Application...255
Stopping, Undeploying, and Deleting an Application...256
Debugging Deployed Applications ...257
Checking Remote Debugger Status...257
Creating a Debug Configuration...257
Launching a Debug Configuration...258
Attaching a Debugger to a Running Application...258
Chapter 17 TIBCO ActiveMatrix Administrator...261
Deployment Servers...262
Creating a Deployment Server...262
Connecting to a Deployment Server...262
Editing Deployment Server Properties...262
Refreshing a Deployment Server...263
Disconnecting from a Deployment Server...263
Deployment Server Reference...263
Administrator Explorer View...265
Displaying the Administrator Explorer View...267
Administrator Command-Line Interface...268
Build Files...268
AMXAdminTask...271
Actions...275
Data Files...275
Objects...276
Object Formats...276
Property File Reference...277
Generating an Administrator Command-Line Interface Script...278
Running an Administrator Command-Line Interface Script...283
Chapter 18 TIBCO Business Studio Command-Line Interface...285
Running a TIBCO Business Studio Command-Line Interface Script...286
TIBCO Business Studio Command-Line Reference...288
TIBCO Business Studio Command-Line Task Reference...289
Chapter 19 Logging...299
Application Logging...300
Message Flow Logging...303
Logging Payload Reference...307
Appendix A IPv6 Support...309
Preface
TIBCO ActiveMatrix®Service Grid is a scalable and extensible platform for developing, deploying, and managing applications that conform to a service-oriented architecture.
Changes from the Previous Release of this Guide
This section itemizes the major changes from the previous release of this guide.
• Configuration - Added TIBCO Business Studio Configuration on page 20 and Platform Installation on page 21, and moved Target Platforms on page 20 under TIBCO Business Studio Configuration on page 20.
• Project wizards - Updated Creating an Empty SOA Project on page 32,Creating a Basic SOA Project on page 33,Creating an SOA Project from WSDL Files on page 34, and Creating an SOA Project from an Implementation on page 36.
• Added Special Folders on page 26 and Enabling and Disabling Special Folders on page 26.
• Added Disabling Validation on page 30 and Validating WSDL and Schema Files Referenced by a Composite on page 30.
• Added post-requisite to Resolving Validation Rule Violations on page 31.
• Bindings -
– Updated supported features in SOAP Bindings on page 89.
– Updated WSDL generation properties in WSDL Generation Reference on page 99.
– Limitations on the endpoint URI are described in SOAP Binding Reference on page 89.
– Added Enabling Transactions in SOAP and JMS Bindings on page 120.
– Application properties added to JNDI Connection Configuration on page 183
• Wiring - Added Static and Dynamic Wiring on page 78.
• Component properties - Updated the process for binding a component property to a composite property in Setting the Value of a Component Property on page 212.
• Policy sets - Added JMS At Least Once on page 141.
• Updated SSL property defaults in SSL Client Provider on page 193.
• Custom features - Added many new topics under Custom Features on page 223: Configuring Plug-ins on page 228, Configuring Feature Dependencies on page 229, Finding References to a Custom Feature on page 226, Renaming a Custom Feature on page 227, and Configuring Excluded Custom Feature Dependencies on page 230.
• Shared libraries - Added Bundles and Plug-in Projects on page 234 and Shared Libraries on page 233 and updated Creating a Library Plug-in Project on page 236.
• Distributed application archives - Updated Packaging a Composite in a DAA on page 240
• Updated Distributed Application Archive Specifications on page 244.
• Qualifier Replacement -Updated Qualifier Replacement on page 245.
• Added overview section to TIBCO ActiveMatrix Administrator on page 261.
• Reorganized Generating an Administrator Command-Line Interface Script on page 278 and Creating, Deploying, and Starting an Application on page 255 into a task and child reference topics.
• Updated many tasks in TIBCO Business Studio Command-Line Task Reference on page 289.
• Added new sections on Logging on page 299 and Message Flow Logging on page 303. Updated Application Logging on page 300.
TIBCO Product Documentation
This section lists documentation resources you may find useful.
The following documents form the TIBCO ActiveMatrix®Service Grid documentation set:
• Concepts: Read this manual before reading any other manual in the documentation set. This manual describes terminology and concepts of the TIBCO ActiveMatrix platform. The other manuals in the documentation set assume you are familiar with the information in this manual.
• Development Tutorials: Read this manual for a step-by-step introduction to the process of creating, packaging, and running composites in TIBCO Business Studio.
• Composite Development: Read this manual to learn how to develop and package composites.
• Java Component Development: Read this manual to learn how to configure and implement Java components.
• Mediation Component Development: Read this manual to learn how to configure and implement Mediation components.
• Mediation API Reference: Read this manual to learn how to develop custom Mediation tasks.
• Spring Component Development: Read this manual to learn how to configure and implement Spring components.
• WebApp Component Development: Read this manual to learn how to configure and implement Web Application components.
• Administration Tutorials: Read this manual for a step-by-step introduction to the process of creating and starting the TIBCO ActiveMatrix runtime, starting TIBCO ActiveMatrix servers, and deploying applications to the runtime.
• Administration: Read this manual to learn how to manage the runtime and deploy and manage applications.
• Installation and Configuration: Read this manual to learn how to install TIBCO ActiveMatrix Service Grid software and create and upgrade runtime objects.
• Release Notes: Read this manual for a list of new and changed features, steps for migrating from a previous release, and lists of known issues and closed issues for the release.
The documentation for the following features is installed separately:
• TIBCO ActiveMatrix Implementation Type for C++
• TIBCO ActiveMatrix Binding Type for EJB
• TIBCO ActiveMatrix Binding Type for Adapters
• TIBCO ActiveMatrix Implementation Type for Adapters
• TIBCO ActiveMatrix Implementation Type for Microsoft CLR
Other TIBCO Product Documentation
You may find it useful to read the documentation for the following TIBCO products:
• TIBCO Enterprise Message Service™
Typographical Conventions
Table 1: General Typographical Conventions Use
Convention
TIBCO products are installed into an installation environment. A product installed into an installation environment does not access components in other installation environments.
TIBCO_HOME ENV_NAME
Incompatible products and multiple instances of the same product must be installed into different installation environments. An installation environment consists of the following properties:
• Name - Identifies the installation environment. The name is appended to the name of Windows services created by the installer and is a component of the path to the product shortcut in the Windows Start > All Programs menu. This name is referenced in documentation as ENV_NAME.
• Path - The folder into which the product is installed. This folder is referenced in documentation as TIBCO_HOME.
The folder that stores configuration data generated by TIBCO products. Configuration data can include sample scripts, session data, configured binaries, logs, and so on. This folder is referenced in documentation as CONFIG_HOME.
CONFIG_HOME
Code font identifies commands, code examples, filenames, pathnames, and output displayed in a command window. For example:
code font
• Use MyCommand to start the foo process.
• Code example:
public class HelloWorldImpl extends AbstractHelloWorldImpl { ...
public HelloResponseDocument sayHello(HelloRequestDocument firstName) {
...
System.out.println("--> Generating Java Hello Component Response...");
String name =
firstName.getHelloRequest()==null||firstName.getHelloRequest().
equals("")?"Friend":firstName.getHelloRequest();
HelloResponseDocument resp =
HelloResponseDocument.Factory.newInstance();
resp.setHelloResponse("Hi " + name + "! " + "This is the Java component.\n");
System.out.println("--> Java Hello Component Response: \n\t\t"
+
resp.getHelloResponse());
...
} }
• CONFIG_HOME/admin/enterpriseName/samples/remote_props.properties
• Output example:
C:\Program Files\tibco\amx-3\studio\3.5\eclipse>amx_eclipse_ant.exe -buildfile "C:/helloworld1/build.xml" -data "C:/hws"
Buildfile: C:/helloworld1/build.xml createApplicationDAA:
[sds.createDAA] Waited for 47ms for workspace refreshes after building features.
all:
BUILD SUCCESSFUL BUILD SUCCESSFUL
Total time: 2 minutes 18 seconds
Use Convention
Bold code font is used in the following ways:
bold code font
• In procedures, to indicate what a user types. For example: Type admin.
• In large code samples, to indicate the parts of the sample that are of particular interest.
• In command syntax, to indicate the default parameter for a command. For example, if no parameter is specified, MyCommand is enabled:
MyCommand [enable | disable]
Italic font is used in the following ways:
italic font
• To indicate a document title. For example: See TIBCO BusinessWorks Concepts.
• To define new terms. For example: A keystore is a database of keys and certificates.
• To indicate a variable in a command or code syntax that you must replace. For example:
MyCommandpathname.
Key name separated by a plus sign indicate keys pressed simultaneously. For example:
Ctrl+C.
Key names separated by a comma and space indicate keys pressed one after the other.
For example: Esc, Ctrl+Q.
Key
combinations
The note icon indicates information that is of special interest or importance, for example, an additional action required only in certain circumstances.
The tip icon indicates an idea that could be useful, for example, a way to apply the information provided in the current section to achieve a specific result.
The warning icon indicates the potential for a damaging situation, for example, data loss or corruption if certain steps are taken or not taken.
Table 2: Syntax Typographical Conventions Use
Convention
An optional item in command syntax.
For example:
[ ]
MyCommand [optional_parameter] required_parameter
A logical ’OR’ that separates multiple items of which only one may be chosen.
For example, you can select only one of the following parameters:
|
MyCommand param1 | param2 | param3
A logical group of items in a command. Other syntax notations may appear within each logical group.
For example, the following command requires two parameters, which can be either the pair param1 and param2, or the pair param3 and param4.
{ }
MyCommand {param1 param2} | {param3 param4}
In the next example, the command requires two parameters. The first parameter can be either param1 or param2 and the second can be either param3 or param4:
MyCommand {param1 | param2} {param3 | param4}
Use Convention
In the next example, the command can accept either two or three parameters. The first parameter must be param1. You can optionally include param2 as the second parameter.
And the last parameter is either param3 or param4.
MyCommand param1 [param2] {param3 | param4}
Connecting with TIBCO Resources
How to Join TIBCOmmunity
TIBCOmmunity is an online destination for TIBCO customers, partners, and resident experts. It is a place to share and access the collective experience of the TIBCO community. TIBCOmmunity offers forums, blogs, and access to a variety of resources. To register, go to http://www.tibcommunity.com.
How to Access TIBCO Documentation
After you join TIBCOmmunity, you can access the documentation here: http://docs.tibco.com.
How to Contact TIBCO Support
For comments or problems with this manual or the software it addresses, contact TIBCO Support as follows:
• For an overview of TIBCO Support, and information about getting started with TIBCO Support, visit this site:
http://www.tibco.com/services/support
• If you already have a valid maintenance or support contract, visit this site:
https://support.tibco.com
Entry to this site requires a username and password. If you do not have a username, you can request one.
1
TIBCO Business Studio
TIBCO ActiveMatrix design activities are performed in TIBCO Business Studio, an extension of the Eclipse SDK Workbench. In TIBCO Business Studio, analysts, architects, and developers, design, implement, configure, test, and package TIBCO ActiveMatrix applications. Beyond the standard Eclipse Workbench features, TIBCO Business Studio provides:
• Wizards and editors for creating projects and applications.
• Resource template editors for resources such as LDAP and JDBC connections, security providers, and so on.
• Editors for specifying intents and creating policies for governed objects.
• A distribution editor for specifying constraints on how application components are distributed across nodes.
• Rapid application deployment features that support deploying and testing applications on a local deployment environment.
• Tool for generating scripts to deploy applications to a remote deployment environment.
• Support for debugging applications running in a remote deployment environment.
For information on TIBCO Business Studio, see Composite Development.
Topics
• TIBCO Business Studio Configuration
• Starting TIBCO Business Studio
TIBCO Business Studio Configuration
TIBCO Business Studio supports configuration in the Window > Preferences property sheets. The subsections most relevant to TIBCO Business Studio are General > Web Browser , Diagram, Plug-in Development >
Target Platform , and TIBCO SOA Platform.
Target Platforms
A target platform is the set of platform plug-ins against which you develop and test user-defined plug-ins. In TIBCO ActiveMatrix user plug-ins contain Java and Spring component implementations, custom mediation task implementations, and shared libraries. The target platform encompasses the folders containing the plug-ins, the list of plug-ins, the target environment, and launching arguments. There is one target platform per workspace and it applies to all projects in the workspace. By default, the target platform is set to TIBCO_HOME/components/shared/1.0.0.
A target platform file is an XML file that encapsulates a target platform (location, content, environment, and so on). It defines a set of the bundles contained in the location identified by the TIBCO Home field against which the bundles in the workspace are compiled and run.
See also Help > Help Contents > Supplemental Eclipse Help > Plug-in Development Environment Guide
> Reference > Preferences > Target Platform Preferences . Related Topics
Platform Installation Reference on page 22
Displaying the Target Platform
Procedure
1. Select Window > Preferences.
2. Click Plug-in Development > Target Platform node.
The target platform editor displays. In the Target definitions list, the active target platform is bolded and identified by a checked checkbox and the string (Active). If you select a target platform, the folder containing the target platform plug-ins displays in the Locations field.
Creating a Target Platform File
Procedure
1. File > New > TIBCO SOA Resources . The TIBCO SOA Resource Wizard displays.
2. Click Target Platform and click Next >.
The New Target Platform File dialog displays.
3. Type a folder name in the Enter or select the parent folder field or select a folder in the folder list.
4. In the File name field, accept the default name or type a new one and click Next >.
5. In the Target Name field, accept the default name or type a new one.
6. In the TIBCO Home field, accept the default or click to select another TIBCO Home location.
7. In the Product Name list, check the checkboxes next to the product plug-ins to include in the target platform. The default selection is TIBCO ActiveMatrix Platform.
8. Click Finish.
Setting the Target Platform
Procedure
Choose a target platform source and follow the appropriate procedure.
Procedure Target Platform
Source
Predefined 1. Select Window > Preferences.
2. Click the Plug-in Development > Target Platform node.
3. If the target platform you want is not listed in the Target definitions list, click Add...:
a. Click the Template radio button, click , and select one of the following:
– TIBCO ActiveMatrix SOA Studio - Target platform for plug-ins that will be executed in TIBCO Business Studio
– TIBCO ActiveMatrix Runtime - Target platform for plug-ins that will be executed in the TIBCO ActiveMatrix runtime environment.
b. Click Next >.
c. Click Finish.
4. Check the checkbox next to the desired predefined target definition.
5. Click Apply.
6. Click Reload....
7. Click OK.
Target Platform
File • Project Explorer
1. In the Project Explorer, double-click a target platform file.
2. In the top-right of the target platform file editor, click Set as Target Platform.
• Environment variable - Define the environment variable
com.tibco.target.platform.location and set it to the absolute path to the target platform file.
• TIBCO Business Studio configuration
1. In TIBCO_HOME/studio/3.6/eclipse/TIBCOBusinessStudio.ini, specify
-Dcom.tibco.target.platform.location=absolute path to the .target file. 2. Restart TIBCO Business Studio.
• Command line
1. Specify -Dcom.tibco.target.platform.location=absolute path to the .target file when starting TIBCO Business Studio from the command line.
Platform Installation
Multiple versions of ActiveMatrix Service Grid can be installed into the same TIBCO_HOME folder. The platform installation allows you to set the location of TIBCO_HOME folder and choose the version of TIBCO Host that will be used when you run a composite in a local debug node and the version of Administrator that will be used when you generate an Administrator CLI script.
Setting the Platform Installation
Procedure
1. Select Windows > Preferences . The Preferences dialog displays.
2. Click TIBCO SOA Platform > Platform Installation . The Platform Installation screen displays.
3. In the TIBCO Home Location field, click the Browse button.
The Browse for Folder dialog displays.
4. Click a TIBCO_HOME folder and click OK.
The TIBCO Host Version and Administrator Version fields are updated with the versions available in the selected TIBCO_HOME.
Platform Installation Reference Description Field
The location of the ActiveMatrix Service Grid installation.
Default: The value of the system properties com.tibco.target.platform.location or TIBCO_HOME_LOCATION. If neither of the properties are defined, the location of the TIBCO Business Studio or the target platform setting.
TIBCO Home Location
The version of TIBCO Host that will be used when you run a composite in a local debug node.
TIBCO Host Version
The version of Administrator that will be used when you generate an Administrator CLI script
Administrator Version
Related Topics
Target Platforms on page 20
Starting TIBCO Business Studio
• Windows - Run TIBCO_HOME\studio\3.6\eclipse\TIBCOBusinessStudio.exe
• UNIX - Run TIBCO_HOME/studio/3.6/eclipse/TIBCOBusinessStudio
2
SOA Projects
In TIBCO Business Studio you develop SOA assets in SOA projects. To support rapid development of commonly used scenarios, TIBCO Business Studio provides four SOA project wizards:
• Creating an Empty SOA Project on page 32 - Creates an SOA project with an empty composite.
• Creating a Basic SOA Project on page 33 - Creates an SOA project, composite, abstract component with a service and reference, and promoted composite service and reference. The services and references are configured with a sample WSDL file.
• Creating an SOA Project from WSDL Files on page 34 - Creates an SOA project, composite, component and promoted services, optional component and promoted references, and component implementation with services and optional references specified by port types selected from one or more WSDL files.
• Creating an SOA Project from an Implementation on page 36 - Creates an SOA project with a composite, a component, and one or more promoted services and references from an existing implementation.
Topics
• Special Folders
• Versions
• WSDL Files
• Validation
• Creating an Empty SOA Project
• Creating a Basic SOA Project
• Creating an SOA Project from WSDL Files
• Creating an SOA Project from an Implementation
• Legacy Projects
Special Folders
During SOA project creation you have the option to create special folders to contain the following SOA asset types:
• Service Descriptors - Service descriptors such as WSDL and schema files
• Composites - Composite files
• Mediation Flows - Mediation flows
• Resource Templates - Resource template, substitution variable, and policy set files
• Deployment Artifacts - Distributed application specification and archive, distribution, custom feature, and command-line interface build and property files
Special folders created in an SOA project have the following features:
• Asset-specific behavior in the Project Explorer. For example, in the Service Descriptors folder you can expand a WSDL file to view its constituent operations and messages.
• When you right-click a special folder and select New, the appropriate asset type will be available in the context menu.
Enabling and Disabling Special Folders
Procedure
Choose and action and follow the appropriate procedure.
Procedure Action
Enabling 1. Right-click a normal folder and select Special Folders > Use as X, where X is Service Descriptors, Composites, Mediation Flows, Resource Templates, or Deployment Artifacts.
Disabling 1. Right-click a special folder and select Special Folders > Do not use as X Folder , where X is Service Descriptors, Composites, Mediation Flows, Resource Templates, or Deployment Artifacts.
Versions
A version is a property that controls how an object is treated at installation or deployment. Versions are specified in TIBCO Business Studio and cannot be modified in Administrator. The following objects have versions:
• Composites and application templates
• Components - During application upgrade, Administrator compares component versions to determine whether the component needs to be upgraded.
• Features
• Plug-ins
• Packages Version Numbers
A version number is a multicomponent number of the form major. minor. service.qualifier. Changes in the value of each component reflect different types of changes in the versioned object:
• major - Reflects breaking changes to the interface.
• minor - Reflects non-breaking changes in an externally visible way. Examples of externally visible changes include binary compatible changes, significant performance changes, major code rework, and so on.
• service - Reflects changes that are not visible in the interface. For example, a bug has been fixed in the code, documentation has changed, compiler settings have changed, and so on.
• qualifier - Identifies when and where the object was built or packaged.
When you create an object in TIBCO Business Studio, the version is set to "1.0.0.qualifier". If the qualifier component of a version is set to "qualifier" when you create a DAA, TIBCO Business Studio replaces "qualifier"
with a generated qualifier that defaults to a timestamp. You can customize the format of the generated qualifier by specifying a qualifier replacement.
Version Ranges
Some fields require you to specify a version range. For example, a feature may have a dependency on a range of versions of another feature. A version range is an interval specified as: bracket lower limit, upper limit bracket, where bracket can be “[” or “]”, which denotes an inclusive end of the range or “(” or “)”, which denotes an exclusive end of the range. If one end of the range is to be included and the other excluded, the range can contain a square bracket with a round bracket.
There are three common use cases:
• A strict version range, such as [1.0.0,1.0.0], denotes version 1.0.0 and only that version.
• A half-open range, such as [1.0.0,2.0.0),which has an inclusive lower limit and an exclusive upper limit, denotes version 1.0.0 and any later version, up to, but not including, version 2.0.0.
• An unbounded open range expressed as a single number such as 2.0.0, which is equivalent to the range [2.0.0, infinity), denotes version 2.0.0 and any later version.
WSDL Files
TIBCO ActiveMatrix services are described using WSDL port types. TIBCO ActiveMatrix supports services that comply with the WSDL 1.1 specification.
Restriction: Importing schema types using xsd:import is not supported. Instead, embed the types or import using wsdl:import inside the wsdl:definitions element.
If you change the order of operations in the WSDL interface of a service or reference you must recreate all SOAP bindings associated with the service or reference.
Related Topics
Validating WSDL and Schema Files Referenced by a Composite on page 30
Renaming a Port Type
Procedure
1. Open a WSDL file in the WSDL Editor.
2. Click the port type.
The port type properties display in the Properties view.
3. Click the to the right of the Name field.
The Rename wizard displays.
4. In the New name field, type a new name.
The Preview > and OK buttons are enabled.
5. Click Preview >.
The pending refactoring changes display.
6. Uncheck the checkboxes next to the changes you don't want performed.
7. Click OK.
The selected changes are performed.
Validation
TIBCO Business Studio validates the information that you provide when you create and configure composite elements. Validation occurs while you create objects and enter values in wizards and property sheets. When a validation rule is violated TIBCO Business Studio can issue a warning or an error. When possible, TIBCO Business Studio provides quick-fixes that suggest one or more ways to resolve the error.
Warnings identify invalid information but usually do not imply that future actions on the component are restricted. In contrast, errors may restrict future actions on the component. For example, a service assembly flagged with an error may not be deployable.
When TIBCO Business Studio issues a warning or error, one of the following may occur:
• The composite element that violates a validation rule and every container (composite, SOA project) containing that element and is marked with an error badge
• Properties view - The property containing the error is marked with an error badge:
• Problems view - A warning or error is added to the Problems tab
• Wizard - Either the Next button continues to be disabled or the wizard displays a popup describing the error. For example:
Validation Rule Examples
• Component references must be wired to component services or promoted references.
• Component services must be wired to component references or promoted services.
• The WSDL interface of component references and services must be configured.
• Component configurations must match their implementations.
• All components except for abstract components must be configured with an implementation.
Validating WSDL and Schema Files Referenced by a Composite
About this task
WSDL and schema files referenced by composite files are validated by default. If you disable validation, you can manually validate WSDL and schema files as follows:
• In the Project Explorer view, right-click a composite and select Validate Related WSDL/XSD.
The WSDL and schema files referenced by the composite are validated.
Related Topics
WSDL Files on page 28
Disabling Validation
About this task
The automatic validation the WSDL and schema files referenced by a composite performed by TIBCO Business Studio can consume a significant portion of the time to perform operations involving a composite. You can disable validation to speed up operation execution time. For example, you can disable validation to speed up importing a large set of projects using the TIBCO Business Studio command-line interface.
Procedure
Choose the operations for which validation should be disabled and follow the appropriate procedure.
Procedure Validation Disabled For
All operations • Specify
-Dsoa.disableWSDLValidation=true when starting TIBCO Business Studio.
• 1. Select Windows > Preferences . 2. Select TIBCO SOA Platform > WSDL
Validation .
3. Check the Disable Live WSDL Validation checkbox.
• Click OK.
All operations except DAA creation 1. Select WindowsPreferences.
2. Select TIBCO SOA Platform > WSDL Validation .
3. Check the Disable WSDL Validation checkbox.
4. Click OK.
Related Topics
TIBCO Business Studio Command-Line Interface on page 285
Resolving Validation Rule Violations
Procedure
Follow the appropriate procedure to resolve the error message.
Procedure Error Message
Component and Implementation
Out of Sync 1. Right-click the component, select Quick Fixes and then select Update Component from Implementation or Update Implementation.
2. Right-click an error in the Problems view, select Quick Fix and then select Update Component from Implementation or Update Implementation. Click Finish.
3. Hover over the error badge in the composite and select Update Component from Implementation or Update Implementation.
WSDL Interface Not Configured 1. Right-click the reference and select Select Port Type....
2. Click the port type.
3. Click OK.
Component Reference Not
Wired 1. Promote the reference or wire to another component service.
What to do next
Sometimes the validator will not completely refresh the workspace even after you have resolved the errors.
To manually refresh the workspace, select Project > Clean... and click OK.
Creating an Empty SOA Project
Procedure
1. Select File > New > TIBCO SOA Resources . 2. Click TIBCO SOA Project and click Next >.
3. In the Project name field, accept the default name or type a new name and click Next >.
4. Uncheck the checkboxes next to any asset type you don't want created and click Next >.
5. In the Project Types list, choose Empty SOA Project, click Next >.
6. In the Composite File field, accept the default name or type a new name.
The Set Special Folders dialog displays.
7. Optionally rename the special folders and click Finish.
Results
Creates an SOA project with an empty composite.
Creating a Basic SOA Project
Procedure
1. Select File > New > TIBCO SOA Resources . 2. Click TIBCO SOA Project and click Next >.
3. In the Project name field, accept the default name or type a new name and click Next >.
4. Uncheck the checkboxes next to any asset type you don't want created and click Next >.
5. In the Project Types list, click Basic SOA Project and click Next >.
The Composite Details dialog displays.
6. Accept the default names or type new names for the composite file, component, service, and reference and click Next >.
7. Optionally rename the special folders and click Finish.
Results
Creates an SOA project, composite, abstract component with a service and reference, and promoted composite service and reference. The services and references are configured with a sample WSDL file.
Creating an SOA Project from WSDL Files
Before you begin
Obtain one or more WSDL files.
Procedure
1. Select File > New > TIBCO SOA Resources . 2. Click TIBCO SOA Project and click Next >.
3. In the Project name field, accept the default name or type a new name and click Next >.
4. Uncheck the checkboxes next to any asset type you don't want created and click Next >.
5. In the Project Types list, click SOA Project From WSDLand click Next >.
The Service Port Types dialog displays.
6. In the Composite File field, accept the default name or type a new name.
7. In the Selected Port Types field, select a port type.
Procedure Option
Import new WSDL file 1. Click Import.... The Select External WSDL dialog displays.
2. Browse to a folder containing a WSDL file, click the file, and click Open.
3. The port type contained in the file is added to the Selected Port Types list.
Add port type from
workspace 1. Click Add.... The Select Port Types dialog displays.
2. Click a port type and click Add.
3. Click OK.
4. The port type is added to the Selected Port Types list.
8. Optionally click Finish.
A composite is created with an abstract component and a promoted service.
9. Click Next >.
The Service Binding Details screen displays.
10. Check the checkbox next to one or more bindings and optionally click in the Binding Name column and rename the bindings.
11. Optionally click Finish.
A composite is created with an abstract component and a promoted service with the specified bindings.
12. Click Next >.
The Reference Port Types dialog displays.
13. Optionally select a port type.
Procedure Option
Import new WSDL file 1. Click Import.... The Select External WSDL dialog displays.
2. Browse to a folder containing a WSDL file, click the file, and click Open.
3. The port type contained in the file is added to the Selected Port Types list.
Add port type from
workspace 1. Click Add.... The Select Port Types dialog displays.
2. Click a port type and click Add.
3. Click OK.
Procedure Option
4. The port type is added to the Selected Port Types list.
14. Click Next >.
The Reference Binding Details dialog displays.
15. Check the checkbox next to one or more bindings and optionally click in the Binding Name column and rename the bindings.
16. Optionally click Finish.
A composite is created with an abstract component and promoted service and reference with the specified bindings.
17. Click Next >.
The Component Details screen displays.
18. In the Component Name field, accept the default name or type a new one.
19. Click a component implementation type.
20. For all component implementation types except Abstract, click Next >.
An implementation-specific dialog displays.
21. Refer to the implementation type documentation for implementation-specific steps.
22. Click Finish.
Results
Creates an SOA project, composite, component and promoted services, optional component and promoted references, and component implementation with services and optional references specified by port types selected from one or more WSDL files.
Creating an SOA Project from an Implementation
Before you begin
Import the package containing the component implementation into the workspace.
Procedure
1. Select File > New > TIBCO SOA Resources . 2. Click TIBCO SOA Project and click Next >.
3. In the Project name field, accept the default name or type a new name and click Next >.
4. Uncheck the checkboxes next to any asset type you don't want created and click Next >.
5. In the Project Types list, click SOA Project from Implementation and click Next >.
The Component Details dialog displays.
6. In the Composite File field, accept the default composite file name or type a new one.
7. In the Component Name field, accept the default component name or type a new one.
8. Click a component implementation type and click Next >.
9. Refer to the implementation type documentation for implementation-specific steps.
10. Click Next >.
11. Select a port type.
12. Check the checkbox next to a binding and optionally rename the binding.
13. Click Finish.
Results
Creates an SOA project with a composite, a component, and one or more promoted services and references from an existing implementation.
Legacy Projects
The structure of TIBCO ActiveMatrix SOA projects and the resources contained within the projects changed between TIBCO ActiveMatrix 2 and TIBCO ActiveMatrix 3. TIBCO Business Studio supports migrating TIBCO ActiveMatrix 2.x projects to TIBCO ActiveMatrix 3.x format.
The migration process updates the type of folders but does not rename folders. For example, the folder that contains resource templates is named Shared Resources in TIBCO ActiveMatrix 2 and Resource Templates in TIBCO ActiveMatrix 3.
Migrating Legacy Projects
Procedure
1. Import the legacy project into TIBCO Business Studio. You should import projects that are dependent on one another (for example, a TIBCO SOA project and the Java plug-in project on which it depends) at the same time. For information on how to import projects, see Help > Help Contents > Workbench User Guide > Tasks > Importing .
The Problems view displays several errors.
2. Invoke the migration wizard:
– In the Project Explorer, right-click the project to be migrated or its contained composite file and select Migrate to ActiveMatrix 3.0 format.
– 1. In the Problems view, right-click the problem and select Quick Fix.
2. Click Migrate legacy project and click Finish.
The Project Migration wizard displays.
3.
Optionally click to specify additional projects.
4. Optionally check the Save a copy of these projects before migrating checkbox and click to browse to the location in which to save the projects. This is strongly recommended, especially if not using source control.
5. Click Next >.
A tree containing the selected projects and the proposed migration actions displays.
6. Uncheck checkboxes next to the migration actions you do not want performed. Deselect only in cases where you really do not want some resource migrated as partial migration is not supported. Resources not migrated at the same time may not be able to be correctly migrated at a later stage if they contain inbound or outbound references to other resources.
7. Click Finish.
The selected migration actions are performed. A summary of the migration displays in a pop-up dialog and is stored in the file ProjName/migration.txt, which is opened in a text editor. The summary lists the actions that were performed, the objects that were not migrated, and the manual actions that you must perform to run the migrated project.
8. Click OK to dismiss the dialog.
Migration Reference
Table 3: Project and Component Migration
Required Actions Migration Output
Input Object
None.
Composites, Shared Resources, and
Deployment Packages migrated to the correct SOA Project
special folder type, but folders are not renamed.
Abstract component
Topic • Change the type of the abstract component
to a valid component and implement as appropriate.
This component type is not supported in 3.x.
.NET
Component • Abstract component
• Change the type of the abstract component to a valid component and implement as appropriate.
• Wires between .NET components are not migrated and the corresponding
component services and references are not
migrated to the abstract component. • Recreate missing component services, references, and wires.
Not supported:
Java
Component • If you want to be able to regenerate the
component implementation, convert the
• @Service annotation generated for a Java
component with Out-* MEP. 2.x class structure to the 3.x class structure following the procedure in the appendix
• @Reference annotation for an Out-*
reference:
@Reference
OutInPT referenceName1 = new
Converting Migrated Java Component Implementations of Java Component Development.
org.example.www.outin.OutInPT(){
public OutInOperationDocument • Update the package names of
SOAPException and SOAPDetail to
com.tibco.amf.platform.runtime.
extension.exception.
outInOperation(
OutInOperationResponseDocument parameters){
//..
}
}; • Update the package names of
EndpointReference, and
ReferenceParameters to
com.tibco.amf.platform.runtime.
extension.exception.
• Update the package names of
WsAddressingConstants to
com.tibco.amf.spline.api.constants.
WsAddressingConstants.
• Extract header properties from
com.tibco.amf.platform.runtime.extension.
context.MutableRequestContext instead of HashMap.
• Extract WS-Addressing properties from
com.tibco.amf.platform.runtime.extension.
context.MutableRequestContext instead of HashMap.
Required Actions Migration Output
Input Object
• If you use the class
org.osoa.sca.ComponentContext, open the Java plug-in manifest in the manifest editor, go to Dependencies tab and add the import package: org.osoa.sca. Mediation
Component • Update these mappings to match their 3.x
environment as it relates to dynamic endpoint references.
• Context Mechanism In 3.x the context parameters are defined on the
component/composite/implementation service & reference.
Context Parameters - Context parameters defined as a simple type in 2.x are
• Add the correct policy.
migrated as context properties with the same direction and of type that is the Java equivalent of the 2.x schema type.
Parameters defined at the output level are copied to the fault level after migration.
Transport and Security context - Transport context properties are migrated as context parameters of type bag. The HTTP headers are migrated as HttpHeader of type bag.
The JMS properties are separated during migration into JmsHeaders and
JmsProperties. Security context is migrated as a mediation parameter of type security.
• Set Context Task Mapping of 2.x context parameters is retained and mapped accurately.
• Set Dynamic Reference Task The Set Dynamic Task Endpoint Reference mechanism was changed from 2.x to 3.x by using Application Name & Service Name (3.x) instead of Service Name &
Service Namespace (2.x). The Set Dynamic Reference task uses a mapper to set these values. The migration attempts to preserve these mappings even though the semantics of the dynamic routing have changed.
• End Task The value of the End Type property has changed from error to Stop Message Delivery and now mandates the configuration of a ’At-least-once’ policy at the mediation operation level.
• Query Database Task Shared resources profile references defined in the Query Database task are migrated as property references.
• Timeout Faults Mediation Flows 3.x contain a timeout fault path for all target operations. Mediation Flows 2.x do not contain this fault path which is
automatically added during migration.
Table 4: Service and Reference Migration
Required Actions Migration Output
Input Object SOAP/HTTP
Service • Create an HTTP Connector and install
instance on node prior to deployment.
• Promoted service with SOAP binding
• If transport type is HTTPS, transport type
is HTTP • If transport type was HTTPS, configure
HTTP Connector for SSL.
• Connector Name property set to resource profile name or to httpConnector. .
• If Enable WS-Addressing and Anonymous checked in binding, the binding is configured with policy set
"WSAddressingPolicyForService_BindingName
• If Enable WS-Reliable Messaging checked in binding, the binding is configured with policy set "WSRMPolicy_BindingName
None.
SOAP/JMS
Service • Promoted service with SOAP binding
• JMS Connection Factory, JMS Connection Factory Configuration, JMS Destination, JNDI Connection Configuration
None.
SOAP/HTTP
Reference • Promoted reference with SOAP binding
• If the binding pointed to an HTTP Client Shared Resource, an HTTP Client.
None.
SOAP/JMS
Reference • Promoted reference with SOAP binding
• JMS Connection Factory, JMS Destination (inbound), JMS Destination (outbound), JNDI Connection Configuration
The project will migrate but will result in a composite that is not supported.
SOAP Reference with
• Convert reference to a supported binding type.
Third-Party Binding
None.
AMX Service • Promoted service with Virtualization binding.
• If a port type was set on the service then the name for the generated Virtualization binding will match the name of the port type. Otherwise, the name of the Virtualization binding will be Virtualization.
AMX
Reference • Promoted reference with Virtualization • binding.
Wire the applications at deploy time using Administrator or create a wrapping composite with components of type composite wired together.
• If a port type was set on the reference then the name for the generated Virtualization binding will match the name of the port type. Otherwise, the name of the Virtualization binding will be Virtualization.
Required Actions Migration Output
Input Object
JMS Service • Promoted service with JMS binding • Configure generated JMS resource templates to point to JNDI Connection Configuration.
• JMS Connection Factory Configuration
• JMS Connection Factory
• JMS Destination Configuration
• JMS Destination
• JNDI Connection Configuration
• JMS target address is mapped to JMS Destination Configuration
• JMS reply address is mapped to JMS Destination
Promoted reference with JMS binding
JMS Reference • Configure generated JMS resource
templates to point to JNDI Connection Configuration.
• Promoted service with JMS binding
• JMS Connection Factory Configuration
• JMS Connection Factory
• JMS Destination Configuration
• JMS Destination
• JNDI Connection Configuration
• JMS target address is mapped to JMS Destination Configuration
• JMS reply address is mapped to JMS Destination
See TIBCO ActiveMatrix Binding Type for Adapters Binding Development.
Adapter Reference
See TIBCO ActiveMatrix Binding Type for EJB Binding Development.
EJB Reference
Table 5: Shared Resource Migration
Required Actions Migration Output
Input Object JMS Shared
Resource • If connection type is direct, create a JNDI
Connection Configuration.
• JMS Connection Factory
• JMS Connection Factory Configuration
• Configure generated JMS resource templates to point to JNDI Connection Configuration.
• If connection type is JNDI, a JNDI Connection Configuration
JNDI Shared
Resource • Rename resource template if shared
resource name contained a space.
• JNDI Connection Configuration
• If the resource contained an identity, an Identity Provider and an empty Keystore Provider.
• Configure the Keystore Provider.
3
Composites
As described in the SCAAssembly specification, a composite is a configuration of services comprising an application that conforms to a service-oriented architecture. A composite contains components, services, references, the wires that interconnect them, and properties that are used to configure the components. Composites can be nested (contained by other composites). A root composite equates to an SCA application.
The constituents of a composite can run in a single process on a single computer or be distributed across multiple processes on multiple computers. A complete application might be constructed from just one composite or it could combine several different composites. The components making up each composite can be implemented using different technologies. Figure 1: Composite on page 43 depicts a composite and illustrates the relationships between composite elements.
Figure 1: Composite
You edit composites in the TIBCO Business Studio Composite Editor depicted in Figure 2: Composite Editor on page 44.
Figure 2: Composite Editor
By default, composite files are stored in the Composites special folder in an SOA project.
Topics
• Creating a Composite
• Setting Composite Diagram Preferences
• Adding An Element to a Composite
• Application Modularization
• Running and Debugging a Composite
• Composite Reference
Related Topics
Packaging a Composite in a DAA on page 240
Creating a Composite
About this task
This topic describes how to create a composite in an existing SOA project. You can also create a composite when you create a new SOA project.
Procedure
1. Choose a starting point and follow the relevant procedure . Procedure
Starting Point
Composite Component 1. Create a composite component.
2. Create the component implementation:
– In the canvas, right-click the component and select Quick Fixes >
Create Composite . – In the Problems view:
1. Right-click the error Component "Compositen" is not configured and select Quick Fix.
2. In the Quick Fix dialog, click Create Composite and click Finish.
Toolbar 1. Select File > New > TIBCO SOA Resources > Composite.
Project Explorer 1. Right-click a Composites folder and select New > Composite.
The New Composite dialog displays.
2. Select a folder to contain the composite.
3. In the File name field, type a name for the composite.
4. Click Finish.
Setting Composite Diagram Preferences
Procedure
1. Select Windows > Preferences . The Preferences dialog displays.
2. Click TIBCO SOA Platform > Composite Diagram .
The composite diagram preferences display on the right. The default setting is to enable all the preferences.
Description Preference
When you hover over a service or reference, connector handles display, which when clicked allow you to wire to a matching reference or service.
Show connector handles
When you hover over a composite or composite element a pop-up bar containing elements that can be added will display.
Show popup bars
Not used.
Enable animated layout
When you zoom in or out, the elements in the canvas are scaled gradually.
Enable animated zoom
Controls the quality of the lines.
Enable anti-aliasing
When a wire is selected, the wire displays small balls flowing from left to right. Animation can cause the CPU usage of TIBCO Business Studio to Enable connection animation
spike. You can also toggle animation by clicking the button in the toolbar above the canvas.
Adding An Element to a Composite
Procedure
The Composite Editor provides three mechanisms—popup toolbars, context-menu, and the palette—for adding an element to a composite.
Popup Toolbars
TIBCO Business Studio supports two popup toolbars: composite and component. The toolbars provides the following two benefits:
• They allow you to add composite and component elements to the canvas without having to move the cursor off to the canvas to the palette
• They enable you to hide the palette so that the canvas has increased screen area
The composite toolbar , which displays when the focus of the cursor is a composite,
allows you to add component to the canvas. The component toolbar , which displays when the focus of the cursor is a component, allows you to add services, references, and properties to a component.
The toolbars display for a few seconds and then disappear.
Enabling and Disabling Popup Toolbars
To specify whether a context-sensitive popup toolbar should display when you mouse over a composite or component:
• Select Window > Preferences .
• Click the Diagram node.
• Check the Show popup bars checkbox.
• Click OK.
Palette
The palette contains a toolbar, one unnamed section, and one named section—Component Types.
The toolbar contains buttons to select elements within the canvas, zoom in and out, and add various types of notes to the composite canvas.
The unnamed section contains buttons to add components, services, references, wires, and properties to the composite canvas.
The Component Types section contain icons for adding typed components to the composite. The named section is extensible; TIBCO ActiveMatrix products can add new types of components to this section.
Figure 3: Palette
The palette has several features that enable you to control whether the palette is displayed and which sections within the palette are displayed. These features allow you to control the screen real estate occupied by the palette.
Toggling the Palette
The palette enables you to control whether the palette is displayed.
To hide the palette, click the right arrow icon in the Palette heading. To display the palette, click the left arrow icon in the palette heading.
Selecting an Element in the Palette
To select a composite element in the palette, click the element. The element is highlighted. Once a composite element has been selected the only operations you can perform are left-click to drop the element on the canvas or click another element in the palette or toolbar.