TIBCO BusinessConnect ™ Gateway Server Administration
Software Release 7.2.1 August 2020
Important Information
SOME TIBCO SOFTWARE EMBEDS OR BUNDLES OTHER TIBCO SOFTWARE. USE OF SUCH EMBEDDED OR BUNDLED TIBCO SOFTWARE IS SOLELY TO ENABLE THE FUNCTIONALITY (OR PROVIDE LIMITED ADD-ON FUNCTIONALITY) OF THE LICENSED TIBCO SOFTWARE. THE EMBEDDED OR BUNDLED SOFTWARE IS NOT LICENSED TO BE USED OR ACCESSED BY ANY OTHER TIBCO SOFTWARE OR FOR ANY OTHER PURPOSE.
USE OF TIBCO SOFTWARE AND THIS DOCUMENT IS SUBJECT TO THE TERMS AND CONDITIONS OF A LICENSE AGREEMENT FOUND IN EITHER A SEPARATELY EXECUTED SOFTWARE LICENSE
AGREEMENT, OR, IF THERE IS NO SUCH SEPARATE AGREEMENT, THE CLICKWRAP END USER LICENSE AGREEMENT WHICH IS DISPLAYED DURING DOWNLOAD OR INSTALLATION OF THE SOFTWARE (AND WHICH IS DUPLICATED IN THE LICENSE FILE) OR IF THERE IS NO SUCH SOFTWARE LICENSE AGREEMENT OR CLICKWRAP END USER LICENSE AGREEMENT, THE LICENSE(S) LOCATED IN THE “LICENSE” FILE(S) OF THE SOFTWARE. USE OF THIS DOCUMENT IS SUBJECT TO THOSE TERMS AND CONDITIONS, AND YOUR USE HEREOF SHALL CONSTITUTE ACCEPTANCE OF AND AN AGREEMENT TO BE BOUND BY THE SAME.
ANY SOFTWARE ITEM IDENTIFIED AS THIRD PARTY LIBRARY IS AVAILABLE UNDER SEPARATE SOFTWARE LICENSE TERMS AND IS NOT PART OF A TIBCO PRODUCT. AS SUCH, THESE SOFTWARE ITEMS ARE NOT COVERED BY THE TERMS OF YOUR AGREEMENT WITH TIBCO, INCLUDING ANY TERMS CONCERNING SUPPORT, MAINTENANCE, WARRANTIES, AND INDEMNITIES. DOWNLOAD AND USE OF THESE ITEMS IS SOLELY AT YOUR OWN DISCRETION AND SUBJECT TO THE LICENSE TERMS APPLICABLE TO THEM. BY PROCEEDING TO DOWNLOAD, INSTALL OR USE ANY OF THESE ITEMS, YOU ACKNOWLEDGE THE FOREGOING DISTINCTIONS BETWEEN THESE ITEMS AND TIBCO PRODUCTS.
This document is subject to U.S. and international copyright laws and treaties. No part of this document may be reproduced in any form without the written authorization of TIBCO Software Inc.
TIBCO, the TIBCO logo, the TIBCO O logo, TIB, Information Bus, TIBCO ActiveMatrix BusinessWorks, TIBCO Administrator, TIBCO Designer, TIBCO Hawk, TIBCO Rendezvous, and TIBCO Runtime Agent are either registered trademarks or trademarks of TIBCO Software Inc. in the United States and/or other countries.
Java and all Java based trademarks and logos are trademarks or registered trademarks of Oracle Corporation and/or its affiliates.
All other product and company names and marks mentioned in this document are the property of their respective owners and are mentioned for identification purposes only.
This software may be available on multiple operating systems. However, not all operating system platforms for a specific software version are released at the same time. See the readme file for the availability of this software version on a specific operating system platform.
THIS DOCUMENT IS PROVIDED “AS IS” WITHOUT WARRANTY OF ANY KIND, EITHER EXPRESS OR IMPLIED, INCLUDING, BUT NOT LIMITED TO, THE IMPLIED WARRANTIES OF MERCHANTABILITY, FITNESS FOR A PARTICULAR PURPOSE, OR NON-INFRINGEMENT.
THIS DOCUMENT COULD INCLUDE TECHNICAL INACCURACIES OR TYPOGRAPHICAL ERRORS.
CHANGES ARE PERIODICALLY ADDED TO THE INFORMATION HEREIN; THESE CHANGES WILL BE INCORPORATED IN NEW EDITIONS OF THIS DOCUMENT. TIBCO SOFTWARE INC. MAY MAKE
Contents
|
iiiContents
Figures . . . v
Tables . . . vii
Preface . . . ix
Related Documentation . . . x
TIBCO BusinessConnect Documentation. . . x
Other TIBCO Product Documentation . . . x
Typographical Conventions . . . xii
TIBCO Product Documentation and Support Services . . . xv
How to Access TIBCO Documentation . . . xv
How to Contact TIBCO Support . . . xv
How to Join TIBCO Community . . . xv
Chapter 1 Introduction. . . 1
Gateway Server Overview . . . 2
Chapter 2 Gateway Server Quick Start . . . 5
Gateway Server Deployment and Start . . . 6
gsengine Commands . . . 9
Chapter 3 Gateway Instances . . . 11
Managing Gateway Instances . . . 12
Viewing Gateway Instances Statistics . . . 14
Monitoring Gateway Instances. . . 16
Chapter 4 Gateway Services . . . 17
Overview . . . 18
Configuring Gateway Services. . . 19
HTTP . . . 19
FILE . . . 21
SSO Implementation Using OAuth. . . 25
iv
|
ContentsChapter 5 Gateway Tokens . . . 29
Overview . . . 30
Creating Gateway Tokens . . . 31
Creating a New Gateway Token Using TIBCO Administrator. . . 31
Creating a New Gateway Token Using CLI . . . 32
Managing Gateway Tokens . . . 33
Chapter 6 Network Filters . . . 35
Overview . . . 36
Using Filtering . . . 36
Filtering Levels . . . 36
Filter Expressions . . . 37
Creating Network Filters . . . 39
Editing a Network Filter . . . 40
Index . . . 41
Figures
|
vFigures
Figure 1 Gateway and Interior Server Communication . . . .3
Figure 2 Gateway Instance. . . .12
Figure 3 Gateway Service Assigned to an Instance. . . .13
Figure 4 Audit Log: Completed Transaction . . . .15
Figure 5 Audit Log: Transaction Details . . . .15
Figure 6 New Filter Created . . . .40
vi
|
FiguresTables
|
viiTables
Table 1 General Typographical Conventions . . . xii
Table 2 Syntax Typographical Conventions . . . xiii
Table 3 HTTP Service: New Private Key for the Group . . . 20
Table 4 HTTP Service: Ports Tab . . . 20
Table 5 HTTP Service: Advanced Tab . . . 21
Table 6 FILE Service: Poller Tab . . . 22
Table 7 FILE Service: Fault Tolerance Tab. . . 23
Table 8 FILE Service: Advanced Tab . . . 23
Table 9 Token Parameters . . . 31
Table 10 Network Filter Parameters . . . 39
viii
|
Tables|
ixPreface
TIBCO BusinessConnect™software is a business-to-business (B2B) gateway that your company can use to engage in electronic commerce with your business partners.
Topics
• Related Documentation, page x
• Typographical Conventions, page xii
• TIBCO Product Documentation and Support Services, page xv
x
|
Related DocumentationRelated Documentation
This section lists documentation resources you may find useful.
TIBCO BusinessConnect Documentation
The following documents form the TIBCO BusinessConnect documentation set:
• TIBCO BusinessConnect Installation and Configuration Read this guide to learn how to install and configure TIBCO BusinessConnect.
• TIBCO BusinessConnect Concepts Read this guide to learn about TIBCO BusinessConnect architecture, deployment modes, protocols, and security.
• TIBCO BusinessConnect Interior Server Administration Read this guide in order to administer, operate, and manage TIBCO BusinessConnect Interior Server.
• TIBCO BusinessConnect Gateway Server Administration Read this guide in order to administer, operate, and manage TIBCO BusinessConnect Gateway Server.
• TIBCO BusinessConnect Trading Partner Administration Read this guide to configure and manage trading partners.
• TIBCO BusinessConnect Scripting Deployment User’s Guide Read this guide to configure and manage TIBCO BusinessConnect using the command line interface.
• TIBCO BusinessConnect Release Notes Read the release notes for a list of new and changed features. This document also contains lists of known issues and closed issues for this release.
Other TIBCO Product Documentation
You may find it useful to read the documentation for the following TIBCO products:
• TIBCO Administrator™: This software allows you to manage users, machines
Preface
|
xi• TIBCO Designer™: This graphical user interface is used for designing and creating integration project configurations and building an Enterprise Archive (EAR) for the project. The EAR can then be used by TIBCO Administrator for deploying and running the application.
• TIBCO Runtime Agent™: This software suite is a prerequisite for other TIBCO software products. In addition to TIBCO Runtime Agent components, the software suite includes the third-party libraries used by other TIBCO products such as TIBCO Designer, Java Runtime Environment (JRE), TIBCO Hawk®, and TIBCO Rendezvous®.
• TIBCO Rendezvous®: This software enables programs running on many different kinds of computers on a network to communicate seamlessly. It includes two main components: the Rendezvous programming language interface (API) in several languages, and the Rendezvous daemon.
• TIBCO Enterprise Message Service™: This software provides a message service that enables integration of applications within an enterprise based on the Java Message Service (JMS) specification. This software is a prerequisite for other TIBCO software products.
• TIBCO BusinessEvents®: This software helps companies identify and quantify the impact of events; it notifies people and systems about meaningful events so processes can be adapted on-the-fly. TIBCO BusinessEvents uses a unique model-driven approach to collect, filter, and correlate events and deliver real-time operational insight.
• TIBCO Hawk®: This software is a tool for monitoring and managing distributed applications and operating systems. The software is designed specifically for monitoring distributed systems, so there is no centralized console or frequent polling across the network.
• tibbr®, tibbr Service, tibbr Community, and tibbr Community Service: This software is the first workplace communication tool with which you can follow subjects that relate to your work and interests besides following people as you do in typical social networking applications. That way, you have much more flexibility in obtaining the right information at the right time in the right context. In fact, the information will find you.
• TIBCO BusinessConnect™Palette: This software is about the resources available in the TIBCO BusinessConnect Palette for TIBCO ActiveMatrix BusinessWorks.
xii
|
Typographical ConventionsTypographical Conventions
The following typographical conventions are used in this manual.
Table 1 General Typographical Conventions Convention Use
ENV_NAME TIBCO_HOME BC_HOME
TIBCO products are installed into an installation environment. A product installed into an installation environment does not access components in other installation environments. Incompatible products and multiple instances of the same product must be installed into different installation environments.
An installation environment consists of the following properties:
• Name Identifies the installation environment. This name is referenced in documentation asENV_NAME. On Microsoft Windows, the name is
appended to the name of Windows services created by the installer and is a component of the path to the product shortcut in the Windows Start > All Programsmenu.
• Path The folder into which the product is installed. This folder is referenced in documentation asTIBCO_HOME.
TIBCO BusinessConnect installs into a directory within aTIBCO_HOME. This directory is referenced in documentation as BC_HOME. The default value of BC_HOMEdepends on the operating system. For example, on Windows systems, the default value isC:\tibco\bc\version.
code font Code font identifies commands, code examples, filenames, pathnames, and output displayed in a command window. For example:
UseMyCommandto start the foo process.
bold code font
Bold code font is used in the following ways:
• In procedures, to indicate what a user types. For example: Typeadmin.
• In large code samples, to indicate the parts of the sample that are of
Preface
|
xiiiitalic font Italic font is used in the following ways:
• To indicate a document title. For example: See TIBCO BusinessConnect Concepts.
• To introduce new terms. For example: A portal page may contain several portlets. Portlets are mini-applications that run in a portal.
• To indicate a variable in a command or code syntax that you must replace.
For example:MyCommandPathName Key
combinations
Key names separated by a plus sign indicate keys pressed simultaneously. For example: Ctrl+C.
Key names separated by a comma and space indicate keys pressed one after the other. For example: Esc, Ctrl+Q.
The note icon indicates information that is of special interest or importance, for example, an additional action required only in certain circumstances.
The tip icon indicates an idea that could be useful, for example, a way to apply the information provided in the current section to achieve a specific result.
The warning icon indicates the potential for a damaging situation, for example, data loss or corruption if certain steps are taken or not taken.
Table 1 General Typographical Conventions (Cont’d) Convention Use
Table 2 Syntax Typographical Conventions Convention Use
[ ] An optional item in a command or code syntax.
For example:
MyCommand [optional_parameter] required_parameter
| A logicalORthat separates multiple items of which only one may be chosen.
For example, you can select only one of the following parameters:
MyCommand para1 | param2 | param3
xiv
|
Typographical Conventions{ } A logical group of items in a command. Other syntax notations may appear within each logical group.
For example, the following command requires two parameters, which can be either the pairparam1andparam2, or the pairparam3andparam4.
MyCommand {param1 param2} | {param3 param4}
In the next example, the command requires two parameters. The first parameter can be eitherparam1orparam2and the second can be eitherparam3orparam4:
MyCommand {param1 | param2} {param3 | param4}
In the next example, the command can accept either two or three parameters.
The first parameter must beparam1. You can optionally includeparam2as the second parameter. And the last parameter is eitherparam3orparam4.
MyCommand param1 [param2] {param3 | param4}
Table 2 Syntax Typographical Conventions (Cont’d) Convention Use
Preface
|
xvTIBCO Product Documentation and Support Services
For information about this product, you can read the documentation, contact TIBCO Support, or join TIBCO Community.
How to Access TIBCO Documentation
Documentation for TIBCO products is available on the TIBCO Product Documentation website mainly in the HTML and PDF formats.
The TIBCO Product Documentation website is updated frequently and is more current than any other documentation included with the product. To access the latest documentation, visithttps://docs.tibco.com.
Documentation for TIBCO BusinessConnect is available on the
https://docs.tibco.com/products/tibco-businessconnectProduct Documentation page.
How to Contact TIBCO Support
You can contact TIBCO Support in the following ways:
• For an overview of TIBCO Support, and information about getting started with TIBCO Support, visithttp://www.tibco.com/services/support
• For accessing the Support Knowledge Base and getting personalized content about products you are interested in, visit the TIBCO Support portal at https://support.tibco.com.
• For creating a Support case, you must have a valid maintenance or support contract with TIBCO. You also need a user name and password to log in to https://support.tibco.com. If you do not have a user name, you can request one by clicking Register on the website.
How to Join TIBCO Community
TIBCO Community is the official channel for TIBCO customers, partners, and employee subject matter experts to share and access their collective experience.
TIBCO Community offers access to Q&A forums, product wikis, and best practices. It also offers access to extensions, adapters, solution accelerators, and tools that extend and enable customers to gain full value from TIBCO products. In addition, users can submit and vote on feature requests from within theTIBCO Ideas Portal. For a free registration, go tohttps://community.tibco.com.
xvi
|
TIBCO Product Documentation and Support Services|
1Chapter 1 Introduction
This chapter introduces TIBCO BusinessConnect Gateway Server and explains its functionality.
Topics
• Gateway Server Overview, page 2
2
|
Chapter 1 IntroductionGateway Server Overview
TIBCO BusinessConnect Gateway Server is located in the demilitarized zone (DMZ) outside of the company firewall. It receives B2B communications directly from the Internet and performs SSL validation. The firewall between the Gateway Server and the rest of your system protects against the threat of malicious
communications.
TIBCO BusinessConnect Gateway Server does not depend either on TIBCO ActiveMatrix BusinessWorks or on TIBCO Runtime Agent installation; however, it still needs TIBCO Enterprise Message Service™to communicate with the Interior server.
The Gateway Server installation already includes gateway services such as FILE and HTTP. You can assign more gateway services such as SSHFTP, FTPS, TCM, PartnerExpress, and so on if you also have these plug-in products installed and configured. TIBCO BusinessConnect Gateway Server is also installed by TIBCO Universal Installer using the same TIBCO BusinessConnect release package, from which you can choose only the Gateway Server component to be installed on a machine located in DMZ. See TIBCO BusinessConnect Installation and
Configuration.
TIBCO BusinessConnect Gateway Server requires a Gateway Token to start. The Gateway Token contains initial information to start Gateway Server, including the management and data ports, the TIBCO Enterprise Message Service transport configurations, which are required for communication between the Gateway Server and Interior Server. For more information, see TIBCO BusinessConnect Concepts.
You can create a Gateway Token in BusinessConnect > Gateway > Gateway Tokensin TIBCO Administrator. After the token is created, you can export it and import this token to the Gateway Server machines where you start the Gateway Servers.
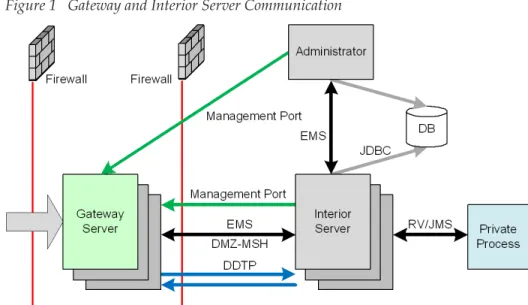
Figure 1depicts a diagram of the Gateway Server and Interior Server communications.
Gateway Server Overview
|
3Figure 1 Gateway and Interior Server Communication
The Gateway Server has the following features:
• Secure
The Gateway Server uses secure TIBCO Enterprise Message Service
connection or secure or plain streaming DMZ Data Transfer Protocol (DDTP) to transfer data received from trading partner to the Interior network. No direct connection is initiated from DMZ to the Interior network.
After the Gateway Server is shut down, all the data and configurations in memory is vanished. Therefore, there is no more data and configuration existing on Gateway Server machines.
• Flexible
Gateway Servers are manageable from TIBCO Administrator through secure JMX management protocol. You can assign different gateway services, such as HTTPS, SSHFTP, FTPS, PartnerExpress, TCM, and so on, to different Gateway Servers, and start or stop these services independently from TIBCO
Administrator.
After a Gateway Server instance restarts, all gateway services already assigned to this Gateway Server restart automatically, with all the relevant services configurations being pulled from the Interior Servers automatically.
For more details about the Gateway Server, see "Interior Server and Gateway Server Architecture" in TIBCO BusinessConnect Concepts, Chapter 2, "TIBCO BusinessConnect Architecture."
4
|
Chapter 1 Introduction|
5Chapter 2 Gateway Server Quick Start
This chapter gives the basic steps to quickly install and deploy the Gateway Server.
Topics
• Gateway Server Deployment and Start, page 6
• gsengine Commands, page 9
6
|
Chapter 2 Gateway Server Quick StartGateway Server Deployment and Start
To deploy and start the TIBCO BusinessConnect Gateway Server, follow these steps:
Task A Create a Gateway Token
On the machine where the Interior Server is already running:
1. Using TIBCO Administrator, expand BusinessConnect > Gateway.
2. Click Gateway Tokens.
3. In the Gateway Tokens dialog, click New.
In the Enter Token Parameters window enter information as inTable 9.
4. Click Create.
Task B Export the Gateway Token
On the machine where the Interior Server is already running:
1. In the Gateway Tokens window, check the check box next to the token you want to export.
2. Click Export.
3. Save the filesecuretoken.dat on a desired location.
Task C Start a Gateway Server Container
On the machine where the Gateway Server will be deployed:
The token file should only be readable to the Gateway server process to which it is copied. Any other instances of the file must be safely deleted. The token can be re-exported at any time until it is revoked or deleted from the TIBCO
BusinessConnect configuration.
Gateway Server Deployment and Start
|
73. Make sure that the Interior Server is already running!
4. Start the Gateway Server container from the directory BC_HOME/bin by initializing the filegsengine. Execute
gsengine on UNIX, or
gsengine.exe on Windows.
Upon startup, the Gateway Server registers itself with the Interior Server, which provides real time updates from the Gateway Server and allows the Interior Server to manage the life cycle of the Gateway Services at the Gateway Server. Through TIBCO Administrator, the Interior Server can start and reassign Gateway Services at the Gateway Server.
Task D Configure a Gateway Service
On the machine that will be used to deploy the Gateway Server:
1. Using TIBCO Administrator, expand BusinessConnect > Gateway.
2. Click Gateway Services.
3. Click New.
4. Add the service name and select the transport type: FILE or HTTP.
More Gateway services are available upon installation of various plug-ins to the TIBCO BusinessConnect Gateway, such as PX and FTPS.
5. Click OK.
The window New Gateway Service appears.
6. Depending on the selected transport, continue configuration as explained in HTTP, page 19orFILE, page 21.
To configure services for TIBCO PartnerExpress™, see TIBCO PartnerExpress User’s Guide.
To configure services for TIBCO BusinessConnect™ Plug-in for FTP Server, see TIBCO BusinessConnect Plug-in for FTP Server User’s Guide.
To configure services for TIBCO BusinessConnect™ Plug-in for SSH Server, see TIBCO BusinessConnect Plug-in for SSH Server User’s Guide.
To configure services for TIBCO BusinessConnect™ Trading Community Management, see TIBCO BusinessConnect Trading Community Management User’s Guide.
Task E Assign the Gateway Service to the Gateway Instance On the machine that will be used to deploy the Gateway Server:
8
|
Chapter 2 Gateway Server Quick Start1. Using TIBCO Administrator, expand BusinessConnect > Gateway >
Gateway Instances.
2. Select the button next to an active running Gateway Server container where you wish to deploy public transports (Gateway Services) and click Manage.
3. Choose a transport type to deploy.
This transport must be previously enabled under System Settings > Inbound Public Transport Types.
4. Select Assign.
5. In the Configure Service screen, choose the Gateway Server Group and choose the Group from the list.
6. Click OK.
7. In the Manage Service screen, click Done.
8. Start the public transports assigned on this Gateway Server container by clicking Start.
The transport is now activated and ready for inbound requests.
gsengine Commands
|
9gsengine Commands
The commandgsengineitself starts the Gateway Server, as explained inTask C, Start a Gateway Server Container, page 6.
When combined with additional command options,gsengineis used to manage the Gateway instances.
Syntax gsengine <command> --propFile <fileName>
where<command>can be one of the following command switches:
--install Installs a wrapped application as a service --uninstall Uninstalls a previously installed service
--update Updates a previously installed wrapped application, or installs it if the application does not exist
--start Starts a previously installed service --stop Stops a running service
--run Runs a wrapped application as a console application
10
|
Chapter 2 Gateway Server Quick Start|
11Chapter 3 Gateway Instances
This chapter explains how to view and manage Gateway Instances.
Topics
• Managing Gateway Instances, page 12
• Viewing Gateway Instances Statistics, page 14
• Monitoring Gateway Instances, page 16
12
|
Chapter 3 Gateway InstancesManaging Gateway Instances
After a Gateway Token is exported from the Interior Server to the Gateway Server and an instance of the Gateway Server is started, it can be viewed and managed in the Gateway Instances window.
On the machine where the Gateway Server has been deployed:
1. Using TIBCO Administrator, expand BusinessConnect > Gateway.
2. Click Gateway Instances.
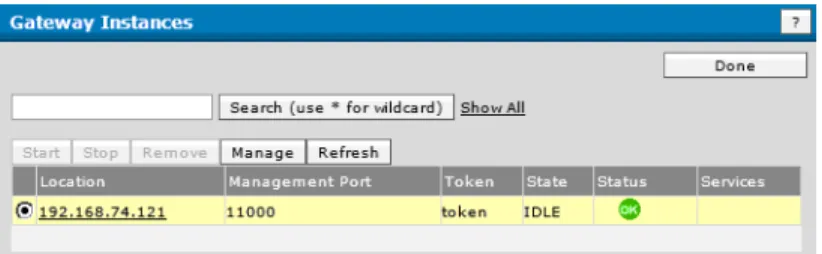
The Gateway Instances window opens and lists all registered active Instances.
Figure 2 Gateway Instance
3. You can manage the listed Service Instances using the provided buttons:
— Start to start an instance
— Stop to stop an instance
— Remove to remove an instance
— Manage to remove an instance or
to assign a Gateway service to an instance (seeAssigning a Gateway Service to a Gateway Instance, page 12)
— Refresh To refresh the screen
Managing Gateway Instances
|
135. In the Configure Services window, select the service from the Gateway Server Grouplist.
6. Click OK.
The Manage Service window now shows that a service is assigned to an instance presented with the transport type used.
7. Click Done.
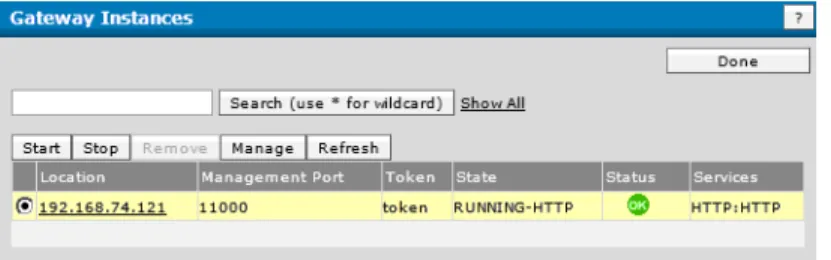
The Gateway Instances window now shows the complete status of the assigned service.
Figure 3 Gateway Service Assigned to an Instance
8. To start the assigned service, click Start.
After the service is started the State column displaysRUNNING-service instead ofIDLE.
14
|
Chapter 3 Gateway InstancesViewing Gateway Instances Statistics
TIBCO BusinessConnect administrators can obtain audit trail information about the Gateway instance activity that is currently occurring.
They can get information such as:
• Type of the currently running Gateway event sources
• Status of the different event Sources such as HTTP and FILE.
• Information about the ports that are used to communicate with the Interior Servers
To obtain the audit trail information:
1. Using TIBCO Administrator, expand BusinessConnect > Log Viewer.
2. In the Log Viewer window, select the button next to the Gateway Service Instance.
3. Click Audit.
The Audit log of the Gateway Service instance appears, with the status ANY.
4. Choose the status of the transactions you want to view:
— ANY
— COMPLETED
— ERROR
— PROCESSED
— PROCESSING
5. Click Search to filter the results.
Viewing Gateway Instances Statistics
|
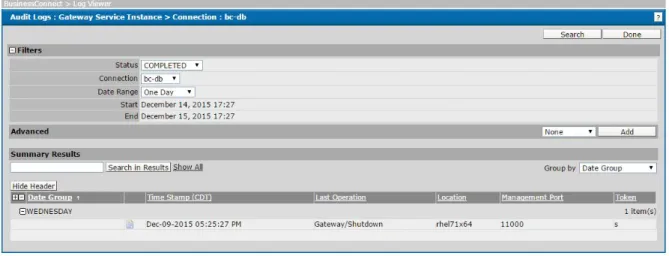
15Figure 4 Audit Log: Completed Transaction
6. To see the details for the transaction in the audit log, click next to the transaction.
The Transaction Details window opens.
Figure 5 Audit Log: Transaction Details
16
|
Chapter 3 Gateway InstancesMonitoring Gateway Instances
The health and statistical information of TIBCO BusinessConnect Gateway Instances can be exposed to TIBCO Hawk.
TIBCO Hawk Agent and Display do not have to run within the same DMZ or subnet where the Gateway Instances run. TIBCO BusinessConnect Interior Server Instances play the bridge role between the Gateway Instances and TIBCO Hawk Agent.
Rulebases can be used to manage Gateway Instances as other applications. The health and statistical information of Gateway Instances are also available in TIBCO Administrator through TIBCO Hawk.
For how to monitor and manage Gateway Instances, see the section about Configuring Application Monitoring and Management Settings in TIBCO BusinessConnect Trading Partner Administration.
|
17Chapter 4 Gateway Services
This chapter explains the functionality and management of the Gateway Services.
Topics
• Overview, page 18
• Configuring Gateway Services, page 19
• SSO Implementation Using OAuth, page 25
18
|
Chapter 4 Gateway ServicesOverview
If a Gateway Service has been started successfully and registered with the Interior Server at least once and using at least one Gateway Service, the Gateway Server will remember that information and will automatically restart the next time with the same groups.
After a restart, users do not have to return to the GUI and reassign these groups to that same Gateway Server container, provided no changes to the groups are needed. The Gateway Server itself returns to the GUI and captures the latest information associated with a specific container.
In order to make changes to the Gateway Services, make any desired changes to the groups using the GUI, and then restart the edited Gateway service so that new setting is captured.
Configuring Gateway Services
|
19Configuring Gateway Services
After an empty container has been started, you need to deploy a Gateway Service in that container.
To create a Gateway Service (a public transport group):
1. Using TIBCO Administrator, expand BusinessConnect > Gateway.
2. Click Gateway Services.
3. Click New.
The window New Gateway Service appears. Depending on the selected service, different configuration options will be available.
— HTTP, page 19
— FILE, page 21
— FTPS: See TIBCO BusinessConnect Plug-in for FTP Server User’s Guide for information.
— SSHFTP: See TIBCO BusinessConnect Plug-in for SSH Server User’s Guide for information.
— PX: See TIBCO BusinessConnect™ Plug-in for PartnerExpress User’s Guide for information.
— TCM: See TIBCO BusinessConnect Trading Community Management User’s Guide for information.
4. Enter the name for the new service, select the service type and click OK.
HTTP
To configure the HTTP service, you will use the following tabs:
• General Tab for HTTP, page 19
• Credentials Tab for HTTP, page 20
• Transport Tab for HTTP, page 20 General Tab for HTTP
Select the Active check box to activate the service.
20
|
Chapter 4 Gateway ServicesCredentials Tab for HTTP
You can use this tab to select a private key used by the Gateway Service.
1. Click New Private Key.
2. Click Save.
The new Private key is now listed under Credential Name.
Transport Tab for HTTP
This tab contains two subtabs to configure the Gateway Service settings.
The following table lists the fields in the Ports tab of the HTTP service:
Table 3 HTTP Service: New Private Key for the Group Field Description
Alias Enter the name for the new private key.
Current Credential
To set a new key or to replace an existing one, click change.
Upload the new private key from your machine.
Password Add the password to protect the key (required).
Table 4 HTTP Service: Ports Tab Field Description
Plain Port The default value is6700. Secure Port The default value is6705.
Note:To disable secure communications on HTTP, enter0or leave the Secure Portor Secure CA Port fields empty.
Secure CA Port
The default value is6707.
Configuring Gateway Services
|
21The following table lists the fields in the Advanced tab of the HTTP service:
3. Click Save.
FILE
To configure the FILE service, use the following tabs:
• General Tab for FILE, page 21
• Transports Tab for FILE, page 22 General Tab for FILE
Select the Active check box to activate the service.
Table 5 HTTP Service: Advanced Tab
Field Description
Security Minimum Encryption Strength
Select the encryption strength from the list:
• All
• Only Stronger Than Export Policy
• Only 128-Bit and Stronger
• Only Stronger Than 128-Bit
• Only 256-Bit and Stronger Gateway to Interior Settings
Data Streaming Threshold (KB)
This threshold value controls when data streaming is utilized to transfer the payload data between the Gateway Server and the Interior Server.
The default value is10000. Request Timeout
(secs)
This timeout value controls how long the Gateway Server has to wait for the request to be replied by the Interior Server.
This timeout must be shorter than the HTTP timeout value set by the trading partner waiting for the reply from the TIBCO BusinessConnect server.
The default value is3600.
22
|
Chapter 4 Gateway ServicesTransports Tab for FILE
This tab contains the following subtabs:
• Poller Tab, page 22
• Fault Tolerance Tab, page 22
• Advanced Tab, page 23 Poller Tab
You can use this tab to configure the File Poller, as explained inTable 6.
Table 6 FILE Service: Poller Tab
Field Description
Monitor Directory (Required) Specify the directory to be monitored by the File Poller.
This directory must start with '/' or '\' or '//' or '[a-zA-Z]:' and must end with '/' or '\'.
Example:C:\tibco\bc\6.0\monitorFiles\file.txt Polling Interval
(secs)
Specify a period of time in seconds. The Poller monitors the specified location for the new and updated files.
The default value is 300 seconds.
Delete Files after Processing
Select this check box to delete the files after processing.
By default, this check box is selected.
Directory to Place Error Files
(Required) Specify a directory where the error files are saved.
This directory must start with '/' or '\' or '//' or '[a-zA-Z]:' and must end with '/' or '\'.
Maximum Jobs Specify the size of the thread pool that can be used by each Gateway Server for inbound file poller transport.
Configuring Gateway Services
|
23You can deploy multiple File Services on multiple Gateway Servers to work in fault tolerance mode. At any time, just one poller is working. However, the idle poller can take over service after the working poller hangs.
Use this tab to configure the transport as explained inTable 7.
Advanced Tab
This tab is used to configure communication settings between the Gateway Server and the Interior Server.
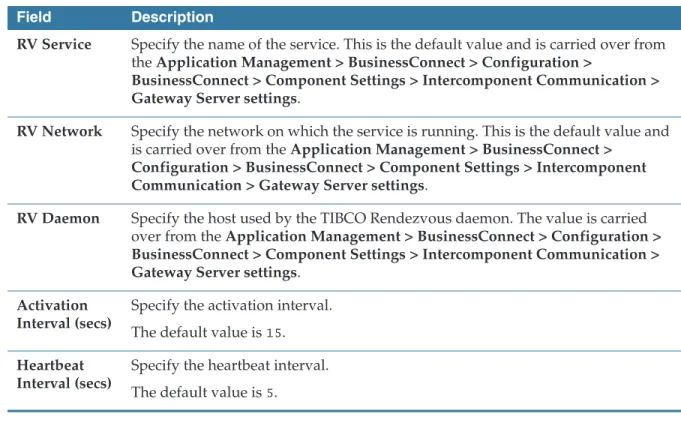
Table 7 FILE Service: Fault Tolerance Tab Field Description
RV Service Specify the name of the service. This is the default value and is carried over from the Application Management > BusinessConnect > Configuration >
BusinessConnect > Component Settings > Intercomponent Communication >
Gateway Server settings.
RV Network Specify the network on which the service is running. This is the default value and is carried over from the Application Management > BusinessConnect >
Configuration > BusinessConnect > Component Settings > Intercomponent Communication > Gateway Server settings.
RV Daemon Specify the host used by the TIBCO Rendezvous daemon. The value is carried over from the Application Management > BusinessConnect > Configuration >
BusinessConnect > Component Settings > Intercomponent Communication >
Gateway Server settings.
Activation Interval (secs)
Specify the activation interval.
The default value is15. Heartbeat
Interval (secs)
Specify the heartbeat interval.
The default value is5.
Table 8 FILE Service: Advanced Tab
Field Description
Gateway to Interior Setting Data Streaming
Threshold (KB)
This threshold value controls when DDTP data streaming is utilized to transfer the payload data between the Gateway Server and the Interior Server.
The default value is10000.
24
|
Chapter 4 Gateway ServicesClick Save.
Request Timeout (secs)
This timeout value controls how long Gateway Server has to wait for the reply from Interior Server after the data is sent to Interior Server.
The default value is3600. Table 8 FILE Service: Advanced Tab
Field Description
SSO Implementation Using OAuth
|
25SSO Implementation Using OAuth
Single Sign-On (SSO) mechanism is a one time login process in which you can access several connected applications with a single credential. This means if you log in to one of the connected applications, you do not have to enter user id and password separately to log in to the other applications.
Using OAuth with TIBCO BusinessConnect Client Application
TIBCO BusinessConnect is configured to use OAuth 2.0, which facilitates SSO authentication for accessing TIBCO BusinessConnect client applications (TCM/PX). This means the user who already has a login session with the client application does not need to provide their login credentials again when accessing another TIBCO BusinessConnect client application. The user name and password are stored in the (Lightweight Directory Access Protocol) LDAP that supports OAuth.
Before the client application can use OAuth for authentication, the following configuration prerequisites should be taken into consideration:
• You must configure LDAP as the first source of authentication in TIBCO Business Connect Administrator.
• OAuth provider must be configured to provide email ID as the user ID in the authentication or the login ID of the OAuth provider should be the email id, which is the external user ID of Business Connect. This is validated against the user information present in the configured LDAP. OAUTH providers should point to the same LDAP used by Business Connect for maintaining the consistency.
• You must set the SSO properties in BusinessConnect > System Settings >
Activated Protocol Plug-ins and Properties.
If the SSO properties are not set properly, the user is directed to the usual (non- SSO) login process of the client applications.
For detailed information about the properties, see TIBCO BusinessConnect™
Trading Partner Administration, Activated Protocol Plug-ins and Properties.
The following describes the basic flow when someone attempts to log in to TIBCO BusinessConnect client applications, which is configured to use OAuth, using their credentials:
26
|
Chapter 4 Gateway Services1. A user starts a client application that is using SSO authentication.
2. The OAuth provider displays their login screen, requesting the user's LDAP configured credentials.
3. The user enters the credentials.
4. After the authentication is successful, the user is redirected to the configured client URL by the OAuth provider being used and the client application requests for the token by providing the Client ID, Client Secret, and other configurations.
5. The OAuth provider sends an ID Token in the form of JSON Web Token (JWT) and claims information to the "Redirect URI" that is the servlet URI where the authorization process occurs. For every client application, the Redirect URI must be as follows:
https://<host>:<port>/<appname>/OAuthLogin/
where the host is the DNS name or IP address of the server that hosts the TIBCO BusinessConnect, the port is the port used by the application, and the appname is the name of the application enabled with OAuth.
SSO Implementation Using OAuth
|
278. Interior Server returns the external user permissions to the client application if the user does not have these permissions. This results in an error message and the user logs out of all the client applications and the SSO sessions. These fetched user permissions are used to create the session cookies and load the client application.
9. After authentication/authorization of the user, the client applications work according to their implementation.
10. When an OAuth-authenticated user logs out of the client application, all the cookies that were created upon login are cleared.
If a user authenticates and logs in to one of the SSO implemented applications in a web browser, no authentication is required for the other SSO applications using the same browser provided the user has permissions for accessing that client application.
When multiple SSO implemented applications are using the same browser and if a user logs out of any one of the applications, then the OAuth provider session also logs out and the other application continues to work, as they are already authenticated.
If the user tries to log in to any of the SSO implemented applications after the OAuth provider session logs out, the user is asked to reauthenticate.
If any network or database fails or any browser related issues occur when you login by using the SSO process, you are required to reopen the browser to resolve these issues. If this issue still persists, clear the browser data manually.
28
|
Chapter 4 Gateway Services|
29Chapter 5 Gateway Tokens
This chapter explains the functionality and management of the Gateway Tokens.
Topics
• Overview, page 30
• Creating Gateway Tokens, page 31
• Managing Gateway Tokens, page 33
30
|
Chapter 5 Gateway TokensOverview
The Gateway Token is a secured configuration file that is used to establish a trusted connection between the Gateway Server and the Interior Server. Its configuration involves setting up a Management Port for the secure JMX to be opened and monitored from the Interior Server Administrator to the Gateway Server. Configuration also requires a secure Data Port to be used for streaming the payload between the Gateway Server and the Interior Server.
The Gateway Server container reads the Gateway Token to start establishing a secure trusted connection with the Interior Server.
The Gateway Token also defines policy control and validates policies upon startup.
After exporting the token (securetoken.dat) and transferring the file to the Gateway engine (for example by using a flash drive), only the engine process should have read access to this file. The token file should then be safely deleted from any other location than the dedicated Gateway server. The TIBCO
BusinessConnect configuration will retain this token until it is revoked or deleted.
Creating Gateway Tokens
|
31Creating Gateway Tokens
Creating a New Gateway Token Using TIBCO Administrator
When a new Gateway Token is created using TIBCO Administrator, the file is downloaded and saved under the namesecuretoken.dat,which then needs to be placed in the folder BC_HOME/gs/token.
1. Expand BusinessConnect > Gateway.
2. Click Gateway Tokens.
3. In the Gateway Tokens dialog, click New.
In the Enter Token Parameters window enter information as inTable 9.
Table 9 Token Parameters
Field Description
Name Name of the Gateway Token
Description Brief description for the Gateway Token Management
Port
The port used for JMX based management of the Gateway Server. Gateway Server listens on this port for JMX connections from Interior Server or TIBCO Administrator.
The default value is11000.
Data Port The port used for streaming payload data from the Gateway Server to the Interior Server using DDTP. Gateway Server listens on this port for DDTP connections from Interior Server.
The default value is12000.
Policy Policies are optional configuration parameters that are used to secure that the Gateway Token is used for Gateway engines only for the specified public transport and/or management and data port binding addresses.
When a Gateway Token is created using the IP addresses defined on public transport bindings and/or for management and data port bindings, these specified values are checked when the Gateway engine is started.
32
|
Chapter 5 Gateway Tokens4. Click Create.
Creating a New Gateway Token Using CLI
If the new Gateway Token is not saved under the default namesecuretoken.dat
but under a different file name, such asnewsecuretoken.dat, then the Gateway server should be started using the CLI command:
cdBC_HOME/gs/token
gsengine -gstoken newsecuretoken.dat
Public Transport Binding
You can use this binding to bind the public inbound listeners on a specific IP address in a multi-homed host.
If no value is specified, the Gateway Server will bind to all IP addresses and impose no restriction on a particular address for external communication with trading partners.
Management and Data Transport Binding
You can use this binding to bind the management listeners on a specific IP address in a multi-homed host.
If no value is specified, the Gateway Server will bind to all IP addresses and impose no restriction on a particular address for external communication with the Interior Servers.
Advanced
JMS JNDI Url You can use this to override the URL that you set to connect to the EMS Server from the Gateway Server.
You must set this URL when the EMS server used for intercomponent communication is reachable only by a different URL from the network where the Gateway Server resides.
Table 9 Token Parameters (Cont’d)
Field Description
Managing Gateway Tokens
|
33Managing Gateway Tokens
Adding a New Token
In the Gateway Tokens window, click New to add a new token. Every time you do an initialization of BusinessConnect database, the existing tokens become invalid, and you have to create a new token.
All added tokens will be listed in the Name column.
Removing a Token
To remove unwanted tokens, select one or more tokens and click Remove.
Exporting a Token
To export a token for deployment on the Gateway Server, select one token and click Export.
Save the filesecuretoken.datin the BC_HOME/gs/tokendirectory. This directory is located on the Gateway Server side.
Editing a Token
To edit an existing token, select the token link.
In the Edit Token Settings window, edit the desired settings as explained in Table 9.
Revoking Tokens
To revoke Gateway Tokens:
1. Expand BusinessConnect > Manage.
2. In the Configuration Repository, section Revoke Gateway Tokens, click Revoke.
A message is displayed to warn you that invalidating all trusted Gateway Tokens exported with this Installation will shut down all currently running Gateway instances. Previously exported tokens become invalid, and new tokens have to be created and exported again.
It is good practice to shut down all currently running Gateway instances before proceeding this step.
3. Click OK.
34
|
Chapter 5 Gateway Tokens|
35Chapter 6 Network Filters
This chapter explains the functionality and management of the Gateway Server network filters.
Topics
• Overview, page 36
• Creating Network Filters, page 39
36
|
Chapter 6 Network FiltersOverview
Network filters are used to define where the inbound traffic to a Gateway Server will be coming from based on the IP address or based on the trading partners.
Using Filtering
The propertybc.ipfilter.enabledcan be used to enable or disable IP filtering.
If disabled (check box unchecked), no filtering takes place at any level and all incoming requests will be allowed to pass with any remote IP address. If enabled (check box checked), then every incoming request will be evaluated as follows:
• DENY If there is no matching filter expression regardless of typeDenyor
AcceptAND the default policy isDeny.
• DENY If there is at least one filter expression that matches the address and is of typeDeny.
• ACCEPT If there is no matching filter expression regardless of typeDenyor
AcceptAND the default policy isAccept.
• ACCEPT If there is no matching filter expression of typeDenyAND there is at least one matching filter expression of typeAccept.
Filtering Levels
Network filters can perform two levels of filtering:
• Filtering based on the IP address (first level)
• Filtering based on the trading partner name (second level)
First level of filtering, where IP addresses are specified, takes precedence over the If there is any disabled individual filter expression that matches the address, it will not participate in the filtering decision but it can be reactivated at any time.
Overview
|
37You can also define the first level filtering by expanding BusinessConnect >
System Settings > Activated Protocol Plug-ins and Properties > BC, and then looking for the entry bc.ipfilter.default.noMatchPolicy.
From the menu select the Default IP Filter Policy:
• Accept
• Deny
Based on this selection, the default first level filtering will either deny or accept the traffic from a certain IP address if no existing (and active) rules have matched the address.
Second Level Filtering
The second level filtering using the field From Participant is exercised on the Interior Server only for FTPS transports. It is performed before user
authentication and during on login for FTPS.
Filter Expressions
Only one filter expression can be created with a single filter entry and can match the remote IP addresses directly, or can define any arbitrary ranges with a specific pattern syntax.
IPv4 canonical textual representation: N1.N2.N3.N4 where N1-4 are segments between 0 and 255 inclusive.
Matching Patterns
Here are some examples of matching patterns to use:
• 1.2.3.4 Matches the IPv4 address 1.2.3.4 directly. Any other address on this pattern will be non-matching.
• 1.2.3.* Matches all the IPv4 addresses between 1.2.3.0 and 1.2.3.255 inclusive, a total of 256 addresses.
• 1.2.3.4-12 Matches all the IPv4 addresses between 1.2.3.4 and 1.2.3.12 inclusive, a total of 9 addresses.
• 1.2.3-5.* Matches all the IPv4 addresses between 1.2.3.0 and between 1.2.5.255, a total of 768 addresses.
• 1.2.* Matches all the IPv4 addresses between 1.2.0.0 and 1.2.255.255, a total of 65,536 addresses.
38
|
Chapter 6 Network Filters• Any combination of ranges (n1-n2) and wildcards*are allowed for a different segment. The expression *.*.*.* can be used to match every possible IPv4 address.
If the pattern doesn't specify every segment, they are canoncicalized so that they match every address for the given segments' range.
Creating Network Filters
|
39Creating Network Filters
To create a network filter:
1. Expand BusinessConnect > Gateway > Network Filters.
2. Click Add.
3. Enter filter parameters as described inTable 10.
4. Click Save.
5. The new filter is displayed in the Network Filters window.
Table 10 Network Filter Parameters Field Description
Name Enter the filter name.
Enable Check this field to enable the filter.
Default is checked.
Type This field defines whether a single IP address, or a range of IP addresses, will be denied or accepted:
• Deny Indicated that a matching IP address will be denied or
• Accept Indicated that a matching IP address will be accepted
IP Expression This is first level filtering based on the IP address denial or acceptance and is required. Enter the IP address information by using wildcards * or a range -.
No regular expressions or comma-delimited expressions are allowed.
Example: 1.2.1-100.*
For more details seeMatching Patterns on page 37.
From Participant
This is second level filtering based on the trading partner name and is performed before user authentication and during login for SFTP or FTPS.
This field is not required.
For more details seeFiltering Levels on page 36.
40
|
Chapter 6 Network Filters6. Use the Network Filters window to:
— Add a new filter
— Delete an existing filter
— Editing a Network Filter, page 40 Figure 6 New Filter Created
Editing a Network Filter
To edit an existing network filter:
1. In the Network Filters window, click the filter link.
2. In the Edit filter Settings window, edit the filter settings as explained in Table 10 on page 39.
Index
|
41Index
C
configuring Gateway Services 19 Credentials tab for HTTP 20 FILE transport 22
General tab for HTTP transport 19 customer support xv
E
ENV_NAME xii
G
GatewayServerPX.Partner.Ports 19 General tab for FILE transport 22
M
monitoring Gateway instances 16
S
support, contacting xv
T
technical support xv
TIBCO support TIBCOmmunity xv TIBCO_HOME xii,xii Transports tab for File
Advanced tab 24 Fault Tolerance tab 23 Poller tab 22
V
viewing Gateway instances statistics 14