國
立
交
通
大
學
資訊科學系
碩
士
論
文
適用於 Visual Studio .NET 上之
多使用者介面產生器
A Multi User-Interface Generation Plug-in for
Visual Studio .NET
研 究 生:高啟涵
適用於 Visual Studio .NET 上之多使用者介面產生器
A Multi User-Interface Generation Plug-in for Visual Studio .NET
研 究 生:高啟涵 Student:Chi-Han Kao
指導教授:袁賢銘 Advisor:Shyan-Ming Yuan
國 立 交 通 大 學
資 訊 科 學系
碩 士 論 文
A ThesisSubmitted to Institute of Computer and Information Science College of Electrical Engineering and Computer Science
National Chiao Tung University in partial Fulfillment of the Requirements
for the Degree of Master
in
Computer and Information Science June 2005
Hsinchu, Taiwan, Republic of China
適用於
Visual Studio .NET 上之多使用者介面產生器
學生: 高啟涵 指導教授: 袁賢銘
國立交通大學資訊科學系﹙研究所﹚碩士班
摘
要
隨著手機的多樣化,各種設備間的規格也漸趨差異。就程式設計師而言, 相同功能的程式,為了在不同平台上執行,便必須以不同的程式語言重新撰寫。 這樣的行為對於程式開發者而言,是重覆而不必要的。因此,我們希望提供一 個轉換的工具,將撰寫好的程式,轉換成特定語言的版本。 在本篇論文中,我們選擇將轉換的功能嵌入到 Microsoft 所開發的 Visual Studio .NET 。 這 是 一 套 在 .NET 平 台 下 , 開 發 程 式 的 整 合 性 開 發 工 具 (Integrated Development Environment) , 我 們 希 望 使 用 者 利 用 Visual Studio .NET 本身的開發環境,拖拉使用者介面呈現的方法,而後我們的轉換工 具便可以產生相對應的 C#、J2ME、XHTML-MP 和 WML 版本的使用者介面,節省程 式設計師的開發時間。所以,從程式開發者的角度而言,只要將我們的轉換工 具安裝到 Visual Studio .NET 中,使用一樣的方式作使用者介面的開發,而後 便可以得到不同版本的使用者介面,節省在不同平台上開發程式的時間。
A Multi User-Interface Generation Plug-in for Visual Studio .NET
Student: Chi-Han Kao Advisor: Shyan-Ming Yuan
Department of Computer and Information Science
National Chiao Tung University
Abstract
With the variety of the mobile devices, specifications between devices have become more and more different. From the point view of programmers, in order to execute the application with the same function on the different platform, programmers have to rewrite the program in another language. The repeated action of rewriting is meaningless and unnecessary for programmers. Therefore, we want to provide a toolkit for programmers. The finished program can be translated into the target language through the toolkit.
In this thesis, we choose the Integrated Development Environment – Visual Studio .NET as the target IDE to embed our toolkit into it. Visual Studio .NET is developed by Microsoft and it is used to edit the program executed on the .NET platform. Users operate the IDE to edit the program, design the layout of the User Interface with the IDE. According the layout designed by users, our toolkit can generate the User Interface written in C#, J2ME, XHTML-MP and WML. In terms of users, they only have to install our toolkit into Visual Studio .NET, operate the IDE as usual, and they can get the User Interface written in their desired programming language.
Acknowledgement
首先,謝謝我們的指導老師 - 袁賢銘教授,給予我們很大的研
究空間,讓我們可以在無拘束的環境中學習。再來是碩二的同學們,
仁凱、小於、小武、林董,因為你們的陪伴,讓寫論文的日子不再
那麼難熬。以及指導我的高子漢學長,謝謝你的教導。
最後,我必須要感謝我的父母,謝謝你們的養育之恩。雖然你們
沒能看著我完成碩士班的學業,但是我希望藉著這篇論文,大聲的
告訴你們-我沒有辜負你們的期望!!
Table of Contents
Acknowledgement ... v
Table of Contents... vi
List of Figures ... viii
List of Tables... ix
Chapter 1 Introduction... 1
1.1. Preface ... 1 1.2. Motivation ... 1 1.3. Objectives... 2 1.4. Organization ... 3Chapter 2 Background and Related Works ... 4
2.1. Background ... 4
2.1.1. XML-based Mobile Application Development Kit... 4
2.1.2. Visual Studio .NET... 5
MExE (Mobile Execution Environment) ... 6
XML (Extensible Markup Language) ... 8
2.2. Related Works ... 9
2.2.1. CodeSmith ... 9
2.2.2. CodeCharge ... 9
Chapter 3 Ideas of Design ...11
3.1. Ideas of Design... 12
3.2. The Process of Embedding... 23
4.1. Introduction of Pervasive User-interface Markup Language ... 27
4.1.1. The design ideas of PUML... 28
4.1.2. All Elements included in PUML ... 28
4.1.3. Example of PUML ...32
4.2. Implementation of the embedding... 34
4.2.1. The toolkit be combined with the front-end IDE ... 35
4.2.2. The document transmission to the back-end toolkit... 41
Chapter 5 Comparison ... 43
5.1. CodeCharge ... 43
5.2. CodeSmith ... 44
Chapter 6 Conclusion and Future Work ... 46
6.1. Conclusion... 46
6.2. Future Work... 48
List of Figures
Figure 2-1 the structure of XML-based Mobile Application Development Kit... 5
Figure 2-2 the develop environment of Visual Studio .NET... 6
Figure 3-1 example of translating program from J2ME to WML... 11
Figure 3-2 the installing process of our toolkit ... 13
Figure 3-3 icon about our toolkit program ... 14
Figure 3-4 choosing the program that users have installed ... 15
Figure 3-5 uninstalling the program that user select ... 15
Figure 3-6 the controls users can select the control they want... 17
Figure 3-7 IDE after instill our toolkit program... 18
Figure 3-8 the result of Visual Studio .NET... 19
Figure 3-9 after installation, the tab “Items for PUML” been added to the IDE ... 21
Figure 3-10 the properties window for the properties of the controls... 22
Figure 3-11 an example of the translation process... 24
Figure 4-1 the layout of the application ... 33
Figure 4-2 the PUML document of the application... 33
Figure 4-3 the executable file after we package our toolkit ... 35
List of Tables
Table 4-1 the detail of all PUML elements ... 30 Table 4-2 IDTEntensibility2 Interface ... 38 Table 5-1 Comparison of the translation toolkits... 45
Chapter 1 Introduction
1.1. Preface
As the mobile devices are developed vigorously in recent years, there are thousands of devices have been published in the world. Therefore, many mobile applications are coded in many different programming languages. There is a problem for the people who develop the mobile application. If they want to operate mobile applications with same function in various mobile execution environments, they have to edit various versions of program by using different programming languages.
To save the problem, the member of our lab – Shen, had proposed a toolkit named “XML-based Mobile Application Development Kit” [1]. The toolkit is designed in the concept “Write Once, Run Anywhere”, the function of this toolkit is translating the document to the target language users assigned, and the translated document can be executed in the mobile environment. The document is written in the language we defined, and the translated document is written in the physical language known by public. From now on, programmers only have to write the program once, and our toolkit can translate the program to various languages in the public by using our toolkit.
1.2. Motivation
Although the toolkit proposed by shen saves the problem of various mobile execution environments, the environment for users to edit the document in the language we defined is in the text mode. It is not convenient for users to edit the
document. We want users can edit the document in the WYSIWYG [2] development environment. When users develop the User Interface (UI) of the mobile application, they can get the layout of the User Interface immediately from the development environment.
At first, we want to develop the development environment ourselves own. But there is a problem about this development environment. Users who first operate the development environment have to learn the skills about the environment. It is not convenient for users.
In the next step, we find that there are many integrated development environment (IDE) have been published in the world. In normal, programmers usually use the IDE to develop the program. This situation excites our thought to embed our toolkit into the IDE known by public. In this way, programmers can use the IDE they are familiar to edit the document, and our toolkit can translate the document to the target language they assigned.
1.3. Objectives
Since our motivation is embedding the translation toolkit into the famous IDE, we have to provide a convenient method for users to operate our toolkit. Convenience is our objective. The meaning of the convenience can be divided into two parts, we will describe as follow:
Use Conveniently:
Because our toolkit is a third party development, it is not one part of the target IDE at first. We have to provide a convenient method of using our toolkit.
The method of operating our toolkit is just like other operations in the IDE, there is no different between our toolkit and other operations.
Install Conveniently:
As we mention above, our toolkit is a third-party development, how we can embed our toolkit into the target IDE conveniently is important to users. We would like to provide a simple installation for users. There are no unnecessary steps in the installation process, and no complex steps in the process too. All the installation is simple for users.
1.4. Organization
The rest of this thesis is organized as follows. In the next chapter, we review a few background and related works. The characteristics of our implementation are provided in Chapter 3. In Chapter 4, we will explain how to implement our development in detail. After that, we will compare our development with the other programs which have the function are similar to us in Chapter 5. Final chapter is the conclusions and future works.
Chapter 2 Background and Related Works
2.1. Background
2.1.1. XML-based Mobile Application Development Kit
This is the target toolkit we want to embed into the famous integrated development environment. This toolkit is developed by shen[1]. The objective of this toolkit is based on the concept “Write Once, Run Anywhere”. This concept is similar with Java. The toolkit translates the program to the target language assigned by users to achieve the objective “Write Once, Run Anywhere”.
This toolkit is capable of translating a program written in the extra language to that of a certain mobile environment. The language is in the abstract level, and the method to describe the application is to record all the information about this application in the document written in XML[3] language. The document described the mobile application can be translate to the program executed in many kinds of mobile execution environment. The environment for example: WML / WMLScript[4], J2ME MIDP[5]…and so on.
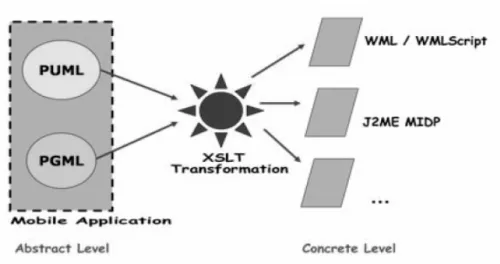
Figure 2-1 the structure of XML-based Mobile Application Development Kit
From Figure 2-1 the structure of the toolkit, we can find out that the description of the mobile application are divided into two parts: One is the part of the User Interface, and the other is the logic computing of the application. In the abstract level, the author design description languages based on XML. The description language for User Interface is named as PUML (Pervasive User-interface Markup Language), and the language for logic computing is named as PGML (Pervasive loGic Markup Language)
The author uses the mechanism of the XSLT[6] as the translation technology. Using the XSLT translation mechanism, the toolkit can translate the document in the abstract level to each kind of program in physical language, and the translated program can be executed in it mobile environment.
2.1.2. Visual Studio .NET
Visual Studio .NET 2003 Professional[7] enables user to rapidly build a broad range of applications for Microsoft Windows®, the Web, and devices. With intuitive visual designers, high-performance data access tools, server-side visual designers,
native support for the Microsoft .NET Compact Framework, and inherent support for XML Web services, Visual Studio .NET 2003 Professional delivers improved reliability, security, and performance.
Visual Studio .NET 2003 enables user to address today's most pressing application development and deployment challenges, streamline business processes, and realize new business opportunities. The unified Visual Studio .NET 2003 integrated development environment (IDE) and a choice of programming languages—including Microsoft Visual Basic® .NET 2003, Microsoft Visual C++® .NET 2003, Microsoft Visual C#® .NET 2003, and Microsoft Visual J#™ .NET 2003—enable user to build applications using your existing skills. Figure 2-2 is the develop environment of Visual Studio .NET.
Figure 2-2 the develop environment of Visual Studio .NET
MExE (Mobile Execution Environment)
is published by 3GPP. They claim that there are five types of mobile devices in MExE. If any mobile device belongs to the five types, this mobile device can be the MExE device too.
The objective of MExE is to set a standard in the mobile execution environment. This standard can be applied to the development of mobile application or the software service, makes them more convenience and fast.
According to execution environment and computing capability of every mobile device, MExE divides the execution environment into five class marks. The five calssmarks are listed as follow:
1. classmark 1 – WAP execution environment:
The mobile device in this execution environment has a lightweight browser. The browser can browse or execute the web pages written in WML/WMLScript. The device must follow the WAP standard, and is compatible with the wireless network environment.
2. classmark 2 – Personal Java execution environment:
In this execution environment, the computing power and the hardware capability of the devices are better. This execution environment (is the Java Virtual Machine) can execute the mobile application written in Personal Java (PJava), it can supports more complex User Interface of the application and the APIs.
3. classmark 3 – J2ME/CLDC execution environment
Devices in this execution environment are limited to the computing power and the hardware capability itself. Devices can not display the complex User Interface, and the screen of these devices have are usually smaller. So, the APIs
in J2ME is designed for this kind of mobile devices. The application be executed in this environment is written in the language-J2ME.
4. classmark 4 – CLI compact execution environment
The application written in the programming language (embedded C++ for example) of Microsoft can be executed in this environment.
5. classmark 5 – Virtual Palmtop network execution environment
The environment of this part uses the client-server architecture to execute the application. The mobile device only display the User Interface, and the data inputted by the user will be transmitted to the remote server for logic computing through Internet. The result will be transmitted to the mobile device back, and displayed on the screen with the suitable User Interface.
XML (Extensible Markup Language)
XML is an open meta-language, and it is text-based language. The structure and the metadata of XML are based on the tags. Because it is text-based language, people who read the document written in XML can easily read and understand it. In addition, XML provide the ability of describing data, the structure data can be read by machines.
Because XML is a meta-language, it can be used to create the other language and generate a lot of application. There are lots of applications of XML now. For example, XSLT, MateML, XPath, SOAP, and WML….and so on.
2.2. Related Works
2.2.1. CodeSmith
CodeSmith[10] is a FREEWARE template-based code generator that allows user to generate code for any ASCII-based language. The code generated can be customized by the use of properties. A property can be any .NET object that has a designer (most built in .NET types have designers already) and can be as simple as a boolean property that allows user to conditionally add or remove code from the resultCodeSmith's syntax is almost identical to ASP.NET. So if users are familiar with ASP.NET. Users can use the C#, VB.NET or JScript.NET languages in they templates and they templates can output any ASCII-based language.
CodeSmith includes a couple ways to generate code in batch. There is a Visual Studio .NET 2003 custom tool included that allows including templates that can generate code based on multiple property sets. This custom tool effectively allows CodeSmith to simulate generics in that users can have a template and create specialized instances of that template by adding additional property sets. CodeSmith is being released as freeware in an attempt to build a strong community of users and templates.
2.2.2. CodeCharge
CodeCharge[11] Studio is the productive solution for visually creating Web applications with minimal amount of coding. The support for virtually all databases, web servers and web technologies makes CodeCharge Studio one of a kind. It is a
solution available for Web development.
Also included is CodeCharge Studio Add-In for FrontPage - the first product that extends FrontPage functionality into an integrated web development environment that makes it creating database-enabled web sites. It also can use the external editor as the User Interface editor. For example, the IDE named “DreamWeaver” which is developed by Macromedia is the external editor can support CodeCharge to edit the User Interface..
Chapter 3 Ideas of Design
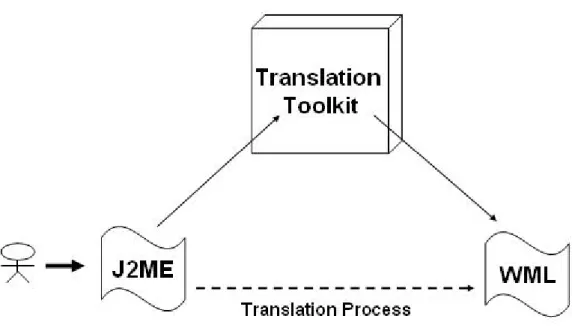
The toolkit that we developed is used to translate the program from one language to another. For example, according to Figure 3-1, we can edit the program in J2ME, and we can get the program written in WML through our toolkit[12][13].
Figure 3-1 example of translating program from J2ME to WML
This is the usage of our toolkit. In the toolkit, we define a language, which was named Pervasive User-interface Markup Language (PUML). We will introduce the language “PUML” roughly in this chapter, and we will detail the language in Chapter Four. PUML is the intermediary language for translating; we can save the developing time of writing the program with the same function but in the different language. It’s convenient to get the program in the language we want through PUML. And if we edit the program by PUML directly, we can save the translating time.
In the original method, we have to choose one language (not PUML) to edit the program, and through the PUML language to translate the file to another language. Our motivation is that users can write the program by PUML, and we can reduce the translation process to once. However the major problem is that PUML is developed by my colleague of our LAB, it’s not known to others. So, there must be a way for user to edit the program in PUML easily, and they don’t have to know much about PUML.
Our method is embedded the language “PUML” into the Integrated Development Environment (IDE) that known to the public, and use the language to edit the program. Our motivation is making users to edit the program written in PUML, but they can edit the program in the graphical User Interface environment. Therefore, Users don’t have to understand all the PUML language. The code of the User Interface can be generated by our toolkit, and users can write the program in PUML easily.
3.1. Ideas of Design
As we mentioned above, in order to make user convenient use PUML to edit the program, there are some characteristic about our toolkit (embed PUML in IDE) described as follow:
Easy Install Easy Uninstall –
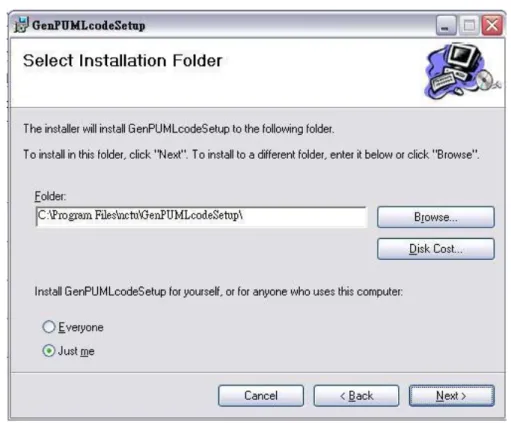
Because our toolkit is a third-party development, before user use it, they have to install it first. But many software before user begin to use it, they have to do lots niggling about setting. It’s very inconvenient. We hope that all the things user need to do is to
download the toolkit installation file, double click the file, and the install process is finished. So, we package our program as an executable file. Users only have to download the installation file, install the file just like other common application software we use; Figure 3-2 is the installing process of our toolkit. We can see the process from the picture, users only have to click the “Next” button, and the installing process is finished.
Figure 3-2 the installing process of our toolkit
After users finish the installation process, users can see the icon about our toolkit from the IDE (We choose Visual Studio .Net as the IDE toolkit), Figure 3-3 is the icon about our toolkit embedded in Visual Studio .Net[14].
Figure 3-3 Icon about our toolkit program
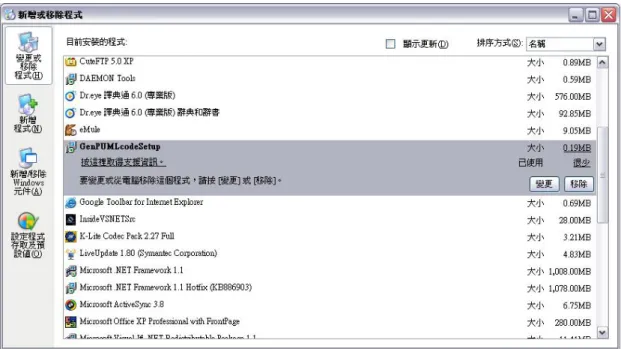
Not only simple the install process as possible, but also the uninstall process does. When user want uninstall the program, they don’t need to take many action about it. They just follow the steps of uninstalling other common software as usual. The steps are as follow: Entering “Control Panel” → Select “Add or Remove Program” → Choose the program that we install → Select “Uninstall it”. And the program will be uninstalled. Figure 3-4 is the picture about choosing the program that user has installed. Figure 3-5 is the picture about the uninstalling process.
Figure 3-4 choosing the program that users have installed
Figure 3-5 uninstalling the program that user select
So, it is convenient for users who want to use our toolkit to install the program in the IDE that they are used to edit programs. And the uninstall process is also convenient for user. There are no other
install/uninstall steps that user have to learn. All they have to do are “click the button”.
Tight Combination
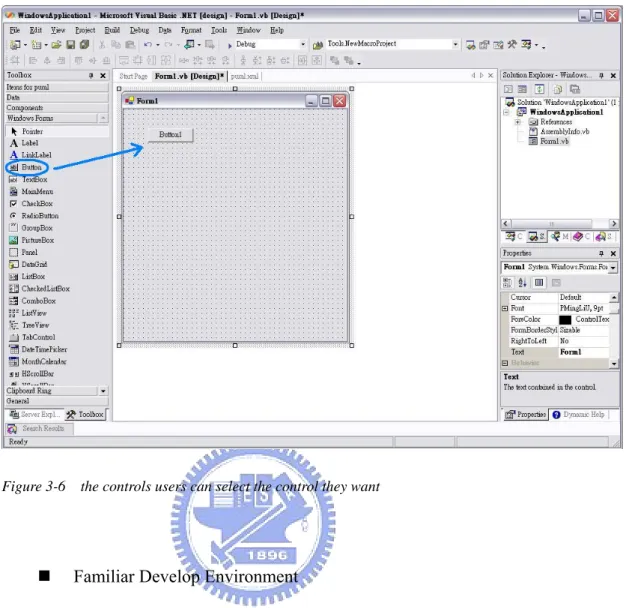
When users finish the installation, our toolkit becomes one part of the IDE. Our purpose is to embed our toolkit into the famous IDE, and for users to operate the IDE that they are used to editing the program they want. It is obvious that the toolkit doesn’t be combined well if it is too complex for users. That is to say, the way for using the toolkit we developed should be as simple as possible. However, when users design the User Interface of the application, they can drag controls to the design form from the IDE, Figure 3-6 is an example how users can edit a button with the IDE, and they don’t have to worry about the code of the UI controls. According to the User Interface (UI) controls they design, users can see the PUML code form the IDE automatically. They just have to click one button from the IDE. Therefore, it is easy for users to use our toolkit.
Figure 3-6 the controls users can select the control they want
Familiar Develop Environment
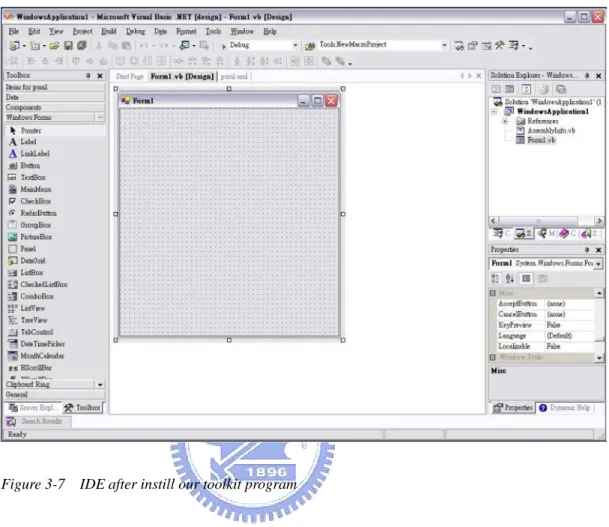
We want users to use the IDE they like to edit the program. This is why we decide to embed our toolkit into the famous IDE toolkit (like Visual Studio .NET). If we develop our own IDE for editing PUML program, we can control the style of the IDE. But users that first use the IDE, they have to learn how to use the IDE. It is not convenient for user to use the IDE we develop. So, we make the toolkit embedded into the famous IDE, users who want to edit PUML program can use the IDE that they know. Figure 3-7 is the IDE “Visual Studio .NET” after we install our toolkit. The Environment of the IDE is the same as before we install our toolkit into it. And the way to use the IDE to edit PUML program is the same as the program
of other languages.
Figure 3-7 IDE after instill our toolkit program
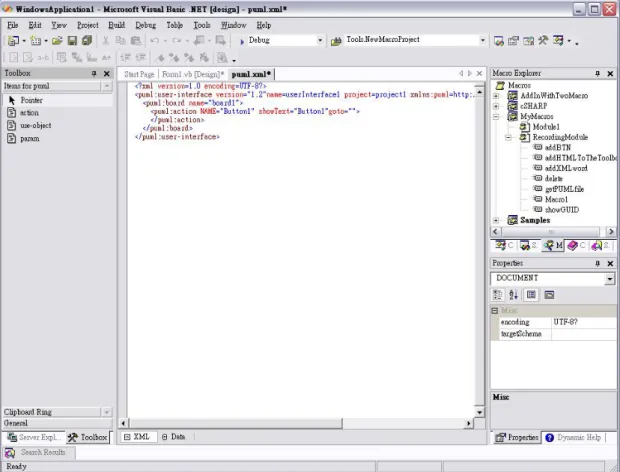
Click and Generation
In the characteristic “Tight Combination”, we describe that our toolkit is combined with Visual Studio .NET through a button we build in the Visual Studio .NET, and we also describe what the relationship between our toolkit and the IDE - Visual Studio .NET is. In this characteristic, we will explain the result after users press the button we build in the IDE. Figure 3-8 is the result of Visual Studio .NET after the button of our toolkit has been pressed by users. We can see the PUML document from Figure 3-8, the document is generated by our toolkit automatically after the button has been
pressed. And the document is generated according to the controls on the design form that users want. Not only the PUML tags of the controls, but also the properties of the controls. User set the properties in the properties window, after they finish the setting, click the generation button in Visual Studio .NET, our toolkit will generate the PUML document, including the tags about all the controls and the properties of each control that users set in the properties window.
Figure 3-8 the result of Visual Studio .NET after the button of our toolkit has been pressed by users
Easy Drag-and-Drop
(left side of the IDE) to the design form, and they can see the layout of the controls immediately. It is convenient for users to design the User Interface of the application. Not only the layout of the controls, but also the action of the controls. When users finish the UI design of the application, they must have to decide what action each control will be taken. The action will be taken when the control is triggered by End Users.
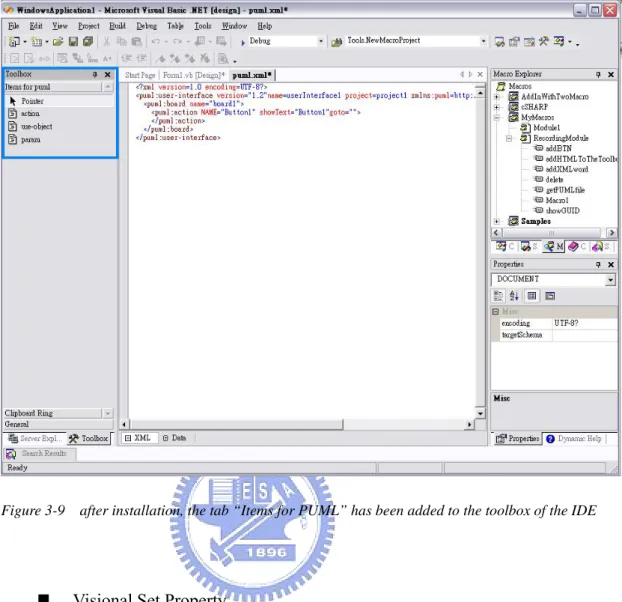
We have to point out our purpose again: our toolkit embedded in the IDE is making users to edit program easily. And it is not convenient for users when they edit the action of each control; they need to write all the code by themselves. Therefore, after users finish the installation of our toolkit, the toolbox of their IDE will be added one tab named “Items for PUML”. Figure 3-9 is the tab “Items for PUML” added to the toolbox. There are three items in the tab - <action>, <use-object>, <param>. Each item may be used by users when they design the action of each control. Because these items are used for the action of the controls, when users change the window to the user interface design form, the tab “Items for PUML” in the toolbox will disappear automatically. This function can avoid the error operations from the users.
Figure 3-9 after installation, the tab “Items for PUML” has been added to the toolbox of the IDE
Visional Set Property
After users drag the controls to the design form of the IDE, they have to set the properties of the controls they choose. They can set properties in the properties window at the right side of the IDE. Figure 3-10 is the properties window where users can set the properties of the controls.
Figure 3-10 the properties window for users to set the properties of the controls they choose
These are the characters when users operate the IDE that embedded our toolkit. Users can easily edit the program they want with the IDE; the way to use the IDE is the same after they install the toolkit we develop. After users finish the program, they can use our toolkit to generate the program in the language they want. And users can see the result from the emulator of the IDE. This is our purpose to embed the toolkit we develop into the IDE that known to public. In the next part, we will explain the steps about embedding the toolkit into Visual Studio.NET. The embedding process includes two parts – combine the toolkit with the front-end environment, and send the document to the back-end translation engine
3.2. The Process of Embedding
The embedding process of our toolkit into Visual Studio .NET can separate into two parts. One is the front-end environment combination. The other is binding the document that front-end environment generated with the back-end translation engine. In the front-end combination with Visual Studio .NET, we have to detect all the UI controls that users put on the design form[15]. The action “detect UI controls” contains several things, we describe as follow:
The number of controls:
When users use the IDE (in our implementation, the target IDE is Visual Studio .NET) to edit the User Interface of the application, they often modify the User Interface layout of the application. At the moment user triggers the IDE, ask to generate PUML code according to the controls they design, our toolkit have to know the modification about the controls. For example, user may add a button on the design form of the IDE, when generating the PUML code, toolkit have to detect that there is new control added to the form, and generate the PUML code of the button in the PUML document.
The modification of the controls:
When design the application layout, user not only modifies the controls, but also the attributes of the controls. After detecting the modification of the controls, toolkit has to generate the attributes of each control.
After users finish the UI design of the PUML document, the next step is translating the PUML file to the language they wants. In the process of translation, the machine that users operate must to be connected with the Internet. Nowadays, it is not difficult for computers to be connected with Internet; therefore; we design our translation engine as Web Services, and the machine can send the document to the translation engine through Internet.
The reason we decide to make our translation engine as Web Services is that we can simplify the process of embedding our toolkit into the IDE.When users need the service of translation, they send the document they edit to the engine through the internet. After translation engine gets the document sanded by users, the engine translates the document to the language that the user wants. Finally, the engine sends the document been translated to the machine that the user operate, and the IDE displays the document sanded back though the emulator. Users can see the result from the emulator, decide whether the User Interface is they want or not by the result displayed by the emulator. Figure 3-11 is an example about the translation process.
There are five steps of the translation; we describe each action of the steps that users take as follow:
1. Users edit the document with the IDE - Visual Studio .NET. The IDE that users use has been embedded the translation toolkit we developed, and the way to use the IDE to edit the User Interface of the application is the same as usual.
2. After users design the User Interface of their program by putting controls on the design form of the IDE, our toolkit can generate the code of the PUML language according to the controls that users put automatically. In this step, users can edit what action of the control is when it is triggered.
3. When users finish their program, they can click the button we build in the IDE to translate the program. After users click the button, our toolkit will transmit the PUML document to the translation engine through Internet.
4. Translation engine gets the document form the toolkit embedded in the IDE, it translate the document to the language users want, and send the translated document to the toolkit back.
5. When the toolkit receives the translated document, it will display the result to users through the emulator.
In this part, we have described the combination process of our toolkit. First of all, we need to know what controls users have dragged on the design form, our toolkit have to generate the document corresponding to the controls on the design form of the IDE. The generated document includes the tags of the controls and the attributes of the controls that users set in the properties window.
In the following chapter, we will introduce the language “PUML” at first. After the part of “PUML”, we will explain the implementation how we embed our toolkit into Visual Studio .NET, and transmit the document to the back-end translation engine.
Chapter 4 Implementation
In this chapter, we will introduce the core implementation – Pervasive User-interface Markup Language. After PUML is the section of the combination of our toolkit and the IDE.
4.1. Introduction of Pervasive User-interface Markup
Language
PUML is a language for describing the User Interface of the application. When we divide mobile application into two parts: User Interface and Logic Computing, the responsibility of PUML is to describe the User Interface.
PUML is a XML-based language for describing the User Interface. PUML have to follow all the rules in XML, and inherit all the characteristics about XML. We get some ideas from XUL, UIML, and WML to design PUML. Besides the part we learn from other languages described above, PUML also contains our own ideas of design. These ideas make PUML more suitable for rendering the User Interface in the mobile environment. We will introduce these ideas in later of this chapter.
After a PUML document has been translated by the translation engine, we can get the program written in the other language, and the program can be executed in the mobile environment. That is to say, the User Interface described in the PUML document will be translated to the target language. When the translated document is executed in the mobile environment, it will render the layout of the User Interface in
the PUML document.
4.1.1. The design ideas of PUML
Before design PUML, the author has compared several XML-based languages for describing the User Interface. The languages are XUL, UIML, and WML. After comparison these three description method, the author has some conclusion about the language “PUML”. The author figures out the characteristics that PUML must be included. These characteristics are as follow:
The number of the elements must be simplified
The language we design is with the notion of variables. It can be recorded the state of each control by variables in the User Interface. Moreover, the state of each control also can be as the parameter in the logically computing environment.
Controls must be connected with the part of logically computing environment by event-driven method.
Because the language is described the User Interface in the mobile device, the connection between each control in the UI must be simple.
We adopt the concept of the tag “card” in WML to meet the characteristic of the small screen in the mobile device
4.1.2. All Elements included in PUML
In order to satisfy the characteristics of PUML, the number of the elements must be as simplify. From the other hand to think about each element in PUML, it must be applied to as many controls as possible. The control must be represented by our element meaningful, and the elements can be mapped to the User Interface in all
kinds of target language.
The principle we used to design the elements in our PUML is described in the following part:
1. Extract all the common User Interface controls from all languages in the mobile computing environment. The language may be WAP, Personal Java, J2ME, and CLI.
2. Make all the common controls abstract.
3. Map the abstraction of the controls to the elements of our PUML, use our elements to represent the controls.
First of all, the common controls we extracted are: UI container, image, label, text field, choice group, and the button about event-driven. And then we make these common User Interface controls abstract. We will map the process of abstraction to the condition in our living..
We can think the User Interface as the notice board. On the notice board, we post something to remind us. They may be the label, text note, and picture posted on the board.
In our PUML, the elements from the process of abstraction are : <board>, <picture>, <label>, <textnote>, <listpaper>, and <item>. The meaning of the elements we describe as follow:
UI container.
<picture> → This tag is mapped to the picture on the board, and it is used for images.
<label> → This tag is mapped to the label, and it is used for characters.
<textnote> → This tag is mapped to the notepaper, and it is used for text field.
<listpaper> → This tag is used for the selection, and it is mapped to the choice group..
<item> → This tag is mapped to the items of the selection, and it is used for the items of the choice group.
Besides the basic elements we have described above, there still have other elements used to describe the state about the User Interface. The element <user-interface> is used for the information. Elements <logic-objects>, <object>, are used for computing the logic of the program, and elements <action>, <use-object>, <param> are related to the event-driven method. Table 4-1 is the detail of the elements.
Table 4-1 the detail of all PUML elements
Element Description
Core UI Related Elements
<user-interface> This is the root element of each PUML
document. This element is described about the User Interface of the PUML
document
<board> The core element of PUML. This is the
basic unit of the UI container.
<picture> This element is used for the picture
element displayed in the User Interface. It is similar to the image in the browser window.
<label> This element is used to display the text
in the User Interface. It is the same as the label of the Windows environment.
<textnote> This element is used to represent the text
in the single line. It is equivalent to the TextField in the Windows environment.
<listpaper> This element is used for the selection in
the User Interface. It is the same as the Choice Group or Choice List in the Windows.
<item> It is used to represent the items in the
<listpaper> element.
Event-Driven Related Elements
<action> There are two child elements :
<user-object>, <change>. In the content of the <action> element, the three types of the child element can be used by the need of the logic computing, or be
applied to the way how the User Interface be bowered. This element usually represents as Button or Command.
<use-object> This element is used to represent the
logic object. We can assign the method used to the logic object
<param> It is used to represent the parameter of
logic computing.
<change> It is used to change the UI component
state of the element. For example : it can be used to change the String displayed on the screen.
4.1.3. Example of PUML
It is very easy to edit the PUML document. Programmer use the concept of the notice board we have described above to edit the document, the layout of programmer can be generated easily by dragging the controls to the form. In the following is the simple example of using the IDE to edit the PUML document. Figure 4-1 is the layout of the PUML document we edit, and Figure 4-2 is the PUML document after we assign the action of the controls. In this example, it is a user log-in page, users have to input the name and sex in the page. After the button is pressed, the page will send the information about the user to the part of logic computing in the back-end, and the screen will be changed to the other User Interface.
Figure 4-1 the layout of the application
4.2. Implementation of the embedding
In the pervious part, we have introduced the language we develop. Because the language is the basis of our implementation, we have to make readers understand the language. After readers have understood the language, we can begin the next phase of our implementation.
The implementation of embedding the toolkit into the IDE can divide into two parts, we will describe as follow:
1. The combination with the front-end IDE:
In this process, users can choose the control from the toolbox of the IDE, and drag the control to the design form. After they put the controls on the form, the layout of the User Interface is presented. The job of our toolkit is to generate the PUML code according to the controls on the form, therefore, our implementation in this phase is to determine what the controls users have choose, and what the value of the attributes in each control are.
2. The transmission to the back-end translation engine:
The action that users take in this phase will be the translation of the PUML document. Users press the button we build in the IDE, and our toolkit will send the document to the translation engine. In the process of our implementation, we connect the IDE with the translation engine through Internet. In
this way, we can simplify the process of installation.
We have introduced the two parts of our implementation, in the following section, we will detail the implementation in each part. In section 4.2.1, we will introduce the detail about the toolkit to be combined with the front-end IDE. And section 4.2.2 is the content about the transmission sand back to the translation engine.
4.2.1. The toolkit be combined with the front-end IDE
Making users write the program in PUML easily is our motivation. “Easily” means users can install our toolkit in to the IDE easily, they write the program easily, and they get the result in the language they want easily. In order to simply the installation process of our toolkit, we package our toolkit as a plug–in. Figure 4-3 is the executable file after we package our toolkit.
Figure 4-3 the executable file after we package our toolkit
Users who want to use our toolkit can download the plug-in we have packaged, double click the executable file, and the installation is finished. This is the reason that we package our toolkit as a plug-in.
In the Figure 4-4, we demonstrate the structure of the basic plug-in which be plugged into Visual Studio .NET. This plug-in implements the IDTExtensibility2
interface, which serves as the main conduit for plug-in communication. It implements the interface’s five methods-OnConnection, OnStartupComplete,
OnAddInsUpdate, OnBeginShutdown, and OnDisconnection. There’s no Main
method because it is destined to become a DLL. Instead, the OnConnection method serves as the plug-in’s entry point.
Figure 4-4 the basic structure of the plug-in
As we know now, an implementation of IDTExtensibility2 lies at the core of our plug-in. Visual Studio .NET calls the methods on this interface whenever it needs to apprise an plug-in of important events, such as when another plug-in is loaded or unloaded, or when Visual Studio .NET is about to shut down. The communication isn’t just one-way, either: through the IDTExtensibility2 interface, the plug-in has
access to and control over the entire Visual Studio .NET automation object model. We will describe the implementation of IDTExtensibility2 interface in the following section:
OnConnection:
By far the most important of the IDTExtensibility2 methods,
OnConnection provides a plug-in with the main object reference
it needs to communicate directly with the IDE. OnStratupComplete:
The OnStrarupComplete event fires only in plug-in that load when Visual Studio .NET starts. An plug-in that loads at startup can’t always rely on OnConnection for its initialization-if the plug-in arrives too early, it will fail when it tries to access a Visual Studio .NET component that hasn’t loaded. In such cases, the plug-in can use OnStratupComplete to guarantee that Visual Studio .NET is up and running first.
OnAddInsUpdate:
The OnAddInsUpdate event fires when an plug-in joins or leaves the Visual Studio .NET environment. A plug-in can use this event to enforce dependencies on other plug-ins. The lack of useful parameters reveals OnAddInsUpdate’s passive-aggressive nature-it interrupts the plug-in to tell it that the state of some plug-in triggered the event. If you need to know the plug-in responsible for the event, you have to discover its identity on your own.
OnBeginShutdown:
plug-in is running. Although an IDE shutdown might get canceled along the way, OnBeginShutdown doesn’t provide a cancellation mechanism, so a plug-in should assume that shutdown is inevitable and perform its cleanup routines accordingly. A plug-in that manipulates IDE state might use the event to restore the original IDE settings.
OnDisconnection:
This event is similar to OnBeginShutdown in that is signals the end of a plug-in’s life; it differs form OnBeginShutdown in that the IDE isn’t necessarily about to shut down. OnDisconnection also provides more information to an plug-in than
OnBeginShutdown does.
The detail of the IDTEntensibility2 interface we have described above, and we summary the methods of the IDTEntensibility2 interface in Table 4-2.
Table 4-2 IDTEntensibility2 Interface
Method Description
OnConnection Called when the plug-in is loaded.
OnStratupComplete Called when Visual Studio .NET finishes
loading.
OnAddInsUpdate Called whenever a plug-in is loaded or
unloaded from Visual Studio .NET.
OnBeginShutdown Called when Visual Studio .NET is
OnDisconnection Called when the plug-in is unloaded.
This is the basic structure of the plug-in. From now on, we can add the functions we want into the basic plug-in. After install the plug-in, the function of Visual Studio .NET will be increased.
In this combination phase, we need to determine what the controls has been dragged on the form by users. Because some of the controls have it own sub controls, in the process of determination, we need to find the sub controls. For example, when we edit the selection list, we will drag a Choice Group to the form, add several items on the Choice Group, and we have a selection list on the form. The Choice Group has its own sub controls. In the process of determination, we have to find out the entire sub controls that the Choice Group has. In the following is the algorithm how we determine the controls and the sub controls that they have. We name the algorithm for determination as Determination.
Determination (Control control) { if(control.SubContros = flase ){
generate the PUML code of this control, and the attributes of this control
} else {
Determination (control.SubCollection); }
}
Determination (control); }
In the algorithm above, we have a collection of the controls on the form. The collection is the record of the controls; we use this collection to get all the controls. The collection has some function we can use, such as we can extract one of the controls from the collection, get the sub controls from the target control, and count the number of the controls.
At the first of the algorithm, we extract each control from the collection, determine whether the control we get has sub controls or not. If not, we can generate the PUML code of this control on the document. If the control has sub controls, we have to recursive call the algorithm Determination ( ). Until the control inputted into the algorithm has no sub controls, we can take the generation action to generate the PUML code.
Because the situation of adding sub controls is not complex, we can do the recursive call in our algorithm and don’t have to worry about the problem of complexity. We take an example to explain the addition situation of the sub controls. In our elements of PUML, <picture>, <label>, and <textnote> this three element have no sub elements to be added on. The element <listpaper> represents a selection list, and the element <item> is the item of the list added on the element <listpaper>. If the control represented the element <listpaper> is inputted into the algorithm Determination(), the algorithm will recursive call itself, and the sub control is inputted into Determination() will be the element <item>. Because the element <item> has no sub controls to be added on it, the recursive process will be stopped. After the code of
element <item> has been generated, the code of the <listpaper> will be generated in follow. This is the example about when the algorithm will stop. Because the sub controls added on the control are limited, there is nothing to worry about the complexity of the algorithm Determination(). If we define the parameter n as the number of the controls, the complexity of the algorithm will be O(n*n).
4.2.2. The document transmission to the back-end toolkit
Because the transmission to the target language is based on the PUML document, we have to send the PUML document to the translation toolkit. The target language we provide can be divided into two parts: One is the web-based language; the other is the local-side language.
The web-based languages supported by our translation toolkit are XHTML MP and WML. This function is reused from our colleague; we deploy the toolkit as the web service. The requirement of using our web-base translation is the internet connection. After users finish the User Interface design, they press the button to transmit the PUML document to the toolkit we deployed on the internet. The toolkit can translates the PUML document to the target language we supported, and transmits the result back to users.
The other part is the local-side languages. The term “local-side” means the entire program is executed on the machine. The target languages we support in this part is C# and J2ME. The requirement of this function is the XSLT style sheet. Through the style sheet, users can get the User Interface in their assigned language.
The translation in this part needs no network connection. Users only have to download the style sheet, put the style sheet in the machine. In the process of the translation, our toolkit will generate the target language through the style sheet automatically.
Chapter 5 Comparison
In this chapter, we will compare our plug-in with CodeSmith and CodeCharge which we have introduced in Chatper 2. The comparison will from the point of convenience to compare these three translation toolkit. Before the table of the comparison, we will describe the advantages and drawbacks each of them.
5.1. CodeCharge
If people are developing data-driven interactive Web sites or enterprise Internet and Intranet systems, CodeCharge Studio provides a way to build users applications with support for virtually all databases, web servers and web technologies. The advantages and drawbacks are listed as follow:
Advantage:
1. Variety Languages – the target language CodeCharge supported are ASP, JSP, PHP, Perl, ColdFusion, and ASP.NET.
2. Graphic User Interface (GUI) workspace – It is a WYSIWYG editor. Users interact with the GUI workspace of the IDE during the process of using CodeCharge Studio. It is convenient for users.
Drawbacks:
1. Incomplete external editor – Although CodeCharge provides the IDE for users to edit the program, it is not convenience for users who want to use the IDE they favorite to edit the program. The process of using the external editor is to trigger the editor users like in the CodeCharge
IDE. After users finish the program with their favorite editor, they have to back the IDE of CodeCharge for translation.
Unnecessary installation – As we mention above, users who want to translate the program, they have to return to the IDE of CodeCharge. That means all the translation is based on the IDE of CodeCharge. If users who like to use the IDE they favorite to edit the program, use the translation ability of CodeCharge only, they have to install the entire program of CodeCharge (including the IDE interface).
5.2. CodeSmith
The syntax of the templates used for Codesmith is very similar to ASP.NET. In ASP.NET, users can use delimiters to separate code that will execute on the server from HTML and JavaScript code that will be sent to the browser. In Codesmith, users use delimiters to separate the code executed by the template from the code that will be generated.
Advantages:
1. Well Combination – Users can operate CodeSmith in Visual Studio .Net as a custom tool. This custom tool effectively allows CodeSmith to simulate generics in that you can have a template and create specialized instances of that template by adding additional property sets.
2. Known Languages – CodeSmith can let users to edit the program in C#, VB.NET or JScript.NET languages. Users can choose the language they familiar with, and use the language to edit the program. There is no need to learn a new language.
1. Inconvenient UI Design – CodeSmith don’t provide a visual environment for users to edit the User Interface of the application. Users have to edit the UI in the text mode.
2. No Emulator – When people finish their programs, there is no emulator provided. Users can’t get the result from the emulator immediately.
Table 5-1 Comparison of the translation toolkits
Our plug-in CodeCharge CodeSmith
Operation Easy Easy Normal
Combination Good Bad Normal
Installation Easy Easy Easy
UI Design Good Good None
Emulator Yes Yes No
Target IDE VS .Net 1. FrontPage
2. DreamWeaver 3. Itself own
1. VS .Net 2. Itself own
Chapter 6
Conclusion and Future Work
6.1. Conclusion
In the above chapter, we have introduced all the things about this paper. First of all, we have described the translation toolkit developed by our lab colleague. The motivation of this toolkit is similar with the concept of Java. The author wants the concept “Write Once, Run Anywhere” being realized in the mobile environment. The usage of the toolkit is to translate the document written in the language we defined, and users can assign the target language they want to translate the document. The translated document can be executed in the mobile environment according to the language users assign. This is the usage of our toolkit.
But there is a drawback about this toolkit. When users edit the document in the language we defined, they need to work in the environment of characters. There is no IDE for users to edit the document conveniently. In this paper, our motivation is to provide a convenient IDE with users. A lot of IDE have been published in the world, there is no need to develop the IDE our own for the language we define. We can simply embed our toolkit into the famous IDE. Users who want to edit the document we define can install our toolkit, use the IDE they are familiar to edit the document. Since our motivation is convenience, the process of embedding our toolkit should be as simply as possible. The conveniences of embedding process are described as follow:
Easy-to-Use:
Users who want to edit the document in our language can use the IDE they like. The target IDE we choice in our implementation is Visual Studio .NET. We package our toolkit as an executable file, users only have to download the file, install it into the IDE, and they can use the toolkit our developed. The operation of using the IDE is the same as before, there is no need to change the behavior of operating the IDE. Users can operate the IDE as usual, and they can edit the document in our language.
Easy-to-Install
Because our toolkit is a third-party development, users have to install our toolkit before they use it. We package our toolkit as an executable file for users to install our toolkit conveniently. The installation process is simply click the button “Next” (if users don’t want to change any default setting), and the installation process is finished. There is no need to set any class path, or connecting to any SDK after install our package. This is very convenient. After installation, our toolkit has been embedded into the IDE, and users can use our toolkit easily.
According to the characteristics we have described above, it is convenience for users no matter in the process of operation or the installation. The method of operating the IDE is the same as before. We embed our translation toolkit into the IDE, users operate the IDE as usual. The IDE embedded with our toolkit can generate the PUML code according to the dragged controls on the form. After users
have installed our plug-in, they can convenience edit the document in our language, and reduce the repeat action of developing.
6.2. Future Work
After we package our toolkit as a plug-in, users can convenience install and use our toolkit. But the target IDE in our implementation is Visual Studio .NET now, there still have lots of famous IDE published. We wish the target IDE that embedded with our toolkit could be supported more widely and the developing works can be more easily, so we propose a few future works that enhance our plug-in more complete. We describe as follow:
Increase the number of IDEs:
As we mention above, the target IDE we focus to embed our toolkit now, is Visual Studio .NET which is an IDE developed by Microsoft. There are still many famous IDE Published in the world, and users not operate the IDE we focus to edit the program. In other word, there are still lots of people not use Visual Studio .NET to develop the program. Since we hope users to operate the IDE they familiar to edit the document in the language we define, we can enhance our plug-in suitable for embedding into other IDEs. This is the one part that we can still enhance.
Improve the combination of the IDE:
Although the IDE embedded with out toolkit can edit the document in the language we define, but the controls that supported by the IDE are limited to the basic User Interface controls. With the device computing power increasing, the application executed in the mobile device becomes more and more complex; therefore, the function of our toolkit will be
enhanced. So, the combination between the IDE and our toolkit must be improved too. In this reason, we have to make our plug-in more combined with the IDE.
In order to make our plug-in more convenience and complete, we hope to strengthen the parts we described above, make our development more complete.
Bibliography
[1] 沈聖博, "XML-based Mobile Application Development Kit", 國立交通 大學,碩士, 民國 93 年 6 月
[2] Ono, K.; Koyanagi, T.; Abe, M.; Hori, M.; Applications and the Internet, 2002. (SAINT 2002). Proceedings. 2002 Symposium on 28 Jan.-1 Feb. 2002 Page(s):150 - 159
[ 3 ] Extensible Markup Language , W3C
http://www.w3.org/XML/
[ 4 ] WAP Forum, OMA, Open Mobile Alliance
http://www.wapforum.org/index.htm
[ 5 ] Sun Microsystems Inc , Java 2 Platform Micro Edition
http://java.sun.com/j2me/
[ 6 ] XSL Transformations (XSLT) Version 1.0, W3C Recommendation 16 November 1999
http://www.w3.org/TR/xslt
[ 7 ] Microsoft Visual Studio Developer Center http://msdn.microsoft.com/vstudio/ [ 8 ] MexE forum http://www.MExEforum.org [ 9 ] 3GPP http://www.3gpp.org [ 10 ] CodeSmith http://www.codesmithtools.com/ [ 11 ] CodeCharge , YesSoftware,Inc
http://www.yessoftware.com/products/product_detail.php?product_id=1 [12] Nikola MitroviĆ and Eduardo Mena, "Adaptive User Interface for Mobile
Devices", IIS Department, University of Zaragoza, Maria de Luna 3, 50018 Zaragoza, Spain
[13] Johan Plomp, Robbie Schaefer, and Wolfgang Mueller, "Comparing Transcoding Tools for Use with a Generic User Interface Format", Extreme
Markup Languages 2002 Conference
[ 14 ] MSDN , Visual Studio.NET Extensibility
http://msdn.microsoft.com/library/default.asp?url=/library/en-us/dv_vstechart / html/vstchExtensibilityArticles.asp
[ 15 ] Johnson Brian , Skibo Craig , “Inside Visual Studio .NET", Redmond,
Washington :Microsoft Press,c2003.
[ 16 ] Chris Von See and Nitin Keskar, "XSLT Developer's Guide"
[ 17 ] XML Path Language (XPath) Version 1.0, http://www.w3.org/TR/xpath, W3C Recommendation 16 November 1999
[ 18 ] Anna Maria Jankowska, and Andrzej Dabkowski, "Content Adaptation Tag Library – An Approach for User Interface Adaptation for Different Devices", European University Viadrina, Chair of Business Informatics
[ 19 ] Kris Luyten and Karin Coninx, "An XML-based runtime user interface description language for mobile computing devices", 2001 Springer-Verlag [ 20 ] 吳仁凱, "A Visualized Kit for Developing Applications on Multiple Mobile
Devices ", 國立交通大學,碩士, 民國 94 年 6 月
[ 21 ] Les Smith , “Writing Add-Ins for Visual Studio .NET” , APress 2002 [ 22 ] Microsoft , Visual Studio Industry Partner(VSIP)
http://msdn.microsoft.com/vstudio/extend/
Assistant
http://msdn.microsoft.com/vstudio/downloads/tools/jlca/
[ 24 ] Code Generation Network
http://www.codegeneration.net/tiki-index.php
[ 25 ] David De Loveh, Dan Maharry, Bill Sempf, Don Xie , “Effective Visual
Studio .Net ” , WROX PRESS 2002
[ 26 ] Kathleen Dollard , “Code Generation in Microsoft .NET” , APress 2004 [ 27 ] Jack Herrington , “Code Generation in Action” , MANNING 2003