國 立 交 通 大 學
資訊學院 資訊學程
碩 士 論 文
DICOM 醫療資訊應用 Partial DRM
於雲端科技環境
Applied Partial DRM Protection for DICOM Annotated Information
in Cloud Environment
研 究 生:鄭志帆
指導教授:陳登吉 教授
應用 Partial DRM 於 DICOM 醫療資訊之雲端科技環境
Applied Partial DRM Protection for DICOM Annotated Information
in Cloud Environment
研 究 生:鄭志帆
Student:Irfan Marhus
指導教授:陳登吉
Advisor:Deng-Jyi Chen
國 立 交 通 大 學
資訊學院 資訊學程
碩 士 論 文
A ThesisSubmitted to College of Computer Science National Chiao Tung University in Partial Fulfillment of the Requirements
for the Degree of Master of Science
in
Computer Science December 2011
Hsinchu, Taiwan, Republic of China
應用Partial DRM於DICOM醫療資訊之雲端科技環境
學生:鄭志帆
指導教授:陳登吉 博士
國立交通大學 資訊學院 資訊學程碩士班
摘要
目前已成熟的雲端技術環境,為現代人提供了更好的網絡服務品質,使我們能多 方利用網際網路的便利性。筆記型電腦和智慧型手機為常用到的電子產品,使用者能 隨時隨地享用網際網路的服務。這種便利的網路服務,產生更多的有價值的線上應用 程式,提供更簡單的方式,存取、瀏覽網路上的資源,如社交,新聞,照片,銀行系 統,等等。 醫學界也提供使用者網路應用程式。DICOM 是醫療系統的信息交換的標準格式。 在網路上也有許多與 DICOM 有關的應用程式。 快速增長的網際網路引發了安全和隱私問題。數位內容保護成為一個重要課題。 如果數位內容的安全機制沒有做好,會引發未被授權的的使用,存取重要資訊,損害 擁有者的權利。DRM (數位版權管理) 是為了控制、保護、限制數位內容的應用。 本論文提出了一個 Web 應用系統解決方案,提供使用者線上存取 DICOM 資訊,並 能搭配局部 DRM 安全機制設計。使用者可以透過個人的行動裝備,連結到網路上的應 用程式,並查看 DICOM 資訊。這種機制提供了無所不在的環境,讓使用者能方便又快 速得到所需的資訊。Applied Partial DRM Protection for DICOM
Annotation Data in Cloud Environment
Student:Irfan Marhus
Advisor:Dr. Deng-Jyi Chen
Degree Program of Computer Science
National Chiao Tung University
Abstract
Mature cloud technology environment provides good quality of internet and network service which allow us to do things more convenience online. Laptop and smart phone is an example of majority device which provide ubiquitous mobile computing that keeps people connected to the internet. This convenient environment service triggering more useful online applications which provide people many easy ways to access online contents and resources, such as social networking, news, photo management, banking system, and many more.
Medical World also offered some online applications to do their operation. DICOM is the standard format used to exchange information in medical systems. There are also many online applications which are related to DICOM.
Rapid growth of internet results in security and privacy issue. Digital information protection becomes an important subject. There are possibilities for unauthorized access to retrieve the content information for unknown purpose which unintended by the owner if the security mechanism is not well applied. DRM (Digital Rights Management) is designed to control, protect and limit the use of digital content. It is impractical using fixed DRM in all digital contents such as digital medical image.
This paper proposed a web application system solution that offers end-user to access DICOM information online with partial DRM security mechanism design. User can use their personal mobile device to connect to the application and viewing to DICOM information becomes more convenience, since it can be done anytime anywhere.
Acknowledgement
感謝陳登吉教授耐心的指導,在研究的過程中,時時給予建議,正確的方向,才 能順利完成本論文。 同時也要特別感謝博士班學長鎮宇的指導與幫助以及同學簡宏任的互相鼓勵。 最後,要感謝我的家人,在求學的這一段期間內給予的支持與鼓勵,特別要感謝 我的父母親對我的照顧與付出,才能成就我的理想,感謝您們!!Table of Contents
摘要 ... i Abstract ... ii Acknowledgement ... iii Table of Contents ... iv 1 Introduction ... 1 1.1 Background ... 1 1.2 Motivation ... 3 1.3 Goal ... 3 1.4 Chapter Summary ... 4 2 Related Works ... 5 2.1 DICOM Introduction ... 5 2.2 Cloud Technology ... 8 2.3 Previous works ... 103 System Analysis and Design ... 12
3.1 Requirement Analysis ... 12
3.1.1 Upload DICOM file ... 12
3.1.2 Protection method and grant DICOM information permission ... 12
3.1.3 View DICOM file ... 13
3.2 Use Case Diagrams ... 14
3.3 Activity Diagrams ... 14
3.3.1 Admin Activity Diagram ... 14
3.3.2 User Activity Diagram ... 15
3.4 Encryption Method ... 16
3.5 Database Design ... 18
3.6 System Environment ... 19
4 Experiments and Results ... 20
4.1 Environment Setup ... 20
4.2 Data preparation ... 20
4.3 Admin Role Screenshots and Operations ... 21
4.3.1 Admin Login Functionality ... 21
4.3.2 Select Action functionality ... 21
4.3.3 Upload DICOM functionality ... 22
4.3.4 Show Uploaded DICOM Information ... 22
4.3.5 Choose Information Protection Method - Partial ... 23
4.3.8 Demo Scenario ... 24
4.3.9 Information Protection Scenario ... 25
4.3.10 Grant User Permission Scenario ... 25
4.3.11 Save to Database ... 26
4.4 User Role Screenshots and Operations ... 27
4.4.1 User Login Functionality ... 27
4.4.2 Select Action Functionality ... 27
4.4.3 Select DICOM Functionality ... 28
4.4.4 View DICOM Functionality ... 28
4.5 Smart phone devices... 33
5 Conclusions and Future Work ... 38
5.1 Conclusions ... 38
5.2 Future Work ... 38
List of Tables
Table 1. DICOM Value Representations (Source: DICOM Spec. 5-Table 6.2-1) ... 6 Table 2. V1 and V2 Solution Comparisons ... 11 Table 3. System Software List ... 19
List of Figures
Figure 1. DICOM with Patient Information and Additional Annotation Information ... 2
Figure 2. Different users have different view on the DICOM file contents ... 3
Figure 3. DICOM Network Overview ... 5
Figure 4. DICOM Data Element Structure ... 6
Figure 5. Example of DICOM Data Element Content ... 7
Figure 6. Types of Cloud Computing and Its User ... 8
Figure 7. Types of Cloud Based on Security Level ... 9
Figure 8. Previous Team Works and Proposed Solution ... 10
Figure 9. Valid User Lists for Granted Permission Candidate on DICOM information ... 13
Figure 10. Use Case Diagram ... 14
Figure 11. System Admin Activity Diagram Flow ... 14
Figure 12. User Activity Diagram Flow ... 15
Figure 13. Encryption and Decryption Process ... 17
Figure 14. System Table Schema... 18
Figure 15. Admin Login ... 21
Figure 16. Select Upload DICOM Action ... 21
Figure 17. Choose DICOM File to Upload ... 22
Figure 18. Show DICOM Information ... 22
Figure 19. DICOM Information Partial Protection Method ... 23
Figure 20. DICOM Information All Protection Method... 23
Figure 21. DICOM Information No Protection Method... 24
Figure 22. DICOM Information Protection Scenario ... 25
Figure 23. Grant User Permission for DICOM Information ... 25
Figure 24. Save DICOM Information to Database ... 26
Figure 25. User Login ... 27
Figure 26. Select View DICOM Action ... 27
Figure 27. Select DICOM Target to View ... 28
Figure 28. View DICOM ... 28
Figure 29. View Patient Birthday Action ... 29
Figure 30. View Patient ID Action ... 29
Figure 31. View Text Annotation (1) ... 30
Figure 32. View Text Annotation (2) ... 30
Figure 33. Hide or Unhide Functionality for Text Annotation on DICOM Information ... 31
Figure 34. Hide Text Annotation on DICOM Information ... 31
Figure 37. Smartphone Experiment – Select View DICOM Target ... 34
Figure 38. Smartphone Experiment – View DICOM ... 34
Figure 39. Smartphone Experiment – View Patient ID ... 35
Figure 40. Smartphone Experiment – View Text Annotation (1) ... 36
Figure 41. Smartphone Experiment – View Text Annotation (2) ... 36
1 Introduction
1.1 Background
Computer information and technology has becomes a crucial part in medical world. Hospitals, clinics, health departments and other facilities that provide health care are utilizing the information management practices for administration functions and resources information. Cloud computing at this context provides functionality and environment to managing data and information in a ubiquitous manner supporting several platforms, systems, and applications. Such systems provide efficiency and convenience, but also can lead to serious information leakage issue if the related permission and security mechanism is not well designed and applied.
Nowadays in medical world, information is stored in digital and multimedia format, for example internal system that manages the hospital administrative and operation have its data stored in their own database system. Images of X-rays, CT scans, and MRIs can be seen from a computer, which means that there is no need for radiology service to print every image after scanning, and they also can maintain the data on their system for further
analysis. DICOM (Digital Imaging and Communications in Medicine) has become an essential component for the integration of digital imaging in medical systems.
DICOM file contains patient information (for example name, id, birthday, sex, etc) and annotations data. After examine the patient, medical staffs (such as doctors, nurses, etc) can annotate some information on the related file, for example current patient condition which is not convenient to give out to other party, professional medical knowledge which is not intended to share to everybody, etc. The HIPAA (Health Insurance Portability and Accountability Act) Privacy Rule, which enacted by US Congress and signed by US President in 1996, provides federal protections for personal health information held by covered entities and gives patients an array of rights with respect to that information. At the same time, the Privacy Rule is balanced so that it permits the disclosure of personal health information needed for patient care and other important purposes [7]. At this situation, DICOM data protection is very important for both patient and related medical staffs.
Without proper protection, the information inside can be retrieved by anyone, which lead to security and privacy issue.
Figure 1. DICOM with Patient Information and Additional Annotation Information Suitable information should be shared to suitable person. Choosing protection method using full fixed DRM (Digital Rights Management) is impractical since its protection mode is to protect all information inside. Some information might be intended to be exposed to public, and not all information is intended to be seen by user once he has the permission. This paper proposes using partial DRM approach for DICOM information protection. We can choose which user can see which contents information. Therefore, information sharing can be more efficient since different user may have different view of information; without have to worry that the patient’s information and medical staff’s professional knowledge were retrieved by unintended party.
With full DRM protection:
1. Granted user can view all the information on the file, even some part of the information is not intended to be exposed to the related users.
2. Not granted users can’t view information on the file at all, even some part of the information is intended to be exposed to public.
With partial DRM protection:
1. Granted user can only view the information which is intended by the owner selection. 2. Not granted user still can view the public information (no security and privacy issue)
1.2 Motivation
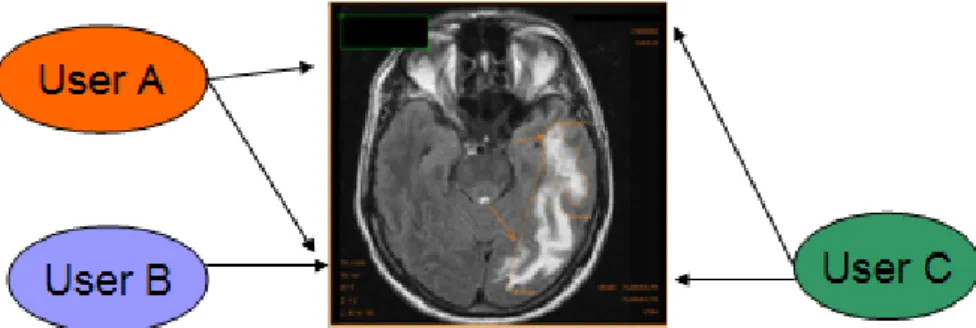
Annotated data on DICOM contains critical information. With partial DRM, partial content protection and partial content sharing can be achieved. For example, during seminar which discussing dangerous disease (ex. AIDS), when showing the related DICOM file, the patient information can be hidden and protected. In this way, different users have different view on the DICOM file contents.
Figure 2. Different users have different view on the DICOM file contents
Using this way, medical staffs can only view the partial encrypted DICOM annotation information on their workstation. They can’t view it on PC at home or on laptop during business travel, since DICOM file, partial DRM engine, and annotator is located inside his workstation. By putting contents on the platform provided by web application with network infrastructure technology support, users can use their devices (such as laptop, smart phone, etc) to view the DICOM information anytime anywhere.
At 2010, author [1] has proposed a partial DRM solution on DICOM information protection. At 2011, author [2] has proposed a DICOM compatible annotator tool. This paper extends and integrates the DICOM annotated information with partial DRM solution in cloud environment where critical information protection and sharing with proper security mechanism in ubiquitous manner can be achieved.
1.3 Goal
This paper objective is to build a web based solution which has “sharing made easy platform” for DICOM annotated information, with proper security mechanism applied. By applying partial DRM technique, we can achieve partial content sharing security, so
that users can only access information which admin has granted to them. Information accessing made easy since content is on the Cloud
1.4 Chapter Summary
Chapter 1, “Introduction”, describe this paper’s backgrounds, motivations, and goals. Chapter 2, “Related Works”, describe related discussions and literature review.
Chapter 3, “System Analysis and Design”, describe the system requirement, and how the system was designed and implemented to fulfill our objectives.
Chapter 4, “Experiments and Results”, contains the demo of the implemented system Chapter 5, “Conclusions”, describe this paper conclusions and future work
2 Related Works
2.1 DICOM Introduction
DICOM (Digital Imaging and Communications in Medicine) is standard format for handling information in medical imaging which is now widely adopted by hospitals. It is developed by ACR (American College of Radiology) and NEMA (National Electrical Manufactures Association) to aid the storage, distribution, and viewing of medical images contents, such as CT scans, MRIs, and ultrasound.
DICOM standard is released because experts realized that improvement is needed for the better transition and compatibility of the old standard output image format which produced from computed tomography or magnetic resonance imaging devices. Now the DICOM standard enables the integration of scanners, servers, workstations, printers, and network hardware from multiple manufacturers into a picture archiving and communication system (PACS).
Figure 3. DICOM Network Overview Below are the steps of how the DICOM is created [1]
1. A CT (Computed Tomography) scan is performed 2. The scanner constructs a set of images (study) 3. The scanner sends the study to a PACS
4. A workstation queries the PACS and retrieves the study 5. Reconstructions or reformats
DICOM data element can be divided into 4 parts, which are TAG, VR (Value Representation), Value Length, and Value Field. Those data elements are represented by HEX. TAG is combination of Group ID and element ID. VR represent the related data element type, for example PN stands for Person Name, DA stands for Date, TM stands for Time, UI stands for UID (Unique ID), etc. VR is an optional field which is used during transfer syntax whether explicitly or implicitly shows the VR information. Value Length represents the length of Value Field, and Value Field itself represents the real data element value.
Figure 4. DICOM Data Element Structure
VR Name Definition DA Date DT Date Time FL Floating Point LO Long String PN Person Name TM Time SQ Sequence of Items OB Other Byte String UI Unique Identifier (UID)
UL Unsigned Long
US Unsigned Short …
2.2 Cloud Technology
Cloud computing is Internet-based computing, whereby shared resources, software, and information are provided to computers and other devices on demand. It is an emerging new computing paradigm for delivering computing services. Cloud computing users pay the service provider only for what they use.
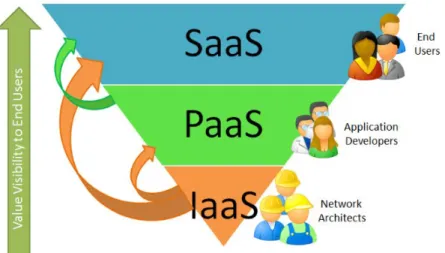
Cloud computing can be categorized into 3 major which are: SaaS (Software as a Service)
A complete application offered as a service on demand. The related software runs on the cloud and services multiple end users. For example: Social Network (facebook, twitter), Google Services (Google Map, Google Docs, Google Calendar), etc. Some companies who charge their users for using SaaS: Salesforce.com (Cloud CRM), NetSuite (Cloud ERP).
PaaS (Platform as a Service)
The provider provides a platform for developer to build their own services. For example: Google Apps engine (Java, Python), Microsoft Azure (.NET Framework). IaaS (Infrastructure as a Service).
Infrastructure as a service delivers basic storage and compute capabilities as standardized services over the network. Service provider provides some hardware servers, storage systems, switches, routers, etc. AWS (Amazon Web Service) EC2 is a widely adopted charged IaaS by worldwide.
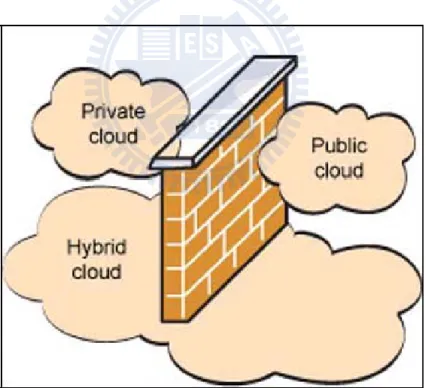
Based on the security level, cloud computing can be categorized into three types: Private Cloud
This cloud hosted within the boundaries (firewall) of the organization which is
managed by the enterprise and considered more secure since it has full control over the resources. But to build and maintain private clouds, organization is required to do some hardware investments and the cost can be exceeding the public cloud.
Hybrid Cloud
Combination of private and public cloud but still has the firewall to distinguish
between them. An organization provides and manages some resources in-house and has others provided externally.
Public Cloud
Service is hosted and opened for use by general public. It fully hosted and managed beyond firewall. Cloud user can be individuals, corporations and organizations. For example Amazon’s Web Services and Google App engine.
Figure 7. Types of Cloud Based on Security Level (Image source: http://www.wifinotes.com)
2.3 Previous works
Author [3] at July 2010 proposed web based solution to store and query the DICOM information. This proposed solution does not cover protection mechanism against DICOM contents information, which can lead to security and privacy issue. Author [4] at June 2011 proposed a secure cloud gateway to access DICOM archive. This proposed solution does not offer sharing mechanism. Some part of DICOM information can’t be shared to groups of specified people.
At previously mentioned this paper extends previous team works to integrate DICOM annotated information with partial DRM solution in cloud environment. Author [2] at July 2011 proposed a DICOM file compatible annotator tool solution approach. Medical staff can use the annotator tool to annotate some important information (for example current patient situation, medical staff knowledge, etc) in the DICOM file. Author [1] at July 2010 proposed a partial DRM solution for DICOM file which intend to partially protect the DICOM critical data (including the annotation information) against unauthorized access which will be needed during DICOM file transfer, which will be referred as V1 solution in below image and next statement.
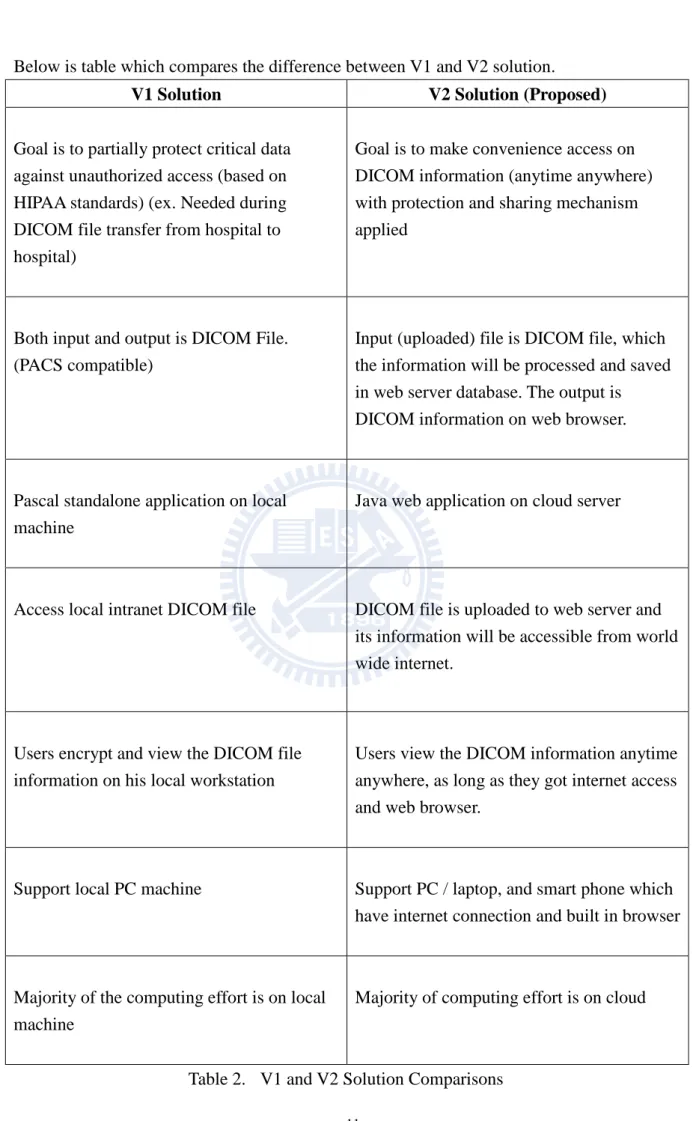
Below is table which compares the difference between V1 and V2 solution.
V1 Solution V2 Solution (Proposed)
Goal is to partially protect critical data against unauthorized access (based on HIPAA standards) (ex. Needed during DICOM file transfer from hospital to hospital)
Goal is to make convenience access on DICOM information (anytime anywhere) with protection and sharing mechanism applied
Both input and output is DICOM File. (PACS compatible)
Input (uploaded) file is DICOM file, which the information will be processed and saved in web server database. The output is DICOM information on web browser.
Pascal standalone application on local machine
Java web application on cloud server
Access local intranet DICOM file DICOM file is uploaded to web server and its information will be accessible from world wide internet.
Users encrypt and view the DICOM file information on his local workstation
Users view the DICOM information anytime anywhere, as long as they got internet access and web browser.
Support local PC machine Support PC / laptop, and smart phone which have internet connection and built in browser
Majority of the computing effort is on local machine
Majority of computing effort is on cloud
3 System Analysis and Design
3.1 Requirement Analysis
Our proposed prototype web based system will have some basic features which are: 3.1.1 Upload DICOM file
User can upload DICOM file to the web server. System will read and show the patient information along with annotated information inside DICOM. After choose the protection method and grant related view access permission, user can save the information to database. If the information is protected, system will do data encryption process to ensure the data security which can’t be view before doing the related decryption process.
3.1.2 Protection method and grant DICOM information permission
After upload the DICOM file and system show the related information, user can choose protection method and which information to be granted to which users. 3.1.2.1 Protection Method
On the protection method, system provides three different options. The first one is “All Protect”, which means that all the patient information and annotation data is to be protected (Full DRM method). The second one is “Partial Protect”, which means that user can choose which patient information or annotation data is to be protected. The third one is “No
Protect”, which means that there is no need to protect the patient information and annotation data.
3.1.2.2 Policy on granting user permission
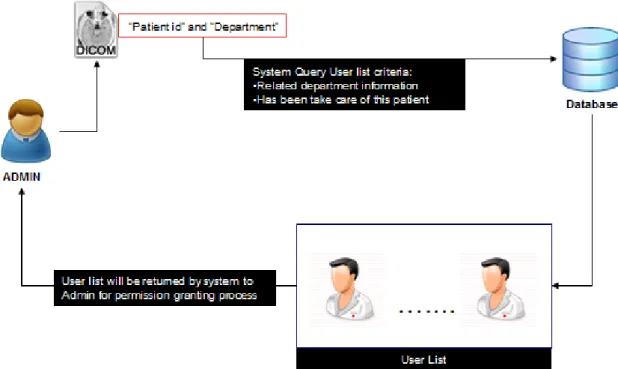
For more reasonable requirement design of the related policy, grant permission access of the medical staffs’ list candidates will be based on the medical staff’s related department information and whether the related medical staff has been take care of patient.
Illustration which can be found on Figure 9 shows us that based on the DICOM information which has department information and patient id, system will bring a list of valid medical staff candidates which their department is the same with the uploaded DICOM and they have been take care of the related patient which identified by the patient ID. Based on this valid medical staffs list, admin can choose which user to be granted which DICOM information.
Figure 9. Valid User Lists for Granted Permission Candidate on DICOM information
3.1.3 View DICOM file
After DICOM has been uploaded and the related information has already been saved to web server, including granted view permission, user can login and access the web server to view the DICOM information.
System will show the DICOM information immediately on the browser if the related information is not protected, which considered public information and have no security concern. If the related DICOM information is protected, then system will show “Info is not visible” wording instead of the real information.
When user tries to view the protected information by clicking the “Info is not visible” wording, system will check whether this user has been granted permission to view the protected information. If user has permission to view the related information, system will do the data decryption process, and show the real information in the browser. If user doesn’t have the permission to view the related information, system will not do the decryption process, instead will show “You don’t have permission to view this information” alert message to notify user that he don’t have access to the information.
3.2 Use Case Diagrams
Figure 10. Use Case Diagram
Our system has two actor roles, which are “Admin” and “User” and three
functionalities. Only “Admin” role can do the “Upload DICOM file” and “Grant DICOM annotation data permission to other user” action. While both “Admin” and “User” can “View DICOM file”.
3.3 Activity Diagrams
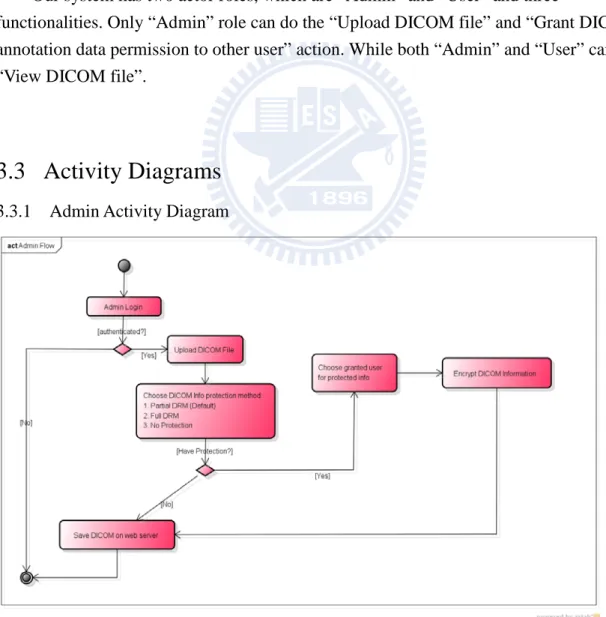
3.3.1 Admin Activity Diagram
Steps of Admin Activity Diagram:
1 Admin do the login action to the web server
2 System will check whether the user is authenticated to access the web server.
3 If it is authenticated, admin can use “Upload DICOM” action. If it is not authenticated, then system will not allow user to do any operation on the web server.
4 After DICOM file was uploaded successfully, system will ask user to choose the information protection method. Default protection method will be “Partial DRM” which will allow user to choose some part of information to be protected.
5 If there is information to be protected, admin can choose which user to be granted permission for the related information. The valid user list is already discussed on previous “System Requirement” section. After confirm what information to be protected, and which user to be granted the view permission, system will encrypt the related information.
6 Save DICOM information in web server
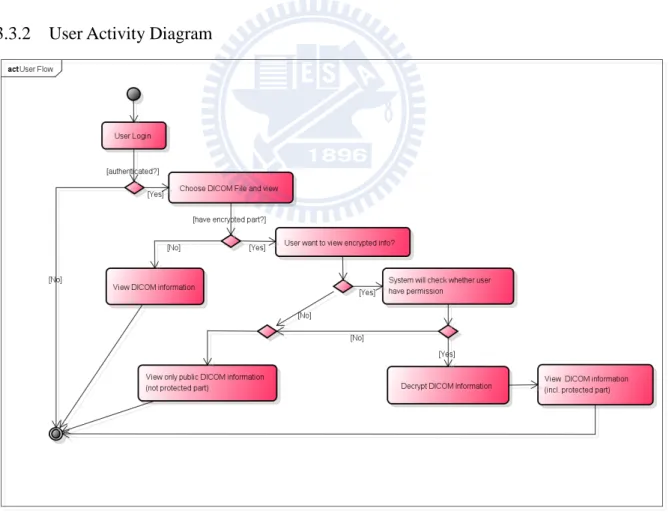
3.3.2 User Activity Diagram
Steps of User Activity Diagram:
1 User do the login action to the web server
2 System will check whether the user is authenticated to access the web server.
3 If it is authenticated, user can use “View DICOM file” action to view the information. If it is not authenticated, then system will not allow user to do any operation on the web server.
4 When showing the DICOM information, if one of the information is protected, then system will show “Encrypted” wording on it.
5 When user click the “Encrypted” wording to decrypt the information, system will check whether the related user has been granted permission to view the related information. If user have the permission, then system will decrypt the protected information, and show the real content to the related user. . If user doesn’t have the permission to view the information, system will not do the decryption process, and keep show “Encrypted” wording.
3.4 Encryption Method
After admin confirm select the protected DICOM information with the granted user access permission, system will save all the information in database. We assume that the protected information is considered critical and contains sensitive data. Based on this assumption, we need to do additional encryption action when saving the record into the database to make sure the protected information is secured, so that not even the database administrator can determine the information when the information is protected. For example, if the database is hosted at third party vendor’s company, then the database administrator who works at the company will be able to view the data at will if the sensitive information is not encrypted.
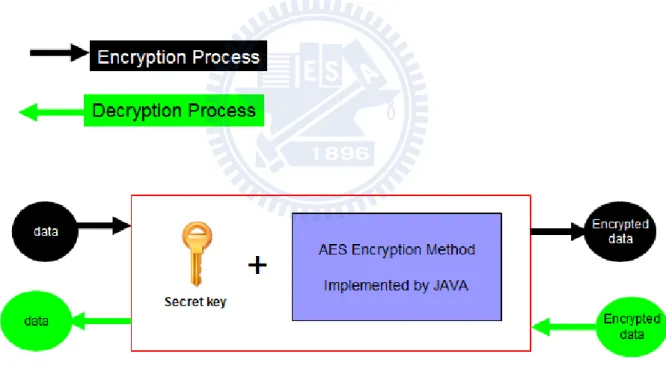
For the cryptography mechanism, we choose symmetric-key encryption algorithm, which means the algorithm using the same key for both encryption and decryption method. We using this kind of algorithm because encryption and decryption process only happened on the web server side, and there is no need we share the key to client to do the message encryption.
For the implementation of symmetric-key encryption, we choose AES (Advanced Encryption Standard). AES was announced at November 2001 by NIST (National Institute of Standards and Technology) as the most suitable standard encryption for U.S. government, and it is now used worldwide. It supports combinations of key and block sizes of 128, 192,
The AES standard has been incorporated into several Java technology offerings. Beginning with the Java 2 SDK, Standard Edition (J2SE) v 1.4.0, the Java Cryptography Extension (JCE) was integrated with the SDK and the JRE. Since then, it has no longer been necessary to install the JCE optional package, since support for strong cryptography is now available as part of J2SE. From a developer perspective, JCE is a higher level of abstraction, and a common set of APIs for newer and different cryptographic algorithms -- without the need to worry about the inner workings of the algorithm.
In current system design, we are using AES encryption method with 128 key block sizes. When saving the record into database, system will determine if the related
information is protected. For non-protected information, system will just write the content to the database. For protected information, system will do encryption process with AES algorithm, and save the encrypted information to the database. When granted user request to view the protected information, system will get the encrypted information from database, and do the decryption process.
3.5 Database Design
Figure 14. System Table Schema User and Patient
To determine whether this user is eligible to be granted view permission for protected DICOM information, system will reference the department information in table “USER” and whether this patient has been taken care by the related user, which the information can be found in table “USER_LOOK_AFTER_PATIENT”.
DICOM information and User
One DICOM have a list of information (which includes patient and annotation data). One to Many relationships will be realized by table “DICOM” and “DICOM_INFO”.
For specific DICOM information, it can be protected or not. If it is protected, then the value will be the encrypted string. The table “USER_HAS_DICOM_INFO” contains data of which user can have view access on the protected information. So system will check this table when user tries to view protected DICOM information.
3.6 System Environment
When building the system, this thesis is focusing on using well known freeware license or open source software which has complete documentation of how to install and use with a great community support from the internet.
We choose JAVA as our main language for this thesis, since it comes with a great support of third party (library file which offers commonly used functionality) and proven track of stable application when it comes to web based solution. As an OOP language, with better design and highly reusable code, we can focus on the use case functionality and business logic implementation. For the third party framework, we use Apache Struts for MVC framework, Spring as application framework, Hibernate as OR mapping framework. Those are powerful and well known open source frameworks in Java EE solution.
For DICOM parser, we choose ImageJ (version 1.44) since it is free and open source JAVA code which is compatible with our language platform. It is image processing software which can show DICOM image and parse the information inside based on the DICOM data element standard. It can also convert from DICOM to image file format (ex. JPG, JPEG, TIF, etc). It power and flexibility allow it to be used as a research tool in medical world.
Module Software
Language Platform and Used Third party Framework
Java EE (Enterprise Edition) 6 and JDK 1.6.0_27 MVC: Apache Struts 1.3.10
Application Framework: Spring 3.0.5 OR Mapping Framework: Hibernate 3.2.1 DICOM Parser: ImageJ 1.44
Web Application Server Sun Glassfish Server 2.1 (Free Edition)
Database MySQL 5.1 (Community Edition)
Operating System Microsoft Windows XP Professional Edition
IDE Eclipse 3.7.0 (INDIGO)
4 Experiments and Results
4.1 Environment Setup
We need to build the related web application system in an environment which can be accessed by outside world wide user to make sure that our demo which include smart phone device to view the DICOM information through cloud can be executed successfully. By the permission of HTC, I built and install the web application on one of its server farms which is located on DMZ (demilitarized zone) and accessible by outside internet.
4.2 Data preparation
We need to do some test data initialization to make sure our experiments scenarios are executed successfully. Data preparation is including the tables of “USER”, “PATIENT”, and “USER_LOOK_AFTER_PATIENT”. For table “USER”, we will insert one “Admin” role with others as normal user. For these normal users, some of them belong to “Neurology Department”, others are belong to “Orthopedics Department”. For table “PATIENT”, we insert the patient id which exactly matches with our DICOM file test’s patient id. For table “USER_LOOK_AFTER_PATIENT”, we insert a set of data, so that there are users whose department is matches with our DICOM file test’s department and those users has been taken care of the related patient.
4.3 Admin Role Screenshots and Operations
At this section, we will demonstrate how an admin role can performs his actions on the systems with some web browser screenshots.
4.3.1 Admin Login Functionality
1. Input Admin user name id and password 2. Click “Login“ button
Figure 15. Admin Login
4.3.2 Select Action functionality
1. Select “Upload DICOM” to process
4.3.3 Upload DICOM functionality 1. Browse DICOM file to be uploaded
2. Click “Upload File” to upload the information to web server
Figure 17. Choose DICOM File to Upload
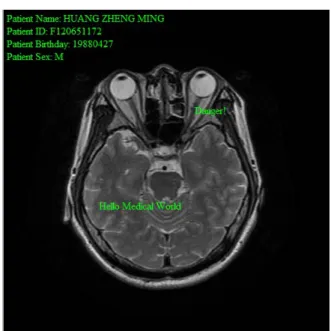
4.3.4 Show Uploaded DICOM Information
1. System will show DICOM image with patient information and text annotation(s) based on it’ x-axis and y-axis position.
4.3.5 Choose Information Protection Method - Partial
1. System will list all the DICOM information (patient and annotations), and admin can choose whether to protect the information and grant the view permission to which users.
2. By default behavior, the protection method will be “Partial Protect” with “Is Protect?” flag for all information will be selected. Admin can manually choose whether protect/not protect the information
Figure 19. DICOM Information Partial Protection Method 4.3.6 Choose Information Protection Method – All Protect (Full)
1. When choosing “All Protect” protection method, system will auto select “Is Protect?” flag for all information.
2. Admin can’t manually choose whether protect/not protect the information 3. Admin can grant this protected information view access to other users.
4.3.7 Choose Information Protection Method – No Protect
1. When choosing “No Protect” protection method, system will auto clear “Is Protect?” flag for all information.
2. Admin can’t manually choose whether protect/not protect the information.
3. Admin can’t grant this protected information view access to other users, since it is unnecessary.
Figure 21. DICOM Information No Protection Method
4.3.8 Demo Scenario
We will use below scenario to demo our system mechanism
1. Valid list candidate users: "Bryan", "Cathy", "Dylan", and "Eason" (which have the same department and have been taken care of this patient)
2. "Patient Sex" is considered not so critical and can be exposed to public, so we decide to not protect the related information.
3. "Patient Name" and "Patient ID" is considered very critical, so we decide to protect the related information and grant the permission to one key person (in this case is "Bryan").
4. "Patient Birth Date" and "Text Annotation (s)" is considered critical, so we decide to protect the related information and grant the permission to some authorized persons (in this case is "Bryan", "Cathy", "Dylan", "Eason")
4.3.9 Information Protection Scenario 1. Use “Partial Protect”
2. “Patient Sex” is not protected 3. Other information is protected
Figure 22. DICOM Information Protection Scenario 4.3.10 Grant User Permission Scenario
1. “Patient Name” and “Patient ID” is granted to “Bryan”
2. "Patient Birth Date" and "Text Annotation (s)" is granted to: “Bryan”, “Cathy”, “Dylan”, and “Eason”.
4.3.11 Save to Database
1. After all information protection and permission granting has been done, user can click “Save”. System will save all the information to server’s database, and show “Save successfully!” message to user.
4.4 User Role Screenshots and Operations
4.4.1 User Login Functionality
1. Input user name id and password (For this scenario, we choose “”Cathy) 2. Click “Login”button
Figure 25. User Login 4.4.2 Select Action Functionality
1. Select “View DICOM” to process
4.4.3 Select DICOM Functionality
1. User can input the related search criteria (optional)
2. Click “Search”, and based on the search criteria, system will show the result list on the screen
3. Click “View” to see the detail DICOM information target
Figure 27. Select DICOM Target to View 4.4.4 View DICOM Functionality
1. “Patient Sex” is not protected
2. “Patient Name” and “Patient ID” only granted to “Bryan”
4.4.4.1 View Patient Birthday
1. Try to view the “Patient Birthday” by clicking the related information
2. System show message: “Show information successfully!” since the related user have permission to view this information
3. “Patient Birthday” will be shown on the screen
Figure 29. View Patient Birthday Action 4.4.4.2 View Patient ID
1. Try to view the “Patient ID” by clicking the related information
2. System show message: “You don’t have permission to view this information” since the related user don’t have the permission to view this information
3. “Patient ID” will not shown on the screen
4.4.4.3 View Text Annotation(s)
1. Try to view the text annotation by clicking the related information
2. System show message: “Show information successfully!” since the related user have permission to view this information
3. The related text annotation will be shown on the screen
Figure 31. View Text Annotation (1)
4.4.4.4 Hide / Unhide Text Annotation(s)
Considering user want to see the DICOM image without annotation text (s) intervention, system enable user to hide/unhide the information from the screen.
Figure 33. Hide or Unhide Functionality for Text Annotation on DICOM Information 1. Hide text annotations information by clicking the button “Hide / Unhide” button 2. System will hide the information from the screen, so that user can see the DICOM
1. Unhide one of the text annotation by clicking the related information’s “Hide/Unhide” button
2. System will unhide the information from the screen, so that user can see the information on DICOM image
4.5 Smart phone devices
We using an android smart phone based to do “View DICOM information” experiments process. Below are the screenshot from android emulator
1. Input user name id and password 2. Click “Login” button
3. Select “View DICOM” to process
1. Click the combo box to select DICOM target 2. Select DICOM target
3. Click “ÖK” button to process
Figure 37. Smartphone Experiment – Select View DICOM Target View DICOM
1. Try to view the “Patient ID” by clicking the related information
2. System show message: “You don’t have permission to view this information” since the related user don’t have the permission to view this information
3. “Patient ID” will not shown on the screen
1. Try to view the text annotation by clicking the related information
2. System show message: “Show information successfully!” since the related user have permission to view this information
3. The related text annotation will be shown on the screen
Figure 40. Smartphone Experiment – View Text Annotation (1)
1. Hide text annotations information by clicking the button “Hide / Unhide” button 2. System will hide the information from the screen, so that user can see the DICOM
image without text intervention clearly
5 Conclusions and Future Work
5.1 Conclusions
This thesis proposed solution to make DICOM information available in cloud environment Convenience, since information can be accessed anytime anywhere as long as user got
internet access and device built in web browser For partial data protection and sharing mechanism:
Sharing data to suitable group of peoples can be achieved
Enable user to show suitable information based on the situation (ex. seminar)
5.2 Future Work
On the future, we can do some functionality extension to make the system a better application with below direction:
Integration with DICOM multimedia annotator Online annotate DICOM information
Support text, image, audio, and video annotation Integration with hospital system
DICOM data input is from PACS
Radiology machine output DICOM, and automatically upload it to web browser Web server security mechanism
6 References
[1] Hsu, Hsiang-Chin. (2010). A Study of Partial DRM Application on DICOM Information Protection. (Master of Science), National Chiao Tung University, Hsinchu.
[2] Hsu, Hao-Tai. (2011). A Multimedia Annotator with DICOM Compatibility on Digital Medicine Image. (Master of Science), National Chiao Tung University, Hsinchu.
[3] Chia-Chi Teng, Jonathan Mitchell, Christopher Walker, Alex Swan, Cesar Davila, David Howard, Travis Needham. (2010). A Medical Image Archive Solution in the Cloud. Paper presented at the Software Engineering and Service Sciences (ICSESS) - IEEE
International Conference, Beijing.
[4] Luís A. Bastião Silva, Carlos Costa, Augusto Silva and José Luís Oliveira. (2011). A PACS Gateway to the Cloud. Paper presented at the Information Systems and
Technologies (CISTI) - Iberian Conference.
[5] Charalampos Doukas, Thomas Pliakas, Ilias Maglogiannis. (2010). Mobile Healthcare Information Management utilizing Cloud Computing and Android OS. Paper presented at the 32nd Annual International Conference of the IEEE EMBS, Buenos Aires, Argentina. [6] Huang, Shih-Ting. (2010). The System Porting and Implementation of a Multimedia
Lecturing Presentation Player under the Android Platform. (Master of Science), National Chiao Tung University, Hsinchu.
[7] U. S. 104th Congress (Aug. 21, 1996), Health Insurance Portability and Accountability Act, Public Law 104-191.
[8] NEMA. (2011). DICOM Standard. Retrieved 2011-08-11, from http://medical.nema.org/standard.html
[9] Wikipedia. (2011). DICOM. Retrieved 2011-11-10, from http://en.wikipedia.org/wiki/DICOM
[10] T. Ferreira, W. Rasband. (2011). ImageJ User Guide. Retrieved 2011-08-01, from http://rsbweb.nih.gov/ij/docs/guide/index.html
[11] Wikipedia. (2011). Cloud Computing. Retrieved 2011-10-01, from http://en.wikipedia.org/wiki/Cloud_computing
[12] Zadgaonkar, Hrushikesh. (2011). Cloud Computing Concepts and Migration Strategies of an Application to Cloud! Retrieved 2011-10-02, from
http://hrushikeshzadgaonkar.wordpress.com/2011/05/20/cloud-computing-concepts-and-migration-strategies-of-an-application-to-cloud/
[13] Wikipedia. (2011). Advanced Encryption Standard. Retrieved 2011-11-01, from http://en.wikipedia.org/wiki/Advanced_Encryption_Standard
[14] Srinivas, Rags. (2003). Using AES with Java Technology. Retrieved 2011-11-01, from http://java.sun.com/developer/technicalArticles/Security/AES/AES_v1.html
International Conference on Natural Computation.
[16] Wikipedia. (2011). Digital rights management. Retrieved 2011-10-01, from http://en.wikipedia.org/wiki/Digital_rights_management
[17] Apache. (2008). Struts 1 Documentation. Retrieved 2011-10-05, from http://struts.apache.org/1.3.10/index.html
[18] Rod Johnson, Juergen Hoeller, Keith Donald. (2010). Spring Framework 3.0 Reference Documentation. Retrieved 2011-11-01, from
http://static.springsource.org/spring/docs/3.0.x/spring-framework-reference/html/
[19] Gavin King, Christian Bauer, Max Rydahl Andersen, Emmanuel Bernard, Steve Ebersole. (2010). Hibernate Reference Documentation. Retrieved 2011-11-01, from
http://docs.jboss.org/hibernate/core/3.5/reference/en-US/html/
[20] MySQL. (2011). MySQL 5.1 Reference Manual. Retrieved 2011-10-12, from http://dev.mysql.com/doc/refman/5.1/en/index.html
![Figure 3. DICOM Network Overview Below are the steps of how the DICOM is created [1]](https://thumb-ap.123doks.com/thumbv2/9libinfo/7579633.126307/15.892.137.761.541.872/figure-dicom-network-overview-steps-dicom-created.webp)