國 立 交 通 大 學
電子工程學系 電子研究所 碩士班
碩 士 論 文
射 頻 功 率 放 大 器 之 靜 電 放 電 防 護 設 計
ESD PROTECTION DESIGN FOR
RADIO-FREQUENCY POWER AMPLIFIER
研 究 生:蒙國軒
指導教授:柯明道 教授
射頻功率放大器之靜電放電防護設計
ESD PROTECTION DESIGN
FOR RADIO-FREQUENCY POWER AMPLIFIER
研 究 生:蒙國軒 Student:Guo-Xuan Meng
指導教授:柯明道 教授 Advisor:Ming-Dou Ker
國 立 交 通 大 學電子工程學系 電子研究所 碩士班
碩 士 論 文 A ThesisSubmitted to Department of Electronics Engineering & Institute of Electronics College of Electrical and Computer Engineering
National Chiao Tung University in Partial Fulfillment of the Requirements
for the Degree of Master
in
Electronics Engineering September 2007
射頻功率放大器之靜電放電防護設計
學生: 蒙 國 軒
指導教授: 柯 明 道 教授
國立交通大學
電子工程學系 電子研究所碩士班
摘要
本篇論文主旨在於設計適用於射頻功率放大器之靜電放電防護電路。其原理 為利用元件或電路特性,使靜電放電防護電路對原電路的負面影響降到最低,且 具有高水準之靜電放電防護能力。本論文提出兩個適用於射頻功率放大器的靜電 放電防護策略,共下線了兩顆晶片以作驗證。所下線之兩顆晶片皆以標準零點一 三微米互補式金氧半場效電晶體製程所製造。 第一種射頻功率放大器的靜電放電防護策略是利用電感性元件作為靜電放 電箝制元件。因為靜電放電事件屬於較低頻行為,而射頻訊號佔據高頻頻譜,因 此電感性元件可區分靜電放電事件和射頻訊號,作為一低阻抗之靜電放電路徑。 此電感性箝制元件亦可作為輸出阻抗匹配網路之一部份,並與輸出阻抗匹配網路 共同設計,因此電感性箝制元件可以對原射頻功率放大器完全無任何負面影響。 同時,一個MIM 電容可以與輸出訊號路徑串連,阻擋靜電放電電流直接貫穿而 轟擊到內部主動核心元件,提高保護效果。實驗證明此靜電放電防護策略可有效 提供防護等級超過八千伏特人體放電模式靜電放電轟擊測試,與四百伏特機器放 電模式靜電放電轟擊測試。第二種射頻功率放大器的靜電放電防護策略是利用低寄生電容之電容性靜 電放電箝制元件。格狀陣列形式的矽控整流器和二極體可在相同晶片佈局面積下 提供最大靜電放電路徑周長,因此可在貢獻最小寄生電容之前提下,提供最高靜 電放電防護等級。實驗證明此靜電放電防護策略可有效提供防護等級超過八千伏 特人體放電模式靜電放電轟擊測試,與八百伏特機器放電模式靜電放電轟擊測 試。 實驗結果亦證明,靜電放電轟擊確實對射頻功率放大器的射頻操作效能有極 大影響。射頻功率放大器極需靜電放電防護設計,否則無法於靜電放電轟擊存活。
ESD PROTECTION DESIGN FOR
RADIO-FREQUENCY POWER AMPLIFIER
Student: Guo-Xuan Meng
Advisor: Prof. Ming-Dou Ker
Department of Electronics Engineering & Institute of Electronics
National Chiao-Tung University
ABSTRACT
The aim of this thesis is to design the ESD protection circuits which are suitable in radio-frequency (RF) power amplifiers (PA). The ESD protection capability and the influence on the performance of the RF PA circuit after inserting the ESD protection circuit needs to be considered simultaneously. This thesis includes two RF PA ESD protection strategies which have been verified through two individual chips fabricated in standard 0.13-μm CMOS process.
The first RF PA ESD protection strategy is to use an inductive ESD clamp which can be co-designed with the RF PA output matching network. An inductive device can distinguish ESD event which occupies the lower frequency spectrum from the normal RF signals. It acts as the low impedance discharging path for ESD current and provides specific impedance for RF signal. A MIMCAP in series of the signal line can block out the ESD current from directly penetrating into the active devices in RF PA core. The measurement results have verified this ESD protection strategy and proved that the proposed ESD protection technique indeed provides excellent ESD robustness
of up to 8kV HBM ESD level and 400V MM ESD level.
The second RF PA ESD protection strategy is to use capacitive ESD devices with low parasitic capacitances. Waffle-structured SCR and diodes are utilized to provide maximum discharging peripheral within a given layout area for minimizing the parasitic capacitance. The waffle-structured SCR is designed with ESD detection and trigger circuit to provide the best ESD protection capability while contributing minimal parasitic capacitance to the RF PA. The measurement results have verified the effectiveness of the proposed ESD protection strategy and proved that this ESD protection technique indeed provides excellent ESD robustness of up to 8kV HBM ESD level and 800V MM ESD level.
Further, the measurement results also verify that an unprotected RF PA can not survive any single ESD zapping. RF PA circuitry is in urgent need of ESD protection with low parasitic effect.
誌謝
首先我要感謝我的指導教授柯明道博士,在這一年半來所給予我的指導與鼓 勵。在研究上,教授指導我做研究的方向、方法、與態度:要求我追求研究的完 整性與嚴謹性,讓我從一個一開始什麼都不懂的菜鳥,歷經多次的摸索與跌倒, 開始對做研究有個比較清晰的概念。而在教授指導我的過程中,也間接地讓我瞭 解到,研究跟人生其實有著相同的道理。現實生活中的研究,正如同現實生活中 的人生,過程中往往會發生許多料想不到的意外,和很多很麻煩卻又不得不去做 的dirty work。繁雜瑣碎的意外鳥事,我們無法去避免;而我們唯一能做的,就 是仔細地思考,用心地計畫未來必須做的工作,並且努力地去完成它。至於成功 與否,就虛心接受,因為自己已經盡了最大的努力,而問心無愧。教授的苦口婆 心,到最後才真正的有所體悟,並且為此由衷地感謝。 對於實驗室的學長們給予我的協助與指導,實在不勝感激。尤其是蕭淵文學 長和黃俊學長,在RF ESD 的電路設計與量測技巧上給予我許多實質的建議與帶 領;王暢資學長所提供的下線機會讓我可以實際做出晶片並驗證。此外也感謝張 瑋仁學長,顏承正學長,王資閔學長,陳世宏學長,和賴泰翔學長,不吝給予做 研究的心態與經驗上的傳承。也感謝307 實驗室的王文傑學長,給予專業的 RF 電路設計與量測技巧的建議與解答。 謝謝同年級的同儕們。感謝黃曄仁在工作繁忙之際仍協助我進行wafer-level ESD 的測試,感謝林群祐在 waffle-structured SCR 元件實作上的協助,也感謝他 在論文撰寫格式上的大力相助。另外也謝謝同一研究群的邱柏硯,莊介堯,和所 有同在527 研究室的同學和學長姐們,一起修課,做研究,偷閒時聊聊心中的快 樂與酸苦,並且交流研究的經驗與技巧。這些讓單調苦悶的生活增添許多色彩與 歡笑。 最後我要謝謝我的父母蒙志明先生和邱雪霞女士,和姊姊蒙秀婉小姐,給予 我物質上的協助,使我無後顧之憂,並且在我失去信心時給我的支持與鼓勵,而 從未對我失去過信心。這一直是我精神上最大的支柱。 還要感謝很多人,不可勝數,在此一併謝過,我不會讓你們失望的。 蒙國軒 九十六年九月CONTENTS
ABSTRACT (CHINES) ………... ……i
ABSTRACT (ENGLISH) ……….. …..iii
ACKNOWLEDGEMENT……….. …...v
CONTENTS………. …..vi
TABLE CAPTIONS……… ...ix
FIGURE CAPTIONS……….. …...x
Chapter 1
Introduction……… …...1
1.1 MOTIVATION……… …….1
1.2 THESIS ORGANIZATION……… …….3
Chapter 2
RF PA Basics……….. …...5
2.1 NARROWBAND CLASS-ABPA……….. …….5
2.1.1 Conventional Architecture………. …….5
2.1.2 Load-line Design……… …….5
2.1.3 Matching Network Design………. …….6
2.1.4 The Design Principle of the Narrowband Class-AB PA……….. …….6
2.2 ULTRA-WIDEBAND CLASS-ABDISTRIBUTED PA……… …….7
2.2.1 Conventional Architecture………... …….7
2.2.2 Load-line Design of Each Gm-cell……… …….8
2.2.3 Input and Output Line Design……….. …….9
2.2.4 Design Principle of the UWB Distributed Amplifier……… …...10
2.3 BASIC PAFOM……….... …...10
2.3.1 Scattering Parameters, S-parameters……… …...10
2.3.2 Large Signal Transfer Characteristics……….. …...14
Chapter 3
RF ESD Protection Basics………... ….28
3.1 ESDTESTING BASICS………... …...28
3.2.1 General Architecture……….. …...33
3.2.2 Power Rail ESD Clamp……….. …...34
3.2.3 I/O ESD Clamp……….. …...36
3.3 LOW-CESDDEVICE……… …...38
3.3.1 Silicon-controlled Rectifier Basics……… …...38
3.3.2 Practical SCR structure………. …...39
3.3.3 Whole-chip ESD Protection with SCR and Trigger Circuit…………. …...40
3.4 INDUCTIVE ESDDEVICES……… .…..41
3.4.1 ESD Power Spectrum………. …...41
3.4.2 Inductor Co-design Methodology……….. …...41
Chapter 4
Experimental Results………. ….59
4.1 NARROWBAND CLASS-ABPA WITH AN INDUCTIVE ESDDEVICE………. …...59
4.1.1 Design of the PA Circuit……… …...59
4.1.2 Chip Implementation………. …...61
4.1.3 Measurement Results………... …...61
4.1.4 Conclusion……….. …...63
4.2 UWBCLASS-ABDISTRIBUTED AMPLIFIER WITH LOW-CESDDEVICES. …...63
4.2.1 Design of the PA Circuit……… …...64
4.2.2 Chip Implementation………. …...66
4.2.3 Measurement Results………... …...67
4.2.4 Conclusion……….. …...69
Chapter 5
Failure Analysis……….. ...109
5.1 ESDDAMAGE MECHANISM FOR PASSIVE DEVICES………... ….109
5.1.1 LOUT... ….109
5.1.2 COUT……….. ….110
5.1.3 Effects of the Damage of the Passive Devices……… ….111
5.2 DAMAGE MECHANISM OF ESD ON THE LOW-CESDCLAMP……… ….112
5.2.1 Transfer I-V Characteristics of the Low-C ESD Clamps………... ….113
5.2.2 SEM Photos of the Low-C ESD Clamps………. ….113
5.2.3 Operation of the Low-C ESD Clamps during ESD……… ….114
Chapter 6
Conclusions and Future Works……… ...122
6.1 CONCLUSIONS……….. ….122
REFERENCES……… ...125
VITA………... ...127
TABLE CAPTIONS
Table 4.1 Device parameters of the 3-GHz 0-dBm narrowband class-AB PA…. 71 Table 4.2 Summary of the RF performance of the 3-GHz 0-dBm narrowband
class-AB PA………... 71 Table 4.3 Summary of the RF performance of the 3-GHz 0-dBm narrowband
class-AB PA after ESD testing zapping………. 72 Table 4.4 Device parameters of the 3-to-10GHz 0-dBm ultra-wideband
class-AB distributed amplifier………... 73 Table 4.5 Device parameters of the ESD protection circuit of the 3-to-10GHz
0-dBm ultra-wideband class-AB distributed amplifier………. 74 Table 4.6 Summary of the RF performance of the 3-to-10GHz 0-dBm
ultra-wideband class-AB distributed amplifier………. 74 Table 4.7 Summary of the RF performance of the 3-to-10GHz 0-dBm
FIGURE CAPTIONS
Fig. 2.1 Conventional class-AB PA architecture……… …17 Fig. 2.2 Typical circuit implementation of the conventional class-AB PA
architecture……… …17 Fig. 2.3 Typical I-V relationship and the optimal load-line for maximum
output power efficiency, of conventional class-AB PA core operation……… …18 Fig. 2.4 Behaviors and effects of impedance transform on the ZY Smith
chart………... …19 Fig. 2.5 Four types of the L-section with the corresponding design
equations……… …20 Fig. 2.6 Four types of the T-section with the corresponding design
equations……… …21 Fig. 2.7 Four types of the π-section with the corresponding design
equations……… …22 Fig. 2.8 Conventional distributed amplifier architecture……… …23 Fig. 2.9 Typical circuit implementation of the conventional distributed
amplifier architecture……… …23 Fig. 2.10 Loading condition of each Gm-cell………... …24 Fig. 2.11 Distributed amplifier with artificial line……… …24 Fig. 2.12 Detailed artificial line structure and corresponding design
equations of (a) low-pass line, (b) high-pass line, and (c) band-pass line……… …25 Fig. 2.13 Demonstration of the system characterized by the S-parameters…. …26 Fig. 2.14 Demonstration of the S-parameters of a typical PA……….. …26 Fig. 2.15 Power transfer characteristic (PTC) of a PA………. …27 Fig. 2.16 Maximal linear operation limit of the PA active devices when 1-dB
compression point is approached……….. …27 Fig. 3.1 Typical pad layout allocation of a RF system IC……….. …43 Fig. 3.2 Pin assignments of ESD test zapping for I/O pads of (a) PS-mode,
(b) NS-mode, (c) PD-mode, and (d) ND-mode………. …43 Fig. 3.3 Pin assignments of ESD test zapping for VDD pads of (a) positive
Fig. 3.5 (a) Equivalent testing circuit models, (b) typical current waveform, and (c) corresponding power spectrum, of machine-model (MM) ESD testing……… …45 Fig. 3.6 (a) Equivalent testing circuit models, (b) typical current waveform,
and (c) corresponding power spectrum, of charged-device-model (CDM) ESD testing………... …46 Fig. 3.7 Traditional mixed-voltage I/O interface circuit………. …47 Fig. 3.8 General I/O interface circuit specifically designed for RF
application: (a) low-noise amplifier (LNA) as the RF input interface, (b) power amplifier (PA) as the RF output interface, and (c) RF switch as an integrated RF I/O interface……… …48 Fig. 3.9 Whole-chip ESD protection of (a) conventional architecture and
(b) architecture with signal line blocker……… …49 Fig. 3.10 Power rail ESD clamp with (a) typical architecture, (b) a big
NMOS as the main clamp device, and (c) a parasitic bipolar transistor as the main clamp device………... …50 Fig. 3.11 I/O ESD clamp using (a) a pair of GGNMOS and PGPMOS, and
(b) a pair of diodes within the whole-chip ESD protection architecture……… …51 Fig. 3.12 ESD current under (a) positive, and (b) negative, VDD-to-VSS
modes for the I/O ESD clamp using a pair of diodes within the whole-chip ESD protection architecture.……….. …52 Fig. 3.13 ESD current under (a) PS-mode, (b) NS-mode, (c) PD-mode, and
(d) ND-mode, for the I/O ESD clamp using a pair of diodes within
the whole-chip ESD protection architecture.……… …52 Fig. 3.14 (a) Device cross-sectional view, (b) simplified structural
illustration, (c) equivalent circuit, and (d) typical I-V characteristic, of SCR device……… …53 Fig. 3.15 (a) Device cross-sectional view, (b) simplified structural
illustration, and (c) equivalent circuit, of another SCR device……. …54 Fig. 3.16 Power rail ESD clamp using SCR device………. …55 Fig. 3.17 Whole-chip ESD protection circuit with the I/O ESD clamp using
SCR device……… …55 Fig. 3.18 ESD current under (a) PS-mode, (b) NS-mode, (c) PD-mode, and
(d) ND-mode, for the whole-chip ESD protection circuit with the I/O ESD clamp using SCR device………. …56 Fig. 3.19 (a) Spectral locations of ESD and RF power. (b) Clamp device
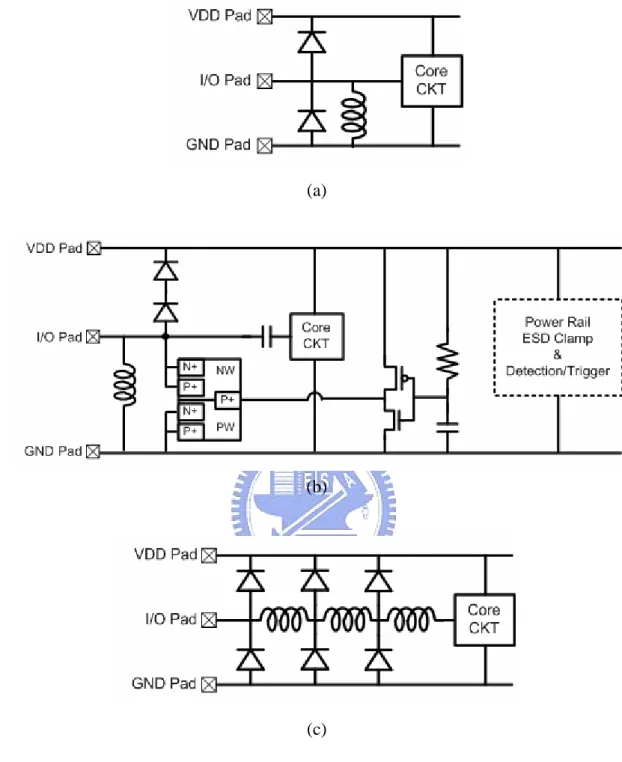
Fig. 3.20 Inductor as (a) a RF choke, and (b) part of the matching network, in potentially applicable RF circuits using inductor co-design methodology. ……… …57 Fig. 3.21 (a) Parallel resonant tank composed of an inductor and a diodes,
(b) parallel resonant tank composed of an inductor and a SCR, and (c) distributed ESD protection in potentially applicable RF circuits
using inductor co-design methodology.. ………... …58 Fig. 4.1 Circuit schematic of the 3-GHz 0-dBm narrowband class-AB
PA. ……… …76 Fig. 4.2 Pre-layout simulation results: matching situations of (a) S11, and
(b) S22, of the PA……….. …76 Fig. 4.3 Pre-layout simulation results: power transmission of (a) S21, and
(b) S12, of the PA……….. …77 Fig. 4.4 Pre-layout simulation results: large signal PTC at 5.2-GHz of (a)
output power versus input power, and (b) gain versus input power,
of the PA……… …77 Fig. 4.5 Layout top view of the 3-GHz 0-dBm narrowband class-AB
PA. ……… …78 Fig. 4.6 Post-layout simulation results: matching situations of (a) S11, and
(b) S22, of the PA……….. …78 Fig. 4.7 Post-layout simulation results: power transmission of (a) S21, and
(b) S12, of the PA……….. …79 Fig. 4.8 Post-layout simulation results: large signal PTC at 3.64-GHz of (a)
output power versus input power, and (b) gain versus input power,
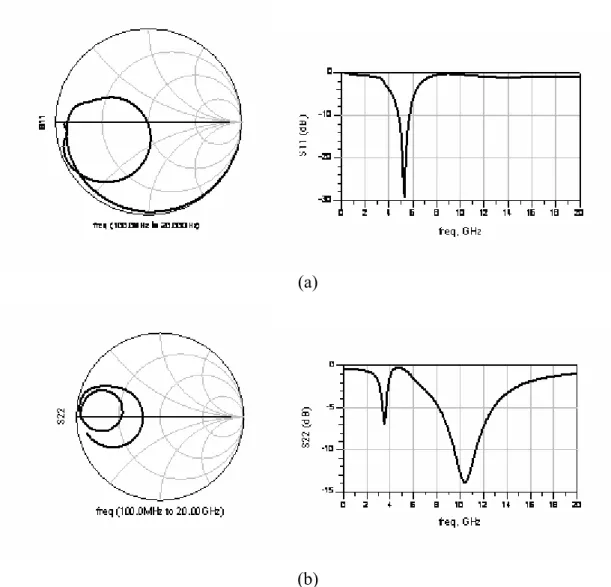
of the PA.………... …79 Fig. 4.9 Die photo of the 3-GHz 0-dBm narrowband class-AB PA………... …80 Fig. 4.10 Measurement results: matching situations of (a) S11, and (b) S22,
of the PA……… …81 Fig. 4.11 Measurement results: power transmission of (a) S21, and (b) S12,
of the PA……… …81 Fig. 4.12 Measurement results: large signal PTC at 3.2-GHz of (a) output
power versus input power, and (b) gain versus input power, of the PA. ……… …82 Fig. 4.13 ESD testing set-up for the 3-GHz 0-dBm narrowband class-AB
times HBM ESD zapping……….. …84 Fig. 4.16 Measurement results of (a) output power versus input power, and
(b) gain versus input power, of the PA after three times HBM ESD
zapping……….. …85 Fig. 4.17 Measurement results of (a) S21, and (b) S12, of the PA after three
times MM ESD zapping……… …86 Fig. 4.18 Measurement results of (a) output power versus input power, and
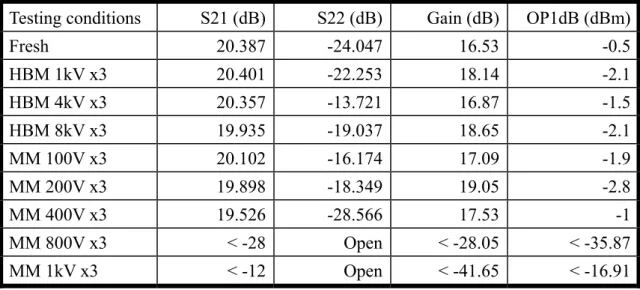
(b) gain versus input power, of the PA after three times MM ESD zapping.………. …87 Fig. 4.19 Summary of the RF performance of the 3-GHz 0-dBm narrowband
class-AB PA after ESD zapping.………... …88 Fig. 4.20 Circuit schematic of the 3-to-10-GHz 0-dBm ultra-wideband
class-AB distributed amplifier (DA)………. …88 Fig. 4.21 The ESD protection circuit of the 3-to-10-GHz 0-dBm
ultra-wideband class-AB distributed amplifier.……… …89 Fig. 4.22 (a) The device cross-sectional view, and (b) the layout top view, of
the waffle-structured SCR.……… …89 Fig. 4.23 Pre-layout simulation results: matching situations of (a) S11, and
(b) S22, of the unprotected DA………. …90 Fig. 4.24 Pre-layout simulation results: power transmission of (a) S21, and
(b) S12, of the unprotected DA………. …90 Fig. 4.25 Pre-layout simulation results: (a) gain, and (b) OP1dB, versus
frequency of the unprotected DA……….. …91 Fig. 4.26 Layout top view of the 3-to-10-GHz 0-dBm ultra-wideband
class-AB distributed amplifier (DA)………. …91 Fig. 4.27 Post-layout simulation results: matching situations of (a) S11, and
(b) S22, of the unprotected……… …92 Fig. 4.28 Post-layout simulation results: power transmission of (a) S21, and
(b) S12, of the unprotected……… …92 Fig. 4.29 Post-layout simulation results: (a) gain, and (b) OP1dB, versus
frequency of the unprotected DA……….. …92 Fig. 4.30 Post-layout simulation results: matching situations of (a) S11, and
(b) S22, of the protected DA………. …93 Fig. 4.31 Post-layout simulation results: power transmission of (a) S21, and
(b) S12, of the protected DA………. …93 Fig. 4.32 Post-layout simulation results: (a) gain, and (b) OP1dB, versus
frequency of the protected DA……….. …93 Fig. 4.33 Die photo of the 3-to-10-GHz 0-dBm ultra-wideband class-AB
distributed amplifier (DA)………. …94 Fig. 4.34 Measurement results: matching situations of (a) S11, and (b) S22,
of the unprotected DA………... …94 Fig. 4.35 Measurement results: power transmission of (a) S21, and (b) S12,
of the unprotected DA………... …95 Fig. 4.36 Measurement results: (a) gain, and (b) OP1dB, versus frequency
of the unprotected DA………... …95 Fig. 4.37 Measurement results: matching situations of (a) S11, and (b) S22,
of the unprotected DA………... …96 Fig. 4.38 Measurement results: power transmission of (a) S21, and (b) S12,
of the protected DA………... …96 Fig. 4.39 Measurement results: (a) gain, and (b) OP1dB, versus frequency
of the protected DA………... …96 Fig. 4.40 ESD testing set-up for (a) the unprotected DA and (b) the
protected DA. ………... …97 Fig. 4.41 Die photo of the unprotected DA after three times ESD zapping of
(a) 4kV HBM and (b) 400V MM.………. …98 Fig. 4.42 Measurement results of (a) S21, and (b) S22, of the unprotected
DA after three times HBM ESD zapping……….. …99 Fig. 4.43 Measurement results of (a) gain, and (b) OP1dB, versus frequency
of the unprotected DA after three times HBM ESD zapping……… ..100 Fig. 4.44 Measurement results of (a) S21, and (b) S22, of the protected DA
after three times HBM ESD zapping………. ..101 Fig. 4.45 Measurement results of (a) gain, and (b) OP1dB, versus frequency
of the protected DA after three times HBM ESD zapping………… ..102 Fig. 4.46 Measurement results of (a) S21, and (b) S22, of the unprotected
DA after three times MM ESD zapping……… ..103 Fig. 4.47 Measurement results of (a) gain, and (b) OP1dB, versus frequency
of the unprotected DA after three times MM ESD zapping……….. ..104 Fig. 4.48 Measurement results of (a) S21, and (b) S22, of the protected DA
after three times MM ESD zapping………... ..105 Fig. 4.49 Measurement results of (a) gain, and (b) OP1dB, versus frequency
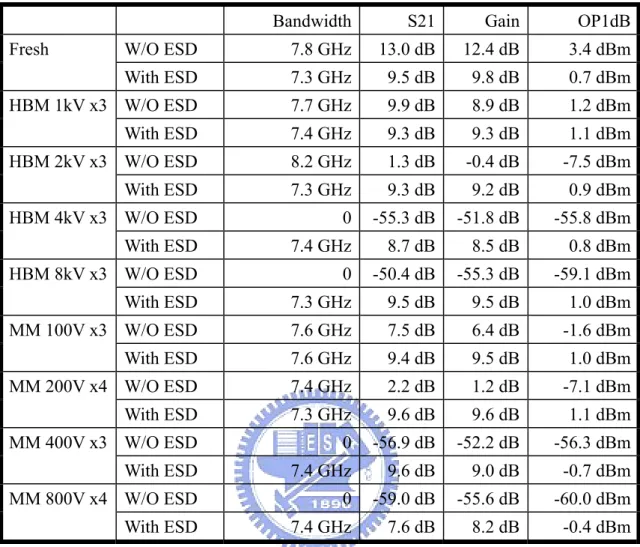
of the protected DA after three times MM ESD zapping………….. ..106 Fig. 4.50 Summary of the RF performance of the 3-to-10-GHz 0-dBm
zapping: (a) the unprotected DA and (b) the protected DA.………. ..108 Fig. 5.1 Illustrations of the current wave propagations of (a) the incident
ESD current and (b) the reflected current………. ..117 Fig. 5.2 The DC I-V curves of (a) output pad to GND pad after PS-mode
zapping and (b) VDD pad to GND pad after VDD-to-VSS-mode zapping………... ..118 Fig. 5.3 The pulse I-V curves of (a) output pad to GND pad after PS-mode
zapping and (b) VDD pad to GND pad after VDD-to-VSS-mode zapping……….. ..118 Fig. 5.4 The TLP I-V curves of (a) output pad to GND pad after PS-mode
zapping, (b) VDD pad to GND pad after VDD-to-VSS-mode zapping, and (c) the TLP testing instrument set-up schematic…….. ..119 Fig. 5.5 The SEM photos of (a) the PMOS of the RC-inverter and (b) the
observably damaged location of the PMOS……….. ..120 Fig. 5.6 Circuit schematics of (a) the whole-chip ESD protection circuit
Chapter 1
Introduction
1.1
M
OTIVATIONESD robustness is one of the most serious reliability issues in CMOS IC manufacturing. With the continuously technology scale-down and rapidly increasing operation frequency in CMOS ICs, providing ESD protection circuits without influencing the normal core circuit function has become a great challenge.
To fulfill the requirement of ESD robustness for high-speed and RF circuits, a pair of diodes is inserted closed to the I/O pin along with a power-rail ESD protection circuit to provide whole-chip ESD protection ability without degrading the performance of the core circuit much [1], [2]. This pair of diodes is designed with certain sizes to provide an ESD protection level good enough for practical standards. Unfortunately, the parasitic capacitance of even such a small diode pair can still degrade the RF performance of the core circuit. Therefore, tradeoff emerges between the ESD robustness and the RF performance.
To minimize the negative impact of the ESD protection devices on the core circuit performance, the best solution is to co-design the core circuit with the ESD protection circuit. If it is possible to integrate partially, or even completely, the ESD clamp device into the core circuit normal function, the negative impact on
interface first comes across a low-noise amplifier (LNA), while the output interface is typically a power amplifier (PA). Although the ESD protection design on LNA has been widely researched [3], [4], the ESD protection research on PA still remains little [5]. Therefore, this work focuses on the co-design of the RF PA and ESD protection strategies.
Two practical RF PA and ESD protection co-design schemes are proposed. One is to use inductor instead of the diode as the I/O ESD clamp device [4]. The other is to use silicon-controlled rectifier (SCR) [6].
Utilizing inductive devices for both RF matching and ESD discharge can provide excellent ESD robustness while preserving exact RF circuit performance without being degraded. The frequency-domain nature of an inductor can provide the ability to distinguish the ESD event from and the normal RF operation. Further more, this inductor can also serve in the RF matching network, providing normal RF circuit function. Therefore, in this way the ESD protection circuit is co-designed with the core circuit and has no negative impact on the normal RF circuit performance.
On the other hand, SCR devices can provide the best ESD level per unit chip area, that is, highest ESD robustness with minimum parasitic capacitance. In such sense, it can potentially provide excellent co-design capability. Therefore, careful co-design with proper triggering circuits is expected to exhibit good performance both on ESD robustness and RF circuit function.
Along with the co-design strategies, novel failure criteria specifically suitable for the RF circuits are presented. The RF circuitry is far different from the traditional digital circuitry [7-9], mainly because of the numerous passive devices in the input and output matching networks [10]. Not only the active devices but also these passive devices may be damaged by the ESD energy, and thus the overall RF operation behavior may be altered [11], [12]. The traditional leakage current test for digital
circuits is no longer suitable. Therefore, a complete functional test must be performed to examine the impact of the ESD event on the RF circuit performance, and new failure criteria must be set up specifically for high-speed/RF circuits.
The two co-design ideas were put into chip fabrication to verify their practicability. A narrowband class-AB PA is designed and utilizes an inductor as the output ESD clamp. An ultra-wideband class-AB distributed PA utilizing the SCR clamp device is designed, and the negative impact of the SCR devices on the RF bandwidth was investigated. Both PAs and corresponding ESD protection circuits were constructed in a standard 0.13-um CMOS process. The measurement results proved that both strategies indeed enhanced the ESD protection ability with tolerable degradation of the RF performance.
1.2
T
HESISO
RGANIZATIONThe chapter 2 of this thesis investigates the basic principle and the consideration of two types of RF PAs. One of them is the narrowband class-AB PA and the other is the ultra-wideband class-AB distributed PA. A thorough discussion on the design equations and performance matrices are presented.
Chapter 3 investigates several ESD protection strategies. Two protection schemes for RF application are proposed. One of them is to use an inductive device as the ESD clamp, and the other is to use SCR devices as the ESD clamp. The co-design methodology and flow is proposed and investigated. Circuit topologies and
narrowband PA and the ultra-wideband distributed PA, along with the corresponding ESD protection schemes, both fabricated in a standard 0.13-um CMOS process. The measurement results are compared and analyzed. The result reveals that both of the proposed ESD protection schemes can indeed provide excellent ESD robustness.
Chapter 2
RF PA Basics
2.1
N
ARROWBANDC
LASS-AB
PA
2.1.1 Conventional Architecture
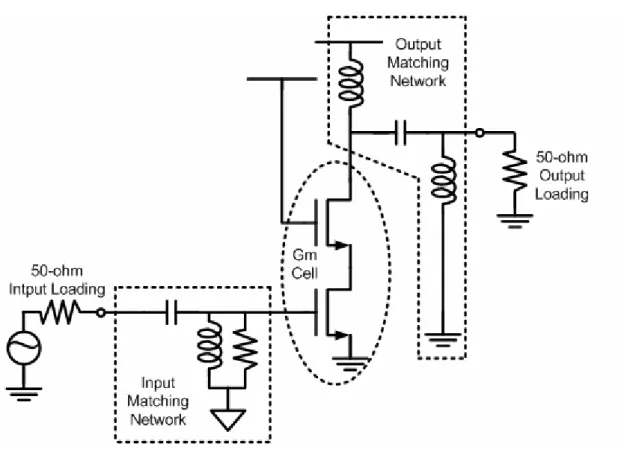
Fig. 2.1 is the conventional class-AB PA architecture. A class-AB PA is basically a transconductor (Gm-cell), providing a sufficient amount of the output current corresponding to the input driving power. Fig. 2.2 is a typical circuit implementation of this architecture. The cascode topology provides good voltage gain and good isolation; it also prevents drain overstress since the voltage swing may approach 2 times the VDD. The input and output matching networks provide suitable impedance matching for RF signal integrity, power transfer efficiency, and the narrowband selectivity [13].
2.1.2 Load-line Design
The loading impedance of the class-AB PA is designed for maximum output power capability, and therefore the load-line design aims to exploit the maximum usefulness of the circuit limit. To accomplish this goal, the load-line of the class-AB PA is designed as shown in Fig. 2.3. Fig. 2.3 is a typical I-V relationship of the conventional class-AB PA core output, along with the maximum output power
RL is the target impedance for the output matching network. VMAX and Vknee are
the maximum and minimum output voltage operation limit, respectively. IMAX is the
maximum output current capability of the device. All these parameters are set whenever the sizes and the bias of the active devices are set.
Once the class-AB PA is designed with a PA core loading of the optimal load-line impedance RL, the PA can theoretically operate with maximum output power
efficiency. Therefore, the output matching of a PA is also named as the load-line match.
2.1.3 Matching Network Design
Lossless devices (inductors and capacitors) are used in order not to dissipate any of the signal power. Their behaviors and the effects of impedance transform are shown in Fig. 2.4 on the ZY Smith chart. There are three commonly used matching network configurations to transform impedance to a desired position on the Smith chart. Namely, they are L-section (Fig. 2.5), T-section (Fig. 2.6), and π-section (Fig. 2.7). Form these figures and the attached design equations, proper input and output matching networks can be designed accordingly.
In the typical circuit implementation of this architecture in Fig. 2.2, the output matching network is in the π-section configuration, and the input matching network is as the L-section configuration.
2.1.4 The Design Principle of the Narrowband Class-AB PA
The output power is defined in (2-2).
Once the output power specification is given, RL is set by (2-2), according to the
maximum output voltage swing available from the given circuit topology. The required maximum output current (IMAX) is set by (2-1). Thus, the sizes and bias of
the active devices are set.
Once the sizes and bias of the active devices are set, the input and output impedance of the active devices is defined. Then, the input and output matching networks can be designed to transform the input and output impedance of the active devices to a suitable impedance level accordingly. After the input and output matching networks are designed properly, the narrowband class-AB PA is ready to work.
2.2
UWB
C
LASS-AB
D
ISTRIBUTEDA
MPLIFIER2.2.1 Conventional Architecture
The distributed amplifier is an elegant way to overcome the limitation of maximum gain-bandwidth product [14]. This architecture achieves a gain-delay trade-off without the penalty on bandwidth. Theoretically, this architecture can provide possibly infinite bandwidth with arbitrary gain. Therefore, ultra-wideband amplification is accomplished.
Fig. 2.8 is the conventional distributed amplifier architecture. Each Gm-cell acts as a transconductor to provide a certain amount of output current corresponding to the input driving voltage signal. While the input driving voltage signal propagates down the input line, each Gm-cell is being excited in succession, producing the output
other half of the output current signals ultimately sum in time coherence if the delays of the input and output lines are matched. Therefore, the output current waves sum up coherently in constructive superposition manner.
2.2.2 Load-line Design of Each Gm-cell
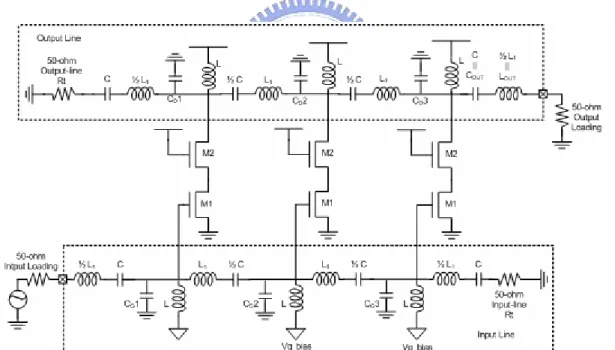
Fig. 2.9 is a typical circuit implementation of this architecture. The cascode topology provides good voltage gain and good isolation. The input and output lines can be synthesized by lumped passive devices, exhibiting a transmission line characteristic impedance of Zo.
Fig. 2.10 shows the loading condition of each Gm-cell. The active device output is loaded with a characteristic impedance of Zo in both directions. Equivalently, each Gm-cell is loaded with Zo/2. Therefore, it is easy to show that the voltage gain, Av, of
the distributed amplifier is governed by equation (2-3).
(2-3)
The n, the number of stages, in (2-3) is the number of Gm-cell in the distributed amplifier.
The distributed amplifier architecture provides the capability to achieve simultaneously 50-ohm conjugate match and load-line match. Since each direction seen by the active device output is designed to be 50-ohm for minimum signal reflection, the total loading seen by the active device output is 25-ohm as the 50-ohm output matching condition. If each Gm-cell is also designed to be with a 25-ohm optimal load-line RL, as shown in Fig. 2.10, 50-ohm conjugate match and optimal
load-line match is simultaneously achieved. Therefore, minimum output signal reflection and PA maximum output power efficiency can be accomplished at the same time. Note that this is impossible in the case of narrowband class-AB PA, which must
trade the output 50-ohm matching and the PA maximum output power efficiency, since the optimal load-line impedance is usually much smaller than 50-ohm.
Finally, the total output power can be derived and shown in (2-4).
(2-4) Pouteach is the output power of each Gm-cell; Pouttotal is the total output power
appear at the output port.
2.2.3 Input and Output Line Design
Fig. 2.11 is the distributed amplifier architecture whose input and output lines are synthesized by lumped devices. In such manner, the input and output lines are named as the artificial lines.
From Fig. 2.11 the governing equation (2-5) of the characteristic impedance of Zo of the line is also straight forward [].
(2-5) To achieve 50-ohm matching, the characteristic impedance Zo of the line is designed to be 50-ohm. The terminal resistor Rt at the end of the line is also 50-ohm to ensure no signal reflection back to the input and output port.
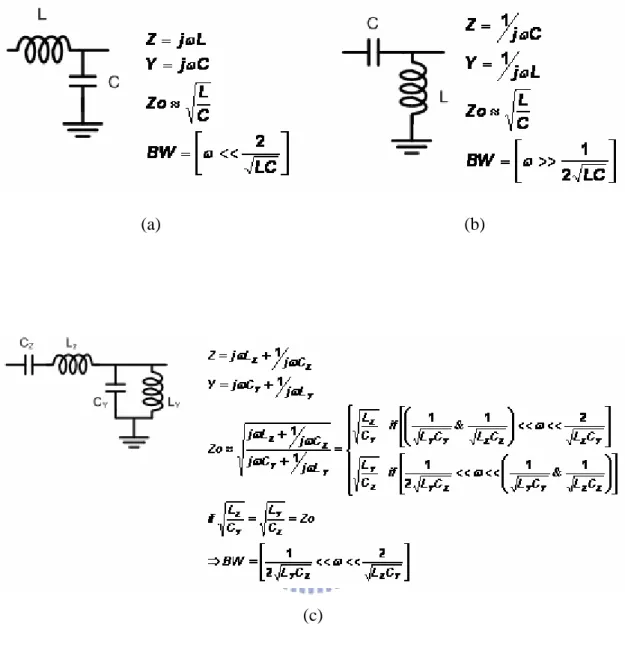
There are three configurations for the artificial lines (Z and Y), namely low-pass line, high-pass line, and band-pass line, as shown in Fig. 2.12. From Fig. 2.11, it can be observed that the overcome of the bandwidth limitation of this architecture comes
into the input and output line, causing entirely no degradation on the circuit operation speed. Therefore, until the cutoff frequency of the line itself is approached, the input and output impedance remains constant and equal to Zo, and the overall operation bandwidth is controlled solely by the input and output lines. It is obvious that the band-pass line structure is the most convenient way to control the overall band-pass type bandwidth.
2.2.4 Design Principle of the UWB Distributed Amplifier
First of all, the optimal load-line RL condition of each Gm-cell is designed as the
25-ohm, as shown in Fig. 2.10. In this case, conjugate matching condition and maximum output power efficiency condition can be simultaneous achieved. Therefore, minimum signal reflection and excellent power efficiency can be guaranteed.
Once the optimal load-line RL is set, the size and bias of the active devices is set.
Also, the output power of each Gm-cell is defined, as shown in (2-4). Therefore, the input and output impedance of the active devices is defined. With the information of the input and output capacitances, along with the bandwidth specification, the input and output artificial line can be designed, according to Fig. 2.12.
Finally, from the output power specification, the number of stages can be defined, according to (2-4), and the ultra-wideband distributed amplifier is ready to work.
2.3
B
ASICRF
PA
F
IGURES OFM
ERITS2.3.1 Scattering Parameters, S-parameters
To characterize the behavior of a RF two port network, scattering parameters (S-parameters) are used [14]. Fig. 2.13 is the demonstration of a two-port network
characterized by S-parameters.
S-parameters are defined by power waves. For RF systems, the signals are actually in the form of power waves, and thus S-parameters are suitable for characterizing these systems which operate at high frequency. On the other hand, the traditional Z-parameters and Y parameters are not capable of defining such systems. It is because the definitions of Z-parameters and Y parameters require perfectly open and short conditions, which are difficult to obtain at high frequency. Also, active devices, such as diodes, BJTs, and MOSFETs, cannot function stably under open and short terminal conditions. Therefore, S-parameters are the most common way to define a microwave/RF system.
S-parameters are defined in (2-6).
(2-6) In (2-6), a1 and a2 represent the incident waves from the source and the load,
respectively; b1 and b2 represent the reflected waves from Port 1 and Port 2 of the
system to the source and the load, respectively. The physical meaning of the terms in the S-parameters matrix is in (2-7).
Port 2 to Port 1.
S-parameters of a PA are commonly used to demonstrate the small signal power handling capability of the PA over the frequency range of interest. S11 describes the
input matching condition of the PA. S22 describes the output matching condition of the
PA. S21 describe the small signal power gain of the PA. S12 describes the reverse
isolation condition of the PA and stands for the unilateral property of the PA. Fig.2-14 shows a typical S-parameters behavior of a PA. Note that the S-parameters are indexed with frequency. Therefore, it can be somehow viewed as the frequency response of the PA small signal power handling capability.
From the S-parameters the stability of a RF amplifier can be extracted. The stability of a RF amplifier indicates the property that the RF amplifier can function properly without going into oscillation. This is crucial for RF amplifiers, especially for RF power amplifiers, since power amplifiers consume and output a large amount of power, which is prone to oscillation. Oscillation happens when the real part of the input or output impedances becomes negative. This condition results in the situation that input or output reflection coefficient, Γin or Γout, is greater than unity. Under this
circumstance, the RF amplifier would no longer stably amplifying signals but behave as an oscillator.
The stability can be quantified by the S-parameters of the active devices, the matching conditions of the amplifier circuit, and the source and load impedances. There are two factors to describe this quantity of stability, k-factor and μ-factor. [] (1) k-factor:
Given a S-parameters of a two-port network between the input source and the output loading, the necessary and sufficient conditions for unconditional stability are that k is greater than unity and |Δ| is less than unity, as shown in (2-8).
⇒ (2-8) This expression can be further manipulated into another equivalent condition, as shown in (2-9).
(2-9) The k factor is also named as stability factor and b factor is named as stability measure.
(2) μ-factor
The μ-factor gives the geometric distance from the center of the Smith chart to the nearest output (load) stability circle. This stability factor is given by (2-10).
(2-10)
The single necessary and sufficient condition for unconditional stability of the 2-port network is that μ is greater than unity. This condition actually describes the fact that the output reflection coefficient, Γout, is less than unity, and thus the output
impedance is not negative resistive. Positive real part of the output or input impedances guarantees unconditional stability.
Alternatively, the single necessary and sufficient condition for unconditional stability of the 2-port network is that μ′ is greater than unity, as shown in (2-11).
that the input reflection coefficient, Γin, is less than unity, and thus the input
impedance is not negative resistive, which also guarantees the unconditional stability.
2.3.2 Large Signal Transfer Characteristics
The plot of output power versus input power gives the power transfer characteristics (PTC) of a PA. PTC is commonly used to demonstrate the large signal power handling capability of a PA [13]. Fig.2-15 shows a typical PTC of a PA.
A commonly used unit for describing RF power is dBm, which is defined in (2-12).
(2-12) From the PTC, two properties of the PA can be read. The first property is the saturation power, which is the maximum output power capability of the PA.
The second property is the large signal power gain, which is defined in (2-13).
(2-13) PTC can be further manipulated to extract the linearity property of the PA. One of the most important linearity indicators is the 1-dB compression point (P-1dB). From the PTC of a PA, it can be noticed that, for sufficient large input power, the output power would no longer be amplified by the same constant gain. The output power would eventually saturate, and there would be no further linear amplification relationship between the input and the output.
The reason for this phenomenon is that, for linear PAs, usually the active devices should remain in their active regions during the whole operation cycle. For MOSFETs the active region is its saturation region. For small output signal power this assumption stays true. However, when the output power increases, the signal swing at
the active device output node (for MOSFETs it means drain) would gradually increases, and eventually the devices would swing into the nonlinear region of the device I-V curve (for MOSFETs it means triode region). Thus, the output swing would be compressed, and so as the output power. No further output power can be delivered to the load since from now on the active devices have been driven to their maximal operation limit, as shown in Fig.2-16.
1-dB compression point, P1dB, quantifies this phenomenon. It is defined in (2-14).
(2-14) OP1dB is the output power at P1dB, and IP1dB is the corresponding input power. The definition of P1dB is that at this power level the amplifier is unable to amplify the signal at the same constant rate as it can for much smaller signal level. At P1dB, the actual gain (OP1dB(dBm)-IP1dB(dBm)) is 1 dB smaller than the small signal linear gain.
It is then defined that this point is the starting point at which the output power begins to be noticeably compressed. Therefore, OP1dB can be treated as the maximum linear output power capability of a PA.
Another performance metric for PA large signal operation is efficiency. Efficiency of a RF amplifier indicates the utilization of power participated in the process of transforming input power into output power. There is always inevitable loss in this transforming process; no one hundred percent perfect utilization of power. Thus the efficiency of this transforming process needs to be quantified to describe the PA performance of utilizing power to satisfy its output power requirements.
(1) Drain efficiency, η
Drain efficiency, η, describes the utilization of the DC supplying power (PVDD)
in the viewpoint that a PA’s duty is to output power. Therefore, this metric describes how efficiently the supplying power is used to satisfy the output power requirement. (2) Power added efficiency, PAE
Power added efficiency, PAE, describes the utilization of the DC supplying power (PVDD) in the viewpoint that a PA needs to output and amplifies power. In such
manner, PAE describes how efficiently the supplying power is used in the PA to satisfy its output power capability and the power amplification capability, and thus is more suitable for a power amplifier metric of efficiency.
(3) Total efficiency, ηT
Total efficiency, ηT, describes the utilization of the DC supplying power (PVDD)
in the viewpoint that a PA output power by consuming supplying power and input power. In such manner, ηT describes how efficiently the supplying power and the
input driving power are used in the PA to satisfy its output power capability, and thus is suitable for specifying overall system performance.
Fig. 2.1 Conventional class-AB PA architecture.
Fig. 2.2 Typical circuit implementation of the conventional class-AB PA architecture.
Fig. 2.3 Typical I-V relationship and the optimal load-line for maximum output power efficiency, of conventional class-AB PA core operation.
Fig. 2.8 Conventional distributed amplifier architecture.
Fig. 2.9 Typical circuit implementation of the conventional distributed amplifier architecture.
Fig. 2.10 Loading condition of each Gm-cell.
(a) (b)
(c)
Fig. 2.12 Detailed artificial line structure and corresponding design equations of (a) low-pass line, (b) high-pass line, and (c) band-pass line.
Fig. 2.13 Demonstration of the system characterized by the S-parameters.
Chapter 3
RF ESD Protection Basics
3.1
ESD
T
ESTINGB
ASICS3.1.1 ESD Testing Pin Assignments
Fig. 3.1 shows a typical pad layout allocation of a RF system IC. The input and output (I/O) pads of a RF system are in GSG style, providing good shielding and wave-guiding capability for signal power waves. The VDD pad provides the DC power supply for the system. All the GND pads should be carefully connected all together internally or externally to provide a stable voltage reference level for RF signals.
The ESD energy enters an IC device most likely through its I/O VDD, and GND pads, in the form of a discharging current or voltage overstress. All these pads serve as the communication interface between the IC internal circuits and the external environment. Through these pads, however, ESD current can also find its way and discharge into the IC, causing damage to the IC internal circuits. Therefore, the first priority of the ESD protection circuits is to shunt away the ESD current at the very first moment whenever the ESD current appears at the I/O, VDD, or GND pads.
There are four configurations of ESD testing pin assignments for I/O pads. Namely, they are PS-mode, NS-mode, PD-mode, and ND-mode, as shown in Fig. 3.2 (a) to (d). With these four configurations, the ESD robustness of an I/O pad can be thoroughly verified against all the ESD zap situations [15].
Namely, they are positive VDD-to-VSS mode and negative VDD-to-VSS mode. With these two modes, the ESD robustness of a VDD pad can be thoroughly verified against all the ESD zap situations.
3.1.2 ESD Testing Models
There are three typical ESD testing models for industrial standards. Namely, they are Human Body Model (HBM), Machine Model (MM), and Charged Device Model (CDM) [15]. These models define how semiconductor devices are being tested for ESD robustness under different situations of the build-up and discharge of electrostatic charges. Their equivalent testing circuit models and corresponding ESD energy characteristics are shown in Fig. 3.4, Fig. 3.5, and Fig. 3.6, respectively. The damage caused by ESD energy comes into two classes. One is the heat generated by the ESD current flowing through a resistive component. Power is generated in the form of heat, as shown in equation (3.1).
R I
Power = ESD2 ⋅ (3.1) This heat may damage the via and contacts of the interconnect or alter the doping profiles of well, diffusion, and substrate, changing the characteristics of active devices.
The other class of ESD damage is the overstress of ESD voltage potential. Strong electrical field accompanying the ESD overstress voltage may exceed the dielectric strength of the IC interior insulators and punch through the dielectric layers, such as the gate oxide layer of a MOSFET, causing device to fail.
phenomenon wherein a charged human body directly transfers all the accumulated electrostatic charges to an IC through its I/O interface or power supply pads. These electrostatic charges stored on a human body commonly occur when a person accumulates static charges by walking or any other mechanisms. Other non-human materials that accumulate and transfer charge in a similar manner are also covered by the HBM.
The HBM is the most commonly used model for testing the ESD robustness of an IC device. The general HBM ESD testing set-up for this model consists of a 100pF capacitor that can be charged to a certain voltage, and then discharged by a switching component into the device under test through a 1.5k-ohm resistor. Fig. 3.4 (a) shows the basic HBM test circuit.
Fig. 3.4 (b) illustrates a typical 2-kV HBM ESD current waveform. Fig. 3.4 (c) illustrates the corresponding power spectrum of the HBM ESD current. A typical 2-kV HBM ESD event may reach an instantaneous peak current of 1.33 amperes within 2~10ns, and an average current of several amperes within a HBM ESD duration of several hundreds ns.
(2) MM
The Machine Model (MM) simulates a more rapid and severe electrostatic discharge from a charged robotic arm, testing fixture, or tool of any kinds, as compared to the HBM. The general MM testing set-up consists of charging up a 200pF capacitor to a certain voltage and then discharging this capacitor directly into the device under test through a 500nH inductor with no series resistor. Figure 3.5 (a) shows the basic MM test circuit.
In the MM the stored electrostatic charges are much more than that in the HBM, since the storing capacitance is larger. Further more, the MM has no resistance (though, practically a few ohms) on the discharging path, and therefore the MM ESD
event is faster. Thus, the ESD current in the MM is much larger than that in the HBM. Fig. 3.5 (b) illustrates a typical 400-V MM ESD current waveform. Fig. 3.5 (c) illustrates the corresponding power spectrum of the MM ESD current. A typical 400V MM ESD event may reach an instantaneous peak current of 6~8 amperes within 10~20 ns. Besides, there is a 500nH inductance on the discharging path. The effect of this inductor is that the MM ESD current appears as a positive-negative alternating style. This oscillatory MM ESD current causes even severer damage to IC devices.
(3) CDM
The Charged Device Model (CDM) simulates the electrostatic discharge from a charged IC device to another body (usually at the level of external ground). A device can accumulate electrostatic charges in a variety of ways, especially in situations where they undergo movement while in contact with another object, such as when sliding down a track or feeder. If they come into contact with another conductive body that is at a lower potential, it discharges into that body. This ESD current flows from the interior of the IC outward to the exterior and cause damage in the discharging process. Figure 3.6 (a) shows the basic CDM test circuit.
There is no equivalent circuit model for CDM, since the device under test possesses different equivalent circuit model according to different IC physical package, position, and even orientation. Therefore, it is difficult to simulate and predict the CDM ESD event. However, typically CDM can even be more destructive than HBM and MM ESD (despite its shorter pulse duration) because of its high current. From Fig. 3.6 (a) it can be seen that the discharging path has only 1 ohm resistance, and the CDM ESD event can be generally faster and severer than MM.
Therefore, it is expected that the CDM ESD is much more destructive than the MM and HBM ESD.
3.1.3 Failure Criteria of RF Circuits
Fig. 3.7 shows a traditional mixed-voltage I/O interface circuit of an IC [7-9]. Fig. 3.8 shows a general RF I/O interface circuit specifically designed for RF application [10]. Comparing these two figures, it can be noticed that the RF I/O interface circuit contains numerous passive device networks in between the active devices (LNA core, PA core, and the RF switch core) and the RF I/O pads. These passive device networks serve as filters and impedance transformers for RF signal processing. On the other hand, the traditional mixed-voltage I/O interface circuit has its active devices directly connected to the I/O pads. Further, they possess quite different circuit topologies in their nature. Consequently, two types of I/O interfaces exhibit different influences caused by ESD events.
In the traditional mixed-voltage I/O interface, the enormous and destructive ESD current directly damages the active device drain terminals. The consequence is an increase in the device dc leakage current and, even further, malfunctions of device operation in the form of drain-opening.
In the general RF I/O interface, the ESD current firstly encounters the passive device networks. Destructive current flows through these passive devices and causes shifting in the device characteristics, such as metal migration and a consequent increase in the series parasitic resistance. The active devices are damaged in succession. Depending on the circuit topology, the active devices may be directly zapped by the ESD current flowing through a connected metal traces, or non-directly zapped by the strong electrical field of the ESD overstress voltage potential coupled through a capacitor.
An increase in the dc leakage current of the device under test is the usual failure criterion for traditional mixed-voltage I/O interfaces. However, it is not clear that an increase in the dc leakage current can reliably predict performance degradation, or even failure, of a radio frequency (RF) circuit. The damage on any passive device networks may have an even more profound performance shift in RF operation since it alters the characteristics of a filter or matching network. It is showed in [11] that the performance of RF circuits and devices can degrade at ESD stress levels below the failure level established with a commercial HBM ESD tester. In [12], a combined TLP/RF ESD testing system for the detection of ESD failures in RF circuits is proposed and established to perform RF functionality tests, along with the conventional dc leakage current measurement, after each ESD testing zap to detect failure.
In short, it is evident that the ESD influence on RF system ICs needs to be qualified not just solely by a simple dc leakage current test but also by a complete RF functionality test. For complete RF PA ESD qualifications, the dc leakage current test incorporates the dc leakage current when the PA is off and the dc bias current when the PA is on. The RF functionality test incorporates the S-parameters measurement and the large signal RF operation.
3.2
C
ONVENTIONALW
HOLE-
CHIPESD
P
ROTECTIONA
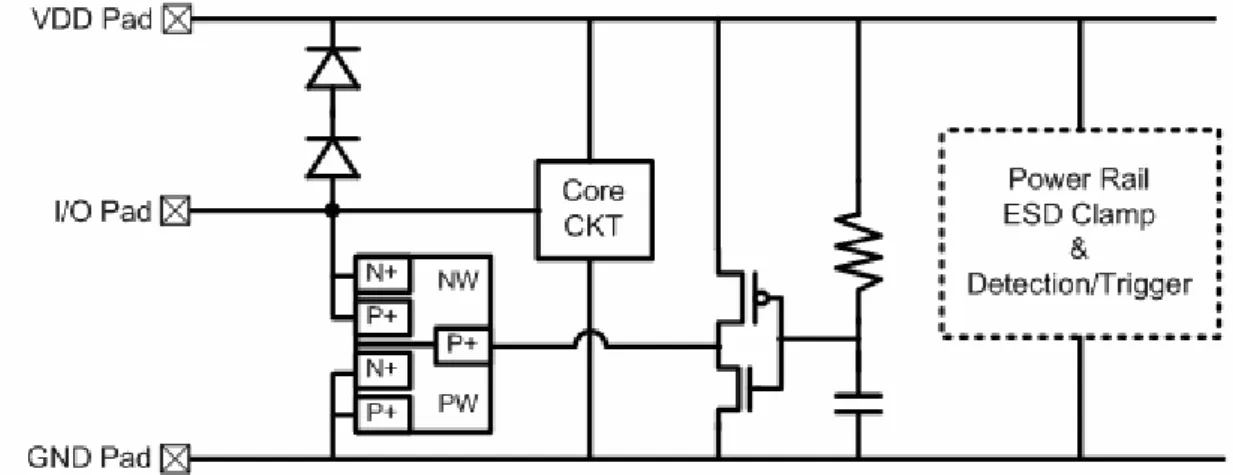
RCHITECTUREon-chip ESD protection circuits are to clamp the overstress voltage across the internal circuits and to discharging the ESD current of several amperes. The ESD protection circuits shunt away the destructive ESD current at the very first moment whenever the ESD current appears at the I/O, VDD, or GND pads. The locations of the ESD protection circuits to achieve whole-chip ESD protection for CMOS ICs are illustrated in Fig. 3.9 (a) [1].
The whole-chip ESD protection architecture consists of a pair of I/O ESD clamp and a power rail ESD clamp. When an ESD event happens, the I/O ESD clamp provides a low impendence path for ESD current and discharge the ESD current to the power rail (VDD and GND lines), preventing the ESD current to flow directly into the internal circuit and cause damage. The low impedance nature of the I/O ESD clamps is also capable of clamping the ESD overstress voltage which may damage the internal thin oxide layers by its strong electrical filed. The power rail ESD clamp serves a similar function to clamp the VDD-to-GND overstress and discharge the ESD current on the power rail. Since RF circuits incorporate numerous passive devices in between the I/O pads and the internal circuits, it is possible to design a signal line blocker. The signal line blocker can serve for RF normal operation purpose and also a passive network that appears open, such as a dc-coupling MIMCAP, for the ESD events in between the I/O pads and the internal circuits, as shown in Fig. 3.9 (b). In such manner, the I/O pads and internal circuit cores are isolated, resulting less possibility of direct damage by ESD current.
3.2.2 Power Rail ESD Clamp
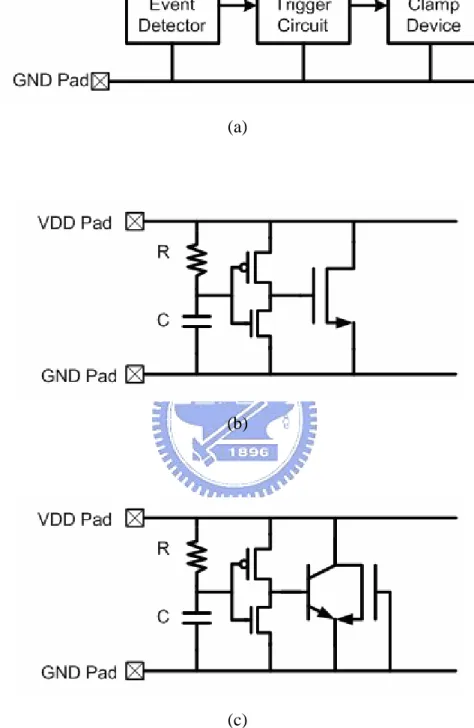
Typical power rail ESD clamp architecture is illustrated in Fig. 3.10 (a) [16]. It consists of an ESD event detector, a clamp trigger circuit, and a main clamp device. The ESD event detector first detect if there is an ESD energy burst on the power rail.
The clamp trigger circuit is then activated and use a minor share of the ESD energy to send out a trigger signal. The main clamp device is then activated and forms a low impedance path to discharge the ESD energy on the power rail.
A conventional ESD event detector is a RC-detector. It makes use of a RC time constant to distinguish a normal power-on event and an ESD event. The speed of a normal power-on event is on the order of millisecond, and the speed of an ESD event is on the order of nanosecond. Therefore, if the RC time constant is designed to be on the order of microsecond, the ESD detector can easily distinguish the normal power-on event and the ESD event.
A conventional clamp trigger circuit is simply a CMOS inverter. For a normal power-on event, the ESD event detector output remains at high level; the resistor in the ESD event detector pulls the input of the clamp trigger circuit to the VDD level. Therefore, the N-MOS is turned on and the clamp trigger circuit output is held at GND level. When an ESD event happens, the whole circuit is floating, and a sudden burst of ESD voltage potential appears on the power rail. By proper design of the RC time constant in the ESD event detector, the capacitor in the ESD event detector holds the input of the clamp trigger circuit at GND level. Therefore, the P-MOS is turned on and the clamp trigger circuit conducts a partial share of the ESD current right in time. This current flows toward the main clamp device and forms the trigger current.
The main clamp device can be in various embodiments. A simple N-MOS of a large enough size (typically several hundreds of micrometers) can serve very well, as shown in Fig. 3.10 (b). A parasitic bipolar transistor inherent in the N-MOS structure can also function satisfactorily, as shown in Fig. 3.10 (c). A silicon-controlled rectifier
3.2.3 I/O ESD Clamp
Parasitic capacitance has a profound negative impact on the RF circuit performance. Since the operation frequency is high enough, even a tiny capacitance on the signal traces may result in relative low impedance and cause a great deal of RF signal loss.
The main parasitic capacitance contributed by the ESD protection circuit comes from the I/O ESD clamp. Therefore, it is unacceptable for the I/O ESD clamp to have a large capacitance value. A traditional I/O ESD clamp is a pair of a GGNMOS and a PGPMOS, as shown in Fig. 3.11 (a) [7, 9, 16, 17]. GGNMOS stands for grounded-gate N-MOS. PGPMOS is a P-MOS whose gate is connected to the VDD power line. The NS-mode and PD-mode ESD energy can be discharged through the parasitic diodes of the GGNMOS and the PGPMOS. The worst case of ESD event is the PS-mode and ND-mode. The ESD energy is discharged through drain breakdown of the GGNMOS and the PGPMOS. The drain breakdown is activated by a relative high switching voltage, as compared to a diode. Thus, it is triggered on much more slowly and clamps the I/O at a much higher voltage level (several volts). As a result, this type of I/O ESD clamp may not be suitable for nano-scale CMOS ICs. Further, this type of I/O ESD clamp contributed an unacceptable amount of parasitic capacitances, mainly comes from the gate oxide capacitance.
A practical solution is illustrated in Fig. 3.11 (b). The I/O ESD clamp is simply a pair of diodes. Since diodes can endure a large amount of current within a relative small die area. It can also clamp the I/O at an almost constant small voltage drop (about 0.7V) when forward biased. Thus, it is suitable to clamp the ESD overstress and discharge the ESD current. The discharged ESD energy through the I/O ESD clamp then reaches the power rail. The power rail ESD clamp can take care of remaining discharging of the ESD energy on the power rail. The corresponding ESD
zapping modes are illustrated in Fig. 3.12 and Fig. 3.13. Practically the diode only occupies a small amount of die area, and thus the parasitic capacitance of this I/O ESD clamp is quite small. The main parasitic capacitance of the on-chip diodes comes from the p-n junction. While normal operation the I/O ESD clamp diodes are reverse biased, and the junction parasitic capacitances are acceptably small. The power rail ESD clamp has theoretically no influence on the RF performance since it adds parasitic capacitance only on the power rail. The power rail ESD clamp can thus be designed with arbitrary ESD robustness without degrading the RF performance. Therefore, the key to high whole-chip ESD robustness without severely degrading the RF performance is to design the I/O ESD clamp with minimum parasitic capacitance but acceptable ESD capability.
The input port of a RF PA is usually integrated with internal circuits, such as up-converter or PA pre-driver. Therefore, the ESD protection design of a RF PA mainly focuses on the PA output port. For such a large signal operation of a PA, the I/O ESD clamp must be designed with additional caution to prevent unexpected activation of the I/O ESD clamp responding to the large signal swing at PA output port. In the whole-chip ESD protection architecture, this is accomplished by cascading a few up-ward diodes in between the output port and the VDD rail. The diode string remains off when normal operation, not cutting in for normal signal swing. However, more diodes mean higher impedance on the discharging path. Certainly it degrades the ESD protection capability, and trade-off comes in between safe operation and ESD robustness.
3.3
L
OW-C
ESD
D
EVICES3.3.1 Silicon-controlled Rectifier Basics
For a specific ESD robustness, the I/O ESD clamp diode must occupy at least a certain amount of die area. It possesses a nonnegotiable amount of parasitic capacitance for a given ESD robustness. Therefore, the limit of RF performance is preset in advance once the ESD robustness specification is given.
To mitigate this problem, it is desired to use another device with similar ESD clamp capability but smaller die area. A SCR device can serve. The SCR device can sustain a much higher ESD level within a smaller layout area in CMOS ICs, so it has been used to protect the internal circuits against ESD damage for a long time. [6], [16].
A basic SCR structure cross-section view and the equivalent circuit schematic are shown in Fig. 3.14. A SCR structure is inherent in the CMOS processes. The SCR device is a 4-layer PNPN structure; it consists of P-plus (P+) diffusion, N-well (NW), P-well (PW), and N-plus (N+) diffusion. These layers (P+/NW/PW/N+) form a 2-terminal device composed of a lateral NPN and a vertical PNP bipolar transistor. A typical I-V characteristic of the SCR device operation is shown in Fig. 3.14 (d). The SCR operation principle is described as follow.
Let’s assume that the cathode of the SCR is connected to the ground reference level. Before the positive voltage applied to the anode of the SCR exceeds the switching voltage (Vt1), the SCR acts as an open circuit, exhibiting purely capacitive. The switching voltage of the SCR device is dominated by the avalanche breakdown voltage of the N-well/P-well junction, which could be as much as 18V in a 130-nm CMOS process. When the positive voltage applied to the anode is greater than the NW-PW junction avalanche breakdown voltage, the hole and electron current will be
generated through the avalanche breakdown mechanism. The hole current will flow through the P-well to P+ diffusion connected to the cathode of SCR, whereas the electron current will flow through the N-well to N+ diffusion connected to the anode of SCR. Once the voltage drop across the P-well resistor (RPWELL) (the N-well resistor
(RNWELL)) is greater than 0.7V, the NPN (PNP) transistor will be turned on to inject
the electrons (holes) to further bias the PNP (NPN) transistor. The consequence is the initiation of the SCR latching action which is intrinsically a positive-feedback regenerative mechanism. Once the positive-feedback regenerative mechanism is initiated, the SCR will be successfully triggered into its latching state through this positive-feedback regenerative mechanism.
Once the SCR is triggered on, the required holding current to keep both the NPN and PNP transistors on can be generated through the positive-feedback regenerative mechanism of latch-up without involving the avalanche breakdown mechanism again. Therefore, the SCR has a lower holding voltage (Vh) of typical 1.5 V in the bulk CMOS processes.
If the negative voltage is applied on the anode terminal of the SCR, the parasitic diode (N-well/P-well junction) inherent in SCR structure will be forward biased to clamp the negative voltage at a lower voltage level of 1 V (cut-in voltage of a diode).
In short, whatever the ESD energy is either positive or negative, the SCR device can clamp ESD overstresses to a lower voltage level. Therefore, the SCR device can sustain the highest ESD robustness within a smallest layout area in CMOS ICs.