國
立
交
通
大
學
網路工程研究所
碩
士
論
文
虛擬機記憶體與磁碟狀態之觀測與操控
The Introspection and Interposition of Virtual Machine Memory and
Disk States
研 究 生:黃俊祺
指導教授:吳育松 教授
虛擬機記憶體與磁碟狀態之觀測與操控
The Introspection and Interposition of Virtual Machine Memory and Disk States
研究生:黃俊祺
Student:Chun-Chi Huang
指導教授:吳育松
Advisor:Yu-Sung Wu
國立交通大學
網路工程研究所
碩士論文
A Thesis Submitted to Institute of Computer Science and Engineering College of Computer Science National Chiao Tung University in partial Fulfillment of the Requirements for the
Degree of Master in Computer Science October 2012
Hsinchu, Taiwan
i
虛擬機記憶體與磁碟狀態之觀測與操控
學生:黃俊祺
指導教授:吳育松 博士
國立交通大學網路工程研究所碩士班
摘 要
在傳統個人電腦的架構下,系統監測與反制工具均安裝於作業系統內部。此類工具 擁有系統權限,能取得系統核心狀態與阻擋系統的特定行為,典型的例子如防毒軟體, 在擁有系統權限的前提下,防毒軟體檢查系統的核心狀態、檔案系統以及存取行為,一 旦發現不符合規則的情況發生,便以對應的動作進行問題排除。但隨著雲端環境的興起, 一台實體機器中可能擁有數台虛擬機器的情況下,過去安裝於系統內部的監測工具顯然 在安裝與維護上會消耗掉不少的時間與人力成本,同時在系統內部去觀測系統狀態會有 rootkit 屏蔽的問題,因此如何在虛擬機器外部進行系統觀測與操控,便成為研究的重點 之一。 現今的虛擬化平台製造商也開始釋出相關的系統觀測 API 給防毒軟體供應商使用, 如 VMWARE 提供 VMSAFE API 給 Trend Micro 開發出的 Deep Security 便是一個典型的 例子。但從現實面考量,使用商業軟體進行開發與研究的門檻並不算低,除了軟體本身 所需要的成本不斐以外,虛擬化平台製造商是否願意將內部開發用的 API 釋出給一般研 究機關使用也是需要考量的問題,因此大多數人便轉向 Xen 及 KVM 兩大開源虛擬化軟 體進行開發與研究。但是目前為止在 Xen 和 KVM 上的發展仍停滯於系統觀測與分析階 段,尚未有實際的系統能保護虛擬機免於惡意軟體的入侵,因此本篇論文在 Xen 的架構 下提出一個能觀測並操控虛擬機記憶體和磁碟狀態的方法,並用此方法實作出 Xen Hypervisor 上第一個保障虛擬機安全的入侵偵測反制系統。由於在 Windows 64 位元版本的作業系統中新增了 Kernel Patching Protection 的機制, 導致我們在操控虛擬機記憶體時會被此機制所阻擋,同時在讀取虛擬機磁碟狀態時,會 因為作業系統內部 disk cache 中的資料尚未寫入磁碟,導致在外部讀取不到最新的磁碟 狀態,針對這兩個問題我們也提出了對應的解決方法。論文的最後針對本系統進行一連 串的實驗與討論,實驗結果顯示本系統能成功繞過 Kernel Patching Protection 機制並正 確地針對虛擬機行為進行監測與反制,目前的系統雖然僅支援 Windows 7 64 位元版本和 Windows Server 2008 64 位元版本,未來我們將以效能及更多元的防護為目標,提供一 個更完善的虛擬機防護機制。
ii
The Introspection and Interposition Virtual Machine Memory and Disk States
Student:Chun-Chi Huang
Advisor:Dr. Yu-Sung Wu
Institutes of Computer Science and Engineering National Chiao Tung University
ABSTRACT
End-point security monitoring is typically integrated with the operating system kernel layer for checking the kernel states and preventing malicious program from gaining kernel privilege. Anti-virus software is one of the classical examples, but in a cloud computing environment, there may be hundreds or thousands of virtual machines. It is impossible to install and maintain end-point security software such as the anti-virus software for every virtual machine. Also, traditional end-point security software may be bypassed by rootkits, which have the same system privilege level as the operating system kernel. As a result, there is a clear need for the ability for security software to introspect and interpose the system states from outside the virtual machines.
In this paper, we propose a virtual machine introspection and interposition system based on Xen Hypervisor. With our system, security applications can introspect and interpose in the memory and disk states of virtual machines from domain 0. We also built prototype IDS/IPS applications to demonstrate the feasibility of the proposed system. However, for Windows x86_64 edition operating systems, memory interposition in kernel pages will be blocked due to kernel patching protection. Also, there is a cache coherence problem when a security application gets the disk states of a virtual machine. In order to introspect and interpose in the virtual machine states accurately, we provide a solution to evade kernel patching protection and maintain consistency disk states, and the result shows our solution works well.
iii
Acknowledgement
In the two years of pursuing Master degree, there are full of frustrations no matter in school lessons or in research. For a new founded laboratory, everything is just begun to work properly. Thanks to my advisor Hank Wu who supports me to build everything fundamentally. His steady patience and belief in my abilities make me have enough freedom to learn everything from the beginning, including the knowledge of system security and cloud computing. Also, I owe the grateful for my schoolmates, Pei Kun Sun, Hsu Fang Lai, Meng Ju Tsai, Yen Chun Hsu, Sung Tse Lu, and Yi Yung Chen. They always provide me helps for the research works even it is at midnight. And I owe the grateful for my friends. They always cheered me up when I was disappointed. Finally, I appreciated my family. They support me everything no matter in material or in spirit comfort whenever I need. Without my advisor, my schoolmates, my friends or my family, this paper works will not be accomplished. I am thankful for all of them and anyone who has helped me in my graduate school life.
Chun Chi Huang
iv
Table of Contents
中文摘要 ……….…i
英文摘要 ………ii
Acknowledgement .………...iii
Table of Contents ...………...iv
List of Tables .………....v
List of Figures ………...vi
Chapter 1. Introduction ... 1
Chapter 2. Background ... 2
Chapter 3. System Design ... 4
Memory Introspection and Interposition ... 6
3.1 Memory Access Control ... 8
3.2 Evading Kernel Patching Protection... 10
3.3 Disk Introspection and Interposition ... 12
3.4 Write Buffer for Disk Cache Coherence ... 13
3.5 Disk Access Controls ... 17
3.6 Chapter 4. Implementation ... 19
Translation of Memory Address ... 19
4.1 Extended Page Table... 21
4.2 Emulating Offending Instruction ... 23
4.3 QEMU Virtual Disk Subsystem ... 25
4.4 Chapter 5. Evaluation and Prototype Applications ... 30
Prototype Application:Real-time Virus Scanning ... 30
5.1 Prototype Application:Enhanced Real-time Virus Scanning ... 39
5.2 Prototype Application:Virus Scan for In Memory Process ... 41
5.3 Prototype Application:Overwriting, Deletion and Quarantine of Malware 5.4 Binaries 42 PatchGuard Triggering Statistics ... 43
5.5 Garbage Collection ... 44
5.6 Chapter 6. Related Work ... 45
Chapter 7. Future Work ... 47
Chapter 8. Conclusion ... 48
v
List of Tables
Table 1. Offending Instructions ... 24 Table 2. Windows File Extensions ... 39 Table 3. PatchGuard Triggering Statistics in Different Benchmarks ... 43
vi
List of Figures
Figure 1. VMMD System Architecture ... 4
Figure 2. Flow Chart of Memory Introspection and Interposition ... 7
Figure 3. x64 hardware page table entry ... 8
Figure 4. Flow Chart of Memory Access Control ... 9
Figure 5. Flow Chart of Evading Kernel Patch Protection ... 11
Figure 6. Flow Chart of Disk Introspection and Interposition ... 12
Figure 7. Flow Chart of Disk Introspection with Write Buffer ... 14
Figure 8. Write Buffer Maintenance ... 15
Figure 9. Write Buffer Usage ... 16
Figure 10. Write Buffer Garbage Collection ... 16
Figure 11. Flow Chart of Disk Access Control ... 17
Figure 12. Memory Address Translation ... 20
Figure 13. Windows System Map File ... 21
Figure 14. Intel EPT ... 22
Figure 15. EPT Address Translation ... 23
Figure 16. Handling Steps by Qemu Device Manager... 25
Figure 17. Architecture of Disk Module Functionalities ... 26
Figure 18. Disk Access Control in QEMU-dm ... 27
Figure 19. QEMU Virtual Disk Structure ... 28
Figure 20. Online Malware Detection Process Flow ... 30
Figure 21. PassMark Benchmark ... 31
Figure 22. RVS x264 Encoding Overhead ... 32
Figure 23. RVS File Compression Overhead ... 34
vii
Figure 25. RVS Build-ClamAV Overhead ... 36
Figure 26. PatchGuard Evasion Overhead in Different Benchmark ... 37
Figure 27. Offending Instructions in Different Benchmark ... 38
Figure 28. ERVS Overhead in Different Benchmarks ... 40
Figure 29. VSMP Flow Chart ... 41
1
Chapter 1. Introduction
System state monitoring technology has been widely used in many end-point security applications, like antivirus application needs system information to ensure system integrity. This kind of applications usually resides in kernel space of operating systems and gathers information by its kernel privilege. Although it seems that getting accurate system information would not be a problem, there is another technology called Rootkit [1].
Rootkit is a set of tools that hides in operating systems. It modifies system critical structures to keep itself invisible from end-point security applications. Due to rootkits, security applications may get incorrect system information. However, rootkits are difficult to be detected because rootkits have the same privilege as the kernel. There is no bullet-proof approach to fight against rootkits within an operating system.
Virtualization [2] technology provides a new architecture for hosting operating systems. With the help of virtualization, multiple operating systems can share the hardware resource of a physical machine. Virtualization technology not only provides a new architecture for running multiple operating systems on a single physical machine but also provides a new way for system state introspection. In the architecture of virtualization, security applications can introspect the system state from the external, which solves the problem of rootkits.
In this paper, we propose the VMMD system for the introspection and interposition of virtual machine memory and disk states. VMMD is developed based on the Xen Hypervisor. With VMMD, third party security applications can not only monitor the states of guest VMs but also manipulate them. In Chapter 2, we will mention about the background of virtualization technology. In Chapter 3, we will talk about the design of VMMD. In 0, we will talk about the implementation of VMMD. The evaluation of the VMMD system is given in Chapter 5. We will discuss related work in Chapter 6 and potential future work in Chapter 7. The conclusion is given in Chapter 8.
2
Chapter 2. Background
Since virtualization technology and hardware support have been developed, cloud computing [3] became more popular. Cloud computing consists of three kinds of architecture, Software as a Service (SaaS), Platform as a Service (PaaS), and Infrastructure as a Service (IaaS). SaaS is a model that hosts software and associated data on the cloud. Users can access software via a web browser, like Gmail and Youtube. PaaS provides a computing platform. Users can develop applications by using tools and libraries from PaaS provider, like Google App Engine. IaaS offers computers for those who need machines to develop on. Users then install operating system image on the machines as well as their application software. In IaaS model, users have to maintain operating system and patch software on their own. Amazon EC2 is an example of IaaS.
IaaS depends on a resource manager, called Virtual Machine Manager (VMM) or Hypervisor [4], to schedule physical resources to each VM. For virtual machines, they are not aware of the existence of VMM, and are running as if they control the whole resources on the physical machine. In nowadays, IaaS is constructed on two mainly Hypervisor, Xen [5] and KVM [6]. Xen Hypervisor provides a security VM as an interface for virtual machine management, usually known as domain 0. To communicate with Xen, the kernel of domain 0 has to be patched and has to be tie-in with the kernel of Xen. Unmatched kernel version will lead to kernel panic and crash the entire system. Xen runs guest operating systems as independent virtual machines. Each of them cannot affect the system states of others. On the other hand, KVM provides a different architecture for virtual machine virtualization. KVM is part of Linux operating system. It has no need to match up the operating system kernel version while being installed. KVM runs virtual machines as regular Linux processes in the security VM. Each virtual machine is scheduled by the standard Linux scheduler as other processes.
3
System introspection outside the virtual machine has been popular since virtualization technology showed up. For a cloud center, it is costly to maintain traditional in-VM security monitor in each virtual machine. To provide a better security solution for cloud center, lots of tools are developed on Xen, KVM platform. The detailed will be discussed in Chapter 6. In short, most of the tools are still stay in the steps of system introspection. None of them can manipulate the states of virtual machine straightly, not to say malware prevention.
Protecting guest operating system outside the guest VMs has some challenges like how to conquer the semantic gap [7] problem, how to manipulate the states without crashing the whole system, and how to provide a general solution across different operating systems. We will introduce our system design and point out the challenges we faced in the next chapter.
4
Chapter 3. System Design
VMMD system allows third party security applications in the domain 0 to introspect and interpose in the memory and disk states of a guest virtual machine (guest VM) on Xen Hypervisor. For memory and disk introspection, third party security applications can read virtual machine memory pages and disk blocks through Xen Hypervisor. For memory and disk interposition, third party security applications can write data to arbitrary memory pages, or disk blocks of a guest VM, and are able to control the memory and disk access of virtual machines.
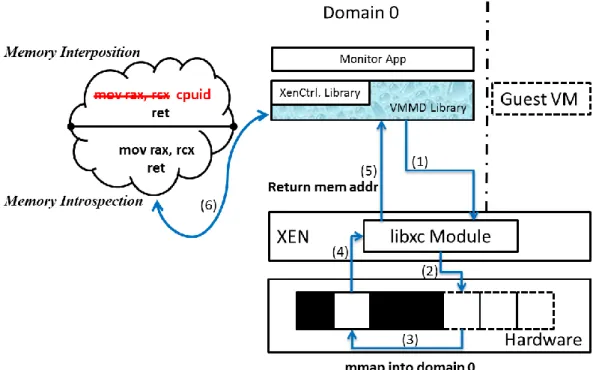
Figure 1. VMMD System Architecture
The architecture of VMMD system is shown as Figure 1. It provides an interface called LibVMMD in domain 0, a memory module in Xen Hypervisor, and a disk module in QEMU
5
[8]. Monitor applications introspect or interpose between the memory subsystems of guest VMs through LibVMMD. To manipulate the guest memory pages, LibVMMD makes use of Xen Control Library (libxc). After monitor applications call LibVMMD, the libxc module will find the mappings in Extended Page Table (EPT [9]), and get the target memory pages on physical memory. On the other side, VMMD system adds a memory module in Xen Hypervisor. Monitor applications can control the guest access of virtual machine memory subsystems through the memory module. For that, LibVMMD transfers the requests of monitor applications to the memory module, and changes the access control bits in EPT. The corresponding guest physical memory pages of the changed access bits are restrained by monitor applications, and the memory pages cannot be accessed by guest operating systems.
Also, LibVMMD allows monitor applications to introspect, interpose, and control the virtual machine disk subsystems. In the architecture of Xen Hypervisor, QEMU handles the I/O requests, like network card and disk, of virtual machines. In order to introspect and interpose between virtual machine disk subsystems, VMMD system has to work with QEMU-dm. In the system architecture, VMMD adds a disk module in QEMU-dm. After receiving notifications from LibVMMD, the disk module will parse the disk structures to get the target disk blocks for introspection and interposition. However, the disk introspection may meet disk cache coherence problem. The latest file contents may be stored in data cache by guest operating system to enhance system performance. To make the disk introspection work properly, we design “Write Buffer” to capture the disk cache data. Thus, LibVMMD will return the latest data to monitor applications with the help of write buffer. Due to the role of QEMU-dm, the disk access control is built in it as well. Monitor applications can quarantine specified files or disk blocks by calling LibVMMD, and the virtual disk requests from guest operating systems will be blocked by the disk module.
6
(PV) [10] and hardware based virtual machine (HVM) [11]. The proposed system supports HVM primarily. PV reduces the time of guest’s operation execution, but it requires the guest operating systems to be ported for para-API. On the other hand, HVM supports unmodified guest operating systems and provides better performance than full virtualization. HVM is more appealing because many popular operating systems nowadays are still closed-sources including Windows and Mac OS. In order to provide a general solution for virtual machine memory and disk introspection and interposition, this system is designed with the following goals:
1. Allow security application in domain 0 to introspect a guest VM’s memory and disk. 2. Allow security application in domain 0 to interpose in a guest VM’s memory and disk. 3. Require no modification of guest OS kernel.
4. Do not depend on pre-installed drivers in the guest VM. 5. Guest VMs cannot circumvent and interfere with this system.
Memory Introspection and Interposition
3.1
Memory contains programs (sequence of instructions) or data (e.g. program state information) for operating systems. When an operating system is running, CPU fetches instructions and data from specified memory pages. After finishing the fetched instructions, CPU will fetch instructions from another specified memory page. In other words, memory is like a paper which records the next step of an operating system.
7
Figure 2. Flow Chart of Memory Introspection and Interposition
Memory introspection allows monitor applications to get the memory contents outside the virtual machines, and memory interposition allows monitor applications to overwrite the memory contents outside the virtual machine. Because of the isolation between virtual machines, guest VMs are unable to notice whether they are being “monitored”. Also, rootkits have no ability to interfere with the control flow of memory introspection and interposition. Figure 2 shows the control flow of memory introspection and interposition.
The monitor application calls LibVMMD to do the memory introspection or interposition. It can assign the process id, the virtual address with cr3, or the guest frame number (GFN) to LibVMMD at step 1. The VMMD Library then gets the memory contents of the argument issued by the monitor application from step 2 to step 6, and returns the contents for introspection, or overwrites the contents for interposition at step 7 and step 8. The step from 2 to 6 is the flow of using Xen Control Library. When the Xen Control Library is called at step 2, the libxc module will map the target guest physical memory page into the address space of LibVMMD at step 3 and step 4. The mapped memory address will return to the LibVMMD at
8
step 5 and step 6. At this moment, LibVMMD can introspect or interpose the guest physical memory page for the monitor application.
Memory Access Control
3.2
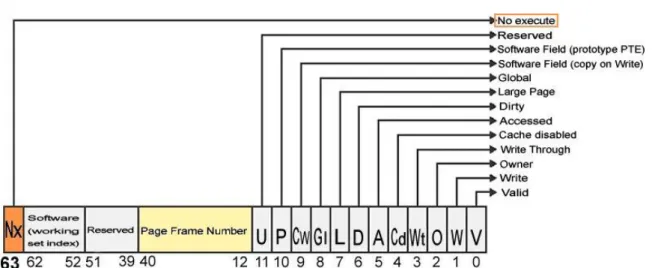
Figure 3. x64 hardware page table entry
Memory access control prevents memory pages from unauthorized access. In the guest page tables, each memory page has three types of access control bits: Read, Write and Execute. Figure 3 presents the fields of an x64 page table entry. By setting these access control bits, any illegal memory manipulation will be caught by the guest OS to ensure its system integrities. However, these bits can be changed by a malicious kernel module. The malicious kernel module can modify the access control bits as it is at the same privilege level as the kernel, and makes memory access control from the guest page tables unreliable.
9
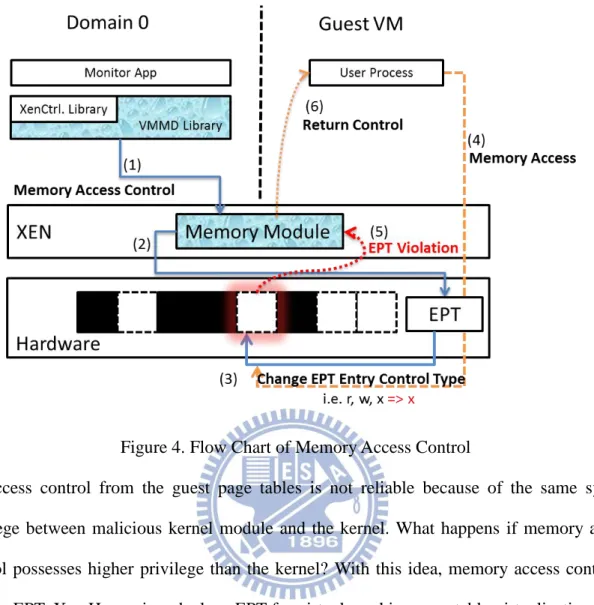
Figure 4. Flow Chart of Memory Access Control
Access control from the guest page tables is not reliable because of the same system privilege between malicious kernel module and the kernel. What happens if memory access control possesses higher privilege than the kernel? With this idea, memory access control is built in EPT. Xen Hypervisor deploys EPT for virtual machine page table virtualization. With the help of EPT, Xen can reduce the overhead by avoiding the VM exits associated with page table virtualization. Figure 4 explains the control flow of memory access control.
When a monitor application needs to control the access of virtual machine memory pages, it uses the control functions of LibVMMD (step 1). LibVMMD will request the memory module to find and to change the control types of the corresponding EPT entries (step 2 ~ step 4). EPT provides access control bits as the guest page table does. When the guest operating system accesses the protected page (step 5), it will trigger an EPT violation due to unauthorized memory manipulation. The violation will be caught by the memory module (step 6), and the memory module will return the control back to the next instruction to skip
10
the unauthorized instruction (step 7). Due to the location of EPT, it is more difficult to alter EPT access bits from guest VMs unless Xen has been compromised. After the control types of virtual machine memory blocks have been set, any unauthorized memory manipulation will be rejected by EPT.
Evading Kernel Patching Protection
3.3
In order to improve OS kernel security, Microsoft has planted a kernel patching protection mechanism [12], informally known as PatchGuard, on recent x64 Windows editions. PatchGuard verifies kernel critical structures periodically to prevent unauthorized kernel patching. When a program (e.g. a malware) attempts to patch the kernel, PatchGuard will trigger a blue screen error and force a reboot of the system.
Because of the kernel patching protection, memory interposition is mostly useless in the kernel address space. Monitor applications cannot patch kernel to set break-points or hook the system APIs through kernel patching techniques such as modification of IDT/SSDT tables or the system call dispatching function. This greatly limits the security monitor applications as much of the operations in the guest kernel cannot be hooked and monitored. We thus need to evade the kernel patch protection mechanism.
PatchGuard protects kernel structures like System Service Descriptor Table (SSDT), Global Descriptor Table (GDT), Interrupt Descriptor Table (IDT), System images (e.g. ntoskrnl.exe, ndis.sys, hal.dll), and Processor MSRs (system call). As a high level application, PatchGuard is implemented to cache the original copies and/or checksums of the kernel structures, and compare with the recent structures in a time interval. If PatchGuard found any difference between recent structures and original copies, it will invoke a blue screen error to reboot the entire system.
11
Figure 5. Flow Chart of Evading Kernel Patch Protection
LibVMMD bypasses PatchGuard by preventing it from verifying the contents of patched memory pages. For the reason, it emulates the PatchGuard instructions in Xen Hypervisor. Figure 5 shows the process of evading kernel patching protection. At the beginning, the monitor application patches the guest kernel memory page through LibVMMD interface. To circumvent the PatchGuard verification routine, the read privilege of the patched memory page has to be canceled. Unfortunately, the privilege of write and execute exist simultaneously leads EPT misconfiguration fault, so the memory module changes the access control type to be execute-only (step 1 & step 2). Meanwhile, PatchGuard is invoked to verify the integrity of guest operating system (step 3). When it reads the patched page, it causes an EPT violation fault and transfers the control to the memory module (step 4). The memory module will emulate the offending instruction in Xen Hypervisor, and return the control back to the next PatchGuard instruction until the verification is finished (step 5).
12
Disk Introspection and Interposition
3.4
Disk introspection and interposition allow monitor applications to read or overwrite disk contents outside the virtual machines. Like memory introspection and interposition, rootkits are unable to interfere with the flow of disk introspection and interposition. Disk introspection and interposition are implemented by modifying the virtual disk emulation codes of QEMU in Xen Hypervisor. LibVMMD plays the role of an interface for the disk module in QEMU. The disk module will wait for monitor applications’ requests, and finish them in QEMU.
Figure 6. Flow Chart of Disk Introspection and Interposition
First of all, the monitor application passes requests to the disk module through LibVMMD. According to the requests, the disk module will find the target blocks in the virtual disk of specified virtual machine. It will return the block contents to monitor applications for disk introspection, or overwrite the block contents for disk interposition. The disk introspection and interposition can be divided into block level and filesystem level. The difference is explained below.
13
3.4.1. Block-level Introspection and Interposition
QEMU emulates the virtual disk as an IDE device. To handle the I/O operations from guest VMs, the IDS device driver uses its I/O operation functions at block level. At block level, the data are stored in sectors as basic unit. The disk module uses the driver operation functions to manipulate the virtual disk at block level. For introspection, it uses the read function of the driver as if the target sector is read by the driver. For interposition, it uses the write function of the driver as if the target sector is overwritten by the driver.
3.4.2. Filesystem-level Introspection and Interposition
Introspecting data at filesystem level is more complicated. The flow is shown in Figure 6. When the monitor application makes the call for disk introspection or interposition through LibVMMD, the request is sent to the disk module (step a). To get the file contents, the disk module has to find the corresponding sector numbers of the file. In the NTFS filesystem, the files are saved as attributes in the Master File Table [13]. To find the corresponding sector numbers, the disk module has to parse the MFT. After parsing the MFT, the disk module can find the sector numbers of the file for disk introspection and interposition as 3.4.1. Therefore, the disk module can return the file contents for introspection, and modifies the file contents for interposition (step b & step c).
Write Buffer for Disk Cache Coherence
3.5
Although the file contents can be dumped by disk introspection, there is another problem called disk cache coherence. For the reason of improving the speed of fetching data, operating systems provide data cache to store frequently used or the latest updated data. These kinds of data will be stored in data cache for a while, and then they will be written to disk storage. However, filesystem introspection gets the file contents from the virtual disk. It cannot get the contents which do not exist on virtual disk storage. This embarrassing situation often happens right after the guest system updates a file’s content. When a file is being updated, the contents
14
may be stored in data cache. At this moment, filesystem introspection is unable to get the latest file contents until they are written to the disk storage.
Figure 7. Flow Chart of Disk Introspection with Write Buffer
To solve this problem, we developed the technique called Write Buffer. Write Buffer stores the latest contents when the guest VM modifies its disk files. The contents are captured and stored in Write Buffer by the control center, which intercepts the system calls [14]. Figure 7 shows the newer disk introspection steps and Write Buffer mechanism. For Write Buffer, there is a control center which intercepts the system calls in domain 0. The intercepted system calls are “NtCreateFile”, “NtOpenFile”, “NtWriteFile”, and “NtClose”. When these system calls are invoked by guest user processes at step A, they will be captured by the interception module at step B, and will be sent to the control center at step C. The control center will parse the system call arguments to maintain Write Buffer at step D, and return the control back to
15
the original system call flow of the guest operating system. Write Buffer adds one more step in newer disk introspection. After the disk module gets the contents from virtual disks as usual (step 1 ~ step 3), it checks whether Write Buffer keeps the latest contents (step 4). If yes, the disk module will merge the contents into Write Buffer (step 5) and return back to the monitor applications (step 6). With the help of Write Buffer, the monitor applications can get the latest file contents with disk introspection even they are not written into the guest virtual disk.
Figure 8. Write Buffer Maintenance
Write Buffer is maintained by the control center and the disk module. The control center handles the Write buffer creation and synchronization. Figure 8 explains the steps of Write Buffer maintenance. When the guest user process invokes a system call, the control center intercepts it and checks its type. If the system call is NtCreateFile or NtOpenFile, the control center will create a file entry to save the mapping between the file path and the file handle, and check if the Write Buffer exists. If the Write Buffer does not exist, the control center creates a Write Buffer and copies the file contents through disk introspection into it. If the system call is NtWriteFile, the control center will use the file handle arguments to find the file path from file entries to see if the Write Buffer exists. If the Write Buffer exists, the control center will copy the contents from system call arguments into the Write Buffer. Otherwise, the control center will create the Write Buffer with its file path and save the contents. The file entries are stored in the memory space of the control center. To avoid running out the memory space, the control center frees the file entry according to the NtClose system call argument.
16
Figure 9. Write Buffer Usage
Figure 9 shows the usage of Write Buffer. When the monitor application calls LibVMMD to do the disk introspection with Write Buffer, VMMD system checks if the file contents are stored in Write Buffer. If yes, VMMD return the Write Buffer contents to the monitor application. If not, VMMD saves the file contents into a Write Buffer through disk introspection and return it to the monitor application. Therefore, subsequent file access will not need to do disk introspection again and can be served by the Write Buffer mechanism.
Figure 10. Write Buffer Garbage Collection
17
consumes the disk space of Domain 0. To maintain the balance between speed and disk space, VMMD provides garbage collection mechanism for Write Buffer. Garbage collection is a mechanism for cleaning outdated Write Buffer. The cleaning procedure is shown in Figure 10. The cleaning procedure is started by the control center. In the procedure, the control center checks the existing Write Buffer and gets the file contents through disk introspection. After getting the file contents, the control center compares them with the Write Buffer. If the result shows the contents are the same as the Write Buffer, it means the guest operating system has written the cache data into its virtual disk. Then the control center is able to free the space of the Write Buffer. The frequency of garbage collection can be regulated, and the overhead of different frequency will be discussed in Section 5.6.
Disk Access Controls
3.6
Figure 11. Flow Chart of Disk Access Control
Disk access control prevents unauthorized disk manipulations from guest VMs. The file control type can be read-only or read-write. The operating system manages the file access control through the control attribute, but the file control attribute can be changed with proper system privilege. The antivirus software has another file access control mechanism. When
18
malicious files are found in the operating system, it quarantines the malicious files to avoid them being accessed by another process. However, the quarantine process may be attacked by malwares; so that the quarantined files will get released.
In VMMD system, we implement a disk access control mechanism within the virtual disk subsystems (i.e. QEMU-dm). The mechanism locates outside the guest virtual machine so it is much more difficult for a malware within the guest VM to attack or bypass the disk access control mechanism. The mechanism can be used by a security monitor to implement more effective quarantine for malicious files on the disk. Figure 11 presents the architecture of disk access control.
3.6.1. Block-level Access Control
To block disk access from guest VMs at block level, the disk module contains a blacklist. The blacklist is maintained by the monitor application and the monitor application can add new blacklist entries through LibVMMD. Each blacklist entry records a virtual disk sector number of a guest VM. When the guest VM tries to access the sectors in blacklist, the disk module will block the requests and return error messages to guest VMs as failed disk access.
3.6.2. Filesystem-level Access Control
To block disk access of the guest VMs at filesystem-level, monitor applications can assign the file path to the disk module through LibVMMD. The disk module will parse the MFT records to find the corresponding sector numbers on the guest virtual disks and add the number to the blacklist. After the corresponding sector numbers are added to the blacklist, the guest VMs cannot access the files as Chapter 0 explains.
19
Chapter 4. Implementation
LibVMMD is implemented in C and C++ as a shared library. It makes use of libxc, ntfs-3g, and QEMU-dm architecture. The current version is built to monitor HVM version of Windows7 x86_64 and Windows Server 2008 x86_64 running on Xen 4.0.1. The implementation details are discussed in the section as below.
Translation of Memory Address
4.1
LibVMMD makes use of Xen Control Library for memory introspection and interposition, but libxc manipulates memory pages with GFN. However, modern operating systems use virtual address mechanism for flexible memory management. To make memory introspection friendlier, LibVMMD provides three different solutions to access guest VMs’ memory subsystems.
4.1.1. Memory Introspection and Interposition with Guest Physical Address
For memory introspection and interposition with guest physical address, the system depends on the Xen Control library (libxc). Libxc provides a function called xc_map_foreign_range() to map guest VMs’ physical memory pages into domain 0 memory address space with GFN. After mapping the target memory pages into domain 0, third party applications can read or overwrite the memory contents as their own memory pages.4.1.2. Memory Introspection and Interposition at a Given Guest Virtual
Address
Comparing to physical address, modern operating systems use virtual memory address as primary. Memory introspection with guest virtual address can avoid Semantic Gap problem. Getting memory contents with guest virtual address is more meaningful than only with guest physical address as well.
20
Figure 12. Memory Address Translation
To find the corresponding guest physical address, a series of memory address conversion is required. Figure 12 shows the memory address translation from guest virtual address to guest physical address. Memory address conversion starts at PML4 table. The bits of the virtual memory address represent the offset at the next table. After walking through the guest page table, the guest virtual address is converted into the guest physical address. The remaining steps are the same as Chapter 4.1.1.
4.1.3. Locating Memory Pages for a Guest User Process
Finding the physical memory pages with guest process id is more advanced than only with the guest virtual address. The virtual addresses which are being used have to be found in the OS kernel structures, converted to the guest physical addresses, and be mapped into domain 0.
21
Figure 13. Windows System Map File
To find the kernel structure of specified guest process id, the system uses system map file to locate the physical memory address of the kernel structure of the initial process. In Windows 7 x64 and Windows Server 2008 x64 editions, the system locates the EPROCESS kernel structure from PsInitialSystemProcess entry in the system map file (Figure 13). Each EPROCESS structure is linked by a double linked list, and the system can find the target EPROCESS structure by walking through the EPROCESS list with specified guest process id. The virtual address area information is stored as an AVL tree in EPROCESS. After obtaining the virtual address area and the CR3 information, the remaining steps are the same as Chapter 4.1.2.
Extended Page Table
4.2
Xen Hypervisor plays the role of resource manager to distribute the hardware resource to each guest virtual machine. In the previous version, Xen deploys shadow page table mechanism to distribute the physical memory resource. Shadow page table records the mapping between guest virtual address and host physical address. To be precisely, Xen
22
maintains the shadow page table when the guest operating system tries to modify its guest page tables. Each guest page table modification will cause a VMEXIT exception to let Xen synchronize the shadow page table, and invoke a VMENTER instruction after the synchronization is completed to resume the guest VM execution. According to the shadow page table, guest CPU can find the requested contents on correct physical memory pages. However, switching the control between guest VM and Xen Hypervisor is costly (about thousands of CPU cycles); frequent switching will slow down the performance of running guest VMs.
Figure 14. Intel EPT
To enhance the performance, recent version of Xen deploys the Extended Page Table to manage the physical memory resource. Extended Page Table is a hardware feature for page table virtualization. It is provided by processors which support Intel Virtualization Technology. Like Figure 14, EPT provides memory translation from guest physical address to host physical address. Unlike shadow page table, guest operating system is allowed to modify its page tables and handles the page faults directly. The maintenance of EPT will be carried out by the CPU hardware. Xen only needs to allocate the machine page table for each guest VM when they are created. With EPT, Xen saves the CPU cycles and improves the performance due to less control switching.
23
Figure 15. EPT Address Translation
Memory access control allows third party applications to change the access control type of any guest physical memory page in EPT. Figure 15 explains the address translation of EPT. At the last step of EPT translation, it gets the EPT entry which points to the beginning of the target machine physical page. The EPT entry has three types of access control bit (Read, Write, and Execute). These bits represent the control type by different combinations. In other words, memory page is the basic unit of the memory access control. When a monitor application needs to change the control type of a guest memory page, it uses the interface of LibVMMD. LibVMMD communicates with the memory module via hypercall interface. The memory module controls the guest memory pages by assigning GFNs and new control types to p2m_change_type() function. The p2m_change_type() function will walk the EPT and change the access bits of the EPT entries.
Emulating Offending Instruction
4.3
Chapter 3.3 introduces the design for evading kernel patching protection. In fact, PatchGuard may not be the only process which accesses the patched kernel memory page. The kernel may access its page as well. For the memory module, it has no need to distinguish which process cause the EPT violation. It emulates all of the offending instructions in Xen Hypervisor.
The memory module hardcodes the offending instructions rather than disassembles them dynamically. When an EPT violation is caused by accessing the patched memory page, the
24
memory module checks the offending instruction with its record. If the offending instruction exists in the record, the memory module will emulate it by corresponding actions. Otherwise, we have to add it and the corresponding behaviors in the record manually.
Table 1. Offending Instructions
The offending instructions can be divided into 4 different operators: movzx, cmp, xor, and mov. The complete instructions are shown in Table 1. The memory module emulates almost every instruction in a normal way except for xor rdx, [r9]. In our verification, xor is the instruction of PatchGuard to calculate the checksum of the kernel memory pages. The r9
25
register stores the virtual address of the kernel memory page which waits for PatchGuard to verify it. When the r9 register points to the patched kernel memory page and causes the EPT violation, the memory module will check the fault memory address. If the fault happens at the patched memory address, the memory module will xor the “original instruction” into rdx register. Otherwise, the memory module will get the memory contents of [r9] and xor it into rdx register.
QEMU Virtual Disk Subsystem
4.4
Figure 16. Handling Steps by Qemu Device Manager
In the architecture of Xen, QEMU device model is realized for I/O emulation of the HVM guest. The corresponding process in domain 0 is QEMU device manager (QEMU-dm). QEMU-dm models the virtual disk as an IDE device, and the IDE device corresponds to a block driver for I/O operations. Figure 16 shows the handling steps of guest virtual disk requests. At step A, QEMU-dm prepares a main loop which listens to the I/O requests from domain U, and it transfers the virtual disk requests to virtual disk IDE device at step B. The IDE device will handle the requests by passing the requests to registered block driver to perform the I/O operations at step C and step D.
26
In the process of HVM creation, QEMU-dm finishes the initial steps and enters into the main loop to wait for the guest requests. At this moment, QEMU-dm creates another thread for disk module initialization. The disk module allocates shared memory to communicate with LibVMMD. On the other side, it uses ntfs_device_alloc() to initialize a ntfs structure for the virtual disk and mounts it by ntfs_volume_startup(). After the initialization has completed, the disk module is allowed to access the virtual disk through ntfs-3g library and listen to LibVMMD for further request.
Figure 17. Architecture of Disk Module Functionalities
The disk module handles the request of disk introspection, disk interposition, and disk access control. For disk introspection, the module returns the disk contents at block level and filesystem level. The monitor application can get the disk contents of specified disk block or disk file. For disk interpostion, the module controls the disk access at block level and filesystem level for the monitor application. The monitor application can quarantine disk files without altering the guest operating system states. Furthermore, the monitor application can delete disk files through the disk module. The flow of disk module functionalities is shown in Figure 17. It will be introduced by the following sections.
27
4.4.1. Block-level Introspection and Interposition
Under QEMU, the virtual disk is emulated as an IDE device. The IDE device has its block device driver and operation functions. When the disk module receives the requests of block level introspection, it uses the virtual disk operation function, bdrv_pread(), to read the virtual disk contents. If the requests are made for block level interposition, the disk module uses bdrv_pwrite() to overwrite the virtual disk contents.
4.4.2. Parsing NTFS file system
When monitor applications need to introspect the virtual disk at filesystem level, the disk module use ntfs_pathname_to_inode() to parse the MFT records. In NTFS filesystem, each file is recorded as file attributes in the MFT. The ntfs_pathname_to_inode() function translates the file path into file attributes from the MFT. After the translation, the disk module uses ntfs_attr_pread() to get the file contents with the file attributes for introspection, and uses ntfs_attr_pwrite() to overwrite the file contents for interposition. The disk module also uses ntfs_delete() for deleting a file from the virtual disk.
4.4.3. Read / Write Control
28
QEMU supports different image file formats as the virtual disks of guest VMs, including raw file, vvfat, qcow, qcow2, vmdk, cloop, dmg, vpc, bochs, and parallels. Each file format corresponds to a block driver of the virtual disk ide device. Figure 16 explains the process flow of handling guest virtual disk requests. To control the disk access from guest VMs, the disk module manages disk requests in QEMU-dm. Figure 18 shows the architecture after the disk access control is added into QEMU-dm. The disk module manages a blacklist for the guest VM disk access control. When the guest VM sends I/O operation requests to QEMU-dm, the disk module will compare the requested disk sector numbers with the blacklist to confirm if they can be accessed.
Figure 19. QEMU Virtual Disk Structure
The black list locates in the BlockDriverState (bdrv) structure. In QEMU, the virtual devices (DriveInfo) are stored in drives_table as Figure 19 shows. The state of a virtual device is saved in BlockDriverState, like whether the device is read only. When the virtual device performs its I/O operation, it uses the I/O operation functions in BlockDriver structure. Meanwhile, the disk module checks the black list to decide whether the operation should be blocked.
Sector is the basic unit of the virtual disk. Each sector contains 512 bytes. To quarantine the virtual disk at block level, monitor applications have to assign sector numbers to
29
LibVMMD. LibVMMD will request the disk module to add the sector numbers into the blacklist. When the disk module finds the matches between requested sector numbers and blacklist sector numbers, it will return error messages for failed disk manipulations.
To block the virtual disk access at filesystem level, the disk module has to find the corresponding sector numbers of the file. In NTFS filesystem, the file information is stored in MFT, so the disk module has to parse the MFT record. The MFT stores the file information in two types, resident attribute and non-resident attribute. When the file size is bigger than the MFT entry size, the file data is saved as non-resident attribute. The data attribute of the MFT entry will store the locations of the file data. Otherwise, the file data is stored in MFT entry.
To find the corresponding sector numbers, we modified the ntfs_pathname_to_inode() and the ntfs_attr_pread() function in ntfs-3g library. The original ntfs_pathname_to_inode() function gets the attributes of the file path from the MFT records. The file contents can be achieved by giving the attributes to the original ntfs_attr_pread() function. If the file size is too large to be stored in the MFT entry, the original ntfs_attr_pread() function will find the file contents in the corresponding sector numbers with the data attribute. The modified ntfs_pathname_to_inode() function returns one more argument, the sector number of the MFT entry. And the modified ntfs_attr_pread() function returns the sector numbers rather than the file contents. As a result, through the modified ntfs-3g library, the sector numbers can be found with the file paths and can be added to the blacklist for filesystem level access control.
30
Chapter 5. Evaluation and Prototype Applications
In this Chapter, we evaluate the overhead of write buffer and PatchGuard evasion. We also combine our design as different types of security prototype applications. The function of prototype applications will be explained below.
Prototype Application:Real-time Virus Scanning
5.1
Real-time Virus Scanning (RVS) is a prototype security application to protect guest operating system online. It combines memory introspection, disk introspection, disk interposition, system call interception, write buffer technique and PatchGuard evasion. To protect guest VM online, RVS intercepts system calls to understand which file is accessed by the guest operating system. Then RVS scans the file with ClamAV scan engine in domain 0 to decide whether the file should be quarantined. RVS guarantee the file access of the guest VMs. The complete process flow is explained below.
Figure 20. Online Malware Detection Process Flow
RVS intercepts “NtOpenFile” and “NtCreateFile” system calls to know when the guest operating system accesses or creates a file. It also intercepts “NtWriteFile” to update the write buffer and intercepts “NtCloseFile” to know when the file modification is finished. Figure 20
31
presents the malware detection process flow of RVS. When the guest operating system invokes “NtCreateFile” or “NtOpenFile” system call at step 1, it will be intercepted by RVS at step 2. RVS judges the guest operating system is reading or writing a file by checking the system call arguments. If the system call is invoked to read a file, RVS gets the file by disk introspection and scans it with ClamAV scan engine at step3. Once the file is accused of malware, it will be quarantined by RVS at step 4, and the system call will be failed at step 5. Otherwise, the guest operating system reads the file successfully. If the system call is invoked for writing a file, RVS allocates a write buffer at step 7. After the guest operating system modifies the file at step 8, RVS updates the write buffer at step 9. The guest operating system invokes “NtClose” system call at step 10 if it finishes the writing. At step 11, the NtClose System call is intercepted by RVS and the file is scanned with ClamAV scan engine at step 12. Like step 3, RVS decides whether it should quarantine the file based on the scanning result. If the file is found as a malware, RVS quarantines it to protect the guest operating system.
5.1.1. RVS Evaluation: PassMark Benchmark
Figure 21. PassMark Benchmark
To understand the overhead of RVS, we use PassMark [15] to evaluate the baseline system and the RVS system. The host machine is equipped with two Intel Xeon 2.27/Ghz processors (16 logical cores in total) and 16 GB memory. The storage consists of 2 SATA
32
HDDs configured JBOD mode. The guest operating system running on the guest VMs is Windows Server 2008 x86_64 and the memory size of the guest VM is 3GB with 4 virtual CPUs.
Figure 21 shows the overhead of CPU and disk rate. PassMark evaluates the CPU rates by calculating integer math (left graph). The average CPU rate of the baseline system is 796 Mops/s, and the average CPU rate of RVS is 746 Mops/s. The overhead of RVS is about 6%. In the disk evaluation, PassMark measures the disk rate by performing sequence read, sequence write and random seek read/write. In the right graph, the overhead of sequence read is about 35%, the overhead of sequence write is about 90% and the overhead of random seek read/write is about 87%. Comparing to the overhead of CPU rate, RVS is much more like an I/O intensive system. Although PassMark provides friendly interface as a system benchmark, we do not know the detail information of the testing data, like how much data are written by PassMark. This makes us find the reason of the overhead more difficult. To have the ability to control the testing data, we also evaluate RVS with other benchmark to verify and explain the result of PassMark evaluation.
5.1.2. RVS Application Evaluation: x264 encoding
Figure 22. RVS x264 Encoding Overhead
33
encoder has two threads and the testing file is an .rmvb file and the file size is 508MB. In the encoding process, x264 encoder consumes thousands of CPU cycles to transform a file to be a .264 file. Although the x264 encoder performs series of NtWriteFile system call to save the transformed contents into a .264 file, the performance of x264 transformation is still decided by the CPU computation. Figure 22 presents the overhead of RVS while the guest operating system performs x264 encoding. To evaluate the CPU overhead accurately, we filter out the write buffer maintenance of the .264 file. RVS intercepts the system calls as usual but it does not update the write buffer while the .264 file is encoded. The overhead in Figure 22 is caused by system call interception write buffer usage and scan with ClamAV engine. When the x264 encoder encodes the .264 file, the other processes may access system files in background. This causes the overhead of write buffer usage and ClamAV scanning. However, the overhead is relatively small. It proves that RVS is not a CPU intensive system.
5.1.3. RVS Disk Application Evaluation: 7-zip Compression
To understand the overhead of sequential read in Figure 21, we choose 7-zip to perform file compression as our benchmark. The 7-zip software performs lots of NtOpenFile and NtCreateFile system call while compressing files. Each file opening will cause RVS to dump the file and scan it with ClamAV scan engine. In short, the file compression can be recognized as a sequential read process with less writing, so we can easily understand the overhead of RVS, especially in write buffer usage. The files which are used to be compressed come from
C:\\Windows\Microsoft.NET, C:\\Windows\System32 and C:\\Windows\SysWOW64
directory of a newly installed Windows Server 2008 x86_64, and the total size is 2.5GB. The compression tool is 7-zip which compresses files into .7z file format with 4 threads.
34
Figure 23. RVS File Compression Overhead
Figure 23 shows the compression time of RVS. The compression time of RVS is about 3 times of the baseline system. Apparently, the performance decreases a lot after adding the function of write buffer usage. In the file compression experiment, RVS has to dump the whole 2.5GB file contents from the guest VM for later scanning in domain 0. The testing files are stored in the guest virtual disk, and there are no modifications on these files. As a result, the overhead of write buffer usage is completely from disk introspection.
5.1.4. RVS Disk Application Evaluation: 7-zip Decompression
To understand the overhead of sequential write in Figure 21, we choose 7-zip to perform file decompression as our benchmark. The compressed file comes from compression experiment. By contrast to compress files, the 7-zip software performs lots of NtCreateFile and NtWriteFile system call while decompressing files. Each NtWriteFile system call causes RVS to update its write buffer for the latest file contents. For 7-zip, it creates totally 2.5GB file contents from the compressed file. The file contents will be captured by write buffer for later scanning. Thus, the file decompression can be recognized as a sequential write process. The overhead of RVS, especially in write buffer maintenance can be easily understood from
35
this benchmark.
Figure 24. RVS File Decompression Overhead
Figure 24 presents the decompression time of RVS. As we can see, the total overhead of RVS is about 7 times of the baseline system. Excluding the overhead of ClamAV scanning, the remaining overhead is still 3 times of the baseline system. In decompression experiment, the totally 2.5GB file contents are captured by write buffer. From the overhead of write buffer maintenance, we can get the average rate of write buffer is about 22MB per second. Although the overhead is a little heavy, what happened in the overhead of write buffer usage? Haven’t we explained decompression experiment does not need to do disk introspection? In fact, the guest operating system dose not only runs the 7-zip benchmark. There are different processes running in the background of the guest operating system. They may access some files and cause RVS to scan them. That’s why there is still some overhead of write buffer usage in decompression experiment.
5.1.5. RVS Disk Evaluation: Build ClamAV
To find out the reason of the overhead in random seek read write experiment in Figure 21, we choose build ClamAV as our benchmark. When the guest operating system is building
36
ClamAV, it compiles lots of .c files and creates lots of object files. For RVS, the building process uses NtOpenFile system call to open the files which need to be compiled, and uses NtCreateFile and NtWriteFile to create the object files. Then the object files are linked to generate dll or exe files by the building process. With the used system calls, the building ClamAV process can be recognized as a random read write benchmark.
Figure 25. RVS Build-ClamAV Overhead
Figure 25 explains the overhead of RVS while the guest operating system is building ClamAV. From Figure 25, the primaries overhead locate in system call interception. For the overhead of write buffer maintenance and write buffer usage, building ClamAV creates lots of new files and repeating access particular files. However, RVS can find the repeating access file contents in write buffer, so that it is no need to copy the data from the virtual machine again, and the overhead is relative small.
5.1.6. RVS Application Evaluation: PatchGuard Evasion
The overhead of PatchGuard evasion is decided by the invoking frequency of PatchGuard. As Figure 5 explained, PatchGuard invokes EPT violation fault whenever it checks the kernel integrity under PatchGuard evasion mechanism. The overhead of PatchGuard evasion consists
37
of code emulation and control transit between guest operating system and Xen Hypervisor. In reality, we would like to know the how much overhead is caused by PatchGuard evasion in CPU and disk processing rate.
Figure 26. PatchGuard Evasion Overhead in Different Benchmark
Figure 26 shows the overhead of PatchGuard evasion under different benchmarks. The overhead is mainly decided by the invoking frequency of PatchGuard. For CPU (x264 encoding) and disk benchmark (7za-zip, 7za-unzip, build-ClamAV), the overhead is rarely small. The frequency of PatchGuard is showed as below.
38
Figure 27. Offending Instructions in Different Benchmark
Figure 27 presents the numbers of offending instructions in different benchmarks. As we can see, the frequency of PatchGuard is not the same in different benchmarks. The detail of PatchGuard frequency will be discussed in Chapter 5.5. For different benchmark, the total number of offending instructions is not the same but the overhead is always small. Why the memory module emulates more instructions but causes the same overhead between 7-zip file compression and build-ClamAV? It is mainly because the overhead of PatchGuard is not only influenced by the invoking frequency, but also influenced by the complexity of the benchmark. When the number of instructions that a benchmark has to execute becomes larger, the overhead of the same number of offending instructions becomes relative small. It also explains why the number of offending instructions in build-ClamAV is larger than 7-zip file compression, but the overhead is small either.
39
Prototype Application:Enhanced Real-time Virus Scanning
5.2
To enhance the performance of RVS, we provide an enhanced version of RVS (ERVS). ERVS supports two new features: a path filter and a guest PV driver. The path filter selects the intercepted file paths according to the file extensions. The selecting rule is based on Kaspersky. Kaspersky supports different types of scanning functions for an operating system, includes scanning every file, scanning files according to the file extensions, and scanning the files which have been modified. The file extensions are as below.
Table 2. Windows File Extensions
The guest PV driver supports multi-thread processing in the control center. In non-PV version, the execution of guest VM is paused after a system call is intercepted by the control center, and it is continued after RVS finishes its processing steps. RVS captures the system calls in serial, but with the help of the guest PV driver, ERVS handles the system calls in parallel. The guest PV driver contains busy loops in guest operating system. When a system call is intercepted, the execution flow is redirected to the busy loop to wait for released after the processing of ERVS is finished. As a result, the guest VM does not need to be paused and the system calls can be intercepted continuously.
40
Figure 28. ERVS Overhead in Different Benchmarks
For 7zip file compression and decompression, the total size of the files which have to be dumped from the guest operating system decreases from 2.5GB to 2GB. For build ClamAV, the total size of the created and accessed files from 930 MB to 130 MB. Except for the path filter, ERVS supports multi-thread system call handling and file scanning with the guest PV driver.Figure 28 shows the improvements of ERVS in different benchmarks. ERVS improves about 20% performance in 7zip file decompression and build-ClamAV benchmark, and improves 40% performance in 7zip file compression benchmark. As a result, ERVS is a more effective mechanism than RVS.
41
Prototype Application:Virus Scan for In Memory Process
5.3
Figure 29. VSMP Flow Chart
RVS protects system security from malicious file access. For those malware which start up at system booting time, RVS has no ability to stop them. Virus Scan for in Memory Process (VSMP) is developed to against malicious process. VSMP uses memory introspection to dump the memory contents of a process, and scans them with ClamAV antivirus engine. The execution flow of VSMP is shown in Figure 29. For Windows guest operating systems, the process information is stored in the EPROCESS structure. VSMP gets the EPROCESS structure with its system map file. After getting the EPROCESS structure, VSMP dumps the memory contents of the process and scan them with ClamAV scan engine. If the process is reported as malicious, VSMP will clean the whole memory contents of the malicious process to prevent it from continuing executing in the system with memory interposition.
42
Prototype Application:Overwriting, Deletion and Quarantine of
5.4
Malware Binaries
When a file is reported as malicious, security applications have three choices, overwrite it, delete it, or quarantine it. For first choice, security applications overwrite the file contents to paralyze the malicious behaviors. In NTFS filesystem, each type of file has its file format, like executive file uses MZ as its header. To paralyze the malicious behaviors, security applications can replace the file contents with zero value. The file then becomes broken due to unknown file format for guest operating system. Though overwriting of malwares destroys the malicious behaviors, it occupies the disk space to store the unnecessary contents. To save the disk space, security applications can take the second choice, deleting malicious files.
Deleting malicious files needs to modify the MFT records of a guest operating system. It saves the disk space and prevents the guest operating system from accessing malicious files. However, the MFT records are maintained by the guest operating system originally, arbitrary modification of them may cause inconsistency problem and crash the guest VM. Also, overwriting or deleting a malicious file cannot be recovered if false positive occurs.
To be recoverable and reliable, quarantine the malicious files become better choice. The quarantine mechanism prevents the malicious file from accessed by the guest operating system. It blocks the access requests in QEMU-dm outside the guest VM. Quarantine the malicious files does not need to modify the state of an operating system, so that there is no inconsistency problem. If the files are misunderstood as malicious, the quarantine mechanism also can release them to recover the disk access of the operating system.
43
PatchGuard Triggering Statistics
5.5
Table 3. PatchGuard Triggering Statistics in Different Benchmarks
To understand the triggering frequency of PatchGuard, we compare the system duration time and the numbers of intercepted system calls with the number of offending instructions. Table 3 presents the PatchGuard triggering statistics in different benchmarks. The intercepted system calls are “NtCreateFile”, “NtOpenFile”, “NtWriteFile” and “NtClose”. As we can see, the average system call frequency relates to the average frequency of offending instructions. When the benchmark invokes more system calls in average, PatchGuard is triggered more times. However, system calls may not be the only reason for triggering PatchGuard. The average system call frequency of x264 encoding is smaller than 7-zip file decompression but the average frequency of offending instructions is much closer. The real reason still needs to be confirmed by monitoring more states of the virtual machine, like intercepts all the system calls from the guest operating system.
44
Garbage Collection
5.6
Figure 30. Garbage Collection Overhead
Figure 30 presents the overhead and the result of the garbage collection mechanism. The workload is 7zip file compression benchmark and the monitor application is our ERVS system. From Figure 30 we can clearly see that the baseline system consumes less time slots but more disk space. To understand the overhead of garbage collection mechanism, we evaluate two different frequencies of collection in 7zip file compression work load. As we can see, the used disk spaces are cleaned up after the file compression is finished. The overhead of garbage collection is about 15% in 7zip file compression, and there is no overhead while performing different collection frequencies in 7zip file compression workload.