Getting Started with Storm
Jonathan Leibiusky, Gabriel Eisbruch, and Dario Simonassi
Beijing
•Cambridge
•Farnham
•Köln
•Sebastopol
•Tokyo
Download from Wow! eBook <www.wowebook.com>
Getting Started with Storm
by Jonathan Leibiusky, Gabriel Eisbruch, and Dario Simonassi
Copyright © 2012 Jonathan Leibiusky, Gabriel Eisbruch, Dario Simonassi. All rights reserved.
Printed in the United States of America.
Published by O’Reilly Media, Inc., 1005 Gravenstein Highway North, Sebastopol, CA 95472.
O’Reilly books may be purchased for educational, business, or sales promotional use. Online editions are also available for most titles (http://my.safaribooksonline.com). For more information, contact our corporate/institutional sales department: 800-998-9938 or [email protected].
Editors:
Mike Loukides and Shawn WallaceProduction Editor:
Melanie YarbroughCover Designer:
Karen MontgomeryInterior Designer:
David FutatoIllustrator:
Rebecca DemarestRevision History for the First Edition:
2012-08-30 First release
See http://oreilly.com/catalog/errata.csp?isbn=9781449324018 for release details.
Nutshell Handbook, the Nutshell Handbook logo, and the O’Reilly logo are registered trademarks of O’Reilly Media, Inc. Getting Started with Storm, the cover image of a skua, and related trade dress are trademarks of O’Reilly Media, Inc.
Many of the designations used by manufacturers and sellers to distinguish their products are claimed as trademarks. Where those designations appear in this book, and O’Reilly Media, Inc., was aware of a trademark claim, the designations have been printed in caps or initial caps.
While every precaution has been taken in the preparation of this book, the publisher and authors assume no responsibility for errors or omissions, or for damages resulting from the use of the information con- tained herein.
Table of Contents
Preface . . . vii 1. Basics . . . 1
The Components of Storm 2
The Properties of Storm 3
2. Getting Started . . . 5
Operation Modes 5
Local Mode 5
Remote Mode 6
Hello World Storm 6
Checking Java Installation 7
Creating the Project 7
Creating Our First Topology 9
Spout 9
Bolts 12
The Main Class 16
See It In Action 18
Conclusion 19
3. Topologies . . . 21
Stream Grouping 21
Shuffle Grouping 22
Fields Grouping 22
All Grouping 22
Custom Grouping 23
Direct Grouping 24
Global Grouping 24
None Grouping 25
LocalCluster versus StormSubmitter 25
DRPC Topologies 26
iii
4. Spouts . . . 29
Reliable versus Unreliable Messages 29
Getting Data 31
Direct Connection 31
Enqueued Messages 34
DRPC 36
Conclusion 37
5. Bolts . . . 39
Bolt Lifecycle 39
Bolt Structure 39
Reliable versus Unreliable Bolts 40
Multiple Streams 41
Multiple Anchoring 42
Using IBasicBolt to Ack Automatically 42
6. A Real-Life Example . . . 43
The Node.js Web Application 44
Starting the Node.js Web Application 45
The Storm Topology 45
UsersNavigationSpout 48
GetCategoryBolt 49
UserHistoryBolt 50
ProductCategoriesCounterBolt 53
NewsNotifierBolt 55
The Redis Server 55
Product Information 56
User Navigation Queue 56
Intermediate Data 56
Results 57
Testing the Topology 57
Test Initialization 57
A Test Example 59
Notes on Scalability and Availability 60
7. Using Non-JVM Languages with Storm . . . 61
The Multilang Protocol Specification 63
Initial Handshake 63
Start Looping and Read or Write Tuples 65
8. Transactional Topologies . . . 71
The Design 71
Transactions in Action 72
The Spout 73
The Bolts 77
The Committer Bolts 80
Partitioned Transactional Spouts 82
Opaque Transactional Topologies 84
A. Installing the Storm Client . . . 87 B. Installing Storm Cluster . . . 89 C. Real Life Example Setup . . . 91
Table of Contents | v
Download from Wow! eBook <www.wowebook.com>
Preface
If you’re reading this, it’s because you heard about Storm somehow, and you’re inter- ested in better understanding what it does, how you can use it to solve various problems, and how it works.
This book will get you started with Storm in a very straightforward and easy way.
The first few chapters will give you a general overview of the technologies involved, some concepts you should understand so we all speak the same language, and how to install and configure Storm. The second half of the book will get you deep into spouts, bolts and topologies (more about these in a moment). The last few chapters address some more advanced features that we consider very important and interesting, like using Storm with languages that are not JVM-based.
Conventions Used in This Book
The following typographical conventions are used in this book:
Italic
Indicates new terms, URLs, email addresses, filenames, and file extensions.
Constant width
Used for program listings, as well as within paragraphs to refer to program elements such as variable or function names, databases, data types, environment variables, statements, and keywords.
Constant width bold
Shows commands or other text that should be typed literally by the user.
Constant width italic
Shows text that should be replaced with user-supplied values or by values deter- mined by context.
This icon signifies a tip, suggestion, or general note.
vii
This icon indicates a warning or caution.
Using Code Examples
This book is here to help you get your job done. In general, you may use the code in this book in your programs and documentation. You do not need to contact us for permission unless you’re reproducing a significant portion of the code. For example, writing a program that uses several chunks of code from this book does not require permission. Selling or distributing a CD-ROM of examples from O’Reilly books does require permission. Answering a question by citing this book and quoting example code does not require permission. Incorporating a significant amount of example code from this book into your product’s documentation does require permission.
We appreciate, but do not require, attribution. An attribution usually includes the title, author, publisher, and ISBN. For example: “Getting Started with Storm by Jonathan Leibiusky, Gabriel Eisbruch, and Dario Simonassi (O’Reilly). Copyright 2012 Jonathan Leibiusky, Gabriel Eisbruch, and Dario Simonassi, 978-1-449-32401-8.”
If you feel your use of code examples falls outside fair use or the permission given above, feel free to contact us at [email protected].
Safari® Books Online
Safari Books Online (www.safaribooksonline.com) is an on-demand digital library that delivers expert content in both book and video form from the world’s leading authors in technology and business.
Technology professionals, software developers, web designers, and business and cre- ative professionals use Safari Books Online as their primary resource for research, problem solving, learning, and certification training.
Safari Books Online offers a range of product mixes and pricing programs for organi-
zations, government agencies, and individuals. Subscribers have access to thousands
of books, training videos, and prepublication manuscripts in one fully searchable da-
tabase from publishers like O’Reilly Media, Prentice Hall Professional, Addison-Wesley
Professional, Microsoft Press, Sams, Que, Peachpit Press, Focal Press, Cisco Press, John
Wiley & Sons, Syngress, Morgan Kaufmann, IBM Redbooks, Packt, Adobe Press, FT
Press, Apress, Manning, New Riders, McGraw-Hill, Jones & Bartlett, Course Tech-
nology, and dozens more. For more information about Safari Books Online, please visit
us online.
How to Contact Us
Please address comments and questions concerning this book to the publisher:
O’Reilly Media, Inc.
1005 Gravenstein Highway North Sebastopol, CA 95472
800-998-9938 (in the United States or Canada) 707-829-0515 (international or local)
707-829-0104 (fax)
We have a web page for this book, where we list errata, examples, and any additional information. You can access this page at http://oreil.ly/gs_storm.
To comment or ask technical questions about this book, send email to [email protected].
For more information about our books, courses, conferences, and news, see our website at http://www.oreilly.com.
Find us on Facebook: http://facebook.com/oreilly Follow us on Twitter: http://twitter.com/oreillymedia
Watch us on YouTube: http://www.youtube.com/oreillymedia
Acknowledgements
First and foremost, we would like to thank Nathan Marz who created Storm. His effort working on this open source project is really admirable. We also would like to thank Dirk McCormick for his valuable guidance, advice, and corrections. Without his pre- cious time spent on this book, we wouldn’t have been able to finish it.
Additionally, we would like to thank Carlos Alvarez for his awesome observations and suggestions while reviewing the book.
We would like to thank Shawn Wallace from O’Reilly for guiding us through the writing and reviewing process and for providing us with a good environment and facilities to complete the project.
Also, we would like to take this opportunity to thank MercadoLibre for giving us the time to play with Storm in real-world applications. It gave us an opportunity to learn a lot about Storm.
Finally, an honorable mention goes to our families and friends for their understanding and support for us in completing this project. Without the help of the people mentioned above, we would never have made it here.
Preface | ix
CHAPTER 1
Basics
Storm is a distributed, reliable, fault-tolerant system for processing streams of data.
The work is delegated to different types of components that are each responsible for a simple specific processing task. The input stream of a Storm cluster is handled by a component called a spout. The spout passes the data to a component called a bolt, which transforms it in some way. A bolt either persists the data in some sort of storage, or passes it to some other bolt. You can imagine a Storm cluster as a chain of bolt components that each make some kind of transformation on the data exposed by the spout.
To illustrate this concept, here’s a simple example. Last night I was watching the news when the announcers started talking about politicians and their positions on various topics. They kept repeating different names, and I wondered if each name was men- tioned an equal number of times, or if there was a bias in the number of mentions.
Imagine the subtitles of what the announcers were saying as your input stream of data.
You could have a spout that reads this input from a file (or a socket, via HTTP, or some other method). As lines of text arrive, the spout hands them to a bolt that separates lines of text into words. This stream of words is passed to another bolt that compares each word to a predefined list of politician’s names. With each match, the second bolt increases a counter for that name in a database. Whenever you want to see the results, you just query that database, which is updated in real time as data arrives. The ar- rangement of all the components (spouts and bolts) and their connections is called a topology (see Figure 1-1).
1
Figure 1-1. A simple topology
Now imagine easily defining the level of parallelism for each bolt and spout across the whole cluster so you can scale your topology indefinitely. Amazing, right? Although this is a simple example, you can see how powerful Storm can be.
What are some typical use cases for Storm?
Processing streams
As demonstrated in the preceding example, unlike other stream processing sys- tems, with Storm there’s no need for intermediate queues.
Continuous computation
Send data to clients continuously so they can update and show results in real time, such as site metrics.
Distributed remote procedure call
Easily parallelize CPU-intensive operations.
The Components of Storm
In a Storm cluster, nodes are organized into a master node that runs continuously.
There are two kind of nodes in a Storm cluster: master node and worker nodes. Master
node run a daemon called Nimbus, which is responsible for distributing code around
nodes run a daemon called Supervisor, which executes a portion of a topology. A top- ology in Storm runs across many worker nodes on different machines.
Since Storm keeps all cluster states either in Zookeeper or on local disk, the daemons are stateless and can fail or restart without affecting the health of the system (see Figure 1-2).
Figure 1-2. Components of a Storm cluster
Underneath, Storm makes use of zeromq (0mq, zeromq), an advanced, embeddable networking library that provides wonderful features that make Storm possible. Let’s list some characteristics of zeromq:
• Socket library that acts as a concurrency framework
• Faster than TCP, for clustered products and supercomputing
• Carries messages across inproc, IPC, TCP, and multicast
• Asynch I/O for scalable multicore message-passing apps
• Connect N-to-N via fanout, pubsub, pipeline, request-reply
Storm uses only push/pull sockets.The Properties of Storm
Within all these design concepts and decisions, there are some really nice properties that make Storm unique.
Simple to program
If you’ve ever tried doing real-time processing from scratch, you’ll understand how painful it can become. With Storm, complexity is dramatically reduced.
Support for multiple programming languages
It’s easier to develop in a JVM-based language, but Storm supports any language as long as you use or implement a small intermediary library.
Fault-tolerant
The Storm cluster takes care of workers going down, reassigning tasks when necessary.
The Properties of Storm | 3
Download from Wow! eBook <www.wowebook.com>
Scalable
All you need to do in order to scale is add more machines to the cluster. Storm will reassign tasks to new machines as they become available.
Reliable
All messages are guaranteed to be processed at least once. If there are errors, mes- sages might be processed more than once, but you’ll never lose any message.
Fast
Speed was one of the key factors driving Storm’s design.
Transactional
You can get exactly once messaging semantics for pretty much any computation.
CHAPTER 2
Getting Started
In this chapter, we’ll create a Storm project and our first Storm topology.
The following assumes that you have at least version 1.6 of the Java Runtime Environment (JRE) installed. Our recommendation is to use the JRE provided by Oracle, which can be found at http://www.java .com/downloads/.
Operation Modes
Before we start, it’s important to understand Storm operation modes. There are two ways to run Storm.
Local Mode
In Local Mode, Storm topologies run on the local machine in a single JVM. This mode is used for development, testing, and debugging because it’s the easiest way to see all topology components working together. In this mode, we can adjust parameters that enable us to see how our topology runs in different Storm configuration environments.
To run topologies in Local Mode, we’ll need to download the Storm development dependencies, which are all the things that we need to develop and test our topologies.
We’ll see how soon, when we create our first Storm project.
Running a topology in Local Mode is similar to running it in a Storm cluster. However it’s important to make sure that all components are thread safe, because when they are deployed in Remote Mode they may run in different JVMs or on different physical machines without direct communication or shared memory.
In all of the examples in this chapter, we’ll work in Local Mode.
5
Remote Mode
In Remote Mode, we submit our topology to the Storm cluster, which is composed of many processes, usually running on different machines. Remote Mode doesn’t show debugging information, which is why it’s considered Production Mode. However, it is possible to create a Storm cluster on a single development machine, and it’s a good idea to do so before deploying to production, to make sure there won’t be any problems running the topology in a production environment.
You’ll learn more about Remote Mode in Chapter 6, and I’ll show how to install a cluster in Appendix B.
Hello World Storm
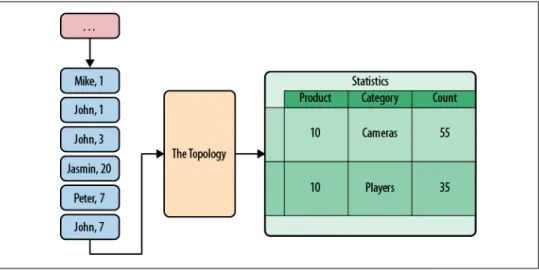
For this project, we’ll create a simple topology to count words. We can consider this the “Hello World” of Storm topologies. However, it’s a very powerful topology because it can scale to virtually infinite size, and with some small modifications we could even use it to create a statistical system. For example, we could modify the project to find trending topics on Twitter.
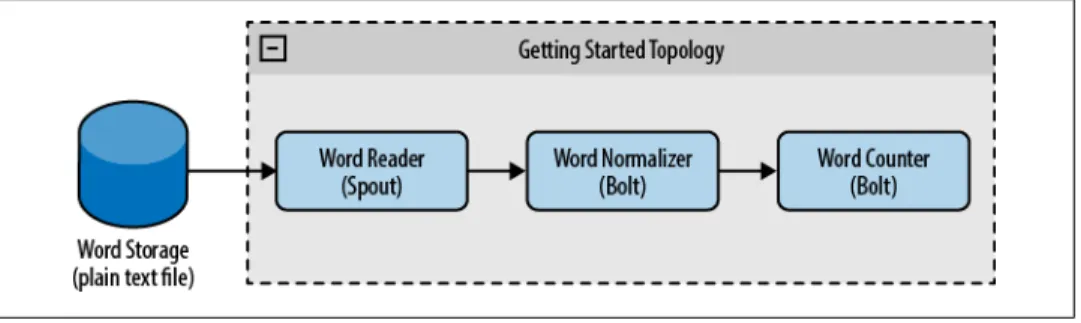
To create the topology, we’ll use a spout that will be responsible for reading words, a first bolt to normalize words, and a second bolt to count words, as we can see in Figure 2-1.
Figure 2-1. Getting started topology
You can download the source code of the example as a ZIP file at https://github.com/
storm-book/examples-ch02-getting_started/zipball/master.
If you use git (a distributed revision control and source code manage- ment), you can run git clone [email protected]:storm-book/examples- ch02-getting_started.git into the directory where you want to down- load the source code.
Checking Java Installation
The first step to set up the environment is to check which version of Java you are running. Open a terminal window and run the command
java -version. We should see something similar to the following:
java -version
java version "1.6.0_26"
Java(TM) SE Runtime Environment (build 1.6.0_26-b03)
Java HotSpot(TM) Server VM (build 20.1-b02, mixed mode)
If not, check your Java installation. (See http://www.java.com/download/.)
Creating the Project
To start the project, create a folder in which to place the application (as you would for any Java application). This folder will contain the project source code.
Next we need to download the Storm dependencies: a set of jars that we’ll add to the application classpath. You can do so in one of two ways:
• Download the dependencies, unpack them, and add them to the classpath
• Use Apache Maven
Maven is a software project management and comprehension tool. It can be used to manage several aspects of a project development cycle, from dependencies to the release build process. In this book we’ll use it extensively. To check if maven is installed, run the command mvn. If not you can download it from http://maven.apache.org/download.html.
Although is not necessary to be a Maven expert to use Storm, it’s helpful to know the basics of how Maven works. You can find more information on the Apache Maven website (http://maven.apache.org/).
To define the project structure, we need to create a pom.xml (project object model) file, which describes dependencies, packaging, source code, and so on. We’ll use the de- pendencies and Maven repository set up by nathanmarz (https://github.com/nathan marz/). These dependencies can be found at https://github.com/nathanmarz/storm/wiki/
Maven.
The Storm Maven dependencies reference all the libraries required to run Storm in Local Mode.
Hello World Storm | 7
Using these dependencies, we can write a pom.xml file with the basic components necessary to run our topology:
<project xmlns="http://maven.apache.org/POM/4.0.0"
xmlns:xsi="http://www.w3.org/2001/XMLSchema-instance"
xsi:schemaLocation="http://maven.apache.org/POM/4.0.0 http://maven.apache.org/xsd/maven-4.0.0.xsd">
<modelVersion>4.0.0</modelVersion>
<groupId>storm.book</groupId>
<artifactId>Getting-Started</artifactId>
<version>0.0.1-SNAPSHOT</version>
<build>
<plugins>
<plugin>
<groupId>org.apache.maven.plugins</groupId>
<artifactId>maven-compiler-plugin</artifactId>
<version>2.3.2</version>
<configuration>
<source>1.6</source>
<target>1.6</target>
<compilerVersion>1.6</compilerVersion>
</configuration>
</plugin>
</plugins>
</build>
<repositories>
<!-- Repository where we can found the storm dependencies -->
<repository>
<id>clojars.org</id>
<url>http://clojars.org/repo</url>
</repository>
</repositories>
<dependencies>
<!-- Storm Dependency -->
<dependency>
<groupId>storm</groupId>
<artifactId>storm</artifactId>
<version>0.6.0</version>
</dependency>
</dependencies>
</project>
The first few lines specify the project name and version. Then we add a compiler plug-
in, which tells Maven that our code should be compiled with Java 1.6. Next we define
the repositories (Maven supports multiple repositories for the same project). clojars is
the repository where Storm dependencies are located. Maven will automatically down- load all subdependencies required by Storm to run in Local Mode.
The application will have the following structure, typical of a Maven Java project:
our-application-folder/
├── pom.xml └── src └── main └── java | ├── spouts | └── bolts └── resources
The folders under Java will contain our source code and we’ll put our Word files into the resource folder to process.
mkdir -p creates all required parent directories.
Creating Our First Topology
To build our first topology, we’ll create all classes required to run the word count. It’s possible that some parts of the example may not be clear at this stage, but we’ll explain them further in subsequent chapters.
Spout
The WordReader spout is a class that implements IRichSpout. We’ll see more detail in Chapter 4. WordReader will be responsible for reading the file and providing each line to a bolt.
A spout emits a list of defined fields. This architecture allows you to have different kinds of bolts reading the same spout stream, which can then define fields for other bolts to consume and so on.
Example 2-1 contains the complete code for the class (we’ll analyze each part of the code following the example).
Example 2-1. src/main/java/spouts/WordReader.java package spouts;
import java.io.BufferedReader;
import java.io.FileNotFoundException;
import java.io.FileReader;
Creating Our First Topology | 9
import java.util.Map;
import backtype.storm.spout.SpoutOutputCollector;
import backtype.storm.task.TopologyContext;
import backtype.storm.topology.IRichSpout;
import backtype.storm.topology.OutputFieldsDeclarer;
import backtype.storm.tuple.Fields;
import backtype.storm.tuple.Values;
public class WordReader implements IRichSpout { private SpoutOutputCollector collector;
private FileReader fileReader;
private boolean completed = false;
private TopologyContext context;
public boolean isDistributed() {return false;}
public void ack(Object msgId) {
System.out.println("OK:"+msgId);
}
public void close() {}
public void fail(Object msgId) {
System.out.println("FAIL:"+msgId);
} /**
* The only thing that the methods will do It is emit each * file line
*/
public void nextTuple() { /**
* The nextuple it is called forever, so if we have been readed the file * we will wait and then return
*/
if(completed){
try {
Thread.sleep(1000);
} catch (InterruptedException e) { //Do nothing
} return;
}
String str;
//Open the reader
BufferedReader reader = new BufferedReader(fileReader);
try{
//Read all lines
while((str = reader.readLine()) != null){
/**
* By each line emmit a new value with the line as a their */
this.collector.emit(new Values(str),str);
}
}catch(Exception e){
throw new RuntimeException("Error reading tuple",e);
}finally{
} } /**
* We will create the file and get the collector object */
public void open(Map conf, TopologyContext context, SpoutOutputCollector collector) { try {
this.context = context;
this.fileReader = new FileReader(conf.get("wordsFile").toString());
} catch (FileNotFoundException e) {
throw new RuntimeException("Error reading file ["+conf.get("wordFile")+"]");
}
this.collector = collector;
} /**
* Declare the output field "word"
*/
public void declareOutputFields(OutputFieldsDeclarer declarer) { declarer.declare(new Fields("line"));
} }
The first method called in any spout is
public void open(Map conf, TopologyContext context, SpoutOutputCollector collector). The parameters it receives are the Topo- logyContext, which contains all our topology data; the conf object, which is created in the topology definition; and the SpoutOutputCollector, which enables us to emit the data that will be processed by the bolts. The following code block is the open method implementation:
public void open(Map conf, TopologyContext context, SpoutOutputCollector collector) {
try {
this.context = context;
this.fileReader = new FileReader(conf.get("wordsFile").toString());
} catch (FileNotFoundException e) {
throw new RuntimeException("Error reading file ["+conf.get("wordFile")+"]");
}
this.collector = collector;
}
In this method we also create the reader, which is responsible for reading the files. Next we need to implement
public void nextTuple(), from which we’ll emit values to be processed by the bolts. In our example, the method will read the file and emit a value per line.
public void nextTuple() { if(completed){
try {
Thread.sleep(1);
} catch (InterruptedException e) {
Creating Our First Topology | 11
//Do nothing }
return;
}
String str;
BufferedReader reader = new BufferedReader(fileReader);
try{
while((str = reader.readLine()) != null){
this.collector.emit(new Values(str));
}
}catch(Exception e){
throw new RuntimeException("Error reading tuple",e);
}finally{
completed = true;
} }
Values is an implementation of ArrayList, where the elements of the list are passed to the constructor.
nextTuple()
is called periodically from the same loop as the
ack()and
fail()methods.
It must release control of the thread when there is no work to do so that the other methods have a chance to be called. So the first line of nextTuple checks to see if processing has finished. If so, it should sleep for at least one millisecond to reduce load on the processor before returning. If there is work to be done, each line in the file is read into a value and emitted.
A tuple is a named list of values, which can be of any type of Java object (as long as the object is serializable). By default, Storm can serialize common types like strings, byte arrays, ArrayList, HashMap, and Hash- Set.
Bolts
We now have a spout that reads from a file and emits one tuple per line. We need to create two bolts to process these tuples (see Figure 2-1). The bolts implement the
backtype.storm.topology.IRichBoltinterface.
The most important method in the bolt is
void execute(Tuple input), which is called once per tuple received. The bolt will emit several tuples for each tuple received.
A bolt or spout can emit as many tuples as needed. When the nextTu ple or execute methods are called, they may emit 0, 1, or many tuples.
You’ll learn more about this in Chapter 5.
Download from Wow! eBook <www.wowebook.com>
The first bolt,
WordNormalizer, will be responsible for taking each line and normaliz- ing it. It will split the line into words, convert all words to lowercase, and trim them.
First we need to declare the bolt’s output parameters:
public void declareOutputFields(OutputFieldsDeclarer declarer) { declarer.declare(new Fields("word"));
}
Here we declare that the bolt will emit one Field named word.
Next we implement the
public void execute(Tuple input)method, where the input tuples are processed:
public void execute(Tuple input) { String sentence = input.getString(0);
String[] words = sentence.split(" ");
for(String word : words){
word = word.trim();
if(!word.isEmpty()){
word = word.toLowerCase();
//Emit the word
collector.emit(new Values(word));
} }
// Acknowledge the tuple collector.ack(input);
}
The first line reads the value from the tuple. The value can be read by position or by name. The value is processed and then emitted using the collector object. After each tuple is processed, the collector’s
ack()method is called to indicate that processing has completed successfully. If the tuple could not be processed, the collector’s
fail()method should be called.
Example 2-2 contains the complete code for the class.
Example 2-2. src/main/java/bolts/WordNormalizer.java package bolts;
import java.util.ArrayList;
import java.util.List;
import java.util.Map;
import backtype.storm.task.OutputCollector;
import backtype.storm.task.TopologyContext;
import backtype.storm.topology.IRichBolt;
import backtype.storm.topology.OutputFieldsDeclarer;
import backtype.storm.tuple.Fields;
import backtype.storm.tuple.Tuple;
import backtype.storm.tuple.Values;
public class WordNormalizer implements IRichBolt { private OutputCollector collector;
Creating Our First Topology | 13
public void cleanup() {}
/**
* The bolt will receive the line from the
* words file and process it to Normalize this line *
* The normalize will be put the words in lower case * and split the line to get all words in this */
public void execute(Tuple input) { String sentence = input.getString(0);
String[] words = sentence.split(" ");
for(String word : words){
word = word.trim();
if(!word.isEmpty()){
word = word.toLowerCase();
//Emit the word
List a = new ArrayList();
a.add(input);
collector.emit(a,new Values(word));
} }
// Acknowledge the tuple collector.ack(input);
}
public void prepare(Map stormConf, TopologyContext context, OutputCollector collector) {
this.collector = collector;
} /**
* The bolt will only emit the field "word"
*/
public void declareOutputFields(OutputFieldsDeclarer declarer) { declarer.declare(new Fields("word"));
} }
In this class, we see an example of emitting multiple tuples in a single execute call. If the method receives the sentence This is the Storm book, in a single execute call, it will emit five new tuples.
The next bolt,
WordCounter, will be responsible for counting words. When the topology finishes (when the
cleanup()method is called), we’ll show the count for each word.
This is an example of a bolt that emits nothing. In this case, the data is added to a map, but in real life the bolt could store data to a database.
package bolts;
import java.util.HashMap;
import java.util.Map;
import backtype.storm.task.OutputCollector;
import backtype.storm.task.TopologyContext;
import backtype.storm.topology.IRichBolt;
import backtype.storm.topology.OutputFieldsDeclarer;
import backtype.storm.tuple.Tuple;
public class WordCounter implements IRichBolt { Integer id;
String name;
Map<String, Integer> counters;
private OutputCollector collector;
/**
* At the end of the spout (when the cluster is shutdown * We will show the word counters
*/
@Override
public void cleanup() {
System.out.println("-- Word Counter ["+name+"-"+id+"] --");
for(Map.Entry<String, Integer> entry : counters.entrySet()){
System.out.println(entry.getKey()+": "+entry.getValue());
} } /**
* On each word We will count */
@Override
public void execute(Tuple input) { String str = input.getString(0);
/**
* If the word dosn't exist in the map we will create * this, if not We will add 1
*/
if(!counters.containsKey(str)){
counters.put(str, 1);
}else{
Integer c = counters.get(str) + 1;
counters.put(str, c);
}
//Set the tuple as Acknowledge collector.ack(input);
} /**
* On create */
@Override
public void prepare(Map stormConf, TopologyContext context, OutputCollector collector) {
Creating Our First Topology | 15
this.counters = new HashMap<String, Integer>();
this.collector = collector;
this.name = context.getThisComponentId();
this.id = context.getThisTaskId();
} @Override
public void declareOutputFields(OutputFieldsDeclarer declarer) {}
}
The
executemethod uses a map to collect and count the words. When the topology terminates, the
cleanup()method is called and prints out the counter map. (This is just an example, but normally you should use the
cleanup()method to close active con- nections and other resources when the topology shuts down.)
The Main Class
In the main class, you’ll create the topology and a
LocalClusterobject, which enables you to test and debug the topology locally. In conjunction with the
Configobject,
LocalClusterallows you to try out different cluster configurations. For example, if a global or class variable was accidentally used, you would find the error when testing your topology in configurations with a different number of workers. (You’ll see more on config objects in Chapter 3.)
All topology nodes should be able to run independently with no shared data between processes (i.e., no global or class variables) because when the topology runs in a real cluster, these processes may run on different machines.
You’ll create the topology using a
TopologyBuilder, which tells Storm how the nodes are arranged and how they exchange data.
TopologyBuilder builder = new TopologyBuilder();
builder.setSpout("word-reader",new WordReader());
builder.setBolt("word-normalizer", new WordNormalizer()).shuffleGrouping("word- reader");
builder.setBolt("word-counter", new WordCounter()).shuffleGrouping("word- normalizer");
The spout and the bolts are connected using
shuffleGroupings. This type of grouping
tells Storm to send messages from the source node to target nodes in randomly dis-
tributed fashion.
Next, create a
Configobject containing the topology configuration, which is merged with the cluster configuration at run time and sent to all nodes with the
preparemethod.
Config conf = new Config();
conf.put("wordsFile", args[0]);
conf.setDebug(true);
Set the property
wordsFileto the name of the file to be read by the spout, and the property
debugto
truebecause you’re in development. When debug is
true, Storm prints all messages exchanged between nodes, and other debug data useful for under- standing how the topology is running.
As explained earlier, you’ll use a
LocalClusterto run the topology. In a production environment, the topology runs continuously, but for this example you’ll just run the topology for a few seconds so you can see the results.
LocalCluster cluster = new LocalCluster();
cluster.submitTopology("Getting-Started-Toplogie", conf, builder.createTopology());
Thread.sleep(2000);
cluster.shutdown();
Create and run the topology using
createTopologyand
submitTopology, sleep for two seconds (the topology runs in a different thread), and then stop the topology by shutting down the cluster.
See Example 2-3 to put it all together.
Example 2-3. src/main/java/TopologyMain.java import spouts.WordReader;
import backtype.storm.Config;
import backtype.storm.LocalCluster;
import backtype.storm.topology.TopologyBuilder;
import backtype.storm.tuple.Fields;
import bolts.WordCounter;
import bolts.WordNormalizer;
public class TopologyMain {
public static void main(String[] args) throws InterruptedException { //Topology definition
TopologyBuilder builder = new TopologyBuilder();
builder.setSpout("word-reader",new WordReader());
builder.setBolt("word-normalizer", new WordNormalizer()) .shuffleGrouping("word-reader");
builder.setBolt("word-counter", new WordCounter(),2)
.fieldsGrouping("word-normalizer", new Fields("word"));
//Configuration
Config conf = new Config();
conf.put("wordsFile", args[0]);
conf.setDebug(false);
//Topology run
conf.put(Config.TOPOLOGY_MAX_SPOUT_PENDING, 1);
Creating Our First Topology | 17
LocalCluster cluster = new LocalCluster();
cluster.submitTopology("Getting-Started-Toplogie", conf, builder.createTopology());
Thread.sleep(1000);
cluster.shutdown();
} }
See It In Action
You’re ready to run your first topology! If you create a file at
src/main/resources/words.txt
with one word per line, you can run the topology with this command:
mvn exec:java -Dexec.mainClass="TopologyMain" -Dexec.args="src/main/resources/
words.txt"
For example, if you use the following words.txt file:
Storm test are great is an Storm simple application but very powerful really Storm is great
In the logs, you should see something like the following:
is: 2
application: 1 but: 1 great: 1 test: 1 simple: 1 Storm: 3 really: 1 are: 1 great: 1 an: 1 powerful: 1 very: 1
In this example, you’re only using a single instance of each node. But what if you have
a very large log file? You can easily change the number of nodes in the system to par-
allelize the work. In this case, you’ll create two instances of
WordCounter:
builder.setBolt("word-counter", new WordCounter(),2) .shuffleGrouping("word-normalizer");
If you rerun the program, you’ll see:
-- Word Counter [word-counter-2] -- application: 1
is: 1 great: 1 are: 1 powerful: 1 Storm: 3
-- Word Counter [word-counter-3] -- really: 1
is: 1 but: 1 great: 1 test: 1 simple: 1 an: 1 very: 1
Awesome! It’s so easy to change the level of parallelism (in real life, of course, each instance would run on a separate machine). But there seems to be a problem: the words is and great have been counted once in each instance of
WordCounter. Why? When you use
shuffleGrouping, you are telling Storm to send each message to an instance of your bolt in randomly distributed fashion. In this example, it’d be ideal to always send the same word to the same
WordCounter. To do so, you can change
shuffleGrouping("word- normalizer")to
fieldsGrouping("word-normalizer",new Fields("word")). Try it out and rerun the program to confirm the results. You’ll see more about groupings and message flow in later chapters.
Conclusion
We’ve discussed the difference between Storm’s Local and Remote operation modes, and the power and ease of development with Storm. You also learned more about some basic Storm concepts, which we’ll explain in depth in the following chapters.
Conclusion | 19
CHAPTER 3
Topologies
In this chapter, you’ll see how to pass tuples between the different components of a Storm topology, and how to deploy a topology into a running Storm cluster.
Stream Grouping
One of the most important things that you need to do when designing a topology is to define how data is exchanged between components (how streams are consumed by the bolts). A Stream Grouping specifies which stream(s) are consumed by each
boltand how the stream will be consumed.
A node can emit more than one stream of data. A stream grouping allows us to choose which stream to receive.
The stream grouping is set when the topology is defined, as we saw in Chapter 2:
...
builder.setBolt("word-normalizer", new WordNormalizer()) .shuffleGrouping("word-reader");
...
In the preceding code block, a bolt is set on the topology builder, and then a source is set using the shuffle stream grouping. A stream grouping normally takes the source component ID as a parameter, and optionally other parameters as well, depending on the kind of stream grouping.
There can be more than one source per InputDeclarer, and each source can be grouped with a different stream grouping.
21
Download from Wow! eBook <www.wowebook.com>
Shuffle Grouping
Shuffle Grouping is the most commonly used grouping. It takes a single parameter (the source component) and sends each tuple emitted by the source to a randomly chosen bolt warranting that each consumer will receive the same number of tuples.
The shuffle grouping is useful for doing atomic operations such as a math operation.
However, if the operation can’t be randomically distributed, such as the example in Chapter 2 where you needed to count words, you should consider the use of other grouping.
Fields Grouping
Fields Grouping allows you to control how tuples are sent to bolts, based on one or more fields of the tuple. It guarantees that a given set of values for a combination of fields is always sent to the same bolt. Coming back to the word count example, if you group the stream by the word field, the
word-normalizerbolt will always send tuples with a given word to the same instance of the
word-counterbolt.
...
builder.setBolt("word-counter", new WordCounter(),2) .fieldsGrouping("word-normalizer", new Fields("word"));
...
All fields set in the fields grouping must exist in the sources’s field dec- laration.
All Grouping
All Grouping sends a single copy of each tuple to all instances of the receiving bolt.
This kind of grouping is used to send signals to bolts. For example, if you need to refresh a cache, you can send a refresh cache signal to all bolts. In the word-count example, you could use an all grouping to add the ability to clear the
countercache (see Topol- ogies Example).
public void execute(Tuple input) { String str = null;
try{
if(input.getSourceStreamId().equals("signals")){
str = input.getStringByField("action");
if("refreshCache".equals(str)) counters.clear();
}
}catch (IllegalArgumentException e) { //Do nothing
}
...
}
We’ve added an
ifto check the stream source. Storm gives us the possibility to declare named streams (if you don’t send a tuple to a named stream, the stream is
"default");
it’s an excellent way to identify the source of the tuples, such as this case where we want to identify the
signals.
In the topology definition, you’ll add a second stream to the word-counter bolt that sends each tuple from the signals-spout stream to all instances of the bolt.
builder.setBolt("word-counter", new WordCounter(),2)
.fieldsGrouping("word-normalizer", new Fields("word")) .allGrouping("signals-spout","signals");
The implementation of signals-spout can be found at the git repository.
Custom Grouping
You can create your own custom stream grouping by implementing the
back type.storm.grouping.CustomStreamGroupinginterface. This gives you the power to de- cide which bolt(s) will receive each tuple.
Let’s modify the word count example, to group tuples so that all words that start with the same letter will be received by the same bolt.
public class ModuleGrouping implements CustomStreamGrouping, Serializable{
int numTasks = 0;
@Override
public List<Integer> chooseTasks(List<Object> values) { List<Integer> boltIds = new ArrayList();
if(values.size()>0){
String str = values.get(0).toString();
if(str.isEmpty()) boltIds.add(0);
else
boltIds.add(str.charAt(0) % numTasks);
}
return boltIds;
} @Override
public void prepare(TopologyContext context, Fields outFields, List<Integer> targetTasks) {
numTasks = targetTasks.size();
} }
You can see a simple implementation of
CustomStreamGrouping, where we use the amount of tasks to take the modulus of the integer value of the first character of the word, thus selecting which bolt will receive the tuple.
Stream Grouping | 23
To use this grouping in the example, change the
word-normalizergrouping by the fol- lowing:
builder.setBolt("word-normalizer", new WordNormalizer()) .customGrouping("word-reader", new ModuleGrouping());
Direct Grouping
This is a special grouping where the source decides which component will receive the tuple. Similarly to the previous example, the source will decide which bolt receives the tuple based on the first letter of the word. To use direct grouping, in the
WordNormal izerbolt, use the
emitDirectmethod instead of
emit.
public void execute(Tuple input) { ...
for(String word : words){
if(!word.isEmpty()){
...
collector.emitDirect(getWordCountIndex(word),new Values(word));
} }
// Acknowledge the tuple collector.ack(input);
}
public Integer getWordCountIndex(String word) { word = word.trim().toUpperCase();
if(word.isEmpty()) return 0;
else
return word.charAt(0) % numCounterTasks;
}
Work out the number of target tasks in the
preparemethod:
public void prepare(Map stormConf, TopologyContext context, OutputCollector collector) {
this.collector = collector;
this.numCounterTasks = context.getComponentTasks("word-counter");
}
And in the topology definition, specify that the stream will be grouped directly:
builder.setBolt("word-counter", new WordCounter(),2) .directGrouping("word-normalizer");
Global Grouping
Global Grouping sends tuples generated by all instances of the source to a single target
instance (specifically, the task with lowest ID).
None Grouping
At the time of this writing (Storm version 0.7.1), using this grouping is the same as using “Shuffle Grouping” on page 22. In other words, when using this grouping, it doesn’t matter how streams are grouped.
LocalCluster versus StormSubmitter
Until now, you have used a utility called
LocalClusterto run the topology on your local computer. Running the Storm infrastructure on your computer lets you run and debug different topologies easily. But what about when you want to submit your topology to a running Storm cluster? One of the interesting features of Storm is that it’s easy to send your topology to run in a real cluster. You’ll need to change the
LocalClusterto a
StormSubmitterand implement the
submitTopologymethod, which is responsible for sending the topology to the cluster.
You can see the changes in the code below:
//LocalCluster cluster = new LocalCluster();
//cluster.submitTopology("Count-Word-Topology-With-Refresh-Cache", conf, builder.createTopology());
StormSubmitter.submitTopology("Count-Word-Topology-With-Refresh-Cache", conf, builder.createTopology());
//Thread.sleep(1000);
//cluster.shutdown();
When you use a StormSubmitter, you can’t control the cluster from your code as you could with a LocalCluster.
Next, package the source into a jar, which is sent when you run the Storm Client com- mand to submit the topology. Because you used Maven, the only thing you need to do is go to the source folder and run the following:
mvn package
Once you have the generated jar, use the
storm jarcommand to submit the topology (you should know how to install the Storm client into Appendix A). The syntax is
storm jar allmycode.jar org.me.MyTopology arg1 arg2 arg3.
In this example, from the topologies source project folder, run:
storm jar target/Topologies-0.0.1-SNAPSHOT.jar countword.TopologyMain src/main/
resources/words.txt
With these commands, you have submitted the topology to the cluster.
To stop/kill it, run:
storm kill Count-Word-Topology-With-Refresh-Cache
LocalCluster versus StormSubmitter | 25
The topology name must be unique.
To install the Storm Client, see Appendix A.
DRPC Topologies
There is a special type of topology known as Distributed Remote Procedure Call (DRPC), that executes Remote Procedure Calls (RPC) using the distributed power of Storm (see Figure 3-1). Storm gives you some tools to enable the use of DRPC. The first is a DRPC server that runs as a connector between the client and the Storm topology, running as a source for the toplogy spouts. It receives a function to execute and its parameters. Then for each piece of data on which the function operates, the server assigns a request ID used through the topology to identify the RPC request. When the topology executes the last bolt, it must emit the RPC request ID and the result, allowing the DRPC server to return the result to the correct client.
A single DRPC server can execute many functions. Each function is identified by a unique name.
The second tool that Storm provides (used in the example) is the
LinearDRPCTopology Builder, an abstraction to help build DRPC topologies. The topology generated creates
DRPCSpouts—which connect to DRPC servers and emit data to the rest of the topology
—and wraps bolts so that a result is returned from the last bolt. All bolts added to a
LinearDRPCTopologyBuilderare executed in sequential order.
As an example of this type of topology, you’ll create a process that adds numbers. This
is a simple example, but the concept could be extended to perform complex distributed
math operations.
Figure 3-1. DRPC topology schema
The bolt has the following output declarer:
public void declareOutputFields(OutputFieldsDeclarer declarer) { declarer.declare(new Fields("id","result"));
}
Because this is the only bolt in the topology, it must emit the RPC ID and the result.
The
executemethod is responsible for executing the add operation:
public void execute(Tuple input) {
String[] numbers = input.getString(1).split("\\+");
Integer added = 0;
if(numbers.length<2){
throw new InvalidParameterException("Should be at least 2 numbers");
}
for(String num : numbers){
added += Integer.parseInt(num);
}
collector.emit(new Values(input.getValue(0),added));
}
Include the added bolt in the topology definition as follows:
public static void main(String[] args) { LocalDRPC drpc = new LocalDRPC();
LinearDRPCTopologyBuilder builder = new LinearDRPCTopologyBuilder("add");
builder.addBolt(new AdderBolt(),2);
Config conf = new Config();
conf.setDebug(true);
LocalCluster cluster = new LocalCluster();
cluster.submitTopology("drpc-adder-topology", conf, builder.createLocalTopology(drpc));
String result = drpc.execute("add", "1+-1");
checkResult(result,0);
result = drpc.execute("add", "1+1+5+10");
checkResult(result,17);
cluster.shutdown();
DRPC Topologies | 27
drpc.shutdown();
}
Create a
LocalDRPCobject that runs the DRPC server locally. Next, create a topology builder and add the bolt to the topology. To test the topology, use the
executemethod on your DRPC object.
To connect to a remote DRPC server, use the DRPCClient class. The DRPC server exposes a Thrift API that could be used from many lan- guages, and it’s the same API if you run DRPC server in locally or remote.
To submit a topology to a Storm cluster, use the method createRemote Topology of the builder object instead of createLocalTopology, which uses the DRPC configuration from Storm config.
CHAPTER 4
Spouts
In this chapter, you’ll take a look at the most commonly used strategies for designing the entry point for a topology (a spout) and how to make spouts fault-tolerant.
Reliable versus Unreliable Messages
When designing a topology, one important thing to keep in mind is message reliability.
If a message can’t be processed, you need to decide what to do with the individual message and what to do with the topology as a whole. For example, when processing bank deposits, it is important not to lose a single transaction message. But if you’re processing millions of tweets looking for some statistical metric, and one tweet gets lost, you can assume that the metric will still be fairly accurate.
In Storm, it is the author’s responsibility to guarantee message reliability according to the needs of each topology. This involves a trade-off. A reliable topology must manage lost messages, which requires more resources. A less reliable topology may lose some messages, but is less resource-intensive. Whatever the chosen reliability strategy, Storm provides the tools to implement it.
To manage reliability at the spout, you can include a message ID with the tuple at emit time (
collector.emit(new Values(…),tupleId)). The methods
ackand
failare called when a tuple is processed correctly or fails respectively. Tuple processing suc- ceeds when the tuple is processed by all target bolts and all anchored bolts (you will learn how to anchor a bolt to a tuple in the Chapter 5).
Tuple processing fails when:
•
collector.fail(tuple)is called by the target spout
• processing time exceeds the configured timeout
29
Let’s take a look at an example. Imagine you are processing bank transactions, and you have the following requirements:
• If a transaction fails, resend the message.
• If the transaction fails too many times, terminate the topology.
You’ll create a spout that sends 100 random transaction IDs, and a bolt that fails for 80% of tuples received (you can find the complete example at ch04-spout examples).
You’ll implement the spout using a
Mapto emit transaction message tuples so that it’s easy to resend messages.
public void nextTuple() { if(!toSend.isEmpty()){
for(Map.Entry<Integer, String> transactionEntry : toSend.entrySet()){
Integer transactionId = transactionEntry.getKey();
String transactionMessage = transactionEntry.getValue();
collector.emit(new Values(transactionMessage),transactionId);
}
toSend.clear();
} }
If there are messages waiting to be sent, get each transaction message and its associated ID and emit them as a tuple, then clear the message queue. Note that it’s safe to call
clearon the map, because
nextTuple,
fail, and
ackare the only methods that modify the map, and they all run in the same thread.
Maintain two maps to keep track of transaction messages waiting to be sent, and the number of times each transaction has failed. The
ackmethod simply removes the trans- action message from each list.
public void ack(Object msgId) { messages.remove(msgId);
failCounterMessages.remove(msgId);
}
The
failmethod decides whether to resend a transaction message or fail if it has failed too many times.
If you are using an all grouping in your topology and any instance of the bolt fails, the fail method of the spout will be called as well.
public void fail(Object msgId) {
Integer transactionId = (Integer) msgId;
// Check the number of times the transaction has failed
Integer failures = transactionFailureCount.get(transactionId) + 1;
if(fails >= MAX_FAILS){
// If the number of failures is too high, terminate the topology throw new RuntimeException("Error, transaction id ["+
}
// If the number of failures is less than the maximum, save the number and re-send the message
transactionFailureCount.put(transactionId, failures);
toSend.put(transactionId,messages.get(transactionId));
LOG.info("Re-sending message ["+msgId+"]");
}
First, check the number of times the transaction has failed. If a transaction fails too many times, throw a
RuntimeExceptionto terminate the worker where it is running.
Otherwise, save the failure count and put the transaction message in the
toSendqueue so that it will be resent when
nextTupleis called.
Storm nodes do not maintain state, so if you store information in mem- ory (as in this example) and the node goes down, you will lose all stored information.
Storm is a fast-fail system. If an exception is thrown, the topology will go down, but Storm will restart the process in a consistent state so that it can recover correctly.
Getting Data
Here you’ll take a look at some common techniques for designing spouts that collect data efficiently from multiple sources.
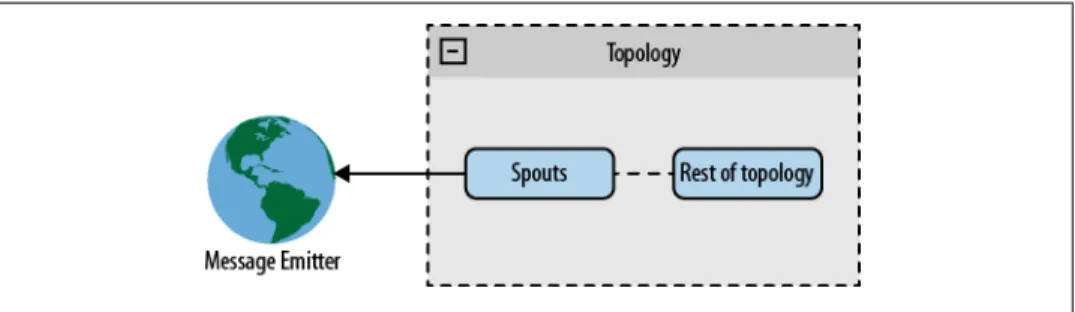
Direct Connection
In a direct connection architecture, the spout connects directly to a message emitter (see Figure 4-1).
Figure 4-1. Direct connection spout
This architecture is simple to implement, particularly when the message emitter is a
well-known device or a well-known device group. A well-known device is one that is
known at startup and remains the same throughout the life of the topology. An
Getting Data | 31unknown device is one that is added after the topology is already running. A well- known device group is one in which all devices in the group are known at start time.
As an example, create a spout to read the Twitter stream using the Twitter streaming API. The spout will connect directly to the API, which serves as the message emitter.
Filter the stream to get all public tweets that match the
trackparameter (as documented on the Twitter dev page). The complete example can be found at Twitter Example github page.
The spout gets the connection parameters from the configuration object (
track,
user, and
password) and creates a connection to the API (in this case, using the DefaultHttp- Client from Apache). It reads the connection one line at a time, parses the line from JSON format into a Java object, and emits it.
public void nextTuple() { //Create the client call
client = new DefaultHttpClient();
client.setCredentialsProvider(credentialProvider);
HttpGet get = new HttpGet(STREAMING_API_URL+track);
HttpResponse response;
try { //Execute
response = client.execute(get);
StatusLine status = response.getStatusLine();
if(status.getStatusCode() == 200){
InputStream inputStream = response.getEntity().getContent();
BufferedReader reader = new BufferedReader(new InputStreamReader(inputStream));
String in;
//Read line by line
while((in = reader.readLine())!=null){
try{
//Parse and emit
Object json = jsonParser.parse(in);
collector.emit(new Values(track,json));
}catch (ParseException e) {
LOG.error("Error parsing message from twitter",e);
} } }
} catch (IOException e) {
LOG.error("Error in communication with twitter api ["+get.getURI().toString()+"], sleeping 10s");
try {
Thread.sleep(10000);
} catch (InterruptedException e1) { }
} }
Download from Wow! eBook <www.wowebook.com>
Here you are locking the nextTuple method, so you never execute the ack and fail methods. In a real application, we recommend that you do the locking into a separate thread and use an internal queue to exchange information (you’ll learn how to do that in the next example, “Enqueued Messages” on page 34).
This is great!
You’re reading the Twitter stream with a single spout. If you parallelize the topology, you’ll have several spouts reading different partitions of the same stream, which doesn’t make sense. So how do you parallelize processing if you have several streams to read?
One interesting feature of Storm is that you can access the
TopologyContextfrom any component (spouts/bolts). Using this feature, you can divide the streams between your spout instances.
public void open(Map conf, TopologyContext context, SpoutOutputCollector collector) {
//Get the spout size from the context int spoutsSize =
context.getComponentTasks(context.getThisComponentId()).size();
//Get the id of this spout
int myIdx = context.getThisTaskIndex();
String[] tracks = ((String) conf.get("track")).split(",");
StringBuffer tracksBuffer = new StringBuffer();
for(int i=0; i< tracks.length;i++){
//Check if this spout must read the track word if( i % spoutsSize == myIdx){
tracksBuffer.append(",");
tracksBuffer.append(tracks[i]);
} }
if(tracksBuffer.length() == 0) {
throw new RuntimeException("No track found for spout" +
" [spoutsSize:"+spoutsSize+", tracks:"+tracks.length+"] the amount" + " of tracks must be more then the spout paralellism");
this.track =tracksBuffer.substring(1).toString();
} ...
}
Using this technique, you can distribute collectors evenly across data sources. The same technique can be applied in other situations—for example, for collecting log files from web servers. See Figure 4-2.
Getting Data | 33
Figure 4-2. Direct connection hashing
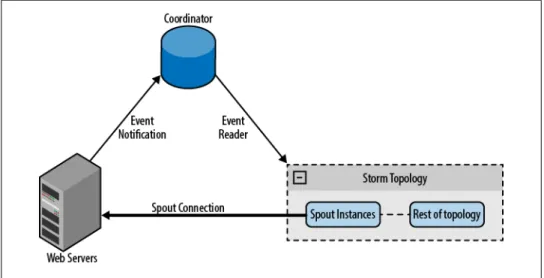
In the previous example, you connected the spout to a well-known device. You can use the same approach to connect to unknown devices using a coordinating system to maintain the device list. The coordinator detects changes to the list and creates and destroys connections. For example, when collecting log files from web servers, the list of web servers may change over time. When a web server is added, the coordinator detects the change and creates a new spout for it. See Figure 4-3.
It’s recommended to create connections from spouts to message emit- ters, rather than the other way around. If the machine on which a spout is running goes down, Storm will restart it on another machine, so it’s easier for the spout to locate the message emitter than for the message emitter to keep track of which machine the spout is on.