Amazon VPC
AWS Transit Gateway
Amazon VPC: AWS Transit Gateway
Copyright © Amazon Web Services, Inc. and/or its affiliates. All rights reserved.
Amazon's trademarks and trade dress may not be used in connection with any product or service that is not Amazon's, in any manner that is likely to cause confusion among customers, or in any manner that disparages or discredits Amazon. All other trademarks not owned by Amazon are the property of their respective owners, who may or may not be affiliated with, connected to, or sponsored by Amazon.
Table of Contents
What is a transit gateway? ... 1
Transit gateway concepts ... 1
How to get started with transit gateways ... 1
Work with transit gateways ... 2
Pricing ... 2
How transit gateways work ... 3
Resource attachments ... 3
Availability Zones ... 3
Routing ... 4
Route tables ... 4
Route table association ... 4
Route propagation ... 4
Routes for peering attachments ... 5
Route evaluation order ... 5
Getting started ... 7
Prerequisites ... 7
Step 1: Create the transit gateway ... 7
Step 2: Attach your VPCs to your transit gateway ... 8
Step 3: Add routes between the transit gateway and your VPCs ... 8
Step 4: Test the transit gateway ... 9
Step 5: Delete the transit gateway ... 9
Design best practices ... 10
Examples ... 11
Centralized router ... 11
Overview ... 11
Resources ... 11
Routing ... 12
Isolated VPCs ... 13
Overview ... 13
Resources ... 13
Routing ... 14
Isolated VPCs with shared services ... 15
Overview ... 15
Resources ... 15
Routing ... 16
Peering ... 17
Overview ... 17
Resources ... 17
Routing ... 18
Centralized outbound routing ... 19
Overview ... 19
Resources ... 20
Routing ... 20
Appliance VPC ... 22
Overview ... 22
Stateful appliances and appliance mode ... 23
Routing ... 24
Work with transit gateways ... 26
Transit gateways ... 26
Create a transit gateway ... 27
View your transit gateways ... 28
Add or edit tags for a transit gateway ... 28
Modify a transit gateway ... 29
Share a transit gateway ... 29
Accept a resource share ... 29
Accept a shared attachment ... 30
Delete a transit gateway ... 30
Transit gateway attachments to a VPC ... 30
VPC attachment lifecycle ... 31
Create a transit gateway attachment to a VPC ... 35
Modify your VPC attachment ... 35
Modify your VPC attachment tags ... 36
View your VPC attachments ... 36
Delete a VPC attachment ... 36
Troubleshoot VPC attachments ... 36
Transit gateway attachments to a Direct Connect gateway ... 37
Transit gateway VPN attachments ... 38
Create a transit gateway attachment to a VPN ... 38
View your VPN attachments ... 38
Transit gateway peering attachments ... 39
Create a peering attachment ... 39
Accept or reject a peering attachment request ... 40
Add a route to the transit gateway route table ... 40
View your transit gateway peering connection attachments ... 41
Delete a peering attachment ... 41
Opt-in AWS Region considerations ... 41
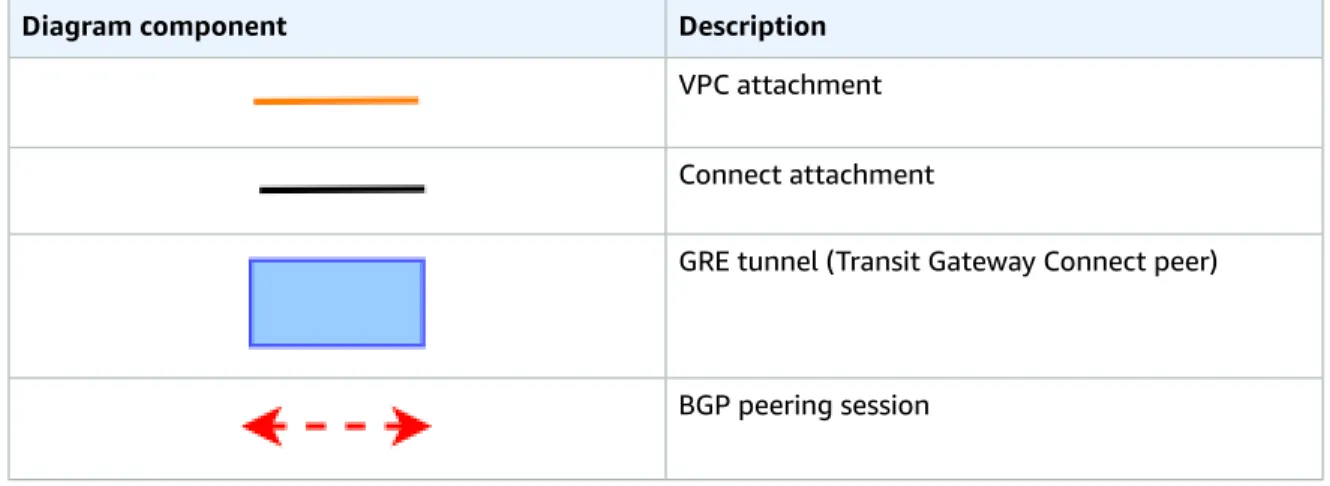
Transit gateway Connect attachments and Transit Gateway Connect peers ... 42
Transit Gateway Connect peers ... 42
Requirements and considerations ... 44
Create a transit gateway Connect attachment ... 45
Create a Transit Gateway Connect peer (GRE tunnel) ... 45
View your transit gateway Connect attachments and Transit Gateway Connect peers ... 46
Modify your Connect attachment and Transit Gateway Connect peer tags ... 46
Delete a Transit Gateway Connect peer ... 47
Delete a transit gateway Connect attachment ... 47
Transit gateway route tables ... 47
Create a transit gateway route table ... 48
Associate a transit gateway route table ... 48
Delete an association for a transit gateway route table ... 48
View transit gateway route tables ... 49
Propagate a route to a transit gateway route table ... 49
Disable route propagation ... 49
View route table propagations ... 50
Create a static route ... 50
Delete a static route ... 50
Export route tables to Amazon S3 ... 51
Delete a transit gateway route table ... 52
Prefix list references ... 52
Multicast on transit gateways ... 54
Multicast concepts ... 1
Considerations ... 54
Multicast routing ... 55
Working with multicast ... 56
Share your transit gateways ... 70
Unshare a transit gateway ... 71
Monitor your transit gateways ... 72
CloudWatch metrics ... 72
Transit gateway metrics ... 72
Metric dimensions for transit gateways ... 73
CloudTrail logs ... 74
Transit gateway information in CloudTrail ... 74
Understanding transit gateway log file entries ... 75
Authentication and access control ... 77
Example policies to manage transit gateways ... 77
Example policies to manage AWS Network Manager ... 79
Service-linked roles ... 79
Transit gateway ... 79
AWS managed policies ... 80
Network ACLs ... 80
Same subnet for EC2 network interface workload and transit gateway association ... 80
Different subnet for EC2 network interface workload and transit gateway association ... 81
Best Practices ... 81
Quotas ... 82
General ... 82
Routing ... 82
Transit gateway attachments ... 82
Bandwidth ... 83
AWS Direct Connect gateways ... 84
MTU ... 84
Multicast ... 84
AWS Network Manager ... 85
Additional quota resources ... 85
Document history ... 86
Transit gateway concepts
What is a transit gateway?
A transit gateway is a network transit hub that you can use to interconnect your virtual private clouds (VPCs) and on-premises networks. As your cloud infrastructure expands globally, inter-Region peering connects transit gateways together using the AWS Global Infrastructure. Your data is automatically encrypted and never travels over the public internet.
For more information, see AWS Transit Gateway.
Note
Transit Gateway Network Manager was renamed to AWS Network Manager. Content related to Network Manager was moved to a new AWS Network Manager User Guide.Transit gateway concepts
The following are the key concepts for transit gateways:
• Attachments — You can attach the following:
• One or more VPCs
• A Connect SD-WAN/third-party network appliance
• An AWS Direct Connect gateway
• A peering connection with another transit gateway
• A VPN connection to a transit gateway
• Transit gateway Maximum Transmission Unit (MTU) — The maximum transmission unit (MTU) of a network connection is the size, in bytes, of the largest permissible packet that can be passed over the connection. The larger the MTU of a connection, the more data that can be passed in a single packet. A transit gateway supports an MTU of 8500 bytes for traffic between VPCs, AWS Direct Connect, Transit Gateway Connect, and peering attachments. Traffic over VPN connections can have an MTU of 1500 bytes.
• Transit gateway route table — A transit gateway has a default route table and can optionally have additional route tables. A route table includes dynamic and static routes that decide the next hop based on the destination IP address of the packet. The target of these routes could be any transit gateway attachment. By default, transit gateway attachments are associated with the default transit gateway route table.
• Associations — Each attachment is associated with exactly one route table. Each route table can be associated with zero to many attachments.
• Route propagation — A VPC, VPN connection, or Direct Connect gateway can dynamically propagate routes to a transit gateway route table. With a Connect attachment, the routes are propagated to a transit gateway route table by default. With a VPC, you must create static routes to send traffic to the transit gateway. With a VPN connection or a Direct Connect gateway, routes are propagated from the transit gateway to your on-premises router using Border Gateway Protocol (BGP). With a peering attachment, you must create a static route in the transit gateway route table to point to the peering attachment.
How to get started with transit gateways
Use the following resources to help you create and use a transit gateway.
• How transit gateways work (p. 3)
Work with transit gateways
• Getting started (p. 7)
• Design best practices (p. 10)
Work with transit gateways
You can create, access, and manage your transit gateways using any of the following interfaces:
• AWS Management Console — Provides a web interface that you can use to access your transit gateways.
• AWS Command Line Interface (AWS CLI) — Provides commands for a broad set of AWS services, including Amazon VPC, and is supported on Windows, macOS, and Linux. For more information, see AWS Command Line Interface.
• AWS SDKs — Provides language-specific API operations and takes care of many of the connection details, such as calculating signatures, handling request retries, and handling errors. For more information, see AWS SDKs.
• Query API — Provides low-level API actions that you call using HTTPS requests. Using the Query API is the most direct way to access Amazon VPC, but it requires that your application handle low-level details such as generating the hash to sign the request, and handling errors. For more information, see the Amazon EC2 API Reference.
Pricing
You are charged hourly for each attachment on a transit gateway, and you are charged for the amount of traffic processed on the transit gateway. For more information, see AWS Transit Gateway pricing.
Resource attachments
How transit gateways work
A transit gateway acts as a Regional virtual router for traffic flowing between your virtual private clouds (VPCs) and on-premises networks. A transit gateway scales elastically based on the volume of network traffic. Routing through a transit gateway operates at layer 3, where the packets are sent to a specific next-hop attachment, based on their destination IP addresses.
Resource attachments
A transit gateway attachment is both a source and a destination of packets. You can attach the following resources to your transit gateway:
• One or more VPCs. AWS Transit Gateway deploys an Elastic Network Interface within VPC subnets, which is then used by the transit gateway to route traffic to and from the chosen subnets. You must have at least one subnet for each Availability Zone, which then enables traffic to reach resources in every subnet of that zone. During attachment creation, resources within a particular Availability Zone can reach a transit gateway only if a subnet is enabled within the same zone. If a subnet route table includes a route to the transit gateway, traffic is only forwarded to the transit gateway if the transit gateway has an attachment in the subnet of the same Availability Zone.
• One or more VPN connections
• One or more AWS Direct Connect gateways
• One or more Transit Gateway Connect attachments
• One or more transit gateway peering connections
Intra-region peering connections are supported. You can have different transit gateways in different Regions.
Availability Zones
When you attach a VPC to a transit gateway, you must enable one or more Availability Zones to be used by the transit gateway to route traffic to resources in the VPC subnets. To enable each Availability Zone, you specify exactly one subnet. The transit gateway places a network interface in that subnet using one IP address from the subnet. After you enable an Availability Zone, traffic can be routed to all subnets in that zone, not just the specified subnet. Resources that reside in Availability Zones where there is no transit gateway attachment cannot reach the transit gateway.
We recommend that you enable multiple Availability Zones to ensure availability.
Using appliance mode support
If you plan to configure a stateful network appliance in your VPC, you can enable appliance mode support for the VPC attachment in which the appliance is located. This ensures that the transit gateway uses the same Availability Zone for that VPC attachment for the lifetime of a flow of traffic between source and destination. It also allows the transit gateway to send traffic to any Availability Zone in the VPC, as long as there is a subnet association in that zone. For more information, see Example: Appliance in a shared services VPC (p. 22).
Routing
Routing
Your transit gateway routes IPv4 and IPv6 packets between attachments using transit gateway route tables. You can configure these route tables to propagate routes from the route tables for the attached VPCs, VPN connections, and Direct Connect gateways. You can also add static routes to the transit gateway route tables. When a packet comes from one attachment, it is routed to another attachment using the route that matches the destination IP address.
For transit gateway peering attachments, only static routes are supported.
Contents
• Route tables (p. 4)
• Route table association (p. 4)
• Route propagation (p. 4)
• Routes for peering attachments (p. 5)
• Route evaluation order (p. 5)
Route tables
Your transit gateway automatically comes with a default route table. By default, this route table is the default association route table and the default propagation route table. Alternatively, if you disable route propagation and route table association, AWS does not create a default route table for the transit gateway.
You can create additional route tables for your transit gateway. This enables you to isolate subnets of attachments. Each attachment can be associated with one route table. An attachment can propagate its routes to one or more route tables.
You can create a blackhole route in your transit gateway route table that drops traffic that matches the route.
When you attach a VPC to a transit gateway, you must add a route to your subnet route table in order for traffic to route through the transit gateway. For more information, see Routing for a Transit Gateway in the Amazon VPC User Guide.
Route table association
You can associate a transit gateway attachment with a single route table. Each route table can be associated with zero to many attachments and can forward packets to other attachments.
Route propagation
Each attachment comes with routes that can be installed in one or more transit gateway route tables.
When an attachment is propagated to a transit gateway route table, these routes are installed in the route table.
For a VPC attachment, the CIDR blocks of the VPC are propagated to the transit gateway route table.
When dynamic routing is used with a VPN attachment or a Direct Connect gateway attachment, you can propagate the routes learned from the on-premises router through BGP to any of the transit gateway route tables.
When dynamic routing is used with a VPN attachment, the routes in the route table associated with the VPN attachment are advertised to the customer gateway through BGP.
Routes for peering attachments
For a Connect attachment, routes in the route table associated with the Connect attachment are advertised to the third-party virtual appliances, such as SD-WAN appliances, running in a VPC through BGP.
For a Direct Connect gateway attachment, allowed prefixes interactions control which routes are advertised to the customer network from AWS.
When a static route and a propagated route have the same destination, the static route has the higher priority, so the propagated route is not included in the route table. If you remove the static route, the overlapping propagated route is included in the route table.
Routes for peering attachments
You can peer two transit gateways, and route traffic between them. To do this, you create a peering attachment on your transit gateway, and specify the peer transit gateway with which to create the peering connection. You then create a static route in your transit gateway route table to route traffic to the transit gateway peering attachment. Traffic that's routed to the peer transit gateway can then be routed to the VPC and VPN attachments for the peer transit gateway.
For more information, see Example: Peered transit gateways (p. 17).
Route evaluation order
Transit gateway routes are evaluated in the following order:
• The most specific route for the destination address.
• For routes with the same destination IP address but different targets, the route priority is as follows:
• Static routes (for example, Site-to-Site VPN static routes)
• Prefix list referenced routes
• VPC propagated routes
• Direct Connect gateway propagated routes
• Transit Gateway Connect propagated routes
• Site-to-Site VPN propagated routes
Transit Gateway only shows a preferred route. A backup route will only appear in the Transit Gateway route table if that route is no longer advertised. For example, if you are advertising the same routes over the Direct Connect gateway and over Site-to-Site VPN. AWS Transit Gateway will only shows the routes received from the Direct Connect gateway route, which is the preferred route. The Site-to-Site VPN, which is the backup route, will only display when the Direct Connect gateway is no longer advertised.
Consider the following VPC route table. The VPC local route has the highest priority, followed by the routes that are the most specific. When a static route and a propagated route have the same destination, the static route has a higher priority.
Destination Target Priority
10.0.0.0/16 local 1
192.168.0.0/16 pcx-12345 2
172.31.0.0/16 vgw-12345 (static) or
tgw-12345 (static)
2
172.31.0.0/16 vgw-12345 (propagated) 3
Route evaluation order
Destination Target Priority
0.0.0.0/0 igw-12345 4
Consider the following transit gateway route table. If you prefer the AWS Direct Connect gateway attachment to the VPN attachment, use a BGP VPN connection and propagate the routes in the transit gateway route table.
Destination Attachment
(Target) Resource type Route type Priority
10.0.0.0/16 tgw-attach-123 |
vpc-1234 VPC Static or
propagated 1
192.168.0.0/16 tgw-attach-789 |
vpn-5678 VPN Static 2
172.31.0.0/16 tgw-attach-456 |
dxgw_id AWS Direct
Connect gateway Propagated 3 172.31.0.0/16 tgw-attach-789
| tgw-connect- peer-123
VPN Propagated 4
172.31.0.0/16 tgw-attach-789 |
vpn-5678 VPN Propagated 5
Prerequisites
Getting started with transit gateways
The following tasks help you become familiar with transit gateways. You will create a transit gateway and then connect two of your VPCs using the transit gateway.
Tasks
• Prerequisites (p. 7)
• Step 1: Create the transit gateway (p. 7)
• Step 2: Attach your VPCs to your transit gateway (p. 8)
• Step 3: Add routes between the transit gateway and your VPCs (p. 8)
• Step 4: Test the transit gateway (p. 9)
• Step 5: Delete the transit gateway (p. 9)
Prerequisites
• To demonstrate a simple example of using a transit gateway, create two VPCs in the same Region.
The VPCs cannot have overlapping CIDRs. Launch one Amazon EC2 instance in each VPC. For more information, see Get started with Amazon VPC in the Amazon VPC User Guide.
• You cannot have identical routes pointing to two different VPCs. A transit gateway does not propagate the CIDRs of a newly attached VPC if an identical route exists in the transit gateway route tables.
• Verify that you have the permissions required to work with transit gateways. For more information, see Authentication and access control for your transit gateways (p. 77).
• You can't ping between hosts if you haven't added an ICMP rule to each of the host security groups.
For more information, see Work with security groups in the Amazon VPC User Guide.
Step 1: Create the transit gateway
When you create a transit gateway, we create a default transit gateway route table and use it as the default association route table and the default propagation route table.
To create a transit gateway
1. Open the Amazon VPC console at https://console.aws.amazon.com/vpc/.
2. In the Region selector, choose the Region that you used when you created the VPCs.
3. On the navigation pane, choose Transit Gateways.
4. Choose Create transit gateway.
5. (Optional) For Name tag, enter a name for the transit gateway. This creates a tag with "Name" as the key and the name that you specified as the value.
6. (Optional) For Description, enter a description for the transit gateway.
7. For Amazon side Autonomous System Number (ASN), enter the private ASN for your transit gateway. This should be the ASN for the AWS side of a Border Gateway Protocol (BGP) session.
The range is from 64512 to 65534 for 16-bit ASNs.
Step 2: Attach your VPCs to your transit gateway
The range is from 4200000000 to 4294967294 for 32-bit ASNs.
If you have a multi-Region deployment, we recommend that you use a unique ASN for each of your transit gateways.
8. (Optional) You can modify the default settings if you need to disable DNS support, or if you don't want the default association route table or default propagation route table.
9. Choose Create transit gateway. When the gateway is created, the initial state of the transit gateway is pending.
Step 2: Attach your VPCs to your transit gateway
Wait until the transit gateway you created in the previous section shows as available before proceeding with creating an attachment. Create an attachment for each VPC.
Confirm that you have created two VPCs and launched an EC2 instance in each, as described in Prerequisites (p. 7).
Create a transit gateway attachment to a VPC
1. Open the Amazon VPC console at https://console.aws.amazon.com/vpc/.
2. On the navigation pane, choose Transit Gateway Attachments.
3. Choose Create transit gateway attachment.
4. (Optional) For Name tag, enter a name for the attachment.
5. For Transit gateway ID, choose the transit gateway to use for the attachment.
6. For Attachment type, choose VPC.
7. Choose whether to enable DNS support. For this exercise, do not enable IPv6 support.
8. For VPC ID, choose the VPC to attach to the transit gateway.
9. For Subnet IDs, select one subnet for each Availability Zone to be used by the transit gateway to route traffic. You must select at least one subnet. You can select only one subnet per Availability Zone.
10. Choose Create transit gateway attachment.
Each attachment is always associated with exactly one route table. Route tables can be associated with zero to many attachments. To determine the routes to configure, decide on the use case for your transit gateway, and then configure the routes. For more information, see Examples (p. 11).
Step 3: Add routes between the transit gateway and your VPCs
A route table includes dynamic and static routes that determine the next hop for associated VPCs based on the destination IP address of the packet. Configure a route that has a destination for non-local routes and the target of the transit gateway attachment ID. For more information, see Routing for a transit gateway in the Amazon VPC User Guide.
To add a route to a VPC route table
1. Open the Amazon VPC console at https://console.aws.amazon.com/vpc/.
2. On the navigation pane, choose Route Tables.
Step 4: Test the transit gateway
3. Choose the route table associated with your VPC.
4. Choose the Routes tab, then choose Edit routes.
5. Choose Add route.
6. In the Destination column, enter the destination IP address range. For Target, choose the transit gateway attachment ID.
7. Choose Save changes.
Step 4: Test the transit gateway
You can confirm that the transit gateway was successfully created by connecting to an Amazon EC2 instance in each VPC, and then sending data between them, such as a ping command. For more information, see Connect to your Linux instance or Connecting to your Windows instance.
Step 5: Delete the transit gateway
When you no longer need a transit gateway, you can delete it. You cannot delete a transit gateway that has resource attachments. As soon as the transit gateway is deleted, you stop incurring charges for it.
To delete your transit gateway
1. Open the Amazon VPC console at https://console.aws.amazon.com/vpc/.
2. On the navigation pane, choose Transit Gateway Attachments.
3. Select the attachments and then choose Actions, Delete transit gateway attachment.
4. Enter delete and choose Delete.
5. On the navigation pane, choose Transit Gateways.
6. Select the transit gateway and then choose Actions, Delete transit gateway.
7. Enter delete and choose Delete.
Transit gateway design best practices
The following are best practices for your transit gateway design:
• Use a separate subnet for each transit gateway VPC attachment. For each subnet, use a small CIDR, for example /28, so that you have more addresses for EC2 resources. When you use a separate subnet, you can configure the following:
• Keep the inbound and outbound network ACLs associated with the transit gateway subnets open.
• Depending on your traffic flow, you can apply network ACLs to your workload subnets.
• Create one network ACL and associate it with all of the subnets that are associated with the transit gateway. Keep the network ACL open in both the inbound and outbound directions.
• Associate the same VPC route table with all of the subnets that are associated with the transit gateway, unless your network design requires multiple VPC route tables (for example, a middle-box VPC that routes traffic through multiple NAT gateways).
• Use Border Gateway Protocol (BGP) Site-to-Site VPN connections. If your customer gateway device or firewall for the connection supports multipath, enable the feature.
• Enable route propagation for AWS Direct Connect gateway attachments and BGP Site-to-Site VPN attachments.
• When migrating from VPC peering to use an AWS Transit Gateway,
• A transit gateway does not support Security Group referencing.
• An MTU size mismatch between VPC peering and the transit gateway might result in some packets dropping for asymmetric traffic. Update both VPCs at the same time to avoid jumbo packets dropping due to size mismatch.
• You do not need additional transit gateways for high availability, because transit gateways are highly available by design.
• Limit the number of transit gateway route tables unless your design requires multiple transit gateway route tables.
• For redundancy, use a single Transit Gateway in each Region for disaster recovery.
• For deployments with multiple transit gateways, we recommend that you use a unique Autonomous System Number (ASN) for each of your transit gateways. Transit Gateway also supports intra-Region peering. For more information, see Building a global network using AWS Transit Gateway Intra-Region peering.
Centralized router
Examples
The following are common use cases for transit gateways. Your transit gateways are not limited to these use cases.
Examples
• Example: Centralized router (p. 11)
• Example: Isolated VPCs (p. 13)
• Example: Isolated VPCs with shared services (p. 15)
• Example: Peered transit gateways (p. 17)
• Example: Centralized outbound routing to the internet (p. 19)
• Example: Appliance in a shared services VPC (p. 22)
Example: Centralized router
You can configure your transit gateway as a centralized router that connects all of your VPCs, AWS Direct Connect, and Site-to-Site VPN connections. In this scenario, all attachments are associated with the transit gateway default route table and propagate to the transit gateway default route table. Therefore, all attachments can route packets to each other, with the transit gateway serving as a simple layer 3 IP router.
Contents
• Overview (p. 11)
• Resources (p. 11)
• Routing (p. 12)
Overview
The following diagram shows the key components of the configuration for this scenario. In this scenario, there are three VPC attachments and one Site-to-Site VPN attachment to the transit gateway. Packets from the subnets in VPC A, VPC B, and VPC C that are destined for a subnet in another VPC or for the VPN connection first route through the transit gateway.
Resources
Create the following resources for this scenario:
Routing
• Three VPCs. For information about creating a VPC, see Create a VPC in the Amazon VPC User Guide.
• A transit gateway. For more information, see the section called “Create a transit gateway” (p. 27).
• Three VPC attachments on the transit gateway. For more information, see the section called “Create a transit gateway attachment to a VPC” (p. 35).
• A Site-to-Site VPN attachment on the transit gateway. The CIDR blocks for each VPC propagate to the transit gateway route table. When the VPN connection is up, the BGP session is established and the Site-to-Site VPN CIDR propagates to the transit gateway route table and the VPC CIDRs are added to the customer gateway BGP table. For more information, see the section called “Create a transit gateway attachment to a VPN” (p. 38).
Ensure that you review the requirements for your customer gateway device in the AWS Site-to-Site VPN User Guide.
Routing
Each VPC has a route table and there is a route table for the transit gateway.
VPC route tables
Each VPC has a route table with 2 entries. The first entry is the default entry for local IPv4 routing in the VPC; this entry enables the instances in this VPC to communicate with each other. The second entry routes all other IPv4 subnet traffic to the transit gateway. The following table shows the VPC A routes.
Destination Target
10.1.0.0/16 local
0.0.0.0/0 tgw-id
Transit gateway route table
The following is an example of a default route table for the attachments shown in the previous diagram, with route propagation enabled.
Destination Target Route type
10.1.0.0/16 Attachment for VPC A propagated
10.2.0.0/16 Attachment for VPC B propagated
10.3.0.0/16 Attachment for VPC C propagated
10.99.99.0/24 Attachment for VPN
connection
propagated
Customer gateway BGP table
The customer gateway BGP table contains the following VPC CIDRs.
• 10.1.0.0/16
• 10.2.0.0/16
• 10.3.0.0/16
Isolated VPCs
Example: Isolated VPCs
You can configure your transit gateway as multiple isolated routers. This is similar to using multiple transit gateways, but provides more flexibility in cases where the routes and attachments might change.
In this scenario, each isolated router has a single route table. All attachments associated with an isolated router propagate and associate with its route table. Attachments associated with one isolated router can route packets to each other, but cannot route packets to or receive packets from the attachments for another isolated router.
Contents
• Overview (p. 13)
• Resources (p. 13)
• Routing (p. 14)
Overview
The following diagram shows the key components of the configuration for this scenario. Packets from VPC A, VPC B, and VPC C route to the transit gateway. Packets from the subnets in VPC, A, VPC B, and VPC C that have the internet as a destination first route through the transit gateway and then route to the Site-to-Site VPN connection (if the destination is within that network). Packets from one VPC that have a destination of a subnet in another VPC, for example from 10.1.0.0 to 10.2.0.0, route through the transit gateway, where they are blocked because there is no route for them in the transit gateway route table.
Resources
Create the following resources for this scenario:
• Three VPCs. For information about creating a VPC, see Create a VPC in the Amazon VPC User Guide.
• A transit gateway. For more information, see the section called “Create a transit gateway” (p. 27).
• Three attachments on the transit gateway for the three VPCs. For more information, see the section called “Create a transit gateway attachment to a VPC” (p. 35).
• A Site-to-Site VPN attachment on the transit gateway. For more information, see the section called
“Create a transit gateway attachment to a VPN” (p. 38). Ensure that you review the requirements for your customer gateway device in the AWS Site-to-Site VPN User Guide.
When the VPN connection is up, the BGP session is established and the VPN CIDR propagates to the transit gateway route table and the VPC CIDRs are added to the customer gateway BGP table.
Routing
Routing
Each VPC has a route table, and the transit gateway has two route tables—one for the VPCs and one for the VPN connection.
VPC A, VPC B, and VPC C route tables
Each VPC has a route table with 2 entries. The first entry is the default entry for local IPv4 routing in the VPC. This entry enables the instances in this VPC to communicate with each other. The second entry routes all other IPv4 subnet traffic to the transit gateway. The following table shows the VPC A routes.
Destination Target
10.1.0.0/16 local
0.0.0.0/0 tgw-id
Transit gateway route tables
This scenario uses one route table for the VPCs and one route table for the VPN connection.
The VPC attachments are associated with the following route table, which has a propagated route for the VPN attachment.
Destination Target Route type
10.99.99.0/24 Attachment for VPN
connection
propagated
The VPN attachment is associated with the following route table, which has propagated routes for each of the VPC attachments.
Destination Target Route type
10.1.0.0/16 Attachment for VPC A propagated
10.2.0.0/16 Attachment for VPC B propagated
10.3.0.0/16 Attachment for VPC C propagated
For more information about propagating routes in a transit gateway route table, see Propagate a route to a transit gateway route table (p. 49).
Customer gateway BGP table
The customer gateway BGP table contains the following VPC CIDRs.
• 10.1.0.0/16
• 10.2.0.0/16
• 10.3.0.0/16
Isolated VPCs with shared services
Example: Isolated VPCs with shared services
You can configure your transit gateway as multiple isolated routers that use a shared service. This is similar to using multiple transit gateways, but provides more flexibility in cases where the routes and attachments might change. In this scenario, each isolated router has a single route table. All attachments associated with an isolated router propagate and associate with its route table. Attachments associated with one isolated router can route packets to each other, but cannot route packets to or receive packets from the attachments for another isolated router. Attachments can route packets to or receive packets from the shared services. You can use this scenario when you have groups that need to be isolated, but use a shared service, for example a production system.
Contents
• Overview (p. 15)
• Resources (p. 15)
• Routing (p. 16)
Overview
The following diagram shows the key components of the configuration for this scenario. Packets from the subnets in VPC A, VPC B, and VPC C that have the internet as a destination, first route through the transit gateway and then route to the Site-to-Site VPN. Packets from subnets in VPC A, VPC B, or VPC C that have a destination of a subnet in VPC A, VPC B, or VPC C (for example from 10.1.0.0 to 10.2.0.0) route through the transit gateway, where they are blocked because there is no route for them in the transit gateway route table. Packets from VPC A, VPC B, and VPC C that have VPC D as the destination route through the transit gateway and then to VPC D.
Resources
Create the following resources for this scenario:
• Four VPCs. For information about creating a VPC, see Create a VPC in the Amazon VPC User Guide.
• A transit gateway. For more information, see Create a transit gateway.
Routing
• Four attachments on the transit gateway for the four VPCs. For more information, see the section called “Create a transit gateway attachment to a VPC” (p. 35).
• A Site-to-Site VPN attachment on the transit gateway. For more information, see the section called
“Create a transit gateway attachment to a VPN” (p. 38).
Ensure that you review the requirements for your customer gateway device in the AWS Site-to-Site VPN User Guide.
When the VPN connection is up, the BGP session is established and the VPN CIDR propagates to the transit gateway route table and the VPC CIDRs are added to the customer gateway BGP table.
Routing
Each VPC has a route table, and the transit gateway has two route tables—one for the VPCs and one for the VPN connection and shared services VPC.
VPC A, VPC B, VPC C, and VPC D route tables
Each VPC has a route table with 2 entries. The first entry is the default entry for local IPv4 routing in the VPC; this entry enables the instances in this VPC to communicate with each other. The second entry routes all other IPv4 subnet traffic to the transit gateway. The following table shows the VPC A routes.
Destination Target
10.1.0.0/16 local
0.0.0.0/0 tgw-id
Transit gateway route tables
This scenario uses one route table for the VPCs and one route table for the VPN connection.
The VPC A, B, and C attachments are associated with the following route table, which has a propagated route for the VPN attachment and a propagated route for the attachment for VPC D.
Destination Target Route type
10.99.99.0/24 Attachment for VPN
connection
propagated
10.4.0.0/16 Attachment for VPC D propagated
The VPN attachment and shared services VPC (VPC D) attachment are associated with the following route table, which has entries that point to each of the VPC attachments. This enables communication to the VPCs from the VPN connection and the shared services VPC.
Destination Target Route type
10.1.0.0/16 Attachment for VPC A propagated
10.2.0.0/16 Attachment for VPC B propagated
Peering
Destination Target Route type
10.3.0.0/16 Attachment for VPC C propagated
10.4.0.0/16 Attachment for VPC D propagated
For more information about propagating routes in a transit gateway route table, see Propagate a route to a transit gateway route table (p. 49).
Customer gateway BGP table
The customer gateway BGP table contains the following VPC CIDRs.
• 10.1.0.0/16
• 10.2.0.0/16
• 10.3.0.0/16
• 10.4.0.0/16
Example: Peered transit gateways
You can create a transit gateway peering connection between transit gateways. You can then route traffic between the attachments for each of the transit gateways. In this scenario, VPC and VPN attachments are associated with the transit gateway default route tables, and they propagate to the transit gateway default route tables. Each transit gateway route table has a static route that points to the transit gateway peering attachment.
Contents
• Overview (p. 17)
• Resources (p. 17)
• Routing (p. 18)
Overview
The following diagram shows the key components of the configuration for this scenario. Transit gateway 1 has two VPC attachments, and transit gateway 2 has one Site-to-Site VPN attachment. Packets from the subnets in VPC A and VPC B that have the internet as a destination first route through transit gateway 1, then transit gateway 2, and then route to the VPN connection.
Resources
Create the following resources for this scenario:
• Two VPCs. For information about creating a VPC, see Create a VPC in the Amazon VPC User Guide.
Routing
• Two transit gateways. They can be in the same Region or in different Regions. For more information, see the section called “Create a transit gateway” (p. 27).
• Two VPC attachments on the first transit gateway. For more information, see the section called “Create a transit gateway attachment to a VPC” (p. 35).
• A Site-to-Site VPN attachment on the transit gateway. For more information, see the section called
“Create a transit gateway attachment to a VPN” (p. 38). Ensure that you review the requirements for your customer gateway device in the AWS Site-to-Site VPN User Guide.
• A transit gateway peering attachment between the two transit gateways. For more information, see Transit gateway peering attachments (p. 39).
When you create the VPC attachments, the CIDRs for each VPC propagate to the route table for transit gateway 1. When the VPN connection is up, the following actions occur:
• The BGP session is established
• The Site-to-Site VPN CIDR propagates to the route table for transit gateway 2
• The VPC CIDRs are added to the customer gateway BGP table
Routing
Each VPC has a route table and each transit gateway has a route table.
VPC A and VPC B route tables
Each VPC has a route table with 2 entries. The first entry is the default entry for local IPv4 routing in the VPC. This default entry enables the resources in this VPC to communicate with each other. The second entry routes all other IPv4 subnet traffic to the transit gateway. The following table shows the VPC A routes.
Destination Target
10.0.0.0/16 local
0.0.0.0/0 tgw-1-id
Transit gateway route tables
The following is an example of the default route table for transit gateway 1, with route propagation enabled.
Destination Target Route type
10.0.0.0/16 Attachment ID for VPC A propagated
10.2.0.0/16 Attachment ID for VPC B propagated
0.0.0.0/0 Attachment ID for
peering connection
static
The following is an example of the default route table for transit gateway 2, with route propagation enabled.
Centralized outbound routing
Destination Target Route type
172.31.0.0/24 Attachment ID for VPN
connection
propagated
10.0.0.0/16 Attachment ID for
peering connection
static
10.2.0.0/16 Attachment ID for
peering connection static
Customer gateway BGP table
The customer gateway BGP table contains the following VPC CIDRs.
• 10.0.0.0/16
• 10.2.0.0/16
Example: Centralized outbound routing to the internet
You can configure a transit gateway to route outbound internet traffic from a VPC without an internet gateway to a VPC that contains a NAT gateway and an internet gateway.
Contents
• Overview (p. 19)
• Resources (p. 20)
• Routing (p. 20)
Overview
The following diagram shows the key components of the configuration for this scenario. You have applications in VPC A and VPC B that need outbound only internet access. You configure VPC C with a NAT gateway and an internet gateway. Connect all VPCs to a transit gateway. Configure routing so that outbound internet traffic from VPC A and VPC B traverses the transit gateway to VPC C. The NAT gateway in VPC C routes the traffic to the internet gateway.
Resources
Resources
Create the following resources for this scenario:
• Three VPCs with IP address ranges that do not overlap. For more information, see Create a VPC in the Amazon VPC User Guide.
• VPC A and VPC B each have private subnets with EC2 instances.
• VPC C has the following:
• An internet gateway attached to the VPC. For more information, see Create and attach an internet gateway in the Amazon VPC User Guide.
• Two subnets.
• A NAT gateway using one of the subnets. For more information, see Create a NAT gateway in the Amazon VPC User Guide.
• One transit gateway. For more information, see the section called “Create a transit gateway” (p. 27).
• Three VPC attachments on the transit gateway. The CIDR blocks for each VPC propagate to the transit gateway route table. For more information, see the section called “Create a transit gateway attachment to a VPC” (p. 35).
Routing
There are route tables for each VPC and a route table for the transit gateway.
Route tables
• Route table for VPC A (p. 21)
• Route table for VPC B (p. 21)
• Route tables for VPC C (p. 21)
• Transit gateway route table (p. 22)
Routing
Route table for VPC A
The following is an example route table. The first entry enables instances in the VPC to communicate with each other. The second entry routes all other IPv4 subnet traffic to the transit gateway.
Destination Target
VPC A CIDR local
0.0.0.0/0 transit-gateway-id
Route table for VPC B
The following is an example route table. The first entry enables the instances in the VPC to communicate with each other. The second entry routes all other IPv4 subnet traffic to the transit gateway.
Destination Target
VPC B CIDR local
0.0.0.0/0 transit-gateway-id
Route tables for VPC C
Configure the subnet with the NAT gateway as a public subnet by adding a route to the internet gateway.
Leave the other subnet as a private subnet.
The following is an example route table for the public subnet. The first entry enables instances in the VPC to communicate with each other. The second and third entries route traffic for VPC A and VPC B to the transit gateway. The remaining entry routes all other IPv4 subnet traffic to the internet gateway.
Destination Target
VPC C CIDR local
VPC A CIDR transit-gateway-id
VPC B CIDR transit-gateway-id
0.0.0.0/0 internet-gateway-id
The following is an example route table for the private subnet. The first entry enables instances in the VPC to communicate with each other. The second entry routes all other IPv4 subnet traffic to the NAT gateway.
Destination Target
VPC C CIDR local
0.0.0.0/0 nat-gateway-id
Appliance VPC
Transit gateway route table
The following is an example of the transit gateway route table. The CIDR blocks for each VPC propagate to the transit gateway route table. The static route sends outbound internet traffic to VPC C. You can optionally prevent inter-VPC communication by adding a blackhole route for each VPC CIDR.
CIDR Attachment Route type
VPC A CIDR Attachment for VPC A propagated VPC B CIDR Attachment for VPC B propagated VPC C CIDR Attachment for VPC C propagated
0.0.0.0/0 Attachment for VPC C static
Example: Appliance in a shared services VPC
You can configure an appliance (such as a security appliance) in a shared services VPC. All traffic that's routed between transit gateway attachments is first inspected by the appliance in the shared services VPC.
You must connect exactly one transit gateway to the appliance VPC to guarantee flow stickiness.
Connecting multiple transit gateways to a single appliance VPC does not guarantee flow stickiness because the transit gateways do not share flow state information with each other.
Note
Traffic in appliance mode is routed correctly as long as the source and destination traffic are coming to a centralized VPC (Inspection VPC) from the same transit gateway attachment.
Traffic can drop if the source and destination are entering from two different transit gateway attachments.
Contents
• Overview (p. 22)
• Stateful appliances and appliance mode (p. 23)
• Routing (p. 24)
Overview
The following diagram shows the key components of the configuration for this scenario. The transit gateway has three VPC attachments. VPC C is a shared services VPC. Traffic between VPC A and VPC B is routed to the transit gateway, then routed to a security appliance in VPC C for inspection before it's routed to the final destination. The appliance is a stateful appliance, therefore both the request and response traffic is inspected. For high availability, there is an appliance in each Availability Zone in VPC C.
Stateful appliances and appliance mode
You create the following resources for this scenario:
• Three VPCs. For information about creating a VPC, see Creating a VPC in the Amazon Virtual Private Cloud User Guide.
• A transit gateway. For more information, see the section called “Create a transit gateway” (p. 27).
• Three VPC attachments - one for each of the VPCs. For more information, see the section called
“Create a transit gateway attachment to a VPC” (p. 35).
For each VPC attachment, specify a subnet in each Availability Zone. For the shared services VPC, these are the subnets where traffic is routed to the VPC from the transit gateway. In the preceding example, these are subnets A and C.
For the VPC attachment for VPC C, enable appliance mode support so that response traffic is routed to the same Availability Zone in VPC C as the source traffic.
The Amazon VPC console does not support appliance mode. You can use the Amazon VPC API, an AWS SDK, or the AWS CLI to enable appliance mode. For example, add --options
ApplianceModeSupport=enable to the create-transit-gateway-vpc-attachment or modify-transit- gateway-vpc-attachment command.
Stateful appliances and appliance mode
When appliance mode is enabled, a transit gateway selects a single network interface in the appliance VPC, using a flow hash algorithm, to send traffic to for the life of the flow. The transit gateway uses the same network interface for the return traffic. This ensures that bidirectional traffic is routed symmetrically—it's routed through the same Availability Zone in the VPC attachment for the life of the flow. If you have multiple transit gateways in your architecture, each transit gateway maintains its own session affinity, and each transit gateway can select a different network interface.
If your VPC attachments span multiple Availability Zones and you require traffic between source and destination hosts to be routed through the same appliance for stateful inspection, enable appliance mode support for the VPC attachment in which the appliance is located.
For more information, see Centralized inspection architecture in the AWS blog.
Routing
Behavior when appliance mode is not enabled
When appliance mode is not enabled, a transit gateway attempts to keep traffic routed between VPC attachments in the originating Availability Zone until it reaches its destination. Traffic crosses Availability Zones between attachments only if there is an Availability Zone failure or if there are no subnets
associated with a VPC attachment in that Availability Zone.
The following diagram shows a traffic flow when appliance mode support is not enabled. The response traffic that originates from Availability Zone 2 in VPC B is routed by the transit gateway to the same Availability Zone in VPC C. The traffic is therefore dropped, because the appliance in Availability Zone 2 is not aware of the original request from the source in VPC A.
Routing
Each VPC has one or more route tables and the transit gateway has two route tables.
VPC route tables
VPC A and VPC B
VPCs A and B have route tables with 2 entries. The first entry is the default entry for local IPv4 routing in the VPC. This default entry enables the resources in this VPC to communicate with each other. The second entry routes all other IPv4 subnet traffic to the transit gateway. The following is the route table for VPC A.
Destination Target
10.0.0.0/16 local
0.0.0.0/0 tgw-id
VPC C
Routing
The shared services VPC (VPC C) has different route tables for each subnet. Subnet A is used by the transit gateway (you specify this subnet when you create the VPC attachment). The route table for subnet A routes all traffic to the appliance in subnet B.
Destination Target
192.168.0.0/16 local
0.0.0.0/0 appliance-eni-id
The route table for subnet B (which contains the appliance) routes the traffic back to the transit gateway.
Destination Target
192.168.0.0/16 local
0.0.0.0/0 tgw-id
Transit gateway route tables
This transit gateway uses one route table for VPC A and VPC B, and one route table for the shared services VPC (VPC C).
The VPC A and VPC B attachments are associated with the following route table. The route table routes all traffic to VPC C.
Destination Target Route type
0.0.0.0/0 Attachment ID for VPC C static
The VPC C attachment is associated with the following route table. It routes traffic to VPC A and VPC B.
Destination Target Route type
10.0.0.0/16 Attachment ID for VPC A propagated
10.1.0.0/16 Attachment ID for VPC B propagated
Transit gateways
Work with transit gateways
You can work with transit gateways using the Amazon VPC console or the AWS CLI.
Contents
• Transit gateways (p. 26)
• Transit gateway attachments to a VPC (p. 30)
• Transit gateway attachments to a Direct Connect gateway (p. 37)
• Transit gateway VPN attachments (p. 38)
• Transit gateway peering attachments (p. 39)
• Transit gateway Connect attachments and Transit Gateway Connect peers (p. 42)
• Transit gateway route tables (p. 47)
• Multicast on transit gateways (p. 54)
Transit gateways
A transit gateway enables you to attach VPCs and VPN connections in the same Region and route traffic between them. A transit gateway works across AWS accounts, and you can use AWS RAM to share your transit gateway with other accounts. After you share a transit gateway with another AWS account, the account owner can attach their VPCs to your transit gateway. A user from either account can delete the attachment at any time.
You can enable multicast on a transit gateway, and then create a transit gateway multicast domain that allows multicast traffic to be sent from your multicast source to multicast group members over VPC attachments that you associate with the domain.
Each VPC or VPN attachment is associated with a single route table. That route table decides the next hop for the traffic coming from that resource attachment. A route table inside the transit gateway allows for both IPv4 or IPv6 CIDRs and targets. The targets are VPCs and VPN connections. When you attach a VPC or create a VPN connection on a transit gateway, the attachment is associated with the default route table of the transit gateway.
You can create additional route tables inside the transit gateway, and change the VPC or VPN association to these route tables. This enables you to segment your network. For example, you can associate
development VPCs with one route table and production VPCs with a different route table. This enables you to create isolated networks inside a transit gateway similar to virtual routing and forwarding (VRFs) in traditional networks.
Transit gateways support dynamic and static routing between attached VPCs and VPN connections. You can enable or disable route propagation for each attachment. Transit gateway peering attachments support static routing only.
You can optionally associate one or more IPv4 or IPv6 CIDR blocks with your transit gateway. You specify an IP address from the CIDR block when you establish a Transit Gateway Connect peer for a transit gateway Connect attachment (p. 42). You can associate any public or private IP address range, except for addresses in the 169.254.0.0/16 range, and ranges that overlap with addresses for your VPC
Create a transit gateway
attachments and on-premises networks. For more information about IPv4 and IPv6 CIDR blocks, see VPCs and subnets in the Amazon VPC User Guide.
Tasks
• Create a transit gateway (p. 27)
• View your transit gateways (p. 28)
• Add or edit tags for a transit gateway (p. 28)
• Modify a transit gateway (p. 29)
• Share a transit gateway (p. 29)
• Accept a resource share (p. 29)
• Accept a shared attachment (p. 30)
• Delete a transit gateway (p. 30)
Create a transit gateway
When you create a transit gateway, we create a default transit gateway route table and use it as the default association route table and the default propagation route table. If you choose not to create the default transit gateway route table, you can create one later on. For more information about routes and route tables, see ??? (p. 4).
To create a transit gateway using the console
1. Open the Amazon VPC console at https://console.aws.amazon.com/vpc/.
2. On the navigation pane, choose Transit Gateways.
3. Choose Create transit gateway.
4. For Name tag, optionally enter a name for the transit gateway. A name tag can make it easier to identify a specific gateway from the list of gateways. When you add a Name tag, a tag is created with a key of Name and with a value equal to the value you enter.
5. For Description, optionally enter a description for the transit gateway.
6. For Amazon side Autonomous System Number (ASN), either leave the default value to use the default ASN or enter the private ASN for your transit gateway. This should be the ASN for the AWS side of a Border Gateway Protocol (BGP) session.
The range is 64512 to 65534 for 16-bit ASNs.
The range is 4200000000 to 4294967294 for 32-bit ASNs.
If you have a multi-Region deployment, we recommend that you use a unique ASN for each of your transit gateways.
7. For DNS support, select this option if you need the VPC to resolve public IPv4 DNS host names to private IPv4 addresses when queried from instances in another VPC attached to the transit gateway.
8. For VPN ECMP support, select this option if you need Equal Cost Multipath (ECMP) routing support between VPN tunnels. If connections advertise the same CIDRs, the traffic is distributed equally between them.
When you select this option, the advertised BGP ASN, the BGP attributes such as the AS-path, and the communities for preference must be the same.
Note
To use ECMP, you must create a VPN connection that uses dynamic routing. VPN connections that use static routing do not support ECMP.View your transit gateways
9. For Default route table association, select this option to automatically associate transit gateway attachments with the default route table for the transit gateway.
10. For Default route table propagation, select this option to automatically propagate transit gateway attachments to the default route table for the transit gateway.
11. (Optional) To use the transit gateway as a router for multicast traffic, select Multicast support.
12. For Auto accept shared attachments, select this option to automatically accept cross-account attachments.
13. (Optional) For Transit gateway CIDR blocks, specify one or more IPv4 or IPv6 CIDR blocks for your transit gateway.
You can specify a size /24 CIDR block or larger (for example, /23 or /22) for IPv4, or a size /64 CIDR block or larger (for example, /63 or /62) for IPv6. You can associate any public or private IP address range, except for addresses in the 169.254.0.0/16 range, and ranges that overlap with the addresses for your VPC attachments and on-premises networks.
14. Choose Create transit gateway.
To create a transit gateway using the AWS CLI
Use the create-transit-gateway command.
View your transit gateways
To view your transit gateways using the console
1. Open the Amazon VPC console at https://console.aws.amazon.com/vpc/.
2. On the navigation pane, choose Transit Gateways. The details for the transit gateway are displayed below the list of gateways on the page.
To view your transit gateways using the AWS CLI
Use the describe-transit-gateways command.
Add or edit tags for a transit gateway
Add tags to your resources to help organize and identify them, such as by purpose, owner, or environment. You can add multiple tags to each transit gateway. Tag keys must be unique for each transit gateway. If you add a tag with a key that is already associated with the transit gateway, it updates the value of that tag. For more information, see Tagging your Amazon EC2 Resources.
Add tags to a transit gateway using the console
1. Open the Amazon VPC console at https://console.aws.amazon.com/vpc/.
2. On the navigation pane, choose Transit Gateways.
3. Choose the transit gateway for which to add or edit tags.
4. Choose the Tags tab in the lower part of the page.
5. Choose Manage tags.
6. Choose Add new tag.
7. Enter a Key and Value for the tag.
8. Choose Save.
Modify a transit gateway
Modify a transit gateway
You can modify the configuration options for your transit gateway. When you modify a transit gateway, the modified options are applied to new transit gateway attachments only. Your existing transit gateway attachments are not modified.
You cannot modify a transit gateway that has been shared with you.
You cannot remove a CIDR block for the transit gateway if any of the IP addresses are currently used for a Transit Gateway Connect peer (p. 42).
To modify a transit gateway
1. Open the Amazon VPC console at https://console.aws.amazon.com/vpc/.
2. On the navigation pane, choose Transit Gateways.
3. Choose the transit gateway to modify.
4. Choose Actions, Modify transit gateway.
5. Modify the options as needed, and choose Modify transit gateway.
To modify your transit gateway using the AWS CLI Use the modify-transit-gateway command.
Share a transit gateway
You can use AWS RAM to share a transit gateway (p. 70) across accounts or across your organization in AWS Organizations. Use the following procedure to share a transit gateway that you own.
You must enable resource sharing from the management account for your organization. For information about enabling resource sharing, see Enable Sharing with AWS Organizations in the AWS RAM User Guide.
To share a transit gateway
1. Open the AWS RAM console at https://console.aws.amazon.com/ram/.
2. Choose Create a resource share.
3. Under Name, type a descriptive name for the resource share.
4. For Select resource type, choose Transit Gateways. Select the transit gateway.
5. (Optional) For Principals, add principals to the resource share. For each AWS account, OU, or organization, specify its ID and choose Add.
For Allow external accounts, choose whether to allow sharing for this resource with AWS accounts that are external to your organization.
6. (Optional) Under Tags, type a tag key and tag value pair for each tag. These tags are applied to the resource share but not to the transit gateway.
7. Choose Create resource share.
Accept a resource share
If you were added to a resource share, you receive an invitation to join the resource share. You must accept the resource share before you can access the shared resources.
Accept a shared attachment
To accept a resource share
1. Open the AWS RAM console at https://console.aws.amazon.com/ram/.
2. On the navigation pane, choose Shared with me, Resource shares.
3. Select the resource share.
4. Choose Accept resource share.
5. To view the shared transit gateway, open the Transit Gateways page in the Amazon VPC console.
Accept a shared attachment
If you didn't enable the Auto accept shared attachments functionality when you created your transit gateway, you must manually accept cross-account (shared) attachments.
To manually accept a shared attachment
1. Open the Amazon VPC console at https://console.aws.amazon.com/vpc/.
2. On the navigation pane, choose Transit Gateway Attachments.
3. Select the transit gateway attachment that's pending acceptance.
4. Choose Actions, Accept transit gateway attachment.
To accept a shared attachment using the AWS CLI Use the accept-transit-gateway-vpc-attachment command.
Delete a transit gateway
You can't delete a transit gateway with existing attachments. You need to delete all attachments before you can delete a transit gateway.
To delete a transit gateway using the console
1. Open the Amazon VPC console at https://console.aws.amazon.com/vpc/.
2. Choose the transit gateway to delete.
3. Choose Actions, Delete transit gateway. Enter delete and choose Delete to confirm the deletion.
To delete a transit gateway using the AWS CLI Use the delete-transit-gateway command.
Transit gateway attachments to a VPC
When you attach a VPC to a transit gateway, you must specify one subnet from each Availability Zone to be used by the transit gateway to route traffic. Specifying one subnet from an Availability Zone enables traffic to reach resources in every subnet in that Availability Zone.
Limits
• When you attach a VPC to a transit gateway, any resources in Availability Zones where there is no transit gateway attachment cannot reach the transit gateway. If there is a route to the transit gateway
VPC attachment lifecycle
in a subnet route table, traffic is forwarded to the transit gateway only when the transit gateway has an attachment in a subnet in the same Availability Zone.
• The resources in a VPC attached to a transit gateway cannot access the security groups of a different VPC that is also attached to the same transit gateway.
• A transit gateway does not support DNS resolution for custom DNS names of attached VPCs set up using private hosted zones in Amazon Route 53. To configure name resolution for private hosted zones for all VPCs attached to a transit gateway, see Centralized DNS management of hybrid cloud with Amazon Route 53 and AWS Transit Gateway.
• A transit gateway doesn't support routing between VPCs with identical CIDRs. If you attach a VPC to a transit gateway and its CIDR is identical to the CIDR of another VPC that's already attached to the transit gateway, the routes for the newly attached VPC aren't propagated to the transit gateway route table.
• You cannot create an attachment for a VPC subnet that resides in a Local Zone. However, you
configure your network to that subnets in the Local Zone can connect to a transit gateway through the parent Availability Zone. For more information, see Connect Local Zone subnets to a transit gateway.
Contents
• VPC attachment lifecycle (p. 31)
• Create a transit gateway attachment to a VPC (p. 35)
• Modify your VPC attachment (p. 35)
• Modify your VPC attachment tags (p. 36)
• View your VPC attachments (p. 36)
• Delete a VPC attachment (p. 36)
• Troubleshoot VPC attachment creation (p. 36)
VPC attachment lifecycle
A VPC attachment goes through various stages, starting when the request is initiated. At each stage, there may be actions that you can take, and at the end of its lifecycle, the VPC attachment remains visible in the Amazon Virtual Private Cloud Console and in API or command line output, for a period of time.
The following diagram shows the states an attachment can go through in a single account configuration, or a cross-account configuration that has Auto accept shared attachments turned on.
VPC attachment lifecycle
• Pending: A request for a VPC attachment has been initiated and is in the provisioning process. At this stage, the attachment can fail, or can go to available.
• Failing: A request for a VPC attachment is failing. At this stage, the VPC attachment goes to failed.
• Failed: The request for the VPC attachment has failed. While in this state, it cannot be deleted. The failed VPC attachment remains visible for 2 hours, and then is no longer visible.
• Available: The VPC attachment is available, and traffic can flow between the VPC and the transit gateway. At this stage, the attachment can go to modifying, or go to deleting.
VPC attachment lifecycle
• Deleting: A VPC attachment that is in the process of being deleted. At this stage, the attachment can go to deleted.
• Deleted: An available VPC attachment has been deleted. While in this state, the VPC attachment cannot be modified. The VPC attachment remains visible for 2 hours, and then is no longer visible.
• Modifying: A request has been made to modify the properties of the VPC attachment. At this stage, the attachment can go to available, or go to rolling back.
• Rolling back: The VPC attachment modification request cannot be completed, and the system is undoing any changes that were made. At this stage, the attachment can go to available.
The following diagram shows the states an attachment can go through in a cross-account configuration that has Auto accept shared attachments turned off.
VPC attachment lifecycle
• Pending-acceptance: The VPC attachment request is awaiting acceptance. At this stage, the attachment can go to pending, to rejecting, or to deleting.
• Rejecting: A VPC attachment that is in the process of being rejected. At this stage, the attachment can go to rejected.
• Rejected: A pending acceptance VPC attachment has been rejected. While in this state, the VPC attachment cannot be modified. The VPC attachment remains visible for 2 hours, and then is no longer visible.