GOT-A900 Series Operating Manual
MITSUBISHI Graphic Operation Terminal
GOT-A900 Series Operating Manual
Specifications subject to change without notice.
MODEL
MODEL CODE
SW1-GTD2-O(SYS)-E 13JU28
SH(NA)-080253-A(0304)MEE
(GT Works2 Version1/GT Designer2 Version1 compatible Extended•Option Functions Manual)
(GT Works2 Version1/GT Designer2 Version1 compatible Extended•Option Functions Manual)
When exported from Japan, this manual does not require application to the Ministry of Economy, Trade and Industry for service transaction permission.
HEAD OFFICE : 1-8-12, OFFICE TOWER Z 14F HARUMI CHUO-KU 104-6212,JAPAN NAGOYA WORKS : 1-14 , YADA-MINAMI 5 , HIGASHI-KU, NAGOYA , JAPAN
Before using this product, please read this manual and the relevant manuals introduced in this manual carefully and pay full attention to safety to handle the product correctly.
The instructions given in this manual are concerned with this product. For the safety instructions of the programmable controller system, please read the CPU module user's manual.
In this manual, the safety instructions are ranked as "DANGER" and "CAUTION".
! DANGER CAUTION
!
Indicates that incorrect handling may cause hazardous conditions, resulting in death or severe injury.
Indicates that incorrect handling may cause hazardous conditions, resulting in medium or slight personal injury or physical damage.
Note that the ! CAUTION level may lead to a serious consequence according to the circumstances.
Always follow the instructions of both levels because they are important to personal safety.
Please save this manual to make it accessible when required and always forward it to the end user.
[PRECAUTION WHEN PERFORMING THE TEST OPERATION]
! CAUTION
• Read the manual carefully and fully understand the operation before the test operation (ON/OFF of bit devices, modifying current value of a word device, modifying timer/counter setting,
modifying the current value, or modifying the current value of a buffer memory) of system monitor, special function module monitor, and ladder monitor.
In addition, never modify data in a test operation to a device which performs a crucial operation to the system.
It may cause an accident by a false output or malfunction.
Apr., 2003 SH (NA)-080253-A First edition Aug., 2003 SH (NA)-080253-B Partial corrections
Chapter 1, Section 2.2, Section 2.3, Section 3.1, Section 3.1.1, Section 3.2, Section 3.2.3,Section 3.3, Section 3.4, Section 3.5, Section 3.5.1, Section 3.6, Section 3.6.1, Section 3.6.3, Section 3.7, Section 4.1, Section 4.2, Section 4.3
Partial additions
Chapter 3, Section 6.3.4, Section 9.1.2 Additions
Section 1.1.9, Section 3.1.3, Section 3.8, Chapter28, Chapter 29, Chapter 30
Jan., 2004 SH(NA)-080253-C Partial corrections
Section 2.1, Section 3.3.1, Section 3.4.3, Section 3.8.3, Section 4.6, Section 4.8, Section 29.2
Partial additions
Section 2.2, Section 3.1.3, Section 28.1, Chapter 30 Additions
Section 1.1.10, Section 3.9, Chapter 31 Jul., 2004 SH(NA)-080253-D Partial corrections
Section 2.2, Section 3.3.1, Section 3.3.4, Section 4.12 MODEL CODE change
Changed from 13JU28 to 1DM206.
Oct., 2004 SH(NA)-080253-E Partial corrections Section 4.4
Partial additions Section 6.3.2
Japanese Manual Version SH-080244-F This manual confers no industrial property rights or any rights of any other kind, nor does it confer any patent
licenses. Mitsubishi Electric Corporation cannot be held responsible for any problems involving industrial property rights which may occur as a result of using the contents noted in this manual.
2003 MITSUBISHI ELECTRIC CORPORATION
Please read this manual carefully so that equipment is used to its optimum.
CONTENTS
SAFETY PRECAUTIONS...A - 1 REVISIONS ...A - 2 INTRODUCTION...A - 3 CONTENTS...A - 3 About Manuals ...A -11 Abbreviations and generic terms in this manual ...A -12
1 OVERVIEW 1 - 1 to 1 - 17
1.1 Features ... 1 - 1 1.1.1 Features of the utility function... 1 - 1 1.1.2 Features of the ladder monitor function... 1 - 3 1.1.3 Features of the system monitor function ... 1 - 5 1.1.4 Features of the special module monitor function ... 1 - 7 1.1.5 Features of the network monitor function ... 1 - 9 1.1.6 Features of the List editor function ...1 -11 1.1.7 Features of the motion monitor function ...1 -12 1.1.8 Features of the servo amplifier monitor functions ...1 -14 1.1.9 Features of the CNC monitor functions ...1 -16 1.1.10 Features of the font change function ...1 -17
2 BEFORE BEGINNING OPERATION 2 - 1 to 2- 10
2.1 Before getting started with various functions ... 2 - 1 2.2 Precautions before use ... 2 - 1
3 SPECIFICATIONS 3 - 1 to 3 -27
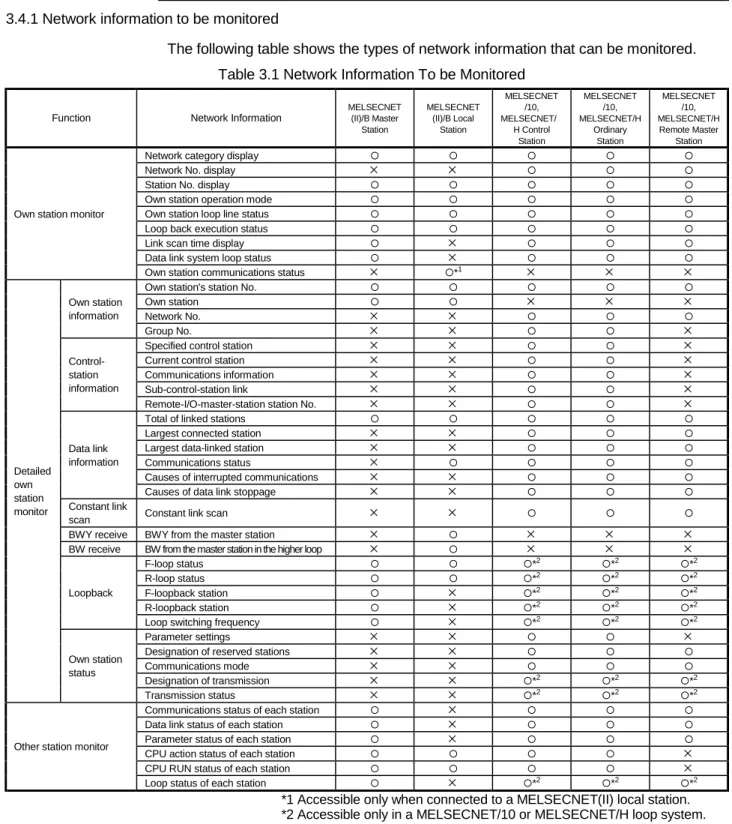
3.1 Ladder monitor function specifications ... 3 - 1 3.1.1 PLC CPUs to be monitored... 3 - 1 3.1.2 Access ranges to be monitored ... 3 - 1 3.1.3 Precautions when using the ladder monitor function... 3 - 1 3.2 System monitor function specifications ... 3 - 2 3.2.1 PLC CPUs to be monitored... 3 - 2 3.2.2 Access ranges to be monitored ... 3 - 2 3.2.3 Names of devices to be monitored ... 3 - 2 3.2.4 Precautions when using the system monitor function ... 3 - 2 3.3 Special module monitor function specifications ... 3 - 3 3.3.1 Access ranges to be monitored ... 3 - 4 3.3.2 Special function modules to be monitored ... 3 - 4 3.3.3 Required memory spaces for use of special module monitor function ... 3 - 5 3.3.4 Precautions when using the special module monitor function... 3 - 6 3.4 Network monitor function specifications... 3 - 9 3.4.1 Network information to be monitored... 3 - 9
3.5.2 Access range that allows for list edit ...3 -11 3.5.3 Precautions for List editor function ...3 -11 3.5.4 List of key arrangement and key functions...3 -12 3.5.5 Display format on the display...3 -15 3.5.6 List of List editor function...3 -18 3.6 Specifications of the motion monitor function... 3 -20 3.6.1 PLC CPUs that can be monitored ...3 -20 3.6.2 Access ranges that can be monitored ...3 -20 3.6.3 Precautions for use of the motion monitor function ...3 -20 3.6.4 Memory space necessary to use the motion monitor function ...3 -20 3.7 Specifications of the Servo Amplifier Monitor Functions ... 3 -21 3.7.1 List of servo amplifier models that can be monitored and functions...3 -21 3.7.2 Access range that can be monitored ...3 -21 3.7.3 Precautions for use of the servo amplifier monitor functions ...3- 22 3.7.4 System configuration for servo amplifier connection ...3 -22 3.7.5 Monitor screen types and memory capacities necessary to use the servo amplifier monitor functions....3 -23 3.8 CNC monitor function specifications ... 3 -26 3.8.1 CNC models that can be monitored ...3 -26 3.8.2 CNC functions that can be monitored...3 -26 3.8.3 Access ranges to be monitored ...3 -26 3.8.4 Precautions when using the CNC monitor function...3 -26 3.9 Font change function specifications ... 3 -27 3.9.1 Available fonts ...3 -27 3.9.2 Applicable range for each font...3 -27 3.9.3 Precautions when using the font change function ...3 -27
4 OPERATING THE UTILITY FUNCTION 4 - 1 to 4 - 21
4.1 Utility function table ... 4 - 1 4.2 Selecting the utility function ... 4 - 2 4.3 Selecting the required function on the utility menu screen
(Adjusting the brightness/contrast of the monitor screen)... 4 - 3 4.4 Copying the monitor data/OS data between the internal
memory and memory card (Screen & OS copy) ... 4 - 5 4.5 Setting the operating environment of the GOT (Setup) ... 4 - 7 4.6 Running diagnostic checks on GOT hardware (self-test)... 4 -14 4.7 Displaying GOT memory information (memory information)... 4 -15 4.8 Setting the Clock (Clock) ... 4 -16 4.9 Displaying the display area cleanup screen (screen cleanup) ... 4 -17 4.10 Changing security levels (security password)... 4 -18 4.11 Controlling limited access to the utility menu (password)... 4 -19 4.12 Adjusting the brightness of the monitor screen on the dedicated screen
(Brightness adjustment) ... 4 -20
5 OPERATION PROCEDURES FOR THE LADDER MONITOR FUNCTION 5 - 1 to 5 - 2 5.1 Operation procedures before starting ladder monitoring ... 5 - 1 5.2 Operation procedures from display of user-created monitor screen
to start of ladder monitoring... 5 - 2
6 OPERATING THE VARIOUS LADDER MONITOR SCREENS 6 - 1 to 6 -26
6.1 Display screens... 6- 1 6.2 Screen operation and screen changes when monitoring ... 6 - 3 6.2.1 Reading data from the PLC... 6 - 3 6.2.2 Ladder read operation... 6 - 9 6.2.3 Using the defect search ...6 -12 6.2.4 Touch search operation...6 -16 6.2.5 Changing from one screen to another...6 -18 6.3 Ladder monitor ... 6 -19 6.3.1 Ladder monitor screen display and key functions...6 -19 6.3.2 Precaution during ladder monitoring...6 -21 6.3.3 Switching the display form (decimal/hexadecimal) and turning the comment display on/off ...6 -23 6.3.4 Changing the device value ...6 -24 6.3.5 About Hardcopy Output ...6 -25
7 ERROR DISPLAY AND HANDLING WITH LADDER MONITORING 7 - 1 to 7 - 2
SYSTEM MONITOR FUNCTION
8 OPERATION PROCEDURES FOR THE SYSTEM MONITOR FUNCTION 8 - 1 to 8 - 2
8.1 Operation procedures before starting system monitoring ... 8 - 1 8.2 Operation procedures from user-created monitor screen display
to start of system monitoring ... 8 - 2
9 OPERATION OF THE VARIOUS SYSTEM MONITOR SCREENS 9 - 1 to 9 -21
9.1 Screen configuration, common operations and changing screens when monitoring ... 9 - 1 9.1.1 Basic screen configuration and key functions (menu)... 9 - 1 9.1.2 Switching the display form (decimal/hexadecimal) and turning the comment display on/off (FORM) ... 9 - 2 9.1.3 Specifying the monitor station and device (SET)... 9 - 4 9.1.4 Changing screens ... 9 - 6 9.2 Entry monitor ... 9 - 7 9.2.1 Basic operation... 9 - 7 9.2.2 Entry monitor screen display and key functions... 9 - 8 9.2.3 Deleting a registered device ... 9 - 9 9.3 Batch monitor ... 9 -10
9.4.2 TC Monitor screen display and key functions ...9 -13 9.5 BM Monitor (monitor of buffer memory) ... 9 -14 9.5.1 Basic operation...9 -14 9.5.2 BM Monitor screen display and key functions...9 -15 9.6 Test... 9 -16 9.6.1 Basic operation...9 -16 9.6.2 Quick test function...9 -19
10 ERROR DISPLAY AND HANDLING WITH SYSTEM MONITORING 10 - 1 to 10 - 2
SPECIAL MODULE MONITOR FUNCTION
11 OPERATION PROCEDURES FOR SPECIAL MODULE MONITOR FUNCTION 11 - 1 to 11 - 2
11.1 Operation procedures before starting special module monitoring...11 - 1 11.2 Operation procedures from user-created monitor screen display to start of special module monitor ...11 - 2
12 OPERATION OF EACH SPECIAL MODULE MONITOR SCREEN 12 - 1 to 12 -77
12.1 Screen configuration, common operation and changing screens when monitoring... 12 - 1 12.1.1 Composition of system configuration screen and key functions...12 - 1 12.1.2 Setting method for remote station monitoring ...12 - 3 12.1.3 Composition of PC Information screen and key functions (only when QCPU(Q mode) is used)...12 - 4 12.1.4 Composition of Unit Detail info screen and key functions (only when QCPU(Q mode) is used)...12 - 5 12.1.5 Monitor screen configuration and key functions ...12 - 6 12.1.6 Specifying monitor module and selecting monitor menu ...12 - 7 12.1.7 Test for special function module ...12 - 8 12.1.8 Changing the screen...12 -10 12.2 A61LS module monitor ... 12 -11 12.3 AD61 module monitor ... 12 -11 12.4 A1SD61 module monitor... 12 -12 12.5 A62DA-S1 module monitor... 12 -13 12.6 A1S62DA module monitor ... 12 -13 12.7 A62LS module monitor ... 12 -14 12.8 A1S62RD module monitor... 12 -15 12.9 A1S63ADA module monitor... 12 -16 12.10 A1S64AD module monitor ... 12 -17 12.11 A68AD module monitor... 12 -18 12.12 A1S68AD module monitor ... 12 -19 12.13 A68ADN module monitor... 12 -20 12.14 A68RD module monitor ... 12 -21 12.15 A1S68DAI, A1S68DAV module monitor ... 12 -22 12.16 A616AD module monitor ... 12 -23 12.17 A616DAI, A616DAV module monitor ... 12 -25 12.18 A616TD module monitor... 12 -26 12.19 AD70, A1SD70 module monitor ... 12 -29
12.22 AD72, A1SD71 module monitor ... 12 -36 12.23 AD75, A1SD75 module monitor ... 12 -39 12.24 AJ71PT32-S3, A1SJ71PT32-S3 module monitor ... 12 -45 12.25 AJ71ID1(ID2) -R4, A1SJ71ID1(ID2) -R4 module monitor... 12 -47 12.26 A84AD module monitor... 12 -48 12.27 A1S64TCTT(BW)-S1, A1S64TCRT(BW)-S1 module monitor ... 12 -49 12.28 Q64AD, Q68ADV, Q68ADI module monitor ... 12 -51 12.29 Q62DA, Q64DA module monitor... 12 -52 12.30 QD62,QD62D module monitor ... 12 -53 12.31 QD75P , QD75D module monitor... 12 -54 12.32 QD75M module monitor... 12 -64
13 OPERATING I/O MODULE MONITOR SCREENS 13 - 1 to 13 - 2
13.1 Specifying the module to be monitored... 13 - 1 13.2 Monitor screen configuration and key functions ... 13 - 2
14 ERROR DISPLAY AND HANDLING WITH SPECIAL MODULE MONITORING 14 - 1 to 14 - 2
NETWORK MONITOR FUNCTION
15 OPERATING THE NETWORK MONITOR FUNCTION 15 - 1 to 15 - 2
15.1 Steps in getting started with the network monitor function ... 15 - 1 15.2 Steps in starting the network monitor function from the user-created monitor screen ... 15 - 2
16 SWITCHING THE NETWORK MONITOR SCREENS 16 - 1 to 16 - 2
17 USING THE NETWORK MONITOR SCREENS 17 - 1 to 17 - 17
17.1 Own station monitor ... 17 - 1 17.1.1 Display contents and keys functions: own station monitor...17 - 1 17.2 Detailed own station monitor ... 17 - 3 17.2.1 Display contents and keys functions: acting as a MELSECNET/B or MELSECNET (II) master station17 - 3 17.2.2 Display contents and keys functions: acting as a MELSECNET/B or MELSECNET (II) local station ..17 - 4 17.2.3 Display contents and keys functions: acting as a MELSECNET/10 Control station/ordinary Station ...17 - 5 17.2.4 Display contents and keys functions: acting as a MELSECNET/10, MELSECNET/H
remote master station ...17 - 8 17.3 Other station monitor ... 17 -11 17.3.1 Display contents and keys functions: other station monitor menu ...17 -11 17.3.2 Display contents and keys functions: other station communication status monitor ...17 -12 17.3.3 Display contents and keys functions: other station data link status monitor...17 -13 17.3.4 Display contents and keys functions: other station parameter status monitor ...17 -14
LIST EDITOR FUNCTION
19 OPERATION PROCEDURES FOR THE LIST EDITOR FUNCTION 19 - 1 to 19 - 5
19.1 Operation procedures before starting the list edit... 19 - 1 19.2 Operation procedures from user-created monitor screen display to starting list editing ... 19 - 2 19.2.1 Operation of keyword input...19 - 3 19.2.2 Selection and operation of mode ...19 - 5
20 OPERATION OF EDITING SCREEN FOR EACH LIST 20 - 1 to 20 - 16
20.1 Basic operation of key input... 20 - 1 20.1.1 Switching of valid key (function indicated at the upper/lower part of the key)...20 - 1 20.1.2 Command input procedures...20 - 2 20.1.3 Action if an incorrect key is input ...20 - 6 20.2 Basic operation of list edit ... 20 - 7 20.2.1 Reading sequence program ...20 - 7 20.2.2 Changing (overwriting) command...20 - 8 20.2.3 Adding (inserting) command ...20 - 9 20.2.4 Deleting command...20 -10 20.2.5 Using Help function...20 -11 20.3 Operation procedure list of list edit ... 20 -13 20.3.1 Common operation ...20 -13 20.3.2 Operation in Write mode (W) ...20 -13 20.3.3 Operation in Read mode (R)...20 -14 20.3.4 Operation in Insert mode (I)...20 -14 20.3.5 Operation in Delete (D) mode ...20 -14 20.3.6 Operation in Parameter mode (P)...20 -15 20.3.7 Operation in Other modes (O)...20 -16
21 ERROR DISPLAY AND CORRECTIVE ACTIONS FOR LIST EDIT 21 - 1 to 21 - 6
21.1 Error detected with the list editor function ... 21 - 1 21.2 Error of PLC CPU... 21 - 4 21.3 Error using list editor function on the link system ... 21 - 5
MOTION MONITOR FUNCTION
22 OPERATION PROCEDURES FOR MOTION MONITOR FUNCTION 22 - 1 to 22 - 4
22.1 Operation procedures before starting motion monitoring ... 22 - 1 22.2 Operation procedures from user-created monitor screen display to start of motion monitor... 22 - 2 22.2.1 Password entry operation procedure ...22 - 4
23.1.1 System configuration screen layout and key functions ...23 - 1 23.2 Changing the screen... 23 - 2 23.3 Motion monitor ... 23 - 3 23.3.1 Display data and key functions of present value monitor screen ...23 - 4 23.3.2 Display data and key functions of SFC error history screen...23 - 5 23.3.3 Display data and key functions of error list screen ...23 - 6 23.3.4 Display data and key functions of error list designated-axis screen...23 - 7 23.3.5 Display data and key functions of positioning monitor screen...23 - 9 23.3.6 Display data and key functions of servo monitor screen...23 -11 23.3.7 Display data and key functions of present value history monitor screen ...23 -12 23.4 Parameter setting... 23 -14 23.4.1 Display data and key functions of parameter setting screen ...23 -14 23.4.2 Parameter setting operation...23 -15 23.5 About Hardcopy Output ... 23 -16
24 ERROR DISPLAY AND HANDLING WITH MOTION MONITORING 24 - 1 to 24 - 2
SERVO AMPLIFIER MONITOR FUNCTION
25 OPERATION PROCEDURES FOR SERVO AMPLIFIER MONITOR FUNCTION 25 -1 to 25 - 2
25.1 Operation procedures before starting motion monitoring ... 25 - 1 25.2 Operation procedures from user-created monitor screen display to start of motion monitor... 25 - 2
26 OPERATIONS OF SERVO AMPLIFIER MONITOR SCREENS 26 - 1 to 26 - 31
26.1 Screen Transition ... 26 - 1 26.2 About the Servo Amplifier Monitor Functions... 26 - 2 26.3 Setup ... 26 - 3 26.3.1 Setup screen ...26 - 3 26.4 Monitor Functions... 26 - 4 26.4.1 Monitor screen...26 - 4 26.5 Alarm Function ... 26 - 6 26.5.1 Alarm display screen...26 - 7 26.5.2 Alarm history screen ...26 - 8 26.6 Diagnostics Function... 26 - 9 26.6.1 DI/DO display screen...26 -11 26.6.2 Function device display screen...26 -12 26.6.3 Amplifier information display screen ...26 -13 26.6.4 ABS data display screen ...26 -14 26.6.5 Unit composition list display screen ...26 -15 26.7 Parameter Setting ... 26 -16 26.7.1 Password entry operation procedure ...26 -17
26.8.2 Preparations for test operations ...26- 26 26.8.3 JOG operation screen...26- 27 26.8.4 Positioning operation screen...26- 28 26.8.5 Motorless operation screen...26- 29 26.8.6 DO forced output screen ...26- 30 26.9 About Hardcopy Output ... 26 -31 27 ERROR INDICATIONS AND CORRECTIVE ACTIONS FOR SERVO AMPLIFIER MONITOR 27 - 1 to 27 - 2
CNC MONITOR FUNCTION
28 OPERATION PROCEDURES FOR THE CNC MONITOR FUNCTION 28 - 1 to 28 - 2
28.1 Operation procedures before starting CNC monitoring ... 28- 1
29 OPERATING THE CNC MONITOR FUNCTION SCREEN 29 - 1 to 29 - 3
29.1 Changing screens ... 29- 1 29.2 About the CNC Monitor Functions... 29- 2 30 ERROR INDICATIONS AND CORRECTIVE ACTIONS FOR SERVO AMPLIFIER MONITOR 30 - 1 to 30 - 2
OTHER EXTENDED/OPTION FUNCTIONS
31 FONT CHANGE FUNCTION 31 - 1 to 31 - 6
31.1 Preparation to use the font change function ... 31- 1 31.1.1 Checking the required devices...31- 1 31.1.2 Checking the ROM_BIOS version...31- 1 31.1.3 Checking the OS...31- 2 31.2 Operation of the font change function ... 31- 3 31.2.1 Setting the font change device...31- 3 31.2.2 Installing font data ...31- 4 31.3 Troubleshooting when font cannot be changed... 31- 6
INDEX Index - 1 to Index - 3
required the according to this table.
• Related manual
Manual name Manual number (type code)
GT Works2 Version1/GT Designer2 Version1 Operating Manual (Startup • Introductory Manual) Describes methods of installing GT Designer2 and introductory drawing methods
(Sold separately)
SH-080250 (1DM203) GT Designer2 Version1 Operating Manual
Describes methods of operating GT Designer2 and transmitting data to GOT
(Sold separately)
SH-080278E (1DM205) GT Designer2 Version1 Reference Manual
Describes the specifications and settings of each object function used in GT Designer2
(Sold separately)
SH-080251 (1DM204) GOT-A900 Series Operating Manual
(GT Works2 Version1/GT Designer2 Version1 compatible Gateway Functions Manual)
Describes the gateway function specifications, system configuration and methods of setting GOT- A900 series.
(Sold separately)
SH-080398E (1DM208)
GT Simulator2 Version1 Operating Manual
Explains the system configuration, screen makeup and using methods of GT Simulator2.
(Sold separately)
SH-080399E (1DM209) A985GOT/A975GOT/A970GOT/A960GOT User’s Manual
Provides performance specification, setting method, and communication board/communication module installation method of each GOT.
(Sold separately)
SH-4005 (1DM099) A950GOT/A951GOT/A953GOT/A956GOT User’s Manual
Provides performance specification, setting method, and communication board/communication module installation method of each GOT.
(Sold separately)
SH-080018 (1DM103)
GOT-A900 Series User’s Manual
(GT Works2 Version1/GT Designer2 Version1 compatible Connection System Manual) Describes the system configuration of which connection method is compatible with GOT-A900 series as well as processing cables.
(Sold separately)
SH-080255 (1DM207)
GT SoftGOT2 Version1 Operating Manual
Describes the system configuration, screen makeup and usage of GT SoftGOT2.
(Sold separately)
SH-080400E (1DM210)
Abbreviations, generic terms
and special terms Description
A985GOT-V Generic term of A985GOT-TBA-V and A985GOT-TBD-V
A985GOT Generic term of A985GOT-TBA, A985GOT-TBD and A985GOT-TBA-EU
A975GOT Generic term of A975GOT-TBA-B, A975GOT-TBD-B, A975GOT-TBA, A975GOT-TBD and A975GOT-TBA-EU
A970GOT
Generic term of A970GOT-TBA-B A970GOT-TBD-B, A970GOT-TBA, A970GOT-TBD, A970GOT-SBA, A970GOT-SBD, A970GOT-LBA, A970GOT-LBD, A970GOT-TBA-EU and A970GOT-SBA-EU
A97*GOT Generic term of A975GOT and A970GOT
A960GOT Generic term of A960GOT-EBA, A960GOT-EBD and A960GOT-EBA-EU
A956GOT Generic term of A956GOT-TBD, A956GOT-SBD, A956GOT-LBD, A956GOT-TBD-M3, A956GOT-SBD-M3 and A956GOT-LBD-M3
A956WGOT Generic term of A956WGOT-TBD
A953GOT Generic term of A953GOT-TBD, A953GOT-SBD, A953GOT-LBD, A953GOT-TBD-M3, A953GOT-SBD-M3 and A953GOT-LBD-M3
A951GOT Generic term of A951GOT-TBD, A951GOT-SBD, A951GOT-LBD, A951GOT-TBD-M3, A951GOT-SBD-M3 and A951GOT-LBD-M3
A951GOT-Q Generic term of A951GOT-QTBD, A951GOT-QSBD, A951GOT-QLBD, A951GOT-QTBD-M3, A951GOT-QSBD-M3 and A951GOT-QLBD-M3
A950GOT Generic term of A950GOT-TBD, A950GOT-SBD, A950GOT-LBD, A950GOT-TBD-M3, A950GOT-SBD-M3 and A950GOT-LBD-M3
A950 handy GOT Generic term of A953GOT-SBD-M3-H, A953GOT-LBD-M3-H, A950GOT-SBD-M3-H and A950GOT-LBD-M3-H
GOT
A95*GOT Generic term of A956GOT, A953GOT, A951GOT, A951GOT-Q, A950GOT and A950 handy GOT Bus connection board Generic term of A9GT-QBUSS, A9GT-QBUS2S, A9GT-BUSS and A9GT-BUS2S
Communica-
tion board Serial communication board Generic term of A9GT-RS4, A9GT-RS2 and A9GT-RS2T
Bus connection unit Generic term of A9GT-QBUS2SU, A9GT-BUS2SU, A9GT-BUS2SU, A7GT-BUSS and A7GT- BUS2S
Data link unit Generic term of A9GT-QJ71LP23, A9G1-QJ71BR13, A7GT-J71AP23, A7GT-J71AR23 and A7GT-J71AT23B
Network unit Generic term of A9GT-QJ71LP23, A9GT-QJ71BR13, A7GT-J71LP23 and A7GT-J71BR13 CC-Link communication unit Generic term of A8GT-J61BT13 and A8GT-J61BT15
Communica- tion unit
Ethernet unit Generic term of A9GT-J71E71-T
Protection sheet Abbreviation of A9GT-80PSC, A9GT-70PSC, A9GT-60PSC and A9GT-50PSC type transparent protection sheets
Backlight Abbreviation of A9GT-80LTT, A9GT-70LTTB, A9GT-70LTT, A9GT-70LTS, A9GT-70LTTBW and A9GT-50LT type backlights
Debug stand Abbreviation of A9GT-80STAND, A9GT-70STAND and A9GT-50STAND type debug stand PC card ( memory card ) Flash PC card, commercially- available flash PC card and SRM type PC card
Flash PC card Generic term of A9GTMEM-10MF, A9GTMEM-20MF and A9GTMEM-40MF Compact flash PC card Abbreviations of commercially- available compact flash PC card
Memory board Abbreviation of A9GT-FNB, A9GT-FNB1M, A9GT-FNB2M, A9GT-FNB4M, A9GT-FNB8M, A9GT-QFNB, A9GT-QFNB4M, A9GT-QFNB8M type option function memory board Attachment Generic term of A77GT-96ATT/A85GT-95ATT/A87GT-96ATT/A87GT-97ATT attachments Ten-key Panel Abbreviation of A8GT-TK ten-key Panel
A7GT-CNB Abbreviation of A7GT-CNB bus connector conversion box Option
A9GT-QCNB Abbreviation of A9GT-QCNB bus connector conversion box
External I/O module Abbreviation of A9GT-70KBF and A8GT-50KBF type external I/O interface module Printer interface module Abbreviation of A9GT-50PRF type printer interface module
Memory card interface
module Abbreviation of A1SD59J-MIF memory card interface module Video/RGB mixed input
interface module Abbreviation of A9GT-80V4R1 type Video/RGB mixed input interface module Video input interface
module Abbreviation of A9GT-80V4 type Video input interface module Option unit
RGB input interface module Abbreviation of A9GT-80R1 type RGB input interface module GT Works2 Version1 Abbreviation of SW1D5C-GTWK2-E software
GT Designer2 Version1 Generic term of SW1D5C-GTD2-E software
GT Designer Abbreviation of image creation software GT Designer for GOT900 GT Simulator2 Abbreviation of GT Simulator2 screen simulator GOT900
GT Converter Abbreviation of data conversion software GT Converter for GOT900 GT SoftGOT2 Abbreviation of GT SoftGOT2 monitoring software
GX Developer Generic term of SW D5C-GPPW-E/SW D5F-GPPW-E software packages Software
GX Simulator Generic term of SW D5C-LLT-E ladder logic test tool function software packages (SW5D5C-LLT-E or later)
QCPU (A Mode) Generic term of Q02CPU-A, Q02HCPU-A and Q06HCPU-A CPU Remote I/O station Network module for MELSECNET/H network system remote I/O station
(QJ71LP25-25, QJ72LP25, QJ72BR15)
QCPU Generic term of QCPU (Q Mode), QCPU (A Mode) and Remote I/O station
QnACPU Type Generic term of Q2ACPU, Q2ACPU-S1, Q2AHCPU, Q2AHCPU-S1, Q3ACPU, Q4ACPU and Q4ARCPU CPU
QnASCPU Type Generic term of Q2ASCPU, Q2ASCPU-S1, Q2ASHCPU and Q2ASHCPU-S1 CPU QnACPU Generic term of QnACPU Type and QnASCPU Type
AnUCPU Generic term of A2UCPU, A2UCPU-S1, A3UCPU and A4UCPU CPU AnACPU Generic term of A2ACPU, A2ACPU-S1 and A3ACPU CPU
AnNCPU Generic term of A1NCPU, A2NCPU, A2NCPU-S1 and A3NCPU CPU AnCPU Type Generic term of AnUCPU, AnACPU and AnNCPU CPU
AnUS(H)CPU Generic term of A2USCPU, A2USCPU-S1 and A2USHCPU-S1 CPU
AnS(H)CPU Generic term of A1SCPU, A1SCPUC24-R2, A2SCPU, A2SCPU-S1, A1SHCPU, A2SHCPU and A2SHCPU-S1 CPU
A1SJ(H)CPU Generic term of A1SJCPU, A1SJCPU-S3 and A1SJHCPU CPU AnSCPU Type Generic term of A2US(H)CPU, AnS(H)CPU and A1SJ(H)CPU CPU
ACPU Generic term of AnCPU Type, AnSCPU Type, A1FXCPU, A0J2HCPU, A2CCPU, A2CCPU24 and A2CJCPU CPU
FXCPU Generic term of FX0 series, FX0N series, FX0S series, FX1 series, FX1N series, FX1S series, FX2 series , FX2C series, FX2N series, FX1NC series and FX2NC series CPU
Motion controller CPU
Generic term of A273UCPU, A273UHCPU, A273UHCPU-S3, A373CPU, A373UCPU, A373UCPU-S3, A171SCPU, A171SCPU-S3, A171SCPU-S3N, A171SHCPU, A171SHCPUN, A172SHCPU, A172SHCPUN, A173UHCPU, A173UHCPU-S1 ,Q172CPU, Q173CPU, Q172CPUN and Q173CPUN CPU
CPU
FA controller Generic term of LM610, LM7600, LM8000 CPU Peripheral
connection module
G4 Abbreviation of AJ65BT-G4-S3
E71
Generic of AJ71E71-S3, AJ71E71N-B2, AJ71E71N-B5, AJ71E71N-T, AJ71E71N-B5T,
A1SJ71E71-B2-S3, A1SJ71E71-B5-S3, A1SJ71E71N-B2, A1SJ71E71N-B5, A1SJ71E71N-T and A1SJ71E71N-B5T
QE71
Generic of AJ71QE71, AJ71QE71-B5, AJ71QE71N-B2, AJ71QE71N-B5, AJ71QE71N-T, AJ71QE71N-B5T, A1SJ71QE71-B2, A1SJ71QE71-B5, A1SJ71QE71N-B2, A1SJ71QE71N-B5, A1SJ71QE71N-T and A1SJ71QE71N-B5T
Ethernet module
Q series-compatible E71 Generic of QJ71E71, QJ71E71-B2, QJ71E71-B5 and QJ71E71-100 Omron PLC
Generic term of C200HS, C200H, C200H series(C200HX, C200HG, C200HE), CQM1, C1000H,C2000H,CV500, CV1000, CV2000, CVM1-CPU11, CVM1-CPU21, CS1, CS1D, CJ1M, CPM1, CPM1A, CPM2A, CPM2C CPU, CQM1H
Yasukawa PLC Generic term of GL60S, GL60H, GL70H, GL120, GL130, CP-9200SH, CP-9300MS, MP-920, MP- 930, MP-940, CP-9200(H) and PROGIC-8 CPU
SLC500 Series Generic term of SLC500-20, SLC500-30, SLC500-40, SLC5/01 SLC5/02, SLC5/03, SLC5/04 SLC5/05
MicroLogix1000 Series
Generic term of 1761-L10BWA, 1761-L10BWB, 1761-L16AWA, 1761-L16BWA, 1761-L16BWB, 1761-L16BBB, 1761-L32AWA, 1761-L32BWA, 1761-L32BWB, 1761-L32BBB, 1761-L32AAA, 1761-L20AWA-5A, 1761-L20BWA-5A, 1761-L20BWB-5A
MicroLogix1500 Series Abbreviation of 1764-LSP
Allen-Bradley PLC Generic term of SLC 500 Series, MicroLogix1000 Series, MicroLogix1500 Series Sharp PLC Generic term of JW-21CU, JW-22CU, JW-31CUH, JW-32CUH, JW-33CUH, JW-50CUH,
JW-70CUH, JW-100CUH, JW-100CU, Z-512J CPU PROSEC T Series Generic term of T2(PU224 type), T2E, T2N, T3, T3H CPU PROSEC V Series Abbreviation of Model3000(S3) CPU
Toshiba PLC Generic term of PROSEC T Series and PROSEC V Series
SIEMENS PLC Generic term of SIMATIC S7-300 Series and SIMATIC S7-400 Series CPU
Large type H series Generic term of H-302(CPU2-03H), H-702(CPU2-07H), H-1002(CPU2-10H), H-2002(CPU2-20H), H-4010(CPU3-40H),.J-300(CPU-03Ha), H-700(CPU-07Ha), H-2000(CPU-20Ha)
H200 to 252 Series Generic term of H-200(CPU-02H, CPE-02H), H-250(CPU21-02H), H-252(CPU22-02H), H- 252B(CPU22-02HB), H-252C(CPU22-02HC, CPE22-02HC)
H Series board type Generic term of H-20DR, H-28DR, H-40DR, H-64DR, H-20DT, H-28DT, H-40DT, H-64DT, HL- 40DR, HL-64DR
EH-150 Series Generic term of EH-CPU104, EH-CPU208, EH-CPU308, EH-CPU316 HITACHI PLC
(HIDIC H Series) Generic term of large type H series,H-200 to 252 Series H Series board type, EH-150 Series Other PLC
Matsushita Electric Works PLC
Generic term of FP0-C16CT, FP0-C32CT, FP1-C24C, FP1-C40C, FP2, FP2SH, FP3, FP5, FP10(S), FP10SH, FP-M(C20TC) and FP-M(C32TC)
Memory abbreviation of memory (flash memory) in the GOT
OS Abbreviation of GOT system software
Object Setting data for dynamic image
Personal Computer Personal computer where the corresponding software package is installed Others
Servo amplifier Generic term of the MR-J2S-A, MR-J2S-CP and MR-J2M A series MELDAS C6/C64 Generic term of the FCA C6, FCA C64
In this manual, the following products are called by new names.
CHAPTER1 OVERVIEW
This manual that can be used on a GOT with an operating system installed. These functions include the utility function, ladder monitor function, system monitor function, special module monitor function, network monitor function, list editor function, motion monitor function, servo amplifier monitor function and CNC monitor function.
POINT
Note that some functions cannot be performed depending on the used GOT and the target CPU/connection form.
Refer to Chapter 2 for more information on the functions available for each GOT and the restrictions on the functions per target CPU and connection form.
1.1 Features
The monitor functions described in this manual are intended to improve the efficiency of trouble-shooting and maintenance operations for the PLC system.
The features of each monitor function are explained in the following sections.
1.1.1 Features of the utility function
The utility function enables you to use GOT setup and self-tests. To use the utility function, you need to install an operating system for the utility function on the GOT built-in internal memory by using GT Designer2. The features of the utility function are shown below.
POINT
Some of the utility functions cannot be used with GT SoftGOT2. Refer to the GT SoftGOT2 Version1 Operating Manual for the utility functions available for GT SoftGOT2.
(1) The brightness of a monitor screen can be adjusted (see Section 4.3 for details).
1
(2) The screen and OS data can be copied between the internal memory and memory card (see Section 4.4 for details).
The data monitored can be copied to and from the GOT built-in internal memory or a memory card installed on the GOT.
The OS data can only be copied from the GOT to the memory card.
(3) Setting a use environment of the GOT (see Section 4.5 for details).
You can set the operating environment of the GOT such as the beep sound, message display language and screen saver's idle time. When using the A985GOT, you can also make settings on the Human sensor.
1
(4) Running diagnostic checks on GOT hardware (see Section 4.6).
You can run diagnostic checks on the GOT hardware, including the image check, font check, memory card check and so on.
(5) Other functions (see Section 4.7 for details)
• Displaying data on available space in the GOT internal memory.
• Adjusting the clock of the PLC CPU.
• Displaying the display area cleanup screen.
• Changing security levels.
• Limiting access to the Utility Menu screen.
1.1.2 Features of the ladder monitor function
Installing the ladder monitor function operating system into the GOT built-in memory using the GT Designer2 enables ladder monitoring of the PLC CPU program as shown in a ladder diagram. The features of the ladder monitor function are shown below.
(1) Monitoring based on ladder symbols (see Section 6.3 for details) (Sample display) Ladder monitor screen
List D2
MOV D1
K 1
MOV D2
K 2
V RST
MOV D162
K 90
MOV D167
K 110
MOV D172
K 100
M9028 SET
M9020 K 400 DUTY
K 350
= D100
K 1234 M999
187 P0
D1 1
V 2
D162 47
D167 90
D172
110 100
DATA OVERFLOWS ONE SCREEN
STEP : 12345/18374
Exit PLCRD. Mon. Menu
Print Screen
Cancel Print
REMARK
The Print Screen and Cancel Print buttons are not displayed on the A956WGOT or the GOT whose display screen type is the EL.
(1) Ladder monitor screen
A maximum of 8 lines (max. 11 contact points per line; with 12 contact points or more, the line returns) of a sequence program are displayed on one screen.
Also, for the current values and other settings of word devices, a maximum of 8 devices are displayed (With 9 devices or more, use the arrow keys to switch displays.).
REMARK
Depending on the GOT model, a display is provided on the MELSEC-Q ladder monitor screen as indicated below.
• A985GOT(-V): Max. 15 lines displayed (1 line: Max. 11 contacts)
• A956WGOT: Max. 5 lines displayed (1 line: Max. 7 contacts)
(2) The display format can be changed to show comments for devices (see Section 6.2.2 for details).
(Sample display) Ladder monitor screen
7
M910 PLS
Y0023 M9036
0
T0 25
STEP : 12345/18374
Normally ON Action X0001 4
Character string display
Ready display
Operation ready
K25 T0 Operation start warning X0002
Start operation instruction
Exit PCRD. Mon. Menu
Print Screen
Cancel Print List
1) Switching the display format
The current values monitor of the word devices at the bottom of the screen are executed in decimal or hexadecimal format.
2) Displaying device comments
Comments of for the device used in the PLC program (comments that are written into the PLC CPU) are displayed.
(3) Monitoring other stations
Other stations in data link systems, network system or CC-Link system,
1.1.3 Features of the system monitor function
Installing the screen monitor function operating system into the GOT built-in memory using the GT Designer2 enables monitoring and testing of the buffer memory for the PLC CPU program and the special functions module. The features of the system monitor function are shown below.
(1) Any desired device can be monitored, using 4 dedicated screens
The system monitor function provides an entry monitor, a batch monitor, and a buffer memory monitor, enabling monitoring of any device, for complete flexibility in any application.
Entry monitor
D 15 -2147483648 DW D 10 -32767 X 001 M 25 Y 70 W 200 43 R 50 68378428 DW D 300 30000 NETWK No. [ 0] STATION[FF]
DEVICE MONITOR TEST MENU FORM SET
Batch monitor
D 10 32767 D 18 -500 D 11 0 D 19 3234 D 12 0 D 20 0 D 13 -1 D 21 0 D 14 0 D 22 0 D 15 3 D 23 -32768 D 16 0 D 24 0 D 17 0 D 25 0 BATCH MONITOR TEST MENU FORM SET NETWK No. [ 0] STATION[FF]
• Up to 8 points for a PLC CPU device registered by the user can be monitored in one window (see Section 9.2).
• Up to 16 points subsequent to a PLC CPU device specified by the user can be monitored in one window (see Section 9.3).
T/C monitor
T 0 PV 0 SV 0 [Production line A ] T 1 PV 0 SV 0 [Production line B ] T 2 PV 150 SV 150 [Production line C ] T 3 PV 0 SV 0 [Production line D ]
TC MONITOR TEST MENU FORM SET NETWK No. [ 0] STATION[FF]
Buffer memory monitor
BM MONITOR TEST MENU FORM SET
BM 1110 -32767 BM 1118 0 BM 1111 64 BM 1119 0 BM 1112 149 BM 1120 150 BM 1113 -1111 BM 1121 131 BM 1114 126 BM 1122 -32768 BM 1115 160 BM 1123 555 BM 1116 255 BM 1124 2368 BM 1117 1200 BM 1125 11000 NETWK No. [ 0] STATION[FF]
I/O NO[ 1]
• Up to 8 points, including the current value, set value, contact point, and coil can be monitored in a window subsequent to a PLC CPU timer (T)/counter (C) specified by the user (see Section 9.4).
• Up to 16 points subsequent to the buffer memory of a special function module specified by the user can be monitored in one window (see Section 9.5).
• With the GOT, the full screen can be divided into four windows and separate monitoring carried out in all four windows simultaneously.
D 15 -2147483648 DW D 10 -32767 X 001 M 25 Y 70 W 200 43 R 50 68378428 DW D 300 30000 NETWK No.[ 0] STATION[FF]
DEVICE MONITOR TEST MENU FORM SET BATCH MONITOR NETWK No.[ 0] STATION[FF]
TEST MENU FORM SET
D 10 32767 D 18 -500 D 11 0 D 19 3234 D 12 0 D 20 0 D 13 -1 D 21 0 D 14 0 D 22 0 D 15 3 D 23 -32768 D 16 0 D 24 0 D 17 0 D 25 0 BM MONITOR
NETWK No.[ 0]
I/O NO[ 1]
STATION[FF]
TEST MENU FORM SET
BM 1110 -32767 BM 1118 0 BM 1111 64 BM 1119 0 BM 1112 149 BM 1120 150 BM 1113 -1111 BM 1121 131 BM 1114 126 BM 1122 -32768 BM 1115 160 BM 1123 555 BM 1116 255 BM 1124 2368 BM 1117 1200 BM 1125 11000 NETWK No.[ 0] STATION[FF]
TC MONITOR TEST MENU FORM SET
T 0 PV 0 SV 0 [Production line A ] T 1 PV 0 SV 0 [Production line B ] T 2 PV 150 SV 150 [Production line C ] T 3 PV 0 SV 0 [Production line D ]
(2) Data can be changed by test operation (see Section 9.6 for details).
(Test sample) When M0 is on
NETWK No.[ 0] STATION[FF] DEC DEVICE[ M] [ 0] RST:0 SET:1[1]
7 4 1 0
8 5 2
− 9 6 3
A C E AC
B D F
DEL
When changing D0 present value
NETWK No.[ 0] STATION[FF] DEC DEVICE[ D] [ 0] VL[K-2147483648]
7 4 1 0
8 5 2
− 6 3
A C E AC
B D F
DEL 9
1) Test for bit device
Device specified by user is turned on or off.
2) Test for word device
Writes designated value into device specified by user.
3) Test for timer/counter
Writes in designated value as current value or set values of device specified by user.
4) Test for buffer memory
Writes designated value into buffer memory specified by user.
(3) Display format can be changed and device comments can be displayed (see Section 9.1.2 for details).
(Sample display) For entry monitor (comment display)
D 200 30 [Line 1 current units ] W 200 43 [Production line A ] R 50 68378428 DW [link status ] X 3
[Input switch 3 ] NETWKNo.[ 0] STATION[FF]
DEVICE MONITOR TEST MENU FORM SET
For batch monitor (hexadecimal display)
D 10 H 7FFF D 18 H FE0C D 11 H 0000 D 19 H 0CA2 D 12 H 0000 D 20 H 0000 D 13 H FFFF D 21 H 0000 D 14 H 0000 D 22 H 0000 D 15 H 0003 D 23 H 8000 D 16 H 0000 D 24 H 0000 D 17 H 0000 D 25 H 0000 NETWK No.[ 0] STATION[FF]
BATCHMONITOR TEST MENU FORM SET
1) Changing display format
The word device values for the entry monitor, batch monitor, T/C monitor, and the buffer memory monitor are monitored in decimal or hexadecimal format.
2) Device comment display
When the PLC CPU device is monitored, the comments written into the PLC CPU are displayed.
(4) Other stations can be monitored.
Other stations in data link systems, network systems or CC-Link systems, including the GOT (or stations connected to the GOT), can be monitored.
1.1.4 Features of the special module monitor function
Installing (or downloading) the special module monitor function operating system and special module monitor data into the GOT built-in memory using the GT Designer2 enables monitoring and changing of data in the special function module buffer memory, using dedicated screens.
Signal statuses of I/O modules can also be monitored.
The features of the special module monitor function are shown below.
(1) Monitoring can be done with dedicated screens (see Section 12.2 for details).
Monitoring is carried out using dedicated screens provided by the manufacturer for the special function module and I/O module.
It is not necessary for the user to create monitor screens.
(Sample display 1: for special function module) Menu screen after module
selection
Monitor screen after menu selection
1 Operation Monitor 2 I/O Monitor 3 Graph Monitor
Graph monitor screen
100 0 -100 -180 200 300 400 500 600
*
* [°C]
12345 678
******/****** ****/****
8 7 6 5 4 3 2 1 8 7 6 5 4 3 2 1 0 0 0 0 0 0 0 0 0 0 0 0 0 0 0 0 1:********************
0:********************
********* 8 7 6 5 4 3 2 1 0 0 0 0 0 0 0 0 0 0 0 0 0 0 0 0 1:*** 0:***
CH1********
CH2 ″ CH3 ″ CH4 ″
CH5********
CH6 ″ CH7 ″ CH8 ″
****** ******** 0
******: 0 0:**JIS.DIN 1:**JIS
********* 8 7 6 5 4 3 2 1 0 0 0 0 0 0 0 0 0 0 0 0 0 0 0 0 1:*** 0:***
A 6 8 R D
Menu selection
(Sample display 2: for I/O module)
Monitor screen
X MODULE
040 041 042 043 044 045 046 047 048 049 04A 04B 04C 04D 04E 04F
050 051 052 053 054 055 056 057 058 059 05A 05B 05C 05D 05E 05F
060 061 062 063 064 065 066 067 068 069 06A 06B 06C 06D 06E 06F
070 071 072 073 074 075 076 077 078 079 07A 07B 07C 07D 07E 07F
X X
z { { {z z { z {{ { { {{ { {
{ { { {{ { { { {{ { { {{ { {
{ { { {{ { { { {{ { { {{ { { z z z zz z { { {{ { { {{ { {
1) Menu screen
The menu is displayed classified into monitor items for the special function module only.
The object monitor screen is displayed by selecting the item from the menu.
2) Monitor screen
With the special function module, the buffer memory contents and the status of the PLC CPU I/O signals are monitored using text, numbers, and graphs.
With the I/O module, the status of I/O signals to and from an external module is monitored.
(2) Data can be changed by writing (see Section 12.1.5. for details).
(Writing example)
Monitor screen When changing channel that can be changed
Menu selection
Graph monitor screen
100 0 -100 -180 200 300 400 500 600
*
* [°C]
12345678
******/****** ****/****
8 7 6 5 4 3 2 1 8 7 6 5 4 3 2 1 0 0 0 0 0 0 0 0 0 0 0 0 0 0 0 0 1:********************
0:********************
********* 8 7 6 5 4 3 2 1 0 0 0 0 0 0 0 0 0 0 0 0 0 0 0 0 1:*** 0:***
CH1********
CH2 ″ CH3 ″ CH4 ″
CH5********
CH6 ″ CH7 ″ CH8 ″
****** ******** 0
******: 0 0:**JIS.DIN 1:**JIS
********* 8 7 6 5 4 3 2 1 0 0 0 0 0 0 0 0 0 0 0 0 0 0 0 0 1:*** 0:***
A 6 8 R D
X∗∗ Y∗∗
Y10 Y11 ∗∗∗∗∗∗∗∗∗∗
Y12 ∗∗∗∗∗
X02 X03 ∗∗∗∗∗∗∗∗∗∗
X06 X07 ∗∗∗∗∗∗∗∗∗∗
Y13 Y14 ∗∗∗∗∗∗∗
X0C X0D ∗∗∗∗∗∗
Y17 Y19 ∗∗∗∗∗∗∗∗
Y1B Y1A ∗∗∗∗∗∗∗
Y15 Y16 ∗∗∗∗
X08 X09 ∗∗∗∗
X04 X05 RUSY X0E X0F ∗∗∗∗
X00 ∗∗∗∗∗∗∗∗
X0A ∗∗∗∗∗∗∗∗
X0B ∗∗∗∗∗∗∗∗
X∗∗ ABCDDEFF 0000000011110100 Y∗∗ ABCDDEFF 0000000011110100 A:∗∗∗∗∗∗∗∗∗∗∗∗∗∗∗∗
0:R∗∗∗ 1:A∗∗∗
B:M∗∗∗∗∗ON/OFF 0:NO 1:YES C:M∗∗∗∗∗∗∗∗∗∗
0:NO 1:YES DD:∗∗∗∗∗∗∗∗∗∗
00:ABS 01:INS 10:ABS+INS E:∗∗∗∗∗∗∗∗∗∗∗∗∗∗∗∗
0:∗∗∗∗ 1:∗∗∗∗
F:∗∗∗∗∗∗∗∗∗∗∗∗∗∗∗∗
00:∗∗∗ 01:∗∗∗
10:∗∗∗ 11:PLS
∗∗∗∗∗∗∗∗∗∗∗∗∗
∗∗∗∗∗∗∗∗∗∗
∗∗∗∗∗∗∗∗∗∗∗∗∗
∗∗∗∗∗∗∗∗∗∗
X∗∗ Y∗∗
1 1 120 120 1000 -6 100 0 0 0 300 0 70
1 1 120 120 1000 2550 100 0 0 0 300 0 70 Parameter Data Monitor Screen AD71
7 4 1
0 8 5 2
− 9 6
3 DEL
1) The designated values are written into the user-specified buffer memory by writing the values from the monitor.
2) When changing the buffer memory data, input the numeric value using the auto display key window and write it into the buffer memory.
(3) Special module monitor data can be allocated as user monitor screen data.
The special module monitor data installed in the computer can be allocated to serve as user monitor screen data. To do this, the steps below are required.
1) Using the Copy function, allocate special module monitor data from another project as user monitor screen data.
2) Correct the data to match the system used for the BM initial buffer memory number of the Object function which has been set.
1.1.5 Features of the network monitor function
To use the network monitor function, you first must install an operating system (OS) for the network monitor function on your GOT by using GT Designer2. This enables you to monitor the status of the MELSECNET/B, MELSECNET (II), and
MELSECNET/10 networks. The following describes the features of the network monitor function.
(1) Network monitor screens are selectable on the own station monitor screen to monitor the own station and other stations on a network.
The own station monitor screen enables you to monitor the status of all the network lines connected to the own station.
A touch of the screen will guide you through various monitor screens to monitor the status of the own station and other stations on a network.
(2) Network information can be obtained from the own station monitor screen.
Dedicated monitor screens are available for each category of station classification, depending on the role that is played by the own station.
Network category: MELSECNET/B, MELSECNET (II) master station MELSECNET/B, MELSECNET (II) local station
MELSECNET/10, MELSECNET/H control station/ordinary station
MELSECNET/10, MELSECNET/H remote master station (Sample display) MELSECNET/B, MELSECNET (II) master station
(3) The status of other stations can be monitored on the other-station monitor screen.
The other-station monitor screen provides the following type of information on the status of other stations connected on a network:
• Communications status of each station
• Data link status of each station
• Parameters status of each station
• CPU action status of each station
• CPU RUN status of each station
• Loop status of each station
(Sample display) Other station monitor menu screen
Other station's communications status monitor screen
1.1.6 Features of the List editor function
Installation of the List editor function OS into the memory with the GT Designer2 allows for list edit of the sequence program in the ACPU.
The following shows features of the List editor function.
(1) Easy parameters and sequence program maintenance
Simple key operations allow checks, partial modifications, changes and additions of the parameters and the sequence program in the PLC CPU.
Without peripheral equipment other than the GOT, the sequence program can be simply edited.
Example of command change in the sequence program LD
OUT LD
X0 Y20 X1
LD MOV LD
X0 D0 X1
D1 Change
(2) Interlock with the ladder monitor function (only when A985/97*/960GOT is used) The list edit window can be started from the ladder monitor screen with a single touch. The list can be edited while viewing the ladder.
The list can also be displayed from the step line displayed on the ladder monitor.
Cansel Print
= K 1234 D100 M999
187 P0
D1 D2 V D162 D167 D167
1 2 47 90 110
STEP : 12345/18374
MOV K
1 D1
K
List EDITOR
SHIFTWRITEREAD INSERT DELETE
PARAM
OTHERHELP
187 188 193 198
LD MOV AND MOV
M999 K1
=K123 K1
D1 D100 D2 R
B
B TO
C INC
E FROM
A D
D F
F /
H CALL
I DEC
K
*
G RET
J MRD
L
>
N <
O _
Q MOV
M P
P MPP
R -
T BCD
U W W +
S
BIN V
MPS X AND
D OR
E MCP
W LD
C MC
F END
Z ANI
9 ORI
A LDI
8 MCR
B ANB
5 ORB
6 SET
4 PLS
7 SFT
1 CJ
2 RST
0 OUT
Ý ’è ( ) ƒ N ƒŠ ƒA «
(¨ )
3 SP GO
Exit PLCRD. Mon. Menu List
Print Screen
(3) The list edit screen can be recorded.
The hard copy function allows recording the edit screen of the list program.
(4) Access to other station is available.
The sequence program of the PLC CPU in other station can be list edited.
(5) Useful help functions
Help functions for read, write, insert and delete are available on the interactive menu selection system. Simple operation is facilitated.
(6) Comment for each device can be displayed.
Comment of the device at the cursor position can be displayed.
W 1 1 9 0 0
MOV Current value
D1
Comment of D1 is displayed.
OUT M50
1.1.7 Features of the motion monitor function
Installation of the motion monitor function OS or downloading of motion monitor data into the built-in memory of the GOT using GT Designer2 enables the servo monitoring and parameter setting of the motion controller CPU (Q172CPU, Q173CPU).
The following are the features of the motion monitor function.
(1) Various servo monitor data can be displayed on multiple monitor screens (refer to Section 23.3 for details)
The motion monitor function has multiple monitor screens, on which you can monitor servo data in a variety of patterns.
(Display examples)
Present Value Monitor Error List
• Monitors and displays the feed current values and actual current values of all running axes. (Refer to Section 23.3.3)
• Displays the history of errors that occurred on and after the leading edge of PLC ready (M2000). (Refer to Section 23.3.3)
Positioning Monitor Error List Designated-Axis
• Monitors the details of the positioning data set to any axis. (Refer to Section 23.3.5)
• Displays the latest errors that occurred on the specified axis. (Refer to Section 23.3.4)
(2) Servo parameters can be set by write operation (refer to Section 23.4 for details) (Write example: Making the auto tuning function invalid)
Parameter setting screen Parameter setting window appears Parameter setting screen
Change auto tuning from "1" to "2"
(No Auto).
Parameter setting is changed.
1) By performing write operation from the parameter setting screen, write the servo parameter setting (basic parameters/adjustment parameters) to the motion controller CPU.
2) When changing any servo parameter setting, enter the necessary numeral or option number from the automatically displayed key window to change the servo parameter setting, and write it to the motion controller CPU.
1.1.8 Features of the servo amplifier monitor functions
You can perform various monitor functions, parameter setting changes, test operations and others for the servo amplifier connected to the GOT.
The features of the servo amplifier monitor functions are described below.
(1) Servo amplifier status is displayed in real time (detailed description: Section 26.4, Section 26.5)
The status and alarm definition of the servo amplifier connected to the GOT can be listed in real time.
(Display example: A975GOT)
Monitor Alarm display
• Lists the monitor data of the servo amplifier.
(Refer to Section 26.4.1.)
• Displays the definition (number, name, occurrence time, occurrence factor) of the alarm currently occurring in the servo amplifier.
It also allows the alarm to be reset. (Refer to Section 26.5.1.)
(2) Various diagnostics can be run on the servo amplifier (detailed description: Section 26.6)
There are multiple diagnostic functions to run various diagnostics on the connected servo amplifier.
(Display example)
DI/DO display Amplifier information display
• Lists the ON/OFF states of the external I/O signals of the servo amplifier. (Refer to Section 26.6.1.)
• Displays the software number of the servo amplifier and the information (model, ID, encoder resolution) of the
(3) Servo parameters can be written (detailed description: Section 26.7)
The parameter values of the servo amplifier can be read, changed and written to the servo amplifier.
(4) Various test operations can be performed (detailed description: Section 26.8) Various test operations can be performed for the connected servo amplifier.
(Display example)
JOG operation Motorless operation
• While the Forward/Reverse key is touched, the servo amplifier runs. (Refer to Section 26.8.3.)
• Simulates the operation of the servo motor in the servo amplifier if the servo motor is not connected.
(Refer to Section 26.8.5.)
1.1.9 Features of the CNC monitor functions
Functions equivalent to the MELDAS dedicated display are available for the MELDAS connected with the GOT, such as Position Display Monitor, Alarm Diagnosis Monitor, Tool Offset/Param, Program Monitor and F0 function.
(detailed description: Section 29.2)
Position Display Monitor Alarm Diagnosis Monitor
Tool Offset/Param Program Monitor
F0 function
1.1.10 Features of the font change function
This function changes the font displayed on the GOT monitor screen, utility and extended function.
(Details: Chapter 31)
Standard font Chinese (simplified characters) font