TIBCO ActiveMatrix® Service Grid WebApp Component Development
Software Release 3.2.0 August 2012
Important Information
SOME TIBCO SOFTWARE EMBEDS OR BUNDLES OTHER TIBCO SOFTWARE. USE OF SUCH EMBEDDED OR BUNDLED TIBCO SOFTWARE IS SOLELY TO ENABLE THE FUNCTIONALITY (OR PROVIDE LIMITED ADD-ON FUNCTIONALITY) OF THE LICENSED TIBCO SOFTWARE. THE EMBEDDED OR BUNDLED SOFTWARE IS NOT LICENSED TO BE USED OR ACCESSED BY ANY OTHER TIBCO SOFTWARE OR FOR ANY OTHER PURPOSE.
USE OF TIBCO SOFTWARE AND THIS DOCUMENT IS SUBJECT TO THE TERMS AND CONDITIONS OF A LICENSE AGREEMENT FOUND IN EITHER A SEPARATELY EXECUTED SOFTWARE LICENSE
AGREEMENT, OR, IF THERE IS NO SUCH SEPARATE AGREEMENT, THE CLICKWRAP END USER LICENSE AGREEMENT WHICH IS DISPLAYED DURING DOWNLOAD OR INSTALLATION OF THE SOFTWARE (AND WHICH IS DUPLICATED IN THE LICENSE FILE) OR IF THERE IS NO SUCH SOFTWARE LICENSE AGREEMENT OR CLICKWRAP END USER LICENSE AGREEMENT, THE LICENSE(S) LOCATED IN THE “LICENSE” FILE(S) OF THE SOFTWARE. USE OF THIS DOCUMENT IS SUBJECT TO THOSE TERMS AND CONDITIONS, AND YOUR USE HEREOF SHALL CONSTITUTE ACCEPTANCE OF AND AN AGREEMENT TO BE BOUND BY THE SAME.
This document contains confidential information that is subject to U.S. and international copyright laws and treaties. No part of this document may be reproduced in any form without the written authorization of TIBCO Software Inc.
TIB, TIBCO, TIBCO ActiveMatrix, TIBCO Adapter, TIBCO Administrator, TIBCO AutoMeditate, TIBCO Enterprise Message Service, ActiveMatrix, AutoMediate, Predictive Business, Information Bus, The Power of Now, and TIBCO Rendezvous are either registered trademarks or trademarks of TIBCO Software Inc. in the United States and/or other countries.
EJB, Java EE, J2EE, and all Java-based trademarks and logos are trademarks or registered trademarks of Sun Microsystems, Inc. in the U.S. and other countries.
All other product and company names and marks mentioned in this document are the property of their respective owners and are mentioned for identification purposes only.
THIS SOFTWARE MAY BE AVAILABLE ON MULTIPLE OPERATING SYSTEMS. HOWEVER, NOT ALL OPERATING SYSTEM PLATFORMS FOR A SPECIFIC SOFTWARE VERSION ARE RELEASED AT THE SAME TIME. SEE THE README FILE FOR THE AVAILABILITY OF THIS SOFTWARE VERSION ON A SPECIFIC OPERATING SYSTEM PLATFORM.
THIS DOCUMENT IS PROVIDED “AS IS” WITHOUT WARRANTY OF ANY KIND, EITHER EXPRESS OR IMPLIED, INCLUDING, BUT NOT LIMITED TO, THE IMPLIED WARRANTIES OF MERCHANTABILITY, FITNESS FOR A PARTICULAR PURPOSE, OR NON-INFRINGEMENT.
THIS DOCUMENT COULD INCLUDE TECHNICAL INACCURACIES OR TYPOGRAPHICAL ERRORS.
CHANGES ARE PERIODICALLY ADDED TO THE INFORMATION HEREIN; THESE CHANGES WILL BE INCORPORATED IN NEW EDITIONS OF THIS DOCUMENT. TIBCO SOFTWARE INC. MAY MAKE IMPROVEMENTS AND/OR CHANGES IN THE PRODUCT(S) AND/OR THE PROGRAM(S) DESCRIBED IN THIS DOCUMENT AT ANY TIME.
THE CONTENTS OF THIS DOCUMENT MAY BE MODIFIED AND/OR QUALIFIED, DIRECTLY OR INDIRECTLY, BY OTHER DOCUMENTATION WHICH ACCOMPANIES THIS SOFTWARE, INCLUDING BUT NOT LIMITED TO ANY RELEASE NOTES AND "READ ME" FILES.
Copyright © 1999-2012 TIBCO Software Inc. ALL RIGHTS RESERVED.
TIBCO Software Inc. Confidential Information
TIBCO ActiveMatrix WebApp Component Development
|
iiiContents
Tables . . . .v
Preface . . . .vii
Changes from the Previous Release of this Guide . . . viii
Related Documentation . . . ix
TIBCO ActiveMatrix Documentation . . . ix
Other TIBCO Product Documentation . . . ix
Typographical Conventions . . . xi
Connecting with TIBCO Resources . . . .xiv
How to Join TIBCOmmunity . . . .xiv
How to Access All TIBCO Documentation . . . .xiv
How to Contact TIBCO Support . . . .xiv
Chapter 1 Overview . . . .1
Introduction . . . 2
Approaches . . . 3
Chapter 2 WebApp Components . . . 5
Creating a WebApp Component . . . 6
Configuring a WebApp Component . . . 8
Configuring a WebApp Component Using Web.xml . . . 10
Configuring a WebApp Component's Custom Feature . . . 12
Configuring a WebApp Component’s External Custom Feature . . . 13
Adding/Configuring a WebApp Component’s Security . . . 14
Form-based Authentication Policy . . . 14
Security Constraint Policy . . . 15
Updating a WebApp Component . . . 19
ZeroConfiguration DAA Creation Using WAR . . . 20
Chapter 3 WebApp Component Implementations . . . .21
Opening an Implementation. . . 22
Generating an Implementation. . . 23
Generate WebApp Component Implementation Reference. . . 24
iv
|
ContentsRegenerating an Implementation . . . 28
Refreshing an Implementation . . . 29
Accessing a Property . . . 30
Invoking a Reference Operation . . . 31
WebApp Component Testing . . . 32
Logging . . . 34
Handling Errors . . . 35
Chapter 4 URL Mappings. . . 37
Use of URL Paths . . . 38
Specification of Mappings . . . 39
Implicit Mappings . . . 39
Index . . . 41
TIBCO ActiveMatrix WebApp Component Development Tables
|
vTables
Table 1 General Typographical Conventions . . . xi
Table 2 Syntax Typographical Conventions . . . xii
Table 3 Code generation details dialog. . . 24
Table 4 XML Data Binding Classes dialog . . . 25
Table 5 Create Servlet dialog . . . 27
Table 6 Example Set of Maps . . . 39
Table 7 Incoming Paths Applied to Example Maps. . . 40
vi
|
TablesTIBCO ActiveMatrix WebApp Component Development
|
viiPreface
TIBCO ActiveMatrix® is a scalable and extensible platform for developing, deploying, and managing applications that conform to a service-oriented architecture. The WebApp component conforms to the SCA Java EE Integration Specification and allows you to create Web applications based on these
specifications.
Topics
• Changes from the Previous Release of this Guide, page viii
• Related Documentation, page ix
• Typographical Conventions, page xi
• Connecting with TIBCO Resources, page xiv
viii
|
Changes from the Previous Release of this GuideChanges from the Previous Release of this Guide
This section itemizes the major changes from the previous release of this guide.
Web Application Component to WebApp Component
The term Web Application component is replaced with the term WebApp component in entire guide, including guide’s title. The changes is done to match the component’s name in the guide with the composite editor.
Adding/Configuring a WebApp Component’s Security
A new section provides additional details on adding/configuring a WebApp component security using authentication and authorization security policies. See Adding/Configuring a WebApp Component’s Security, page 14.
Generate WebApp Component Implementation Reference
Updated the section with a new reference table for the XML Data Binding Classes dialog which provides JAXB code generation feature, similar to Java component.
See Generate WebApp Component Implementation Reference, page 24.
WebApp Component Testing
A new section provides details on performing a WebApp component testing in TIBCO Business Studio for RAD and JAD communication. See WebApp Component Testing, page 32.
Third Party Documentation
The Third Party Documentation section has been removed from the Guide.
TIBCO ActiveMatrix WebApp Component Development Preface
|
ixRelated Documentation
This section lists documentation resources you may find useful.
TIBCO ActiveMatrix Documentation
The following documents form the TIBCO ActiveMatrix documentation set:
• Concepts: Read this manual before reading any other manual in the documentation set. This manual describes terminology and concepts of the TIBCO ActiveMatrix platform. The other manuals in the documentation set assume you are familiar with the information in this manual.
• Development Tutorials: Read this manual for a step-by-step introduction to the process of creating, packaging, and running composites in TIBCO Business Studio.
• Composite Development: Read this manual to learn how to develop and package composites.
• Java Component Development: Read this manual to learn how to configure and implement Java components.
• Mediation Component Development: Read this manual to learn how to configure and implement Mediation components.
• Mediation API Reference: Read this manual to learn how to configure and implement Mediation components.
• Spring Component Development: Read this manual to learn how to configure and implement Spring components.
• WebApp Component Development: Read this manual to learn how to configure and implement WebApp components.
• Administration: Read this manual to learn how to manage the runtime and deploy and manage applications.
• Release Notes: Read this manual for a list of new and changed features, steps for migrating from a previous release, and lists of known issues and closed issues for the release.
Other TIBCO Product Documentation
You may find it useful to read the documentation for the following TIBCO products:
• TIBCO ActiveMatrix® Service Bus
x
|
Related Documentation• TIBCO ActiveMatrix® Service Grid
• TIBCO ActiveMatrix® Registry
• TIBCO ActiveMatrix® Policy Manager
• TIBCO Enterprise Message Service™
• TIBCO Adapter™
• TIBCO Administrator™
• TIBCO Hawk®
• TIBCO Rendezvous®
TIBCO ActiveMatrix WebApp Component Development Preface
|
xiTypographical Conventions
The following typographical conventions are used in this manual.
Table 1 General Typographical Conventions
Convention Use
TIBCO_HOME ENV_NAME
Many TIBCO products must be installed within the same home directory.
This directory is referenced in documentation as TIBCO_HOME. The default value of TIBCO_HOME depends on the operating system. For example, on Windows systems, the default value is C:\tibco.
Other TIBCO products are installed into an installation environment.
Incompatible products and multiple instances of the same product are installed into different installation environments. An environment home directory is referenced in documentation as ENV_HOME. The default value of ENV_HOME depends on the operating system. For example, on
Windows systems the default value is C:\tibco.
code font Code font identifies commands, code examples, filenames, pathnames, and output displayed in a command window. For example:
Use MyCommand to start the foo process.
bold code font Bold code font is used in the following ways:
• In procedures, to indicate what a user types. For example: Type admin.
• In large code samples, to indicate the parts of the sample that are of particular interest.
• In command syntax, to indicate the default parameter for a command.
For example, if no parameter is specified, MyCommand is enabled:
MyCommand [enable | disable]
italic font Italic font is used in the following ways:
• To indicate a document title. For example: See TIBCO ActiveMatrix BusinessWorks Concepts.
• To introduce new terms For example: A portal page may contain several portlets. Portlets are mini-applications that run in a portal.
• To indicate a variable in a command or code syntax that you must replace. For example: MyCommandpathname
xii
|
Typographical ConventionsKey combinations Key name separated by a plus sign indicate keys pressed simultaneously.
For example: Ctrl+C.
Key names separated by a comma and space indicate keys pressed one after the other. For example: Esc, Ctrl+Q.
The note icon indicates information that is of special interest or importance, for example, an additional action required only in certain circumstances.
The tip icon indicates an idea that could be useful, for example, a way to apply the information provided in the current section to achieve a specific result.
The warning icon indicates the potential for a damaging situation, for example, data loss or corruption if certain steps are taken or not taken.
Table 1 General Typographical Conventions (Cont’d)
Convention Use
Table 2 Syntax Typographical Conventions Convention Use
[ ] An optional item in a command or code syntax.
For example:
MyCommand [optional_parameter] required_parameter
| A logical ’OR’ that separates multiple items of which only one may be chosen.
For example, you can select only one of the following parameters:
MyCommand para1 | param2 | param3
TIBCO ActiveMatrix WebApp Component Development Preface
|
xiii{ } A logical group of items in a command. Other syntax notations may appear within each logical group.
For example, the following command requires two parameters, which can be either the pair param1 and param2, or the pair param3 and param4.
MyCommand {param1 param2} | {param3 param4}
In the next example, the command requires two parameters. The first parameter can be either param1 or param2 and the second can be either param3 or param4:
MyCommand {param1 | param2} {param3 | param4}
In the next example, the command can accept either two or three parameters.
The first parameter must be param1. You can optionally include param2 as the second parameter. And the last parameter is either param3 or param4.
MyCommand param1 [param2] {param3 | param4}
Table 2 Syntax Typographical Conventions Convention Use
xiv
|
Connecting with TIBCO ResourcesConnecting with TIBCO Resources
How to Join TIBCOmmunity
TIBCOmmunity is an online destination for TIBCO customers, partners, and resident experts, a place to share and access the collective experience of the TIBCO community. TIBCOmmunity offers forums, blogs, and access to a variety of resources. To register, go to http://www.tibcommunity.com.
How to Access All TIBCO Documentation
After you join TIBCOmmunity, you can access the documentation for all supported product versions here:
http://docs.tibco.com
How to Contact TIBCO Support
For comments or problems with this manual or the software it addresses, please contact TIBCO Support as follows.
• For an overview of TIBCO Support, and information about getting started with TIBCO Support, visit this site:
http://www.tibco.com/services/support
• If you already have a valid maintenance or support contract, visit this site:
https://support.tibco.com
Entry to this site requires a user name and password. If you do not have a user name, you can request one.
TIBCO ActiveMatrix WebApp Component Development
|
1Chapter 1 Overview
This chapter provides an overview of the component and the approaches to the component development process.
Topics
• Introduction, page 2
• Approaches, page 3
2
|
Chapter 1 OverviewIntroduction
A Web application is a group of HTML pages, JSP pages, servlets, resources and source file, which can be managed as a single unit.
Web applications can be simple (consisting of only static Web pages) or they can be advanced and include JavaServer Pages (JSP) files and Java servlets. These resources, along with an XML deployment descriptor (and other Web resources), are contained within a Web project during development. When you are ready to publish the Web application to the Web, you deploy the Web project to the server in the form of a Web archive (WAR) file. The end user can then view the Web application as a Web site from a URL.
The structure of a standard web module is:
The WebApp component integrates Java EE web applications into the TIBCO ActiveMatrix Service Grid and TIBCO ActiveMatrix BPM platform. The integration conforms to the SCA Java EE Integration Specification
(https://www.oasis-open.org/committees/tc_home.php?wg_abbrev=sca-j).
In TIBCO Activematrix Service Grid, all the resources are archived in the
distributed application archive (DAA) which then internally deploys the required WAR file.
TIBCO ActiveMatrix WebApp Component Development Approaches
|
3Approaches
A WebApp component can be used either in:
• Top-down You can start with a WSDL and complete the component reference implementation using a WTP (Web Tools Platform) project created in SDS during Generate Servlet Implementation.
• Bottom-up You can bring an already existing Web application in the TIBCO ActiveMatrix platform. The existing Web application could either be a WAR (Web ARchive) file, WTP project, or an OSGi-fied WebApp.
— Start with an existing WAR file.
You cannot add Properties or References on a component. The DAA has the WAR file bundled in it.
— Start with an existing WTP project.
You can add Servlets, References, and properties if required. In this case, the WTP project is exported into a WAR file and bundled inside the DAA.
— Start with a web.xml file.
This option is used when you want to OSGify your web application. Here, the WebApp component is composed as a set of OSGi bundles (and not as a single WAR file). OSGi bundles are simply jar files, that typically contain the Java class files of the service interfaces, their implementation, and some more meta information in a META-INF/manifest.mf file. Services are Java interfaces and once your bundle is registered as a service with the OSGi framework, other bundles can use your "published" service.
You can add Servlets, References, and properties if required. In this case, the DAA just bundles the web.xml and the Servlets and all static content (HTML, JPEGs, and so on, if any) reside in Java plug-ins.
4
|
Chapter 1 OverviewTIBCO ActiveMatrix WebApp Component Development WebApp Components
|
5Chapter 2 WebApp Components
This chapter describes how to create and configure a WebApp component.
Topics
• Creating a WebApp Component, page 6
• Configuring a WebApp Component, page 8
• Configuring a WebApp Component Using Web.xml, page 10
• Configuring a WebApp Component's Custom Feature, page 12
• Configuring a WebApp Component’s External Custom Feature, page 13
• Adding/Configuring a WebApp Component’s Security, page 14
• Updating a WebApp Component, page 19
• ZeroConfiguration DAA Creation Using WAR, page 20
6
|
Chapter 2 WebApp ComponentsCreating a WebApp Component
Creating an SOA Project To create a new SOA project:
1. Select File > New > TIBCO SOA Resources.
2. Click TIBCO SOA Project and click Next.
3. In the Project name field, type a name for the project and click Next twice.
4. In the Project Types list, choose one of the following ways to create a project:
— SOA Project From Implementation
You can create a Web application project from an existing WAR file, WTP file, or a web.xml file.
— Empty SOA Project
— Basic SOA Project 5. Click Finish.
Adding an Empty WebApp Component
To add an empty WebApp component, do one of the following:
• Right-click the composite canvas and select Add > WebApp.
• Click the canvas and click the WebApp icon in the pop-up toolbar.
• Click the WebApp icon in the Palette and click the canvas.
Starting with an Existing Implementation
• Bottom-up approach:
— Approach 1: Drag and drop the existing WAR file, Web.xml file from the Project Explorer to the composite canvas.
— Approach 2: In the Properties tab, Implementation section, under the Basic tab, specify a WTP project, WAR file, or Web.xml file. WTP project is the default option.
TIBCO ActiveMatrix WebApp Component Development Creating a WebApp Component
|
7• Top-down approach:
a. Drag and drop the WebApp component on the composite canvas.
b. Add reference on WebApp component and attach WSDL port type to reference.
c. Generate the Servlet Implementation.
8
|
Chapter 2 WebApp ComponentsConfiguring a WebApp Component
Implementation Options and Features
Select the WebApp component on the canvas and in the Properties view, click the Implementation tab.
The Options section allows you to specify the approach for component
development and the Features section allows you to specify the custom features on which the implementation depends.
Properties
Select the WebApp component on the canvas and in the Properties view, click the Properties tab. The Context Root and Connector Name properties must always be set.
You can configure a WebApp component using the ZeroConfiguration WAR file.
For details, refer ZeroConfiguration DAA Creation Using WAR, page 20.
Field Description
WTP Project Start with the Eclipse WTP project containing the WebApp component implementation.
WAR Start with the WAR file containing the WebApp component implementation.
Deployment Descriptor (web.xml)
Start with the deployment descriptor of the WebApp component, that is, the
web.xml file.
Field Description
Feature ID The ID of the feature.
Version Range The range of feature versions that the component requires.
TIBCO ActiveMatrix WebApp Component Development Configuring a WebApp Component
|
9Property Description
contextRoot The context root of a web application determines which URLs are to be delegated to your web application. If your application's context root is myapp, any request for /myapp or /myapp/* are handled. For example,
http://localhost:8080/myapp/index.html.
NOTE: A WebApp component must have an unique context root.
defaultConnector This property defines the name for an HTTP Inbound connector. For a Web application, a browser is only way of communication and as browser uses HTTP to communicate with any Web application. In TIBCO ActiveMatrix, you need to configure this HttpInbound Resource template in Administrator before deploying a Web application.
10
|
Chapter 2 WebApp ComponentsConfiguring a WebApp Component Using Web.xml
This section summarizes the procedure for configuring a WebApp component using a web.xml file.
1. Point to the web.xml file in the WebApp component implementation:
— Approach 1: Drag and drop the existing web.xml file from the Project Explorer to the composite canvas.
— Approach 2: Select the WebApp component on the canvas and in the Properties view, Implementation section, specify the web.xml file.
2. Generate the Servlet implementation.
a. In the Properties View, General section, Validation Report area, click the fix... link.
b. Select Generate Servlet Implementation.
The OSGI Plug-in project is created.
3. For static resources and JSP files, create a folder named resources under the
src folder in the generated OSGI Plug-in.
4. Export this non-Java package as an Exported Package from the OSGI Plug-in:
a. Open the MANIFEST.MF file in the META-INF folder of the Plug-in project.
b. In the Runtime tab, click Add for Exported Packages section, select the Show non-Java packages check box, select the resources package and assign any valid version as 1.0.0.
c. Save the MANIFEST.MF file.
5. Add an Import package for the resources package exported from the generated OSGI plug-in using override requirements for the configured WebApp component.
a. Open the General tab of the WebApp component in the composite.
b. Click the Override link under Administrator Requirements. This creates
SOAProjectName.override.requirements.
c. Open the Bundles & Features tab, click the + icon under the Import Packages (OSGi) section and enter the Package Name as resources.
TIBCO ActiveMatrix WebApp Component Development Configuring a WebApp Component Using Web.xml
|
11If JSP file is referring to a class from a java package (except classes from java.*
packages), add the required bundle or import package entry in component requirements file using override requirements. As override requirements is used, you need to explicitly add a custom feature as a required feature in the override requirements file. In this case, the details are not picked up from what is specified in the composite.
12
|
Chapter 2 WebApp ComponentsConfiguring a WebApp Component's Custom Feature
For more information on a custom feature, see TIBCO ActiveMatrix Java Component Development.
When you create a Web application starting with a web.xml file and generate a servlet implementation, a custom feature is automatically created and configured.
A custom feature is not automatically created for the WTP and WAR file options.
If you manually configure the component's implementation, you must manually create and configure the custom feature by selecting File > Create > New >
Custom Feature. If the component implementation uses a library, add the custom feature containing the library in the Properties view.
Starting Point Procedure Properties
View 1. Click the component.
2. In the Properties view, click the Implementation tab.
3. Click the button to the right of the Features table.
The Select a Feature dialog displays.
4. In the Select an item to open field, type a partial feature name. The feature that matches the name displays in the Matching items list.
5. Click a feature and click OK. The feature is added to the Features list.
TIBCO ActiveMatrix WebApp Component Development Configuring a WebApp Component’s External Custom Feature
|
13Configuring a WebApp Component’s External Custom Feature
For more information on a custom feature, see TIBCO ActiveMatrix Java Component Development.
If your WebApp component implementation references a plug-in containing a shared library, you must add the custom feature that contains the plug-in to the WebApp component’s configuration.
1. Click the component.
2. In the Properties view, click the Implementation tab.
3. Click the button to the right of the Features table.
The Select a Feature dialog displays.
4. Click the feature containing the shared library plug-in.
5. Click OK.
The feature is added to the component’s Features list.
14
|
Chapter 2 WebApp ComponentsAdding/Configuring a WebApp Component’s Security
Resources of a Web application are secured using security policies which provide following features:
• Authentication: The means by which communicating entities prove to one another that they are acting on behalf of specific identities that are authorized for access.
• Access control for resources: The means by which interactions with resources are limited to collections of users or programs for the purpose of enforcing integrity, confidentiality, or availability constraints.
• Confidentiality or data privacy: The means used to ensure that information is made available only to users who are authorized to access it.
WebApp component provides the Form-based Authetication and the Security Constraint policies to implement security policies for authentication and authorization of resources.
If a WebApp component is created from a WAR file or WTP project, which already contains the security configuration in web.xml, the security configuration from
web.xml will be mapped to the WebApp’s policy configuration.
Form-based Authentication Policy
Authentication mechanism provides means for verifying user’s access to the website’s protected area based on user name and password.
The form-based authentication mechanism allows you to setup look and feel of login as well as error screens. Login screens presents user an form to enter username and password while accessing a protected resource. The login module checks user’s authority to access the resource. If user is not authenticated, the error page is returned.
Adding/Configuring Form-based Authentication Policy
Follow below steps to implement a form-based authentication policy to a WebApp component:
Form-based login make use of sessions for login. System automatically logs out a user from application, once the session is invalidated.
TIBCO ActiveMatrix WebApp Component Development Adding/Configuring a WebApp Component’s Security
|
152. Select the Properties view and follow either of the below approaches to open the Form-based Authentication Configuration wizard window:
3. In the Form-based Authentication Configuration wizard window, specify the following parameters:
4. Click Finish.
Security Constraint Policy
A security constraint associates authorization and or user data constraints with HTTP operations on web resources. A Security Constraint policy allows to set security constraints on one or more web resource collections. A security constraint, which is represented by security-constraint in deployment descriptor, consists of following elements:
• Web resource collection The HTTP operations and web resources to which a security constraint applies (i.e. the constrained requests) are identified by one Approach 1 • In the Properties view, click the Implementation vertical
tab and select the Security tab.
• Under the Authentication section, select Form as authentication type from the drop-down.
Approach 2 • In the Properties view, click the Policies vertical tab.
• Click the Add Policy Set icon .
• Select Embedded as the Policy Set type, Form-Based Authentication Policy under the System Policies list and click Next.
Login page Page containing fields for entering username and password.
Click Browse to select the desired login page from the project resource list and click OK.
Error page Page displayed to user if authentication fails. Click Browse to select the desired error page from the project resource list and click OK.
Login module
Resource instance for LDAP configuration.
16
|
Chapter 2 WebApp Componentsor more web resource collections (web-resource-collection in deployment descriptor). A web resource collection consists of the following elements:
— URL patterns (url-pattern in deployment descriptor)
— HTTP methods (http-method in deployment descriptor).
• Authorization constraint An authorization constraint (auth-constraint in deployment descriptor) establishes a requirement for authentication and names the authorization roles permitted to perform the constrained requests.
A user must be a member of at least one of the named roles to be permitted to perform the constrained requests.An authorization constraint consists of the role name element (role-name in deployment descriptor).
Sample web.xml which defines the security constraint:
<web-app
xmlns="http://java.sun.com/xml/ns/javaee"
xmlns:xsi="http://www.w3.org/2001/XMLSchema-instance"
xsi:schemaLocation="http://java.sun.com/xml/ns/javaee http://java.sun.com/xml/ns/javaee/web-app_2_5.xsd"
version="2.5">
<display-name>Test WebApp</display-name>
<security-constraint>
<web-resource-collection>
<web-resource-name>Admin Role</web-resource-name>
<url-pattern>/dump/auth/admin/*</url-pattern>
<url-pattern>*.htm</url-pattern>
</web-resource-collection>
<auth-constraint>
<role-name>content-administrator</role-name>
</auth-constraint>
</security-constraint>
<security-constraint>
<web-resource-collection>
<web-resource-name>Super User Role</web-resource-name>
<url-pattern>/dump/auth/admin/*</url-pattern>
<url-pattern>/dump/auth/display/*</url-pattern>
<http-method>HEAD</http-method>
</web-resource-collection>
<web-resource-collection>
<web-resource-name>Super User Role</web-resource-name>
<url-pattern>/dump/auth/system/*</url-pattern>
</web-resource-collection>
The special role name “*” is a shorthand for all role names defined, while an authorization constraint that names no roles indicates that access to the constrained requests must not be permitted under any circumstances.
TIBCO ActiveMatrix WebApp Component Development Adding/Configuring a WebApp Component’s Security
|
17Adding/Configuring Security Constraint Policy
In TIBCO Business Studio you can add/configure a security constraint policy by following the below steps:
1. Open the Configure Web Security Constraint wizard using either of the following approaches:
2. Select the security constraint and rename the security constraint if required.
3. Click on the add web resource collection icon to add web resources under the security constraint or select existing web resource collection to update.
Approach 1 • In the Properties view, click the Implementation vertical tab and select the Security tab.
• Under the Web Security Constraint section, click the policy set to configure it or click the -not set- hyperlink to add a new Web Security Constraint policy set.
Approach 2 • In the Properties view, click the Policies vertical tab.
• Click the Add Policy Set icon.
• Select Embedded as the Policy Set type, Web Security Constraint Policy under the System Policies list, and click Next.
18
|
Chapter 2 WebApp Components4. Type the Name and Description of web resource collection.
5. In the URL pattern field, click the plus icon to add a URL pattern. Double click on a listed URL pattern to modify it.
6. Check the HTTP methods to be allowed for the web resource collection.
Default is "all" HTTP methods. If no methods are selected then "all" HTTP methods option is checked.
7. Click the add auth-constraint icon to add a authorization constraint.
8. Type the Description.
9. Click on plus icon to add a role name to the permissible roles list for the security constraint. Click on a listed role name to modify the role name.
10. Click add security constraint icon to add another security constraint to
TIBCO ActiveMatrix WebApp Component Development Updating a WebApp Component
|
19Updating a WebApp Component
You can update a component after you have configured its implementation.
Control Procedure
Canvas Right-click the component and select Refresh from Implementation.
Canvas Right-click a component and select Quick Fixes > Update Component from Implementation. (The "Quick Fixes" option is available when you add, delete or update a service, reference and property from the WebApp component.)
Properties
View 1. In the Validation Report area on the General tab of the component’s Property View click the fix... link.
2. Select Generate Servlet Implementation.
Problems View
1. In the Problems view, right-click an error of the form "The component
<ComponentName> is out of sync with its implementation" and select Quick Fix. (The "Quick Fix" option is available when you add, delete or update a service, reference and property from the WebApp component.) 2. In the Quick Fix dialog select Update Component from Implementation.
3. Click Finish.
20
|
Chapter 2 WebApp ComponentsZeroConfiguration DAA Creation Using WAR
ZeroConfiguration DAA creation is based on SDS command-line support. You can create a DAA using existing WebApp components (WAR files) on Active Matrix platform, without using the composite editor.
For details, refer SDS Commandline help.
Sample build configuration file:
<?xml version="1.0" encoding="UTF-8"?>
<project name="project" default="default">
<description>
WebApp War DAA creation
</description>
<!-- target: default -->
<target name="default" description="description">
<sds.createSoaProject projectname="webapphelloworld"/>
<sds.createComposite compositename="webapphelloworld"
projectname="webapphelloworld"/>
<sds.createComponent componentname="helloworld"
compositename="webapphelloworld" projectname="webapphelloworld"
implementationloc="<absolute path to war>"/>
<sds.promoteAll projectName="webapphelloworld"
compositeName="webapphelloworld" componentName="helloworld"/>
<sds.createDAA daaloc="webappsample.daa"
projectname="webapphelloworld">
<application compositename="webapphelloworld"
projectname="webapphelloworld" />
</sds.createDAA>
</target>
</project>
Specify the <absolute path to war> in the above build configuration file.
ZeroConfiguration DAA creation supports existing WebApps, which do not invoke any SCA reference.
You must not bundle the following files inside the WAR file's WEB-INF/lib:
j2ee.jar, jasper-*.jar, jsp-api.jar, rt.jar, tools.jar, servlet.jar,
servlet-api.jar, xerce.jar, xerces.jar, and xercesImpl.jar.
TIBCO ActiveMatrix WebApp Component Development WebApp Component Implementations
|
21Chapter 3 WebApp Component Implementations
This chapter describes how to generate a servlet implementation.
Topics
• Opening an Implementation, page 22
• Generating an Implementation, page 23
• Generate WebApp Component Implementation Reference, page 24
• Regenerating an Implementation, page 28
• Refreshing an Implementation, page 29
• Accessing a Property, page 30
• Invoking a Reference Operation, page 31
• WebApp Component Testing, page 32
• Logging, page 34
• Handling Errors, page 35
22
|
Chapter 3 WebApp Component ImplementationsOpening an Implementation
In case of the WTP and web.xml options, the web.xml file is opened. In case of the WAR file option, the WAR file is just highlighted in the Project explorer.
Control Procedure
Canvas Double-click the component.
Project Explorer Select the WTP project and open the implementation.
Canvas Right-click the component and select Open Implementation.
TIBCO ActiveMatrix WebApp Component Development Generating an Implementation
|
23Generating an Implementation
The Code generation details dialog displays.
1. Complete the Generate WebApp Component Implementation Reference, page 24.
2. Click Finish.
A WTP implementation is generated.
The WebContent folder contains items to be published to the server. By default, this folder will be named WebContent for newly created static and dynamic Web projects.
• META-INF — This directory contains the MANIFEST.MF file, which is used to map class paths for dependent JAR files that exist in other projects in the same Enterprise Application project. An entry in this file will update the run-time project class path and Java build settings to include the referenced JAR files.
• WEB-INF — The directory where supporting Web resources for a Web application are kept (for example: .xmi files, .xml files, and web.xml.) Control Procedure
Properties View
1. In the Validation Report area on the General tab of the component’s Property View, click the fix... link.
2. Select Generate Servlet Implementation.
Canvas Right-click the component and select Quick Fixes > Generate Servlet Implementation.
Canvas Right-click the component and select Generate Servlet Implementation.
Problems View
1. In the Problems view, right-click an error of the form "Component
<ComponentName> is not configured" and select Quick Fix.
2. In the Quick Fix dialog, click Generate Servlet Implementation.
3. Click Finish.
24
|
Chapter 3 WebApp Component ImplementationsGenerate WebApp Component Implementation Reference
WebApp component supports JAXB based code generation. For details, refer TIBCO ActiveMatrix Java Component Development guide.
Table 3 Code generation details dialog
Field Description
Project The name of the web application project to contain the implementation.
Default:
• For WTP: "WebApp" + <name of component>
• For web.xml: "com.tibco.webapp" + <name of component>
Source Location The name of the source folder in the plug-in project.
Default: src
Package The name of the package of the implementation.
Class The name of the class of the implementation.
Default: The name of component is the default class name.
Use default location for generated super class
Default: checked.
Super-class package The name of the package of the abstract superclass of the implementation class.
Super-class class The name of the abstract superclass of the implementation class.
Default: Abstract<WebappComponentName>
XML Data Binding Classes dialog appears if the WebApp component is wired to any reference.
TIBCO ActiveMatrix WebApp Component Development Generate WebApp Component Implementation Reference
|
25Table 4 XML Data Binding Classes dialog Field Description
Type The type of the data binding being generated: XMLBeans or JAXB.
If a JAR file already exists for the contract selected in the Contracts list, and you choose a binding type different than the one that exists in the JAR file or the contract has changed since the JAR file was generated, the Overwrite Existing JAR checkbox will be checked.
Default: XMLBeans.
Contracts details
Contracts A list of WSDL and schema files for which XML data binding classes will be generated.
JAR Type The type of JAR file being generated: Beans or Interface. (read only) Source File The path to the source file containing the selected contract. (read only) JAR File The path to the JAR file.
Default: When generating a component implementation:
JAR File
• Beans - projectName/libs/contractFileName.wsdl.jar
• Interface - projectName/libs/contractFileName.wsdl_interface.jar
where contractFileName is the name of the file containing the contract selected in the Contracts list and projectName is the name of the project containing the component implementation.
When generating from a contract file:
• Beans - projectName.libs/libs/contractFileName.wsdl.jar
• Interface - projectName.libs/libs/contractFileName.wsdl_interface.jar
where contractFileName is the name of the file containing the contract selected in the Contracts list and projectName is the name of the project containing the contract file.
26
|
Chapter 3 WebApp Component ImplementationsSet JAR Destination Folder
Invokes a dialog where you can set the folder to contain generated JAR files:
• All Generated JARs - All JAR files will be generated in the same folder as the destination of the currently selected JAR.
• New Generated JARs - Only newly generated JAR files will be generated in the same folder as the destination of the currently selected JAR file.
Setting the JAR folder affects only the JAR files generated by the wizard. It has no effect outside the wizard nor on subsequent wizard runs.
Default: All Generated JARs.
JAR Status The status of the JAR file containing the classes generated for the selected contract:
• JAR is non-existent and will be generated. - The JAR file does not exist.
• Different binding type. JAR must be overwritten. - The value of the Type field is different than the type of the data binding classes in the JAR file.
• JAR exists and will be overwritten. - The JAR file exists and the Overwrite Existing JAR checkbox is checked.
• JAR exists and will be preserved. - The JAR file exists and the Overwrite Existing JAR checkbox is unchecked.
• JAR is outdated and will be overwritten. - The selected contract has changed since the JAR file was generated and the Overwrite Existing JAR checkbox is checked, so the JAR file will be generated.
• JAR is outdated and will be preserved. - The selected contract has changed since the JAR file was generated and the Overwrite Existing JAR checkbox is unchecked, so the JAR file will not be generated.
Overwrite
Existing JAR Enabled only when the JAR file exists. When checked, the JAR file will be regenerated. When unchecked, the existing file will be reused and will not be modified.
Advanced
Use Indicate that the specified data binding configuration file should be used when Table 4 XML Data Binding Classes dialog
Field Description
TIBCO ActiveMatrix WebApp Component Development Generate WebApp Component Implementation Reference
|
27Table 5 Create Servlet dialog Field Description
Name Name of the servlet.
Description Description of the servlet.
Initialization Parameters
Name-value initialization parameters are used to convey setup information.
Typical examples are a Webmaster’s e-mail address, or the name of a system that holds critical data.
URL Mappings
Upon receipt of a client request, the URL mappings determine the Web application to which to forward it. For more information, see URL Mappings, page 37.
28
|
Chapter 3 WebApp Component ImplementationsRegenerating an Implementation
This option allows you to regenerate an implementation without recreating everything. For example, if you have a Web application with a Java SOA project each having their respective implementations. After developing the component, if you need to make a change to the WSDL (for example: a change to the datatype), you can use this option to change the existing implementation to use the updated WSDL instead of creating everything from scratch again.
The implementation must have been originally generated before you can regenerate.
You should regenerate the component implementation after you add (or delete) a service, reference, or property to the component.
The implementation is updated to match the component.
Control Procedure
Canvas Right-click the component and select Regenerate Servlet Implementation.
Problems View
1. In the Problems view, right-click an error of the form "The component
<ComponentName> is out of sync with its implementation" and select Quick Fix.
2. In the Quick Fix dialog select Update Component from Implementation or Update/Create Servlet.
3. Click Finish.
TIBCO ActiveMatrix WebApp Component Development Refreshing an Implementation
|
29Refreshing an Implementation
This option updates the SDS WebApp component based on an underlying implementation. For example, a WebApp component is configured with two properties and an implementation is generated. If one of the properties is accidentally deleted, you can use the refresh option. The SDS component reads the underlying implementation and refreshes the UI with the two properties.
Control Procedure
Canvas Right-click the component and select Refresh from Implementation.
Problems View
1. In the Problems view, right-click an error of the form "The component
<ComponentName> is out of sync with its implementation" and select Quick Fix.
2. In the Quick Fix dialog select Update Component from Implementation or Update/Create Servlet.
3. Click Finish.
30
|
Chapter 3 WebApp Component ImplementationsAccessing a Property
When you generate a WebApp component implementation for a component with a property, TIBCO Business Studio adds a field that represents the property and accessor methods to the WebApp component's abstract implementation servlet.
See TIBCO ActiveMatrix Java Component Development for details.
TIBCO ActiveMatrix WebApp Component Development Invoking a Reference Operation
|
31Invoking a Reference Operation
When you add an In-* reference to a WebApp component, a field and accessor methods are added to the component.
See TIBCO ActiveMatrix Java Component Development for details.
32
|
Chapter 3 WebApp Component ImplementationsWebApp Component Testing
When AMX composite applications run in RAD, or a remote admin is connected through TIBCO Business Studio, you can view information about the WebApp components using the internal WebApp component testing servlet.
The WebApp component testing servlet launches OSGi based Jetty server which hosts the WebApp component to be tested. It launches the WebApp component in the eclipse internal browser.
To test the WebApp component right click the WebApp component running in the Administrator Explorer view and select Invoke WebApp with Web Explorer. The option invokes the WebAppApplicationCommand program.
The WebAppApplicationCommand program detects if the WebApp component is running in RAD environment or at remote machine (JAD environment). Based on the communication environment WebAppApplicationCommand processes the WebApp component.
RAD communication
If the WebApp component is running in RAD, then the
WebAppApplicationCommand program follows below process:
1. The program resolves the launch configuration for the web application DAA or composite file.
— If launched from DAA, WebAppApplicationCommand extracts web.xml from the composite file.
— If launched from the composite file, WebAppApplicationCommand resolves
web.xml from eclipse workspace.
2. The program extracts the contextRoot and defaultConnector property values from the composite resource. The WebAppApplicationCommand
program then extracts the HTTP port number associated with the
defaultConnector property.
3. WebAppApplicationCommand constructs a test URL using contextRoot and HTTP port number (http://localhost:port number/contextRoot) and opens it in the eclipse internal browser.
— If contextRoot is mapped to a welcome page, the browser displays the welcome page
TIBCO ActiveMatrix WebApp Component Development WebApp Component Testing
|
33web.xml. Click on any servlet link in the RAD testing page to load the associated web page in other frame.
JAD communication
If the web application is running in the remote machine, then the
WebAppApplicationCommand invokes administrator web services using SOAP requests to retrieve the properties for the WebApp component:
1. The program extracts the contextRoot and defaultConnector properties value from the property map. If properties are substitutable,
WebAppApplicationCommand resolves the composite properties from
administrator. This is recursive process until final value of substitution is not found.
2. The program then extracts the HTTP host address and HTTP port number from defaultConnector. The WebAppApplicationCommand program:
a. retrieves the node on which component is running
b. retrieves the resource instance of the defaultConnector on the node c. retrieves the resource template for the resource instance
d. retrieves the HTTP port number from the resource template e. retrieves the HTTP host address from the node.
3. WebAppApplicationCommand constructs a test URL using contextRoot, HTTP port number and the HTTP host address (http://host address:port number/contextRoot) and opens it in the eclipse internal browser.
— If contextRoot is mapped to a welcome page, the browser displays the welcome page
— If contextRoot is not mapped to a welcome page, the browser displays the Page Not Found error page.
34
|
Chapter 3 WebApp Component ImplementationsLogging
TIBCO ActiveMatrix Service Grid supports logging to standard out and using a logging API. For simple demonstration applications, you can log to standard out.
However, for product applications you should use the logging API.
See TIBCO ActiveMatrix Java Component Development for details.
TIBCO ActiveMatrix WebApp Component Development Handling Errors
|
35Handling Errors
The WebApp component handles errors in the same way as the Java component.
See TIBCO ActiveMatrix Java Component Development for details on handling declared and undeclared faults.
36
|
Chapter 3 WebApp Component ImplementationsTIBCO ActiveMatrix WebApp Component Development URL Mappings
|
37Chapter 4 URL Mappings
This chapter describes mapping techniques required for Web containers mapping client requests to servlets.
Topics
• Use of URL Paths, page 38
• Specification of Mappings, page 39
38
|
Chapter 4 URL MappingsUse of URL Paths
Upon receipt of a client request, the Web container determines the Web
application to which to forward it. The Web application selected must have the longest context path that matches the start of the request URL. The matched part of the URL is the context path when mapping to servlets.
The Web container next must locate the servlet to process the request using the path mapping procedure described below.
The path used for mapping to a servlet is the request URL from the request object minus the context path and the path parameters. The URL path mapping rules below are used in order. The first successful match is used with no further matches attempted:
1. The container will try to find an exact match of the path of the request to the path of the servlet. A successful match selects the servlet.
2. The container will recursively try to match the longest path-prefix. This is done by stepping down the path tree a directory at a time, using the ’/’
character as a path separator. The longest match determines the servlet selected.
3. If the last segment in the URL path contains an extension (for example, jsp), the servlet container will try to match a servlet that handles requests for the extension. An extension is defined as the part of the last segment after the last
’.’ character.
4. If neither of the previous three rules result in a servlet match, the container will attempt to serve content appropriate for the resource requested. If a
"default" servlet is defined for the application, it will be used. The container must use case-sensitive string comparisons for matching.
TIBCO ActiveMatrix WebApp Component Development Specification of Mappings
|
39Specification of Mappings
In the Web application deployment descriptor, the following syntax is used to define mappings:
• A string beginning with a ‘/’ character and ending with a ‘/*’ suffix is used for path mapping.
• A string beginning with a ‘*.’ prefix is used as an extension mapping.
• A string containing only the ’/’ character indicates the "default" servlet of the application. In this case the servlet path is the request URI minus the context path and the path info is null.
• All other strings are used for exact matches only.
Implicit Mappings
If the container has an internal JSP container, the *.jsp extension is mapped to it, allowing JSP pages to be executed on demand. This mapping is termed an implicit mapping. If a *.jsp mapping is defined by the Web application, its mapping takes precedence over the implicit mapping.
A servlet container is allowed to make other implicit mappings as long as explicit mappings take precedence. For example, an implicit mapping of *.shtml could be mapped to include functionality on the server.
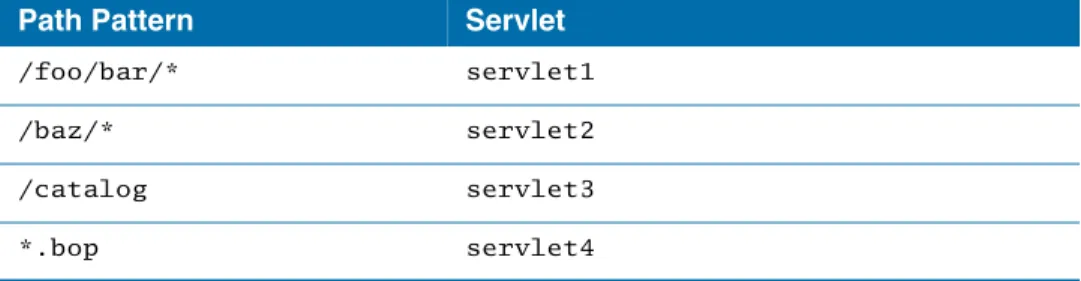
Example Mapping Set
Consider the following set of mappings:
Table 6 Example Set of Maps
Path Pattern Servlet
/foo/bar/* servlet1 /baz/* servlet2
/catalog servlet3
*.bop servlet4
40
|
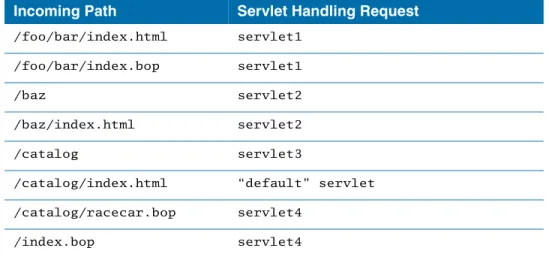
Chapter 4 URL MappingsThe following behavior would result:
Note: In the case of /catalog/index.html and /catalog/racecar.bop, the servlet mapped to “/catalog” is not used because the match is not exact.
Table 7 Incoming Paths Applied to Example Maps
Incoming Path Servlet Handling Request
/foo/bar/index.html servlet1
/foo/bar/index.bop servlet1
/baz servlet2
/baz/index.html servlet2 /catalog servlet3
/catalog/index.html “default” servlet /catalog/racecar.bop servlet4
/index.bop servlet4
TIBCO ActiveMatrix WebApp Component Development
|
41Index
A
Adding/Configuring a WebApp Component’s Security 14
B
bottom-up approach 3
C
changes from the previous release viii contextRoot 9
custom feature 12 customer support xiv
D
defaultConnector 9
E
external custom feature 13
H
handling errors 35
L
logging 34
M
mapping specification 39 META-INF folder 23
P
properties mandatory 8
R
related documentation ix, ix
S
security
authorization constraint 16
form-based authentication policy 14 security constraint policy 15 web resource collection 15 structure
web module 2 support, contacting xiv
42
|
IndexT
technical support xiv TIBCO_HOME xi top-down approach 3
U
URL mappings 37
W
WebApp component testing JAD testing 33
RAD testing 32 WEB-INF folder 23
X
XML data binding classes 24
Z
zero configuration 20