TIBCO BusinessConnect™
Interior Server Administration
Software Release 7.0 July 2018
Important Information
SOME TIBCO SOFTWARE EMBEDS OR BUNDLES OTHER TIBCO SOFTWARE. USE OF SUCH EMBEDDED OR BUNDLED TIBCO SOFTWARE IS SOLELY TO ENABLE THE FUNCTIONALITY (OR PROVIDE LIMITED ADD-ON FUNCTIONALITY) OF THE LICENSED TIBCO SOFTWARE. THE EMBEDDED OR BUNDLED SOFTWARE IS NOT LICENSED TO BE USED OR ACCESSED BY ANY OTHER TIBCO SOFTWARE OR FOR ANY OTHER PURPOSE.
USE OF TIBCO SOFTWARE AND THIS DOCUMENT IS SUBJECT TO THE TERMS AND CONDITIONS OF A LICENSE AGREEMENT FOUND IN EITHER A SEPARATELY EXECUTED SOFTWARE LICENSE
AGREEMENT, OR, IF THERE IS NO SUCH SEPARATE AGREEMENT, THE CLICKWRAP END USER LICENSE AGREEMENT WHICH IS DISPLAYED DURING DOWNLOAD OR INSTALLATION OF THE SOFTWARE (AND WHICH IS DUPLICATED IN THE LICENSE FILE) OR IF THERE IS NO SUCH SOFTWARE LICENSE AGREEMENT OR CLICKWRAP END USER LICENSE AGREEMENT, THE LICENSE(S) LOCATED IN THE “LICENSE” FILE(S) OF THE SOFTWARE. USE OF THIS DOCUMENT IS SUBJECT TO THOSE TERMS AND CONDITIONS, AND YOUR USE HEREOF SHALL CONSTITUTE ACCEPTANCE OF AND AN AGREEMENT TO BE BOUND BY THE SAME.
ANY SOFTWARE ITEM IDENTIFIED AS THIRD PARTY LIBRARY IS AVAILABLE UNDER SEPARATE SOFTWARE LICENSE TERMS AND IS NOT PART OF A TIBCO PRODUCT. AS SUCH, THESE SOFTWARE ITEMS ARE NOT COVERED BY THE TERMS OF YOUR AGREEMENT WITH TIBCO, INCLUDING ANY TERMS CONCERNING SUPPORT, MAINTENANCE, WARRANTIES, AND INDEMNITIES. DOWNLOAD AND USE THESE ITEMS IS SOLELY AT YOUR OWN DISCRETION AND SUBJECT TO THE LICENSE TERMS APPLICABLE TO THEM. BY PROCEEDING TO DOWNLOAD, INSTALL OR USE ANY OF THESE ITEMS, YOU ACKNOWLEDGE THE FOREGOING DISTINCTIONS BETWEEN THESE ITEMS AND TIBCO PRODUCTS.
This document contains confidential information that is subject to U.S. and international copyright laws and treaties. No part of this document may be reproduced in any form without the written authorization of TIBCO Software Inc.
TIBCO, Two-Second Advantage, TIBCO ActiveMatrix BusinessWorks, TIBCO Administrator, TIBCO Designer, TIBCO Hawk, TIBCO Rendezvous, and TIBCO Runtime Agent are either registered trademarks or trademarks of TIBCO Software Inc. in the United States and/or other countries.
Enterprise Java Beans (EJB), Java Platform Enterprise Edition (Java EE), Java 2 Platform Enterprise Edition (J2EE), and all Java-based trademarks and logos are trademarks or registered trademarks of Oracle Corporation in the U.S. and other countries.
All other product and company names and marks mentioned in this document are the property of their respective owners and are mentioned for identification purposes only.
THIS SOFTWARE MAY BE AVAILABLE ON MULTIPLE OPERATING SYSTEMS. HOWEVER, NOT ALL OPERATING SYSTEM PLATFORMS FOR A SPECIFIC SOFTWARE VERSION ARE RELEASED AT THE SAME TIME. SEE THE README FILE FOR THE AVAILABILITY OF THIS SOFTWARE VERSION ON A SPECIFIC OPERATING SYSTEM PLATFORM.
THIS DOCUMENT IS PROVIDED “AS IS” WITHOUT WARRANTY OF ANY KIND, EITHER EXPRESS OR IMPLIED, INCLUDING, BUT NOT LIMITED TO, THE IMPLIED WARRANTIES OF MERCHANTABILITY, FITNESS FOR A PARTICULAR PURPOSE, OR NON-INFRINGEMENT.
THIS DOCUMENT COULD INCLUDE TECHNICAL INACCURACIES OR TYPOGRAPHICAL ERRORS.
CHANGES ARE PERIODICALLY ADDED TO THE INFORMATION HEREIN; THESE CHANGES WILL BE INCORPORATED IN NEW EDITIONS OF THIS DOCUMENT. TIBCO SOFTWARE INC. MAY MAKE IMPROVEMENTS AND/OR CHANGES IN THE PRODUCT(S) AND/OR THE PROGRAM(S) DESCRIBED IN THIS DOCUMENT AT ANY TIME.
THE CONTENTS OF THIS DOCUMENT MAY BE MODIFIED AND/OR QUALIFIED, DIRECTLY OR INDIRECTLY, BY OTHER DOCUMENTATION WHICH ACCOMPANIES THIS SOFTWARE, INCLUDING BUT NOT LIMITED TO ANY RELEASE NOTES AND "READ ME" FILES.
Copyright © 2001-2018 TIBCO Software Inc. ALL RIGHTS RESERVED.
TIBCO Software Inc. Confidential Information
Contents
|
iiiContents
Figures . . . .vii
Tables . . . ix
Preface . . . .xv
Related Documentation . . . xvi
TIBCO BusinessConnect Documentation. . . xvi
Other TIBCO Product Documentation . . . xvi
Typographical Conventions . . . .xviii
TIBCO Product Documentation and Support Services . . . xxi
How to Access TIBCO Documentation . . . xxi
How to Contact TIBCO Support . . . xxi
How to Join TIBCO Community . . . xxi
Chapter 1 Introduction. . . .1
Interior Server Overview . . . .2
Interior Server Quick Start . . . .3
Installing the Interior Server . . . .3
Configuring Deployment . . . .3
Configuring Private Processes . . . .3
Deploying the Interior Server . . . .3
Chapter 2 Deployment Configuration . . . .5
Overview . . . .6
Step 1. Editing Application Configuration. . . .7
Intercomponent Communication. . . .7
Intercomponent Advanced . . . .8
Intercomponent JMS Settings. . . .10
Step 2. Configuring Interior Server.par . . . .13
iv
|
ContentsMap Clusters . . . 23
Chapter 3 Private Process Configuration. . . 27
Private Process Communication . . . 28
Selecting the Private Process Transport . . . 29
JMS Transport . . . 30
Configuring JMS Transport . . . 30
TIBCO Rendezvous . . . 35
Configuring TIBCO Rendezvous . . . 35
Intercomponent Communication Rendezvous Settings . . . 37
Outbound File Pollers . . . 40
Enabling and Configuring Outbound File Poller . . . 40
Chapter 4 Interior Server Deployment . . . 43
Before You Deploy . . . 44
Deploying and Starting the Interior Server . . . 45
Chapter 5 Manage the Interior Server. . . 47
Editing Application Configuration . . . 48
BusinessConnect Tab . . . 48
General Tab . . . 49
Advanced Tab . . . 49
Tracing. . . 50
Tracing for TIBCO Administrator . . . 50
Tracing for the TIBCO BusinessConnect Engine . . . 50
TIBCO LogLogic Integration . . . 51
Checking the State of the Interior Server Instance . . . 54
Starting and Stopping the Server . . . 55
Removing TIBCO BusinessConnect . . . 56
Undeploying TIBCO BusinessConnect . . . 56
Deleting TIBCO BusinessConnect . . . 56
Hawk Microagents for Interior Server . . . 57
Appendix A Database Schema Definition . . . 58
Audit Schema Details . . . 59
BC_TRANSACTIONS . . . 68
BC_MESSAGES . . . 75
BC_MESSAGES_BIN . . . 82
BC_ALERT . . . 84
BC_RESEND_BIN . . . 87
Contents
|
vBC_UACLOG . . . 89
BC_LOGACL_TEMP . . . 92
BC_DUP . . . 93
BC_UACLOG_DETAIL . . . 95
BC_POLLER_INFO . . . 98
Non-Repudiation Schema Details . . . .100
BC_NR_BIN_SIGNATURE . . . 102
BC_NR_BIN_EDCRED . . . 104
BC_NR_BIN_SIGCRED . . . 106
BC_NR_TRANSACTIONS . . . 108
BC_NR_MESSAGES . . . 113
BC_NR_BIN_VALICERT . . . 118
BC_NR_BIN . . . 120
Runtime Schema Details . . . .122
BC_SFWS_ATTACHMENTS_BIN . . . 124
BC_SFWS_MESSAGES . . . 128
BC_SCHEDULED_TASK . . . 133
BC_SFWS_TPINFO . . . 137
BC_MDN. . . 141
BC_HIBERNATION. . . 143
BC_LOGVIEWQUERY . . . 147
BC_HIBERNATION_BIN. . . 149
BC_LOGQUERYBIN. . . 151
Appendix B TIBCO BusinessConnect Palette Projects . . . .153
Deploying TIBCO BusinessConnect Palette Projects . . . .154
Appendix C Deployment Tuning . . . .155
Tuning Interior Server Deployment . . . .156
Deploying the Interior Server on two Subnets . . . .156
Modifying Load Balancing Properties . . . .158
Editing bcengine.tra to Tune Load Balancing . . . .161
Index . . . .163
vi
|
ContentsFigures
|
viiFigures
Figure 1 TIBCO BusinessConnect Interior and Gateway Server Architecture . . . .2
Figure 2 Listed Clusters . . . .23
Figure 3 Map Clusters Dialog . . . .24
Figure 4 Assigned Fault Tolerant Groups. . . .25
Figure 5 Load Balanced Cluster Name . . . .26
Figure 6 Service Instance. . . .26
Figure 7 Editing Application Configuration . . . .29
Figure 8 Editing Service Instance Dialog . . . .52
Figure 9 Audit_RelationShip. . . .59
Figure 10 TIBCO BusinessConnect Deployed on One Subnet . . . .156
Figure 11 Gateway Server and Interior Server Deployed on Two Subnets . . . .156
Figure 12 Private Processes Deployed on a Separate Subnet . . . .157
Figure 13 TIBCO Administrator Deployed on a Separate Subnet . . . .157
viii
|
FiguresTables
|
ixTables
Table 1 General Typographical Conventions . . . xviii
Table 2 Syntax Typographical Conventions . . . xix
Table 3 Editing Intercomponent Communication Settings . . . 7
Table 4 Editing Intercomponent Advanced Settings . . . 8
Table 5 Editing Intercomponent JMS Settings . . . 10
Table 6 Fault Tolerance Configuration . . . 14
Table 7 New Cluster Configuration . . . 18
Table 8 Rule Options for the HTTP/S, HTTPCA, and AS2_HTTP/S Transports . . . 20
Table 9 Rule Options for the FTP/S and SSHFTP Transports . . . 21
Table 10 Rule Options for the File Transport . . . 22
Table 11 Rule Options for the Email and AS1_Email Transports . . . 22
Table 12 JMS . . . 30
Table 13 TIBCO Rendezvous Settings . . . 35
Table 14 Outbound File Poller Configuration . . . 40
Table 15 Deploy Configuration Options . . . 45
Table 16 Audit_RelationShip Values. . . 59
Table 17 Audit Schema Tables Summary. . . 60
Table 18 BC_TRANSACTIONS: Details . . . 68
Table 19 BC_TRANSACTIONS: Columns Summary . . . 71
Table 20 BC_TRANSACTIONS Indices: BC_TRANSACTIONS_UTXID . . . 73
Table 21 BC_TRANSACTIONS Indices: BC_TRANSACTIONS_LOGVIEWER. . . 73
Table 22 BC_TRANSACTIONS Relationships . . . 74
Table 23 BC_MESSAGES: Details . . . 75
x
|
TablesTable 29 BC_MESSAGES Relationships: RESEND_BIN . . . 80
Table 30 BC_MESSAGES Relationships: BC_MESSAGES_BIN . . . 80
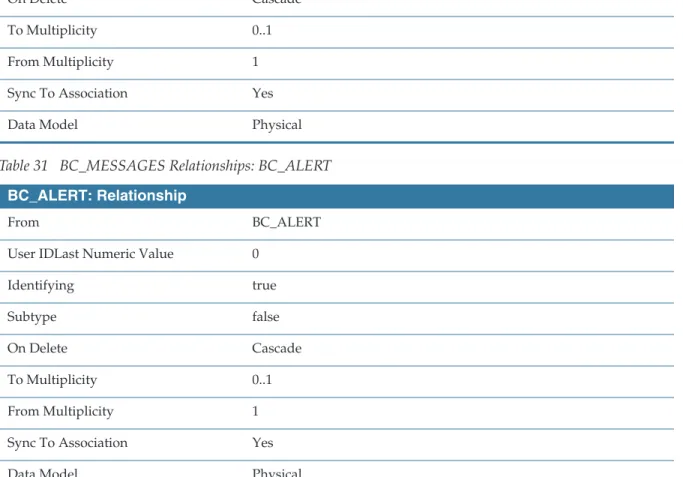
Table 31 BC_MESSAGES Relationships: BC_ALERT . . . 81
Table 32 BC_MESSAGES_BIN: Details . . . 82
Table 33 BC_MESSAGES_BIN: Columns Summary. . . 83
Table 34 BC_MESSAGES_BIN Constraints: MESSAGES_BIN . . . 83
Table 35 BC_MESSAGES_BIN: Relationships . . . 83
Table 36 BC_ALERT: Details . . . 84
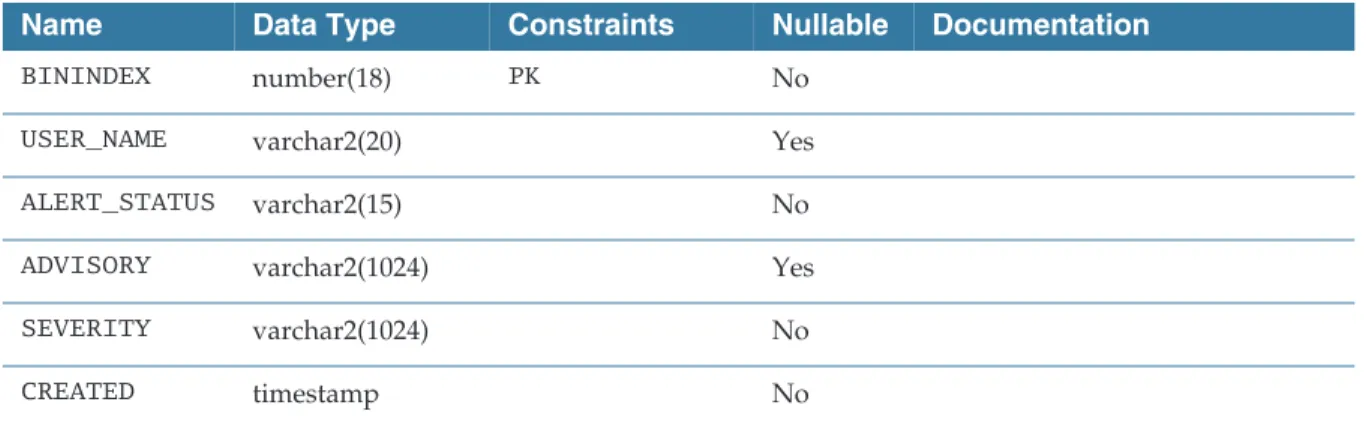
Table 37 BC_ALERT: Columns Summary . . . 85
Table 38 BC_ALERT Constraints: BC_ALERT . . . 85
Table 39 BC_ALERT: Relationships . . . 85
Table 40 BC_RESEND_BIN: Details . . . 87
Table 41 BC_RESEND_BIN: Columns Summary . . . 88
Table 42 BC_RESEND_BIN Constraints . . . 88
Table 43 BC_RESEND_BIN: Relationships . . . 88
Table 44 BC_UACLOG: Details . . . 89
Table 45 BC_UACLOG: Columns Summary . . . 89
Table 46 BC_UACLOG: Relationships. . . 90
Table 47 BC_LOGACL_TEMP: Details . . . 92
Table 48 BC_LOGACL_TEMP: Columns Summary . . . 92
Table 49 BC_LOGACL_TEMP Indices. . . 92
Table 50 BC_DUP: Details . . . 93
Table 51 BC_DUP: Columns Summary . . . 93
Table 52 BC_DUP Constraints. . . 94
Table 53 BC_UACLOG_DETAIL: Details. . . 95
Table 54 BC_UACLOG_DETAIL: Columns Summary . . . 95
Table 55 BC_UACLOG_DETAIL Indices . . . 96
Table 56 BC_UACLOG_DETAIL Constraints. . . 96
Table 57 BC_UACLOG: Relationships. . . 96
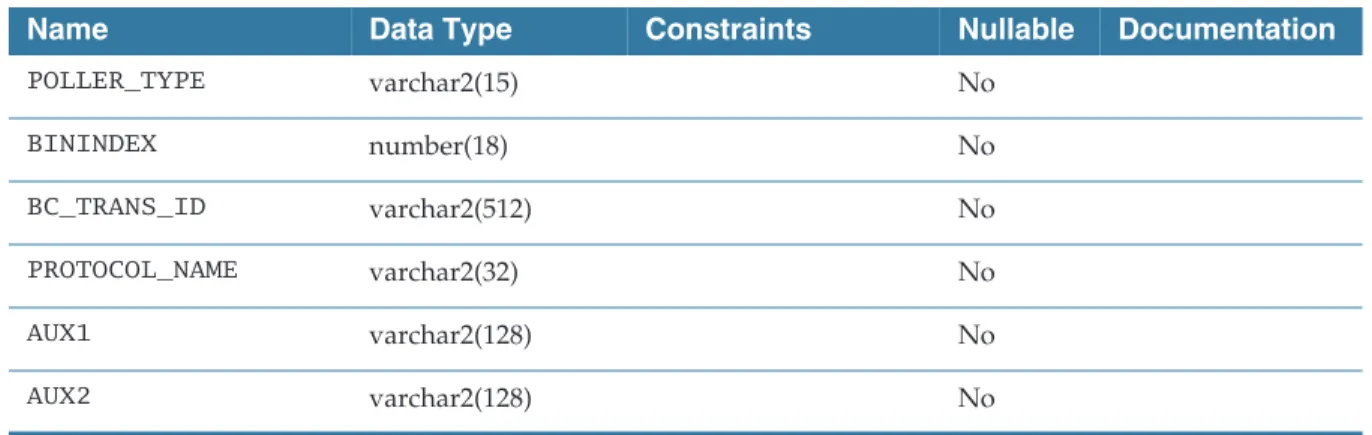
Table 58 BC_POLLER_INFO Details. . . 98
Table 59 BC_POLLER_INFO: Columns Summary . . . 98
Table 60 BC_POLLER_INFO Indices . . . 99
Tables
|
xiTable 61 BC_POLLER_INFO Indices . . . 99
Table 62 Non-Repudiation Schema Details . . . 100
Table 63 BC_NR_BIN_SIGNATURE: Details . . . 102
Table 64 BC_NR_BIN_SIGNATURE: Columns Summary . . . 102
Table 65 BC_NR_BIN_SIGNATURE: Relationships. . . 103
Table 66 BC_NR_BIN_EDCRED: Details . . . 104
Table 67 BC_NR_BIN_EDCRED: Columns Summary . . . 104
Table 68 BC_NR_BIN_EDCRED: Relationships . . . 105
Table 69 BC_NR_BIN_SIGCRED: Details . . . 106
Table 70 BC_NR_BIN_SIGCRED: Columns Summary . . . 106
Table 71 BC_NR_BIN_SIGCRED: Relationships . . . 107
Table 72 BC_NR_TRANSACTIONS: Details . . . 108
Table 73 BC_NR_TRANSACTIONS: Columns Summary . . . 109
Table 74 BC_NR_TRANSACTIONS: Relationships . . . 111
Table 75 BC_NR_MESSAGES: Details . . . 113
Table 76 BC_NR_MESSAGES: Columns Summary . . . 113
Table 77 BC_NR_MESSAGES: Indices . . . 114
Table 78 BC_NR_MESSAGES Relationships: BC_NR_BIN_MID . . . 114
Table 79 BC_NR_MESSAGES Relationships: BC_NR_BIN_SIG_MID . . . 115
Table 80 BC_NR_MESSAGES Relationships: BC_NR_BIN_VALICERT_MID . . . 115
Table 81 BC_NR_MESSAGES Relationships: BC_NR_BIN_SIGCRED_MID . . . 116
Table 82 BC_NR_MESSAGES Relationships: BC_NR_BIN_EDCRED_MID . . . 116
Table 83 BC_NR_MESSAGES Relationships: NR_MESSAGES . . . 117
Table 84 BC_NR_BIN_VALICERT: Details. . . 118
Table 85 BC_NR_BIN_VALICERT: Columns Summary . . . 118
Table 86 BC_NR_BIN_VALICERT: Relationships . . . 119
Table 87 BC_NR_BIN: Details . . . 120
Table 88 BC_NR_BIN: Columns Summary. . . 120
xii
|
TablesTable 93 BC_SFWS_ATTACHMENTS_BIN Indices: SFWS_ATTACH_IDX . . . 126
Table 94 BC_SFWS_ATTACHMENTS_BIN Indices: SFWS_ATTACH_CRIT. . . 126
Table 95 BC_SFWS_ATTACHMENTS_BIN: Relationships. . . 126
Table 96 BC_SFWS_MESSAGES: Details . . . 128
Table 97 BC_SFWS_MESSAGES: Columns Summary . . . 130
Table 98 BC_SFWS_MESSAGES Indices: SFWS_MSGS_UTXID. . . 131
Table 99 BC_SFWS_MESSAGES Indices: SFWS_MSG_TOP. . . 131
Table 100 BC_SFWS_MESSAGES Indices: SFWS_MSG_AUX1. . . 131
Table 101 BC_SFWS_MESSAGES Relationships: BC_SFWS_TPS . . . 131
Table 102 BC_SFWS_MESSAGES Relationships: ATTACHMENTS . . . 132
Table 103 BC_SCHEDULED_TASK: Details . . . 133
Table 104 BC_SCHEDULED_TASK: Columns Summary . . . 134
Table 105 BC_SCHEDULED_TASK Indices: BC_SCHEDULED_TASK_INDX_B . . . 136
Table 106 BC_SCHEDULED_TASK Indices: BC_SCHEDULED_TASK_INDX_C . . . 136
Table 107 BC_SFWS_TPINFO: Details . . . 137
Table 108 BC_SFWS_TPINFO: Columns Summary . . . 138
Table 109 BC_SFWS_TPINFO Indices: SFWS_TPINFO_UTXID . . . 139
Table 110 BC_SFWS_TPINFO Indices: SFWS_TPINFO_TOP. . . 139
Table 111 BC_SFWS_ATTACHMENTS_BIN: Relationships. . . 140
Table 112 BC_MDN: Details . . . 141
Table 113 BC_MDN: Columns Summary. . . 141
Table 114 BC_HIBERNATION: Details . . . 143
Table 115 BC_HIBERNATION: Columns Summary . . . 144
Table 116 BC_HIBERNATION Indices: BC_HIBER_IDX1. . . 146
Table 117 BC_HIBERNATION Indices: BC_HIBER_IDX2. . . 146
Table 118 BC_HIBERNATION: Relationships . . . 146
Table 119 BC_LOGVIEWQUERY: Details . . . 147
Table 120 BC_LOGVIEWQUERY: Columns Summary . . . 147
Table 121 BC_LOGVIEWQUERY Indices: BC_QUERY . . . 148
Table 122 BC_LOGVIEWQUERY: Relationships . . . 148
Table 123 BC_HIBERNATION_BIN: Details . . . 149
Table 124 BC_HIBERNATION_BIN: Columns Summary . . . 149
Tables
|
xiiiTable 125 BC_HIBERNATION_BIN Indices: BC_HIBER_BIN_INDX. . . 149
Table 126 BC_HIBERNATION_BIN: Relationships . . . 150
Table 127 BC_LOGQUERYBIN: Details . . . 151
Table 128 BC_LOGQUERYBIN: Columns Summary . . . 151
Table 129 BC_LOGQUERYBIN Indices: BC_LOGQUERYBIN . . . 152
Table 130 BC_LOGQUERYBIN: Relationships . . . 152
Table 131 DMZ to Interior Inbound Queue . . . 158
Table 132 Private Process to Interior Queue . . . 159
xiv
|
Tables|
xvPreface
TIBCO BusinessConnect™software is a business-to-business (B2B) gateway that your company can use to engage in electronic commerce with your business partners.
Topics
• Related Documentation, page xvi
• Typographical Conventions, page xviii
• TIBCO Product Documentation and Support Services, page xxi
xvi
|
Related DocumentationRelated Documentation
This section lists documentation resources you may find useful.
TIBCO BusinessConnect Documentation
The following documents form the TIBCO BusinessConnect documentation set:
• TIBCO BusinessConnect Installation and Configuration Read this guide to learn how to install and configure TIBCO BusinessConnect.
• TIBCO BusinessConnect Concepts Read this guide to learn about TIBCO BusinessConnect architecture, deployment modes, protocols, and security.
• TIBCO BusinessConnect Interior Server Administration Read this guide in order to administer, operate, and manage TIBCO BusinessConnect Interior Server.
• TIBCO BusinessConnect Gateway Server Administration Read this guide in order to administer, operate, and manage TIBCO BusinessConnect Gateway Server.
• TIBCO BusinessConnect Trading Partner Administration Read this guide to configure and manage trading partners.
• TIBCO BusinessConnect Scripting Deployment User’s Guide Read this guide to configure and manage TIBCO BusinessConnect using the command line interface.
• TIBCO BusinessConnect Release Notes Read the release notes for a list of new and changed features. This document also contains lists of known issues and closed issues for this release.
Other TIBCO Product Documentation
You may find it useful to read the documentation for the following TIBCO products:
• TIBCO Administrator™: This software allows you to manage users, machines and applications defined in a TIBCO Administration Domain. The TIBCO Administrator graphical user interface enables users to deploy, monitor, and start and stop TIBCO applications.
• TIBCO ActiveMatrix BusinessWorks™: This software is a scalable, extensible, and easy to use integration platform that allows you to develop integration projects. TIBCO ActiveMatrix BusinessWorks includes a graphical user interface (GUI) for defining business processes and an engine that executes the process.
Preface
|
xvii• TIBCO Designer™: This graphical user interface is used for designing and creating integration project configurations and building an Enterprise Archive (EAR) for the project. The EAR can then be used by TIBCO Administrator for deploying and running the application.
• TIBCO Runtime Agent™: This software suite is a prerequisite for other TIBCO software products. In addition to TIBCO Runtime Agent components, the software suite includes the third-party libraries used by other TIBCO products such as TIBCO Designer, Java Runtime Environment (JRE), TIBCO Hawk®, and TIBCO Rendezvous®.
• TIBCO Rendezvous®: This software enables programs running on many different kinds of computers on a network to communicate seamlessly. It includes two main components: the Rendezvous programming language interface (API) in several languages, and the Rendezvous daemon.
• TIBCO Enterprise Message Service™: This software provides a message service that enables integration of applications within an enterprise based on the Java Message Service (JMS) specification. This software is a prerequisite for other TIBCO software products.
• TIBCO BusinessEvents®: This software helps companies identify and quantify the impact of events; it notifies people and systems about meaningful events so processes can be adapted on-the-fly. TIBCO BusinessEvents uses a unique model-driven approach to collect, filter, and correlate events and deliver real-time operational insight.
• TIBCO Hawk®: This software is a tool for monitoring and managing distributed applications and operating systems. The software is designed specifically for monitoring distributed systems, so there is no centralized console or frequent polling across the network.
• tibbr®, tibbr Service, tibbr Community, and tibbr Community Service: This software is the first workplace communication tool with which you can follow subjects that relate to your work and interests besides following people as you do in typical social networking applications. That way, you have much more flexibility in obtaining the right information at the right time in the right context. In fact, the information will find you.
• TIBCO BusinessConnect™Palette: This software is about the resources available in the TIBCO BusinessConnect Palette for TIBCO ActiveMatrix BusinessWorks.
xviii
|
Typographical ConventionsTypographical Conventions
The following typographical conventions are used in this manual.
Table 1 General Typographical Conventions Convention Use
ENV_NAME TIBCO_HOME BC_HOME
TIBCO products are installed into an installation environment. A product installed into an installation environment does not access components in other installation environments. Incompatible products and multiple instances of the same product must be installed into different installation environments.
An installation environment consists of the following properties:
• Name Identifies the installation environment. This name is referenced in documentation asENV_NAME. On Microsoft Windows, the name is
appended to the name of Windows services created by the installer and is a component of the path to the product shortcut in the Windows Start > All Programsmenu.
• Path The folder into which the product is installed. This folder is referenced in documentation asTIBCO_HOME.
TIBCO BusinessConnect installs into a directory within aTIBCO_HOME. This directory is referenced in documentation as BC_HOME. The default value of BC_HOMEdepends on the operating system. For example, on Windows systems, the default value isC:\tibco\bc\version.
code font Code font identifies commands, code examples, filenames, pathnames, and output displayed in a command window. For example:
UseMyCommandto start the foo process.
bold code font
Bold code font is used in the following ways:
• In procedures, to indicate what a user types. For example: Typeadmin.
• In large code samples, to indicate the parts of the sample that are of particular interest.
• In command syntax, to indicate the default parameter for a command. For example, if no parameter is specified,MyCommandis enabled:
MyCommand [enable | disable]
Preface
|
xixitalic font Italic font is used in the following ways:
• To indicate a document title. For example: See TIBCO BusinessConnect Concepts.
• To introduce new terms. For example: A portal page may contain several portlets. Portlets are mini-applications that run in a portal.
• To indicate a variable in a command or code syntax that you must replace.
For example:MyCommandPathName Key
combinations
Key names separated by a plus sign indicate keys pressed simultaneously. For example: Ctrl+C.
Key names separated by a comma and space indicate keys pressed one after the other. For example: Esc, Ctrl+Q.
The note icon indicates information that is of special interest or importance, for example, an additional action required only in certain circumstances.
The tip icon indicates an idea that could be useful, for example, a way to apply the information provided in the current section to achieve a specific result.
The warning icon indicates the potential for a damaging situation, for example, data loss or corruption if certain steps are taken or not taken.
Table 1 General Typographical Conventions (Cont’d) Convention Use
Table 2 Syntax Typographical Conventions Convention Use
[ ] An optional item in a command or code syntax.
For example:
MyCommand [optional_parameter] required_parameter
| A logicalORthat separates multiple items of which only one may be chosen.
xx
|
Typographical Conventions{ } A logical group of items in a command. Other syntax notations may appear within each logical group.
For example, the following command requires two parameters, which can be either the pairparam1andparam2, or the pairparam3andparam4.
MyCommand {param1 param2} | {param3 param4}
In the next example, the command requires two parameters. The first parameter can be eitherparam1orparam2and the second can be eitherparam3orparam4:
MyCommand {param1 | param2} {param3 | param4}
In the next example, the command can accept either two or three parameters.
The first parameter must beparam1. You can optionally includeparam2as the second parameter. And the last parameter is eitherparam3orparam4.
MyCommand param1 [param2] {param3 | param4}
Table 2 Syntax Typographical Conventions (Cont’d) Convention Use
Preface
|
xxiTIBCO Product Documentation and Support Services
For information about this product, you can read the documentation, contact TIBCO Support, or join TIBCO Community.
How to Access TIBCO Documentation
Documentation for TIBCO products is available on the TIBCO Product Documentation website mainly in the HTML and PDF formats.
The TIBCO Product Documentation website is updated frequently and is more current than any other documentation included with the product. To access the latest documentation, visithttps://docs.tibco.com.
Documentation for TIBCO BusinessConnect is available on the
https://docs.tibco.com/products/tibco-businessconnectProduct Documentation page.
How to Contact TIBCO Support
You can contact TIBCO Support in the following ways:
• For an overview of TIBCO Support, and information about getting started with TIBCO Support, visithttp://www.tibco.com/services/support
• For accessing the Support Knowledge Base and getting personalized content about products you are interested in, visit the TIBCO Support portal at https://support.tibco.com.
• For creating a Support case, you must have a valid maintenance or support contract with TIBCO. You also need a user name and password to log in to https://support.tibco.com. If you do not have a user name, you can request one by clicking Register on the website.
How to Join TIBCO Community
TIBCO Community is the official channel for TIBCO customers, partners, and employee subject matter experts to share and access their collective experience.
TIBCO Community offers access to Q&A forums, product wikis, and best
xxii
|
TIBCO Product Documentation and Support Services|
1Chapter 1 Introduction
This chapter introduces TIBCO BusinessConnect Interior Server and explains its functionality.
Topics
• Interior Server Overview, page 2
• Interior Server Quick Start, page 3
2
|
Chapter 1 IntroductionInterior Server Overview
TIBCO BusinessConnect Interior Server is the server on which TIBCO BusinessConnect is installed on top of the other required TIBCO software
products. For the list of all required TIBCO and other 3rd party software products, see TIBCO BusinessConnect Installation and Configuration, Installation
Requirements.
TIBCO BusinessConnect Interior Server is located inside the company’s firewall and performs the following tasks:
• Handles all messaging level activities such as encryption, decryption, and digital signatures.
• Takes care of business level logic to be executed by an individual protocol, such as document schema validation.
A diagram of the Gateway Server and Interior Server communications is depicted inFigure 1.
Figure 1 TIBCO BusinessConnect Interior and Gateway Server Architecture
The Interior Server must be deployed and started before the Gateway Server.
For more details about the Interior Server, see TIBCO BusinessConnect Concepts, Interior Server and Gateway Server Architecture.
Interior Server Quick Start
|
3Interior Server Quick Start
To install, configure, deploy, and start the Interior Server, follow these steps:
Installing the Interior Server
1. To install the Interior Server, follow the steps described in TIBCO BusinessConnect Installation and Configuration,Chapter 2, Installation and Uninstallation:
— Preinstallation Tasks
— Installation
2. To create an installation on the Interior Server, follow the steps described in TIBCO BusinessConnect Installation and Configuration, Postinstallation:
— Managing Permissions for the Installation
— Initializing a Database
Configuring Deployment
To prepare the Interior Server for deployment, see:
• Chapter 2, Deployment Configuration, page 5
Configuring Private Processes
To configure private processes, see:
• Chapter 3, Private Process Configuration, page 27
Deploying the Interior Server
After the private processes and server is configured, you can deploy and start the Interior Server:
• Chapter 4, Interior Server Deployment, page 43
4
|
Chapter 1 Introduction|
5Chapter 2 Deployment Configuration
This chapter describes how to configure deployment of the Interior Server using TIBCO Administrator.
Topics
• Overview, page 6
• Step 1. Editing Application Configuration, page 7
• Step 2. Configuring Interior Server.par, page 13
• Step 3: Configuring Smart Routing, page 17
6
|
Chapter 2 Deployment ConfigurationOverview
To prepare the Interior Server for deployment, start as follows:
1. Select BusinessConnect and click Manage.
2. In the Configuration Repository tab, Create Deployment section, click Create.
3. When the Success dialog opens, click OK.
4. Continue withStep 1. Editing Application Configuration, page 7.
5. Add machines as explained inStep 2. Configuring Interior Server.par, page 13.
6. Continue withStep 3: Configuring Smart Routing, page 17.
Step 1. Editing Application Configuration
|
7Step 1. Editing Application Configuration
To edit an application’s configuration:
1. Expand Application Management > BusinessConnect > Configuration.
2. Click the BusinessConnect link.
3. Select the Component Settings tab.
Intercomponent Communication
1. Click the Intercomponent Communication link.
The default values listed inTable 3will be used unless you specify other values. To learn more about network default values, refer to the document TIBCO Rendezvous Administration, Chapter Default Port and Service Numbers.
Table 3 Editing Intercomponent Communication Settings Field Description
Interior Settings
Service Service port specified by the user.
Example: 8700 (default is 7500)
Network IP address on which the service is running.
Example: 190.100.0.10
Daemon Host IP address of the daemon host, which is the same one on which the service is running.
Example: 10.100.100.30
Daemon Port Example: 7500 (default is 7500) Interior Queue Configuration
Scheduler Heartbeat (seconds)
Default is 5.
The active scheduler sends heartbeat messages at the interval you specify (in seconds). Heartbeat messages inform other members that a member is acting
8
|
Chapter 2 Deployment Configuration2. Enter the required values as desired and click Save.
Intercomponent Advanced
1. To configure advanced settings, such as to specify locations for shared and temp files other than the default, follow the descriptions inTable 4.
Scheduler Activation (seconds)
Default is 15.
Defines the amount of time after which the scheduler will be activated.
Table 3 Editing Intercomponent Communication Settings (Cont’d) Field Description
Table 4 Editing Intercomponent Advanced Settings (Sheet 1 of 3)
Filed Description
Require Unlimited Encryption Policy
By default, this check box is selected and ensures that unlimited cipher strength is supported in the encryption algorithms.
If this check box is selected and policy files are not installed, TIBCO BusinessConnect engine will not start in order to prevent failure at runtime.
For information on installing unlimited strength encryption files, see TIBCO BusinessConnect Installation and Configuration, Installing Unlimited Strength JCE Policy Files.
Step 1. Editing Application Configuration
|
9Interior Settings Shared Temporary Directory
Pre-populated with the default location:./
You can enter any valid, available directory location to which TIBCO BusinessConnect can have access to write those messages. For example,
//BC_HOME/shared_temp (for Windows:
C:\tibco\bc\6.3\shared_temp).
Verify that this directory is accessible by all deployment nodes and by Private Processes. It should be accessible to all Interior engines if they are grouped for load balancing. The following files are stored in this directory:
• Inbound FTP and Email messages (if their size exceeds the threshold)
• Inbound messages (in form of a file) published to Private Processes Make sure that you have separate locations for:
• Shared folder
• Temporary folder
• Outbound File Poller
• Inbound File Poller Local Temporary
Directory
Pre-populated with the default location:./
You can enter any valid, available directory location to which TIBCO BusinessConnect can have access to write those messages. For example,
//BC_HOME/local_temp(for Windows:
C:\tibco\bc\6.3\local_temp).
Verify that this directory is accessible from all machines in the deployment.
If this directory is not defined, temporary files will be stored in the root directory or in the local Java directory.
Make sure that you have separate locations for:
• Shared folder
• Temporary folder
Table 4 Editing Intercomponent Advanced Settings (Sheet 2 of 3)
Filed Description
10
|
Chapter 2 Deployment ConfigurationIntercomponent JMS Settings
1. To configure JMS settings and set the connection parameters for the EMS server, follow the descriptions inTable 5.
Interior Component Wait Time (seconds)
The default is 7200 seconds.
This option specifies the timeout for exchanging internal messages between the Gateway and the Interior Server. If the system is heavily loaded with processing messages and it is not possible to deploy additional load-balancing engines to the domain, this property may be used to adapt to the increased response time of internal processes.
In most cases, the default value of 2 hours should be considered as acceptable.
Table 4 Editing Intercomponent Advanced Settings (Sheet 3 of 3)
Filed Description
Table 5 Editing Intercomponent JMS Settings (Sheet 1 of 3)
Field Enter
Intercomponent JMS Settings Protocol Prefix jms://
JMS User Name User name to use when logging into the JMS server.
If the JMS provider does not require access control, this field can be empty.
Not all JMS servers require user names and passwords. Refer to your JMS provider documentation and consult your system administrator to determine if your JMS server requires a user name and password.
JMS Password Password to use when logging into the JMS server.
If the JMS provider does not require access control, this field can be empty.
JNDI Context Factory
The initial context factory class for accessing JNDI.
(javax.naming.Context.INITIAL_CONTEXT_FACTORY).
Note:TIBCO BusinessConnect attempts to find the class. However, you may need to add the Java file supplied by your JNDI service provider to the
CLASSPATHenvironment variable to use JNDI.
Step 1. Editing Application Configuration
|
11JNDI Context URL
This is the URL to the JNDI service provider (javax.naming.Context.PROVIDER_URL).
See your JNDI provider documentation for the syntax of the URL.
JNDI User Name User name to use when logging into the JNDI server (javax.naming.Context.SECURITY_PRINCIPAL).
If the JNDI provider does not require access control, this field can be empty.
JNDI Password Password to use when logging into the JNDI server (javax.naming.Context.SECURITY_CREDENTIALS).
If the JNDI provider does not require access control, this field can be empty.
Topic Ccnnection Factory
The TopicConnectionFactory object stored in JNDI. This object is used to create a topic connection with a JMS application.
See your JNDI provider documentation for more information about creating and storing TopicConnectionFactory objects.
Queue Connection Factory
The QueueConnectionFactory object stored in JNDI. This object is used to create a queue connection with a JMS application.
See your JNDI provider documentation for more information about creating and storing QueueConnectionFactory objects.
Reconnect Max.
Duration (mins)
This is the time during which the TIBCO BusinessConnect server will try to reconnect. After this time, there will be no attempt to reconnect.
This duration time does not represent the reconnection frequency.
Default is 10 minutes.
Secured If selected, the transaction will be secured.
Verify JMS Server If selected, the JMS server's identity (that is, its X509 certificate as well as the specified value in the “Expected JMS Server Host Name” field) will be verified against the data received during the SSL handshake.
If either the trusted CA certificates or the expected hostname doesn't match, Table 5 Editing Intercomponent JMS Settings (Sheet 2 of 3)
Field Enter
12
|
Chapter 2 Deployment Configuration2. Click Test Connection.
JMS Server Certificate
The certificate credential of the JMS server.
To create this certificate, follow the steps described in TIBCO BusinessConnect Trading Partner Administration, Adding LDAP/JMS/Email Server Certificates The credential is stored in the TIBCO BusinessConnect keystore and is expected to be configured on the TIBCO Enterprise Message Service server according to the corresponding guidelines.
Expected JMS Server Host Name
The value of the common name component of the TIBCO Enterprise Message Service server's leaf certificate. This is usually the hostname of the resource, running the TIBCO Enterprise Message Service server. If it is a test system, the common name (CN) value may be any arbitrary string, which must match the value of this field if the “Verify JMS Server” check box is checked.
Strong Ciphers Only
If the box is checked, only strong encryption algorithms will be used between the server (or the palette) and the JMS provider. The below cipher suites are offered by the connecting client (either bc or the palette) in this mode:
TLS_RSA_WITH_AES_256_CBC_SHA TLS_RSA_WITH_AES_128_CBC_SHA TLS_DHE_RSA_WITH_AES_256_CBC_SHA TLS_DHE_RSA_WITH_AES_128_CBC_SHA SSL_RSA_WITH_RC4_128_SHA
SSL_RSA_WITH_3DES_EDE_CBC_SHA SSL_DHE_RSA_WITH_3DES_EDE_CBC_SHA SSL_DHE_DSS_WITH_3DES_EDE_CBC_SHA TLS_DHE_DSS_WITH_AES_128_CBC_SHA TLS_DHE_DSS_WITH_AES_256_CBC_SHA
If only 256-bit Algorithms are available for the JMS provider, the unlimited strength JCE jurisdiction policy files must be installed on TIBCO
BusinessConnect (or the palette/TRA) prior to attempting to connect to the JMS provider.
Use Trace See comments in TIBCO ActiveMatrix BusinessWorks Palette Reference, JMS Palette section Advanced. When this option is used, the SSL-specific debug tracing for the secure JMS transport will be sent to the engine standard output only.
Table 5 Editing Intercomponent JMS Settings (Sheet 3 of 3)
Field Enter
Step 2. Configuring Interior Server.par
|
13Step 2. Configuring Interior Server.par
In this step, you will determine which particular machine(s) will be running the Interior Server, which can be assigned to multiple machines to achieve both fault tolerance and load balancing.
1. Expand Application Management > BusinessConnect > Configuration.
2. Click the Interior Server.par link.
The Edit Service Configuration: Interior Server.par dialog appears.
General Tab
This tab allows you to add the Interior Server to machines.
1. In the General tab, click Add to Additional Machines.
The Bind to Container(s) dialog appears.
2. Select the check box next to the machine on which you want to deploy the Interior component and click OK.
3. Repeat step 2. one or more times to add additional machines.
Each time you add a machine, you will define a service instance. These instances can then be grouped to achieve fault tolerance and load balancing.
Enable Service
When this check box is checked, it will enable services for the Interior Server.
Fault Tolerance Tab
This tab allows you to group machine to achieve fault tolerance.
1. Select the Fault Tolerance tab.
If you only add additional machines, they will provide for load balancing. To achieve fault tolerance, you must group two or more machines into groups.
14
|
Chapter 2 Deployment ConfigurationTable 6 Fault Tolerance Configuration
Field Enter
Service Service used by the fault tolerance daemon Network Network used by the fault tolerance daemon Daemon Host Host used by the fault tolerance daemon Daemon Port Port used by the fault tolerance daemon Heartbeat
Interval (seconds)
The master engine of a fault-tolerant group broadcasts heartbeat messages to inform the other group members that it is still active. The heartbeat interval determines the time (in seconds) between these heartbeat messages. If the master engine fails, the other engine detects the stop in the master's heartbeat and resumes operation in its place. All process starters are restarted on the second machine, and services are restarted to the state of their last checkpoint.
Default is 5.
Activation Interval (seconds)
All secondary process engines track heartbeat messages sent from the master engine. This field specifies the amount of time between the last heartbeat from the master engine and the re-starting of the process starters and process engines on the secondary engine. The Heartbeat Interval should be smaller than the Activation Interval. It is recommended that the Activation Interval be slightly over two heartbeats. Activation Interval is a standard TIBCO Rendezvous fault tolerant parameter, documented in TIBCO Rendezvous Concepts, Developing Fault Tolerant Programs.
Default is 15.
Activation Delay (seconds)
When the master engine resumes operation, the secondary engine shuts down and returns to standby mode. In some situations it may be necessary to ensure that the secondary engine has completely shut down before the master engine resumes operation. This field is used to specify a delay before the master engine restarts. When the time after the last heartbeat from an active member exceeds this value, the ranking inactive member will receive a “hint” so that it can prepare for activation. The Heartbeat Interval should be smaller than the Activation Delay, which should be smaller than the Activation Interval.
Default is 10.
Step 2. Configuring Interior Server.par
|
15Load Balancing In the Service Instance Name-Fault Tolerance Group Settings panel, you will see all machines to which the Interior component was assigned usingGeneral Tab, page 13.
machine1 - Interior Server domain.BCFTGROUP.A
machine2- Interior Server domain.BCFTGROUP.B
machine3 - Interior Server domain.BCFTGROUP.C
machine4- Interior Server domain.BCFTGROUP.D
Machines that belong to one group provide for fault tolerance within that group, while machines in different groups provide for load balancing among these groups.
Fault Tolerance In order to form groups for fault tolerance, decide which machines you will group together. For example, you will assignmachine1andmachine2to the group A andmachine3andmachine4to the group B.
1. Click the link for the machine that you want to re-assign to another group.
The Edit FT Node Settings dialog appears.
2. In the FT Group Name field, correct the existing entry so that the machine can be re-assigned to another group.
For example, instead ofdoman.BCFTGROUP.B, make it doman_name.BCFTGROUP.A.
3. Click Save.
4. Repeat steps for any other machines that need to be re-assigned.
Once you are finished with re-assigning, verify that you have the appropriate group assignments in the Service Instance-Fault Tolerance Group Settings panel, such as
machine1- Interior Server domain.BCFTGROUP.A
machine2 - Interior Server domain.BCFTGROUP.A
machine3- Interior Server domain.BCFTGROUP.B
machine4- Interior Server domain.BCFTGROUP.B
5. Click Save.
16
|
Chapter 2 Deployment ConfigurationMonitoring Tab
The Monitoring tab allows you to manage the Rule Base for load balancing groups as well as events, such as component failures, alerts, email status, and various commands.
For more details about rulebases and events, see TIBCO Administrator User’s Guide.
Advanced Tab
Use this tab to enable tracing. For more information, see TIBCO Administrator User’s Guide andEnabling Tracing for all TIBCO ActiveMatrix BusinessWorks Tasks, page 50.
Step 3: Configuring Smart Routing
|
17Step 3: Configuring Smart Routing
Public smart routing is used to better distribute the workloads and alleviate the likelihood of bottlenecks while receiving inbound documents. Multiple clusters can be introduced to handle a variety of workloads separately. A rule-based routing mechanism based on a combination of configurable conditions and predefined set of criteria is used to make decisions so that it can dispatch the workloads to the best fitting cluster for processing.
In order to configure public transports and use public smart routing, you need to configure clusters of machines based on the transport type, define conditions (rules) for these clusters, and then map the clusters into groups. For more
information about rule based routing, see TIBCO BusinessConnect Concepts, Public Smart Routing.
Configuring Smart Routing Rules
To enable or disable an inbound transport for the installation, do the following:
1. Expand Application Management > BusinessConnect > Configuration.
2. Click the BusinessConnect link in the Configuration Builder panel.
3. Select the Public Process Configuration tab.
4. Click Add.
5. Select one of the transports from the list:
Configuring smart routing is an optional step.
Public smart routing for TIBCO PartnerExpress™ and TIBCO BusinessConnect™
Plug-in for FTP Server is not supported and would always go to the default cluster.
When a rule is changed, the Deployment page will still show as synchronized but the changes to the public smart routing rules will take effect only after both the Interior Server and Gateway Server are restarted.
18
|
Chapter 2 Deployment Configuration— FTP
— FTPS
— HTTP
— HTTPS
— HTTPSCA
— SSHFTP 6. Click OK.
The dialog New Rule with the selected transport type appears:
7. Enter data following the explanations inTable 7.
Table 7 New Cluster Configuration
Fields Enter
Cluster Name Enter the name of the cluster. This is a logical name of the location where messages are routed. The cluster name must begin with an alphanumeric character and be followed by zero or more alphanumeric characters such as '_' (underscore), '-' (hyphen) or '.' (dot); for example,CLUSTER_LARGE_MESSAGES, BC_CLUSTER_03, SERVER-POOL-19, C001
The value is not case sensitive
Transport Type Pre-populated with the name of the transport you have selected.
Rule Expression Expression for the rule is populated from the selection made in the added conditions for the attribute, operator and operand.
Enabled Enable or disable the routing mechanism by selecting or clearing this check box.
Add New Condition
Each time you click this button, a new row of attributes will be added.
Condition Type can be set to
• if all conditions are met: more restrictive rule
• if any conditions are met: less restrictive rule
A new condition is now displayed, with the configurable options Attribute, Operator, and Operand. For more information about these options, see TIBCO BusinessConnect Concepts, Attributes, Operators, and Operands.
Step 3: Configuring Smart Routing
|
198. Enter data as explained in the following tables for the respective transports:
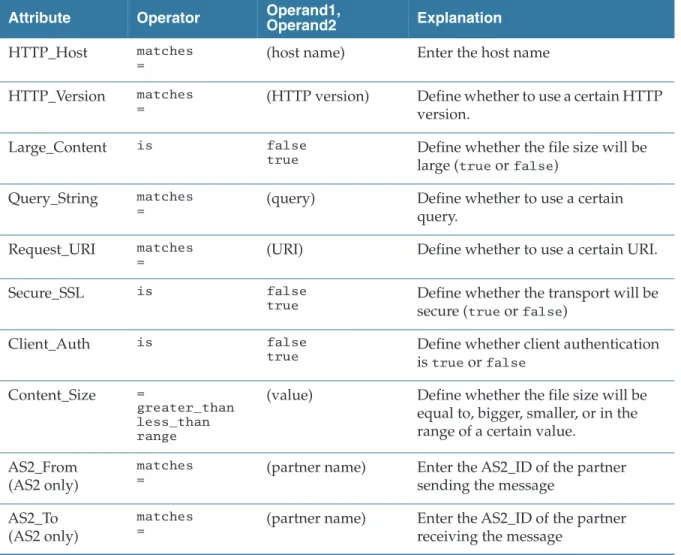
— Rule Options for the HTTP/S, HTTPCA, and AS2_HTTP/S Transports, page 20
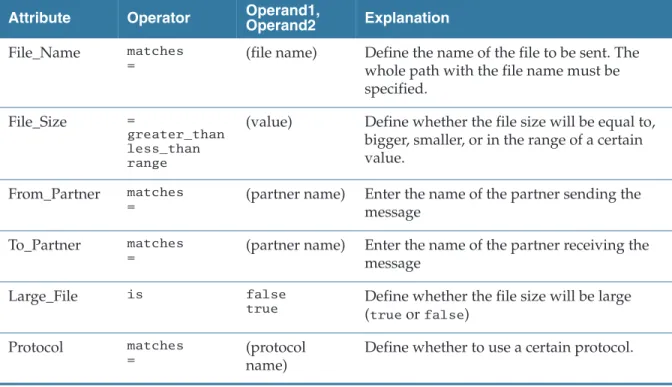
— Rule Options for the FTP/S and SSHFTP Transports, page 21
— Rule Options for the File Transport, page 22
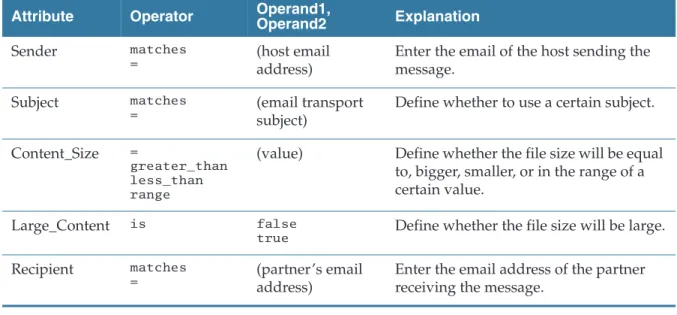
— Rule Options for the Email and AS1_Email Transports, page 22 The defined rules will be displayed in the field Rule Expression.
Cluster names are not unique: multiple rules can be assigned to the same cluster name.
20
|
Chapter 2 Deployment ConfigurationRule Options for the HTTP/S, HTTPCA, and AS2_HTTP/S Transports
Defining Rules Using Regular Expressions
The supplied examples refer to TIBCO BusinessConnect™ Services Plug-in (EZComm).
• Request_URI matches "/EZComm":using the HTTP rule type, create a rule for the Request_URI attribute, use the "matches" operator, specify
"/EZComm" for the value.
Table 8 Rule Options for the HTTP/S, HTTPCA, and AS2_HTTP/S Transports Attribute Operator Operand1,
Operand2 Explanation
HTTP_Host matches
= (host name) Enter the host name
HTTP_Version matches
= (HTTP version) Define whether to use a certain HTTP version.
Large_Content is false
true Define whether the file size will be large (trueorfalse)
Query_String matches
= (query) Define whether to use a certain
query.
Request_URI matches
= (URI) Define whether to use a certain URI.
Secure_SSL is false
true Define whether the transport will be secure (trueorfalse)
Client_Auth is false
true Define whether client authentication istrueorfalse
Content_Size =
greater_than less_than range
(value) Define whether the file size will be equal to, bigger, smaller, or in the range of a certain value.
AS2_From (AS2 only)
matches
= (partner name) Enter the AS2_ID of the partner sending the message
AS2_To (AS2 only)
matches
= (partner name) Enter the AS2_ID of the partner receiving the message
Step 3: Configuring Smart Routing
|
21• Query_String matches ".*fromTp=Partner.*": using the HTTP rule type, create a rule for the Query_String attribute, use the "matches" operator, specify ".*fromTp=Partner.*" for the value
• Query_String matches ".*operationID=BC%2F1\.0%2FNotify.*": using the HTTP rule type, create a rule for the Query_String attribute, use the
"matches" operator, specify ".*operationID=BC%2F1\.0%2FNotify.*" for the value
Rule Options for the FTP/S and SSHFTP Transports
Defining Rules Using Regular Expressions
The supplied example refer to TIBCO BusinessConnect Services Plug-in (EZComm).
Table 9 Rule Options for the FTP/S and SSHFTP Transports Attribute Operator Operand1,
Operand2 Explanation File_Name matches
= (file name) Define the name of the file to be sent. The whole path with the file name must be specified.
File_Size =
greater_than less_than range
(value) Define whether the file size will be equal to, bigger, smaller, or in the range of a certain value.
From_Partner matches
= (partner name) Enter the name of the partner sending the message
To_Partner matches
= (partner name) Enter the name of the partner receiving the message
Large_File is false
true Define whether the file size will be large (trueorfalse)
Protocol matches
= (protocol
name)
Define whether to use a certain protocol.
22
|
Chapter 2 Deployment ConfigurationRule Options for the File Transport
Rule Options for the Email and AS1_Email Transports
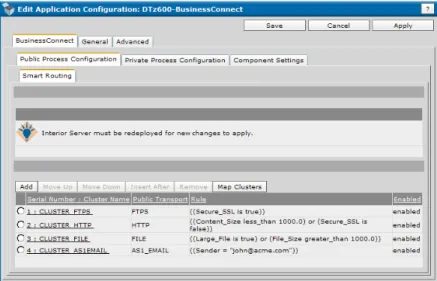
9. Add more rules for clusters with defined conditions, as necessary. All added clusters and rules will be listed, together with their corresponding public transports and the routing rules, as inFigure 2.
Table 10 Rule Options for the File Transport
Attribute Operator Operand1,
Operand2 Explanation File_Name matches
= (file name) Enter the full path for the file name
File_Size =
greater_than less_than range
(value) Define whether the file size will be equal to, bigger, smaller, or in the range of a certain value.
Large_File is false
true Define whether the file size will be large (trueorfalse)
Protocol matches
= (protocol name) Define whether to use a certain protocol.
Table 11 Rule Options for the Email and AS1_Email Transports Attribute Operator Operand1,
Operand2 Explanation
Sender matches
= (host email
address)
Enter the email of the host sending the message.
Subject matches
= (email transport
subject)
Define whether to use a certain subject.
Content_Size =
greater_than less_than range
(value) Define whether the file size will be equal to, bigger, smaller, or in the range of a certain value.
Large_Content is false
true Define whether the file size will be large.
Recipient matches
= (partner’s email
address)
Enter the email address of the partner receiving the message.
Step 3: Configuring Smart Routing
|
23Figure 2 Listed Clusters
The numbers in front of the rules represent their precedence. Once the rules are added and the routing conditions defined, you can group (map) them into fault tolerant groups using the selected criteria.
Map Clusters
Clusters are mapped using the configured rules into fault tolerance groups. The Map Clusters window allows you to list the configured clusters by:
• Load Balanced Cluster Name (Rule Id), as explained inTable 7, New Cluster Configuration, page 18.
• Assigned Fault Tolerance Group, as explained inFault Tolerance Tab, page 13
• Service Instances, as explained inFault Tolerance Tab, page 13 Cluster maps can be edited as follows:
1. Click Map Clusters.
You will notice that, in addition to all the clusters you have defined, there is one additional cluster called NO MATCHING RULES. By default, all service instances are added to this cluster and later can be assigned to another cluster.
24
|
Chapter 2 Deployment ConfigurationFigure 3 Map Clusters Dialog
To read more about this cluster, see TIBCO BusinessConnect Concepts, NO MATCHING RULES.
2. From theGroup bylist, select the criteria by which you want to group the server clusters:
— Load Balanced Cluster Name (Rule Id) Clusters are grouped by the cluster name defined for load balancing
— Assigned Fault Tolerant Group Clusters are grouped in the previously assigned fault tolerant groups
— Service Instance Clusters are grouped by the existing service instances
— None If selected, all load balanced clusters, fault tolerant groups, and service instances are listed without grouping.
Regardless of the grouping on the screen, you will be able to add the previously assigned fault tolerant groups of servers to any of the clusters.
Assigning a Fault Tolerance Group to a Cluster
To assign a fault tolerant group to a cluster (define rules for this group):
1. In the Map Clusters window, click the link cluster_name.
The Edit Cluster Map dialog appears.
After you import a.csxfile that contains the configured public Smart Routing rules, the clusters are still not mapped to any of the fault tolerant groups. You must add again the fault tolerant group to the cluster.
Step 3: Configuring Smart Routing
|
252. Check the check boxes next to the fault tolerant group(s) that you want to add to the cluster map.
3. Click Add to Cluster Map.
The fault tolerant groups to which you assigned the specified cluster map are now listed under Assigned Fault Tolerant Groups.
You can remove any group(s) that you want by checking their check boxes and clicking Remove From Cluster Map.
4. Click Save.
This will list the fault tolerant groups you have assigned under the appropriate cluster.
Clusters have been mapped to two fault tolerant groups
(domain.BCFTGROUP.A and domain.BCFTGROUP.B), and also to two different service instances (machine1 - Interior Server and machine2 - Interior
Server).
5. View the assigned clusters by the assigned fault tolerant groups (Figure 4), by the load balanced cluster name (Figure 5), or by service instance
Figure 4 Assigned Fault Tolerant Groups
26
|
Chapter 2 Deployment ConfigurationFigure 5 Load Balanced Cluster Name
Figure 6 Service Instance
Notice that the cluster NO MATCHING RULES appears in both fault tolerant groups and on both service instances. Notice also the cluster HTTP appears in two fault tolerant groups and on two service instances. This means that ClusterFTPS, AS1Email, and File will be processed only by one of the fault tolerant groups and on one of the instances, while the cluster HTTP will be processed on both the group A and B and on both instances of the Interior Server.
|
27Chapter 3 Private Process Configuration
This chapter explains how to configure Private Processes for TIBCO BusinessConnect, private transports (TIBCO Rendezvous and JMS), and Outbound File pollers.
The configuration steps in this section can only occur after you have created a deployment configuration, as explained inChapter 2, Deployment Configuration.
Topics
• Private Process Communication, page 28
• Selecting the Private Process Transport, page 29
• JMS Transport, page 30
• TIBCO Rendezvous, page 35
• Outbound File Pollers, page 40