TIBCO ActiveMatrix Service Grid Administration
Software Release 3.2.0
August 2012
Important Information
SOME TIBCO SOFTWARE EMBEDS OR BUNDLES OTHER TIBCO SOFTWARE. USE OF SUCH EMBEDDED OR BUNDLED TIBCO SOFTWARE IS SOLELY TO ENABLE THE FUNCTIONALITY (OR PROVIDE LIMITED ADD-ON FUNCTIONALITY) OF THE LICENSED TIBCO SOFTWARE. THE EMBEDDED OR BUNDLED SOFTWARE IS NOT LICENSED TO BE USED OR ACCESSED BY ANY OTHER TIBCO SOFTWARE OR FOR ANY OTHER PURPOSE.
USE OF TIBCO SOFTWARE AND THIS DOCUMENT IS SUBJECT TO THE TERMS AND CONDITIONS OF A LICENSE AGREEMENT FOUND IN EITHER A SEPARATELY EXECUTED SOFTWARE LICENSE AGREEMENT, OR, IF THERE IS NO SUCH SEPARATE AGREEMENT, THE CLICKWRAP END USER LICENSE AGREEMENT WHICH IS DISPLAYED DURING DOWNLOAD OR INSTALLATION OF THE SOFTWARE (AND WHICH IS DUPLICATED IN THE LICENSE FILE) OR IF THERE IS NO SUCH SOFTWARE LICENSE AGREEMENT OR CLICKWRAP END USER LICENSE AGREEMENT, THE LICENSE(S) LOCATED IN THE “LICENSE” FILE(S) OF THE SOFTWARE. USE OF THIS DOCUMENT IS SUBJECT TO THOSE TERMS AND CONDITIONS, AND YOUR USE HEREOF SHALL CONSTITUTE ACCEPTANCE OF AND AN AGREEMENT TO BE BOUND BY THE SAME.
This document contains confidential information that is subject to U.S. and international copyright laws and treaties.
No part of this document may be reproduced in any form without the written authorization of TIBCO Software Inc.
TIBCO, The Power of Now, TIBCO ActiveMatrix, and TIBCO Enterprise Message Service are either registered trademarks or trademarks of TIBCO Software Inc. in the United States and/or other countries.
EJB, Java EE, J2EE, and all Java-based trademarks and logos are trademarks or registered trademarks of Sun Microsystems, Inc. in the U.S. and other countries.
All other product and company names and marks mentioned in this document are the property of their respective owners and are mentioned for identification purposes only.
THIS SOFTWARE MAY BE AVAILABLE ON MULTIPLE OPERATING SYSTEMS. HOWEVER, NOT ALL OPERATING SYSTEM PLATFORMS FOR A SPECIFIC SOFTWARE VERSION ARE RELEASED AT THE SAME TIME. SEE THE README FILE FOR THE AVAILABILITY OF THIS SOFTWARE VERSION ON A SPECIFIC OPERATING SYSTEM PLATFORM.
THIS DOCUMENT IS PROVIDED “AS IS” WITHOUT WARRANTY OF ANY KIND, EITHER EXPRESS OR IMPLIED, INCLUDING, BUT NOT LIMITED TO, THE IMPLIED WARRANTIES OF MERCHANTABILITY, FITNESS FOR A PARTICULAR PURPOSE, OR NON-INFRINGEMENT.
THIS DOCUMENT COULD INCLUDE TECHNICAL INACCURACIES OR TYPOGRAPHICAL ERRORS. CHANGES ARE PERIODICALLYADDED TO THE INFORMATION HEREIN; THESE CHANGES WILL BE INCORPORATED IN NEW EDITIONS OF THIS DOCUMENT. TIBCO SOFTWARE INC. MAY MAKE IMPROVEMENTS AND/OR CHANGES IN THE PRODUCT(S) AND/OR THE PROGRAM(S) DESCRIBED IN THIS DOCUMENT AT ANY TIME.
THE CONTENTS OF THIS DOCUMENT MAY BE MODIFIED AND/OR QUALIFIED, DIRECTLY OR INDIRECTLY, BY OTHER DOCUMENTATION WHICH ACCOMPANIES THIS SOFTWARE, INCLUDING BUT NOT LIMITED TO ANY RELEASE NOTES AND "READ ME" FILES.
Copyright (c) 2005-2012 TIBCO Software Inc. ALL RIGHTS RESERVED.
TIBCO Software Inc. Confidential Information
Contents
Preface...13
TIBCO Product Documentation...14
Other TIBCO Product Documentation...15
Typographical Conventions...16
Connecting with TIBCO Resources...19
Chapter 1 Introduction...21
Design...22
Runtime Environment...23
Administration...24
Administrator Components...25
Logical View of the Enterprise ...26
Physical View of the Enterprise ...27
Governance...29
Chapter 2 Administrator Interfaces...31
Web Interface...32
Logging in to the Web Interface...32
List View...33
Graphical View...34
Runtime State, Action History, and Synchronization Columns ...37
Command-Line Interface...42
Invoking the Command-Line Interface...42
Build Files...42
AMXAdminTask...46
Actions...49
Data Files...50
Objects...50
Supported Objects...51
Object Formats...52
Object Navigation...53
Inter-Object Relationships...54
Property File Reference...54
Chapter 3 Administrator Server Management...57
Administrator Server...59
Creating an Administrator Server...59
Starting and Stopping an Administrator Server...59
Administrator Configuration Reference...60
Editing Server Configurations...61
DDL Script Generator...61
Plug-Ins...61
Notification Server...63
Editing the Notification Server Configuration...63
Authentication Realms...65
Administrator Replication...66
Chapter 4 Enterprise...67
Chapter 5 Environments...69
Creating an Environment...71
Environment General Reference...72
Environment Configuration Reference...73
Messaging Bus...75
Configuring an Environment's Messaging Bus...75
Messaging Bus Reference...75
Chapter 6 Hosts...79
Creating a TIBCO Host Instance...81
Registering a TIBCO Host Instance as a Windows Service...82
Starting a TIBCO Host Instance...83
Stopping a TIBCO Host Instance...84
Enabling Secure Communication between a Host and an Administrator Server...85
Unregistering Hosts...86
GUI...86
CLI...86
Binding Hosts to an Administrator Server...87
Discover Hosts Reference ...87
Register Host Reference...88
Hosts Reference...89
Host General Reference...90
Host Configuration Reference...91
Host Substitution Variables Reference...92
Host Resource Instances Reference...93
Chapter 7 Nodes...95
Navigating to a Nodes List...98
Creating a Node...99
GUI...99
CLI...99
Editing a Node...101
GUI...101
CLI...101
Updating the Port Number for a Node...101
Updating the JVM Configuration for a Node...102
Enabling and Disabling the Java Security Manager...102
Enabling and Disabling Debuggers...103
Installing or Syncing Nodes...105
GUI...105
CLI...106
Uninstalling Nodes...107
GUI...107
CLI...107
Starting Nodes...108
GUI...108
CLI...108
Stopping Nodes...109
GUI...109
CLI...109
Deleting Nodes...110
GUI...110
CLI...110
Nodes Reference...111
Node General Reference...112
Node Configuration Reference...113
Node Substitution Variables Reference...116
Node Resource Instances Reference...117
Transaction Recovery Configuration...118
Configuration Properties for HOWL Log Files...119
Deleting HOWL Logs ...119
Chapter 8 Applications...121
Creating an Application...123
GUI...123
CLI...125
Distributing an Application...126
GUI...126
CLI...126
Application Dependencies...127
Deploying Applications...128
GUI...128
CLI...129
Undeploying Applications...130
GUI...130
CLI...131
Starting Applications...132
GUI...132
CLI...132
Stopping Applications...133
GUI...133
CLI...133
Deleting Applications...134
GUI...134
CLI...134
Editing an Application...135
GUI...135
Upgrading an Application...135
Upgrading an Application across Nodes...136
Applications Reference...138
Displaying an Application's Dependencies...139
Displaying an Application's Components...140
Displaying an Application's Bindings...141
Application General Reference...142
Application Configuration Reference...144
Application Substitution Variables Reference...146
Application Distribution Reference...147
Application Folders...148
Creating a Folder...148
Renaming a Folder...148
Deleting a Folder...149
Moving an Application to a Folder...150
Services and References...151
Displaying the Bindings for a Service or a Reference ...151
Adding a Binding to a Service...151
Configuring a Binding for a Reference...152
Promoting a Service to the Environment...152
Promoting a Reference to the Environment...153
Reference Details Reference...153
Manual Binding Reference...154
Bindings...155
Wire to Binding Reference...178
Properties...179
Setting a Property Value...179
Editable Properties Reference...181
Non-Editable and Policy Set Properties Reference...181
Chapter 9 Resource Templates...183
Navigating to a Resource Templates List...184
Creating a Resource Template...185
GUI...185
CLI...186
Editing a Resource Template...187
Deleting Resource Templates...189
Creating an Obfuscated Password...190
Hibernate...191
HTTP Client...194
Configuring Mutual Authentication...197
HTTP Connector...198
JDBC...201
Configuring Third-Party JDBC Drivers...205
Adding an Updated JDBC Driver ...206
JMS Resource Templates...207
Configuring Third-Party JMS Drivers...207
JMS Connection Factory...208
JMS Connection Factory Configuration...209
JMS Destination...210
JMS Destination Configuration...210
JNDI Connection Configuration...211
LDAP Connection...214
SMTP...217
Teneo...219
Thread Pool...222
Security Resource Templates...224
Identity Provider...224
Kerberos Authentication...225
Kerberos Identity Provider...228
Keystore Provider...229
LDAP Authentication...232
Mutual Identity Provider...236
SiteMinder Authentication...238
SSL Client Provider...240
SSL Server Provider...242
Trust Provider...245
WS-Security ASP...245
Chapter 10 Resource Instances...247
Creating Resource Instances on Nodes...248
GUI...248
CLI...249
Installing Resource Instances on Nodes...250
GUI...250
CLI...252
Uninstalling Resource Instances from Nodes...254
GUI...254
CLI...254
Deleting Resource Instances from Nodes...256
GUI...256
CLI...256
Resource Instances Reference...257
Chapter 11 Substitution Variables...259
Creating a Substitution Variable...260
GUI...260
CLI...260
How Substitution Variables Are Resolved...262
Chapter 12 Software Management...263
Features...264
Adding Features to the Enterprise...264
Adding a Feature to a Node...265
Adding Third-Party Libraries to Nodes...266
Setting Node Features...266
Removing Features from a Node...267
Deleting Features from the Enterprise...268
Feature Reference...269
Features Reference...269
Resource Adapters...271
Adding Resource Adapters to the Enterprise...271
Setting Host Resource Adapters...272
Removing Resource Adapters from a Host...272
Application Templates...274
Adding Application Templates to the Enterprise...274
Deleting Application Templates...275
Application Template Reference...275
Versions...277
Distributed Application Archives...278
Uploading a Distributed Application Archive...278
Distributed Application Archive Reference...278
Chapter 13 Governance...281
Dashboards...282
Displaying the Dashboards...282
Filter Criteria Gadget...282
Setting Dashboard Preferences...283
Drilling Down into Objects...284
Dashboard Controls...284
Users, Groups, and Permissions...285
Users...285
Superusers...286
Groups...288
Permissions...291
Log Viewer...299
Running Searches...299
Search Builder...300
Log Table...306
Deleting Log Entries...307
Monitoring...309
Monitoring Service...309
Disabling the Monitoring Service...309
Enabling and Disabling Extended Monitoring...310
Configuring a Fault Tolerant Monitoring Service...310
Updating the Messaging Configuration ...311
Metrics Reference...312
Chapter 14 Logging...319
Log Services...321
Editing Log Service Properties...321
Log Service Property Reference...321
Logging Appenders...323
Creating a Logging Appender...323
Logging Appender Reference...325
Log Entry Enrichment...327
Logging Configurations...329
Navigating to a Logging Configurations List...329
Creating a Logging Configuration ...329
Applying a Logging Configuration...330
Logging Configuration Reference...331
Payload Services...333
Payload Service Properties Reference...333
Creating Additional Log and Payload Services...334
Chapter 15 Secure Communication Channels...335
Trust Stores...338
Creating a Trust Store Keystore...338
Configuring a Trust Store...338
Enabling Secure Communication Channels Using Command-Line Scripts...340
HTTP Connector ...340
External Database ...340
Database Authentication Realm ...341
LDAP Authentication Realm ...341
Installing Unlimited Jurisdiction Files...342
TIBCO Credential Service...343
Chapter 16 Network Configuration...345
IPv6 Support...346
Port Usage...348
Chapter 17 UDDI Servers...349
Registering a UDDI Server...350
GUI...350
Setting the Default UDDI Server...352
Configuring SSL Communication Between Administrator and the TIBCO ActiveMatrix Runtime UDDI Server ...353
Publishing Services in a UDDI Server...354
UDDI Server Reference...355
Application UDDI Publication Reference...357
Chapter 18 NodeUtil...359
Invoking the NodeUtil Utility...360
NodeUtil Commands...361
Appendix A Troubleshooting...363
Preface
TIBCO ActiveMatrix®Service Grid is a scalable and extensible platform for developing, deploying, and managing applications that conform to a service-oriented architecture.
TIBCO Product Documentation
This section lists documentation resources you may find useful.
The following documents form the TIBCO ActiveMatrix®Service Grid documentation set:
• Concepts: Read this manual before reading any other manual in the documentation set. This manual describes terminology and concepts of the TIBCO ActiveMatrix platform. The other manuals in the documentation set assume you are familiar with the information in this manual.
• Development Tutorials: Read this manual for a step-by-step introduction to the process of creating, packaging, and running composites in TIBCO Business Studio.
• Composite Development: Read this manual to learn how to develop and package composites.
• Java Component Development: Read this manual to learn how to configure and implement Java components.
• Mediation Component Development: Read this manual to learn how to configure and implement Mediation components.
• Mediation API Reference: Read this manual to learn how to develop custom Mediation tasks.
• Spring Component Development: Read this manual to learn how to configure and implement Spring components.
• WebApp Component Development: Read this manual to learn how to configure and implement Web Application components.
• Administration Tutorials: Read this manual for a step-by-step introduction to the process of creating and starting the TIBCO ActiveMatrix runtime, starting TIBCO ActiveMatrix servers, and deploying applications to the runtime.
• Administration: Read this manual to learn how to manage the runtime and deploy and manage applications.
• Installation and Configuration: Read this manual to learn how to install TIBCO ActiveMatrix Service Grid software and create and upgrade runtime objects.
• Release Notes: Read this manual for a list of new and changed features, steps for migrating from a previous release, and lists of known issues and closed issues for the release.
The documentation for the following features is installed separately:
• TIBCO ActiveMatrix Implementation Type for C++
• TIBCO ActiveMatrix Binding Type for EJB
• TIBCO ActiveMatrix Binding Type for Adapters
• TIBCO ActiveMatrix Implementation Type for Adapters
• TIBCO ActiveMatrix Implementation Type for Microsoft CLR
Other TIBCO Product Documentation
You may find it useful to read the documentation for the following TIBCO products:
• TIBCO Enterprise Message Service™
Typographical Conventions
Table 1: General Typographical Conventions Use
Convention
TIBCO products are installed into an installation environment. A product installed into an installation environment does not access components in other installation environments.
TIBCO_HOME ENV_NAME
Incompatible products and multiple instances of the same product must be installed into different installation environments. An installation environment consists of the following properties:
• Name - Identifies the installation environment. The name is appended to the name of Windows services created by the installer and is a component of the path to the product shortcut in the Windows Start > All Programs menu. This name is referenced in documentation as ENV_NAME.
• Path - The folder into which the product is installed. This folder is referenced in documentation as TIBCO_HOME.
The folder that stores configuration data generated by TIBCO products. Configuration data can include sample scripts, session data, configured binaries, logs, and so on. This folder is referenced in documentation as CONFIG_HOME.
CONFIG_HOME
Code font identifies commands, code examples, filenames, pathnames, and output displayed in a command window. For example:
code font
• Use MyCommand to start the foo process.
• Code example:
public class HelloWorldImpl extends AbstractHelloWorldImpl { ...
public HelloResponseDocument sayHello(HelloRequestDocument firstName) {
...
System.out.println("--> Generating Java Hello Component Response...");
String name =
firstName.getHelloRequest()==null||firstName.getHelloRequest().
equals("")?"Friend":firstName.getHelloRequest();
HelloResponseDocument resp =
HelloResponseDocument.Factory.newInstance();
resp.setHelloResponse("Hi " + name + "! " + "This is the Java component.\n");
System.out.println("--> Java Hello Component Response: \n\t\t"
+
resp.getHelloResponse());
...
} }
• CONFIG_HOME/admin/enterpriseName/samples/remote_props.properties
• Output example:
C:\Program Files\tibco\amx-3\studio\3.5\eclipse>amx_eclipse_ant.exe -buildfile "C:/helloworld1/build.xml" -data "C:/hws"
Buildfile: C:/helloworld1/build.xml createApplicationDAA:
[sds.createDAA] Waited for 47ms for workspace refreshes after building features.
all:
BUILD SUCCESSFUL BUILD SUCCESSFUL
Total time: 2 minutes 18 seconds
Use Convention
Bold code font is used in the following ways:
bold code font
• In procedures, to indicate what a user types. For example: Type admin.
• In large code samples, to indicate the parts of the sample that are of particular interest.
• In command syntax, to indicate the default parameter for a command. For example, if no parameter is specified, MyCommand is enabled:
MyCommand [enable | disable]
Italic font is used in the following ways:
italic font
• To indicate a document title. For example: See TIBCO BusinessWorks Concepts.
• To define new terms. For example: A keystore is a database of keys and certificates.
• To indicate a variable in a command or code syntax that you must replace. For example:
MyCommandpathname.
Key name separated by a plus sign indicate keys pressed simultaneously. For example:
Ctrl+C.
Key names separated by a comma and space indicate keys pressed one after the other.
For example: Esc, Ctrl+Q.
Key
combinations
The note icon indicates information that is of special interest or importance, for example, an additional action required only in certain circumstances.
The tip icon indicates an idea that could be useful, for example, a way to apply the information provided in the current section to achieve a specific result.
The warning icon indicates the potential for a damaging situation, for example, data loss or corruption if certain steps are taken or not taken.
Table 2: Syntax Typographical Conventions Use
Convention
An optional item in command syntax.
For example:
[ ]
MyCommand [optional_parameter] required_parameter
A logical ’OR’ that separates multiple items of which only one may be chosen.
For example, you can select only one of the following parameters:
|
MyCommand param1 | param2 | param3
A logical group of items in a command. Other syntax notations may appear within each logical group.
For example, the following command requires two parameters, which can be either the pair param1 and param2, or the pair param3 and param4.
{ }
MyCommand {param1 param2} | {param3 param4}
In the next example, the command requires two parameters. The first parameter can be either param1 or param2 and the second can be either param3 or param4:
MyCommand {param1 | param2} {param3 | param4}
Use Convention
In the next example, the command can accept either two or three parameters. The first parameter must be param1. You can optionally include param2 as the second parameter.
And the last parameter is either param3 or param4.
MyCommand param1 [param2] {param3 | param4}
Connecting with TIBCO Resources
How to Join TIBCOmmunity
TIBCOmmunity is an online destination for TIBCO customers, partners, and resident experts. It is a place to share and access the collective experience of the TIBCO community. TIBCOmmunity offers forums, blogs, and access to a variety of resources. To register, go to http://www.tibcommunity.com.
How to Access TIBCO Documentation
After you join TIBCOmmunity, you can access the documentation here: http://docs.tibco.com.
How to Contact TIBCO Support
For comments or problems with this manual or the software it addresses, contact TIBCO Support as follows:
• For an overview of TIBCO Support, and information about getting started with TIBCO Support, visit this site:
http://www.tibco.com/services/support
• If you already have a valid maintenance or support contract, visit this site:
https://support.tibco.com
Entry to this site requires a username and password. If you do not have a username, you can request one.
1
Introduction
The TIBCO ActiveMatrix platform has four functional areas—design, runtime, administration, and governance—that address all phases of the distributed application life cycle.
Topics
• Design
• Runtime Environment
• Administration
• Governance
Design
TIBCO ActiveMatrix design activities are performed in TIBCO Business Studio, an extension of the Eclipse SDK Workbench. In TIBCO Business Studio, analysts, architects, and developers, design, implement, configure, test, and package TIBCO ActiveMatrix applications.
Runtime Environment
TIBCO ActiveMatrix employs a three-level runtime environment consisting of hosts, nodes, and application fragments. A host runs TIBCO ActiveMatrix platform services, manages the life cycle of nodes, and maintains software features and resources shared between nodes. Nodes run application fragments.
• Hosts
A host is the runtime object that serves as the point of contact between nodes and Administrator. Hosts perform operations such as software distribution, node life cycling, and application deployment. It is not necessary for a host to be running to perform administrative operations. Administrator queues operations and processes them when the host and the nodes it manages are available.
The host that manages the SystemNode node on which the Administrator server runs is named SystemHost.
• Nodes
A node is the runtime environment for TIBCO ActiveMatrix applications. Nodes exist in an environment and are managed by hosts. When managed by a TIBCO Host instance, a node runs in its own OS process and JVM. You can configure a host with multiple nodes. Nodes act as sandboxes for applications.
The node on which the Administrator server runs is named SystemNode.
• Application Fragments
Application fragments are components or bindings of an application that are distributed and deployed to nodes. A fragment can be distributed to many nodes, and a single node can run many fragments. To increase throughput for a component or binding you can deploy multiple copies of the fragment to multiple nodes.
Administration
TIBCO ActiveMatrix Administrator is the utility used to create, configure, monitor, and manage objects in the TIBCO ActiveMatrix runtime. ActiveMatrix Administrator is a web application that provides a browser interface and a command-line scripting interface. The command-line interface is a set of Ant tasks that execute via an automated script.
Administrator Components
TIBCO ActiveMatrix Administrator bundles the following components:
• Administrator backend server - supports the browser web interface and command-line scripting interface.
• TIBCO Credential service - provides a built-in Certificate Authority for security configurations that use SSL.
• Monitoring Service - collates data from the regular broadcast of statistics and performance metrics from remote applications and services deployed in TIBCO ActiveMatrix. This component enables you to view aggregated and summarized metrics in the browser interface.
• Log Service - collects and persists log event messages from an entire TIBCO ActiveMatrix installation to a central database, allowing you to query the logs in powerful ways from the browser interface.
• Payload Service - manages large payloads associated with log events.
Servers
The Administrator server interacts with the following servers:
• One or more Enterprise Message Service servers:
Notification Server - propagates monitoring data such as the runtime states of various entities from the rest of TIBCO ActiveMatrix to Administrator.
Messaging Bus - propagates messages between applications and also between components in an application.
You can partition and segregate business data traffic to multiple Enterprise Message Service Servers using multiple environments.
You can combine the two Enterprise Message Service servers into a single one or have separate servers for your configuration and bandwidth requirements.
All Enterprise Message Service servers must be dedicated to one enterprise and cannot be shared across multiple enterprises.
• LDAP - (optional) integrates the user accounts for the Administrator with your corporate LDAP server.
If not integrating with an LDAP server, you can still create and manage accounts using the Administrator's database.
• Database - (optional) maintains the Administrator server configuration, statistical information about services, and log events. If you do not have an external database server, Administrator can use HSQLDB, a built-in lightweight database.
HSQLDB is suitable for a development environment but use of an HSQLDB database in a production environment is not supported. If you use an HSQLDB database, Administrator replication and concurrent user access to the Administrator server is not supported.
Enterprise
In the TIBCO ActiveMatrix platform the term enterprise has meaning in two different contexts: runtime and administrative.
In the runtime, enterprise refers to the collection of runtime objects that share the Enterprise Message Service server that functions as the notification server. The enterprise is identified by a name specified when you create an Administrator server.
In Administrator, enterprise refers to the top-level administration object. An enterprise contains environments, hosts, and objects shared between all the environments in an enterprise.
Within an enterprise, all host, nodes, and the Administrator server connect to the Notification Server.
Environment
An environment is a logical grouping of applications and nodes. An Administrator server can have multiple environments. For example, you can define environments distinguished by product life cycle function such as development and production, by geographical area, or by business unit.
Administrator Tasks Overview
The following tasks can be performed using the browser interface:
• Upload, configure, and deploy applications.
• Plan and configure high-availability requirements for your applications.
• Manage the resources available for your applications, such as registering new hosts, creating nodes, managing shared resources.
• Plan and configure the security requirements.
• Ensure that the deployed services are running and executing within the expected parameters.
• Create and manage user accounts.
Most of the tasks listed above can be performed using the command-line interface as well.
Administrator Components
TIBCO ActiveMatrix Administrator bundles the following components:
• Administrator backend server - supports the browser web interface and command-line scripting interface.
• TIBCO Credential server - provides a built-in Certificate Authority for security configurations that use SSL.
• Monitoring Service - collates data from the regular broadcast of statistics and performance metrics from remote applications and services deployed in TIBCO ActiveMatrix. This component enables you to view aggregated and summarized metrics in the browser interface.
• Log Service - collects and persists log event messages from an entire TIBCO ActiveMatrix installation to a central database, allowing you to query the logs in powerful ways from the browser interface.
• Payload Service - manages large payloads associated with log events.
Servers
The Administrator server interacts with the following servers:
• One or more Enterprise Message Service servers:
Notification Server - propagates monitoring data such as the runtime states of various entities from the rest of TIBCO ActiveMatrix to Administrator.
Messaging Bus - propagates messages between applications and also between components in an application.
You can partition and segregate business data traffic to multiple Enterprise Message Service Servers using multiple environments.
You can combine the two Enterprise Message Service servers into a single one or have separate servers for your configuration and bandwidth requirements.
All Enterprise Message Service servers must be dedicated to one enterprise and cannot be shared across multiple enterprises.
• LDAP - (optional) integrates the user accounts for the Administrator with your corporate LDAP server.
If not integrating with an LDAP server, you can still create and manage accounts using the Administrator's database.
• Database - (optional) maintains the Administrator server configuration, statistical information about services, and log events. If you do not have an external database server, Administrator can use HSQLDB, a built-in lightweight database.
HSQLDB is suitable for a development environment but use of an HSQLDB database in a production environment is not supported. If you use an HSQLDB database, Administrator replication and concurrent user access to the Administrator server is not supported.
Enterprise
In the TIBCO ActiveMatrix platform the term enterprise has meaning in two different contexts: runtime and administrative.
In the runtime, enterprise refers to the collection of runtime objects that share the Enterprise Message Service server that functions as the notification server. The enterprise is identified by a name specified when you create an Administrator server.
In Administrator, enterprise refers to the top-level administration object. An enterprise contains environments, hosts, and objects shared between all the environments in an enterprise.
Within an enterprise, all host, nodes, and the Administrator server connect to the Notification Server.
Environment
An environment is a logical grouping of applications and nodes. An Administrator server can have multiple environments. For example, you can define environments distinguished by product life cycle function such as development and production, by geographical area, or by business unit.
Administrator Tasks Overview
The following tasks can be performed using the browser interface:
• Upload, configure, and deploy applications.
• Plan and configure high-availability requirements for your applications.
• Manage the resources available for your applications, such as registering new hosts, creating nodes, managing shared resources.
• Plan and configure the security requirements.
• Ensure that the deployed services are running and executing within the expected parameters.
• Create and manage user accounts.
Most of the tasks listed above can be performed using the command-line interface as well.
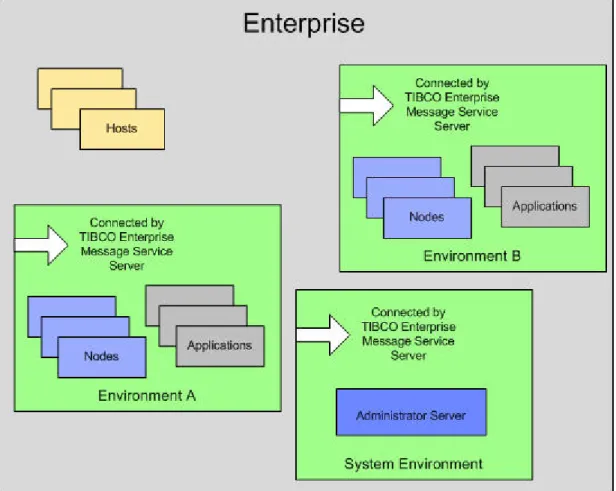
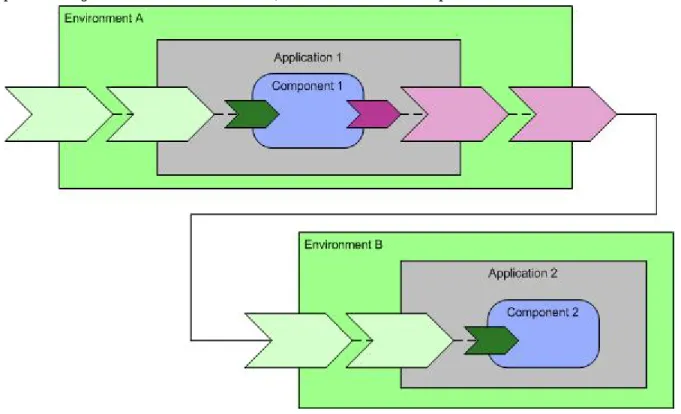
Logical View of the Enterprise
The following figure shows the logical view of an enterprise consisting of two user-defined environments.
Each environment consists on several nodes running applications. The enterprise consists of one Administrator server.
The hosts though a part of the enterprise do not participate in the environment.
Figure 1: Logical View
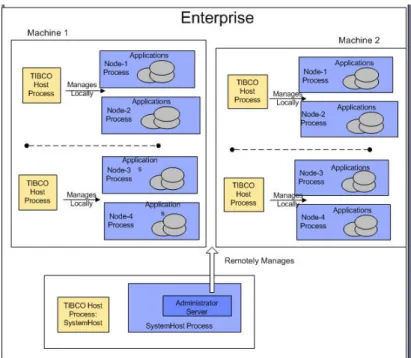
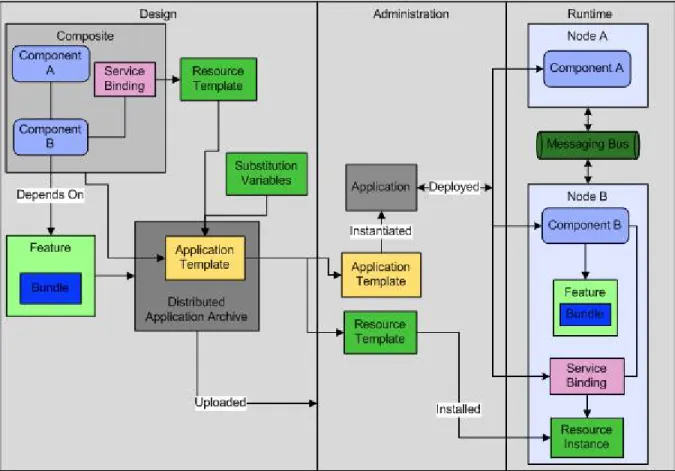
Physical View of the Enterprise
The following figure represents the physical view of the enterprise shown in Figure 1: Logical View on page 27.
Figure 2: Physical View
Governance
• Dashboard
Dashboards display runtime object performance statistics. They allow you to monitor the overall health and performance of infrastructure objects, applications, and resources.
See Dashboards on page 282.
• Access Control
Authorization for all runtime objects is provided by the Administrator Server. See Users, Groups, and Permissions on page 285.
• Log Viewer
The Log Viewer allows you to search the log entries stored by a log service. The log service stores the logs sent from a JMSAppender.
See Log Viewer on page 299.
• SSL
See Secure Communication Channels on page 335.
2
Administrator Interfaces
TIBCO ActiveMatrix Administrator provides two interfaces for interacting with Administrator: web and command-line.
Web Interface
The web interface provides access to all Administrator functionality through a browser.
Command-Line Interface
The command-line interface provides a set of Ant tasks to execute most Administrator functions. You use the command-line interface for repetitive application of standard actions on large numbers of objects.
Sample command-line scripts are provided in CONFIG_HOME/admin/enterpriseName/samples.
The web interface is asynchronous in nature and allows you to perform other actions while one is in progress.
The command-line interface, on the other hand, is synchronous. Any action invoked by a command-line script waits till the action is complete before proceeding to execute the next action.
Topics
• Web Interface
• Command-Line Interface
Web Interface
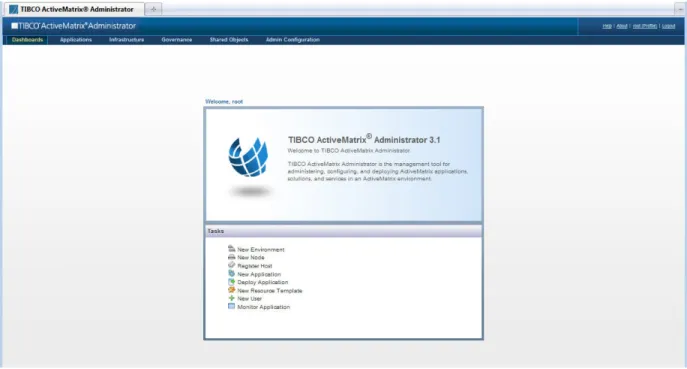
The Administrator web interface provides access to all TIBCO ActiveMatrix Administrator functions. The web interface displays TIBCO ActiveMatrix objects in two views: list and graphical.
Figure 3: TIBCO ActiveMatrixAdministrator
Logging in to the Web Interface
Procedure
1. Open a browser and navigate to the URL http://hostname:port/amxadministrator, where hostname and port are the connection properties you specified when you created the Administrator server. The default URL is http://localhost:8120/amxadministrator.
The Administrator login page displays.
2. Enter the credentials you specified when you created the Administrator server.
The Administrator login page displays.
Results
You are logged into the web interface and can perform any operations for which you have permission for the duration of a session. If you do not perform any actions for the session timeout value (default 30 minutes) set when you created the Administrator server, the session times out and you are automatically logged out.
The session timeout value is set when creating the Administrator server using TIBCO Configuration Tool.
After successfully logging into the web interface, the Welcome Page displays. You can use the task links provided on the Welcome Page or use the menu structure.
The Welcome Page can be accessed anytime by selecting Dashboards > Welcome Page.
List View
In the list view, collections of managed objects are displayed using a master-detail paradigm. The master portion is a list that displays the collection. The master portion also offers action buttons that apply to the selected object in the list. The bottom pane displays the properties of a selected object.
Displaying the List View
• Click List View in the Enterprise Graphical View toolbar.
• Select a menu option in the Administratortoolbar.
Interacting with the List View
The commonly used patterns for displaying objects in the list view are described below.
Flat Lists
The following figure displays a typical flat list which is displayed as a table.
If there are no objects, the list is empty. If there are objects, an item is not selected when the page is opened:
You must select an item in the list to display the details of the object. If an item is selected in a table, the details for that item are displayed in the Details area.
A flat list has the following interactions:
• Click on a row to select it.
• Click the refresh icon to refresh the list. You may have to manually refresh the list periodically, especially when invoking an action and are waiting to see the results of your action on the items in the list.
• You can click column headings to sort by that column. Each click toggles between ascending and descending sort.
• Some columns appear as hyperlinks. Click the hyperlinks to view additional information.
• Some a flat lists provide a filter. Select a value from the drop-down list to view items that match the chosen type.
Tree Lists
A tree list displays a hierarchy of items, such as components of an application or appenders for a logging configuration.
A tree list has the following interactions:
• By default, each level is always in alphabetical order (ascending A-Z).
• The top level entry is the first entry in the tree table.
• Expand and collapse icons are displayed for all parent and child levels except the last level in the list.
Graphical View
The graphical view is an alternative to the list view. The graphical view displays Administrator objects in a graphical canvas. The graphical canvas can display a logical or physical view of the objects. The logical view displays the enterprise from the perspective of the logical administrative entities maintained by Administrator:
environments and applications.
Silverlight is required to view the graphical view and the monitoring dashboards. Refer to the readme file for the supported versions.
At a higher level, the graphical view displays a wide view of your enterprise. You can zoom in on a particular object to view more details. Using the graphical view, you can visualize associations between objects in your enterprise.
The physical view displays the enterprise from the perspective of the physical processes managed by Administrator: hosts and nodes.
Displaying the Graphical View About this task
Choose one of the following options to display the graphical view:
• Choose Infrastructure > Enterprise Graphical View
• Click in the toolbar of an object list.
Interacting with the Graphical View
The graphical view has the following interactions:
• Choose between Logical and Physical View from the drop-down list located at the left hand side of the display.
• The slider located on the right side of the display is used to zoom in and out of the current view.
• The Refresh button updates the data for the objects being displayed.
• Breadcrumbs along the top center can be used to navigate from drilled into objects back up to a higher level view.
• The mouse wheel zooms in and out centered on the cursor's location.
• The large black gray squares with arrows, located towards the bottom of the screen, scroll in the direction of the arrow and appear when some object is out of view.
• Click the button to hide the browser controls and to display over the entire screen. Press the ESC key to exit the full screen mode.
• Click to drill into the selected object.
• The indicators at the top of object boxes indicate the status of the object:
– - running – - unknown – - stopped
• Re-size the boxes to display detailed information.
• In the logical view, use the Application Template tab located at the bottom of the screen to drag applications templates to environments to create applications.
• In the physical view, use the Resource Templates tab located at the bottom of the screen to drag resource templates to a node to create a resource instance or a host to create a resource instance on each node in the host.
• The services (rendered in green) and references (rendered in pink) in the logical view can be used to wire together applications or environments.
– The Wire option from the object menu allows you to pick targets from a list.
– The FreeWire option from the object menu allows you to drag and drop.
Menus
Selecting a single object adds a menu of the actions that can be performed on that object. The contents of the menu depend on the selected object.
Wiring Using the Graphical View About this task
The services (rendered in green) and references (rendered in pink) in the logical view can be used to wire together applications or environments.
Procedure
1. Drill down into an application till the services and references are visible.
2. Click the reference.
The object menu is enabled.
3. Access the FreeWire option.
– If wiring a reference to a service, click the FreeWire option and hold down the mouse button for a few seconds till the wire is visible.
– If wiring a service to a reference, double click the FreeWire option.
The wiring aid tool box appears. The following figure shows an example of a tool box displayed when wiring a service to a reference.
4. Wire the components.
Description Option
When wiring a reference to a service, guide the wire across the screen. On reaching a suitable target service, the color of the wire changes to blue and the service is expanded to display its bindings. Choose a binding.
Wiring a reference to a service
Wiring a service to a
reference 1. When wiring a service to a reference, the service expands to display its bindings.
2. Choose a binding.
The wire is enabled.
3. Guide the wire across the screen. On reaching a suitable target reference, the color of the wire changes to blue. Release the mouse button when over the desired reference.
The wire is created. The wiring aid tool box displays the updated information for a few seconds before it disappears.
What to do next
To delete a wiring, select the wire and press the delete button on your keyboard.
Runtime State, Action History, and Synchronization Columns
The objects managed through Administrator fall into two groups. Hosts, nodes, resource instances, components, and bindings, represent physical entities in the runtime. Environments, applications, resource templates, users, groups, and permissions, are logical entities employed for various management functions.
All runtime objects except for hosts are created in Administrator, and then instantiated in the runtime. Hosts exist in the runtime first and their representation in Administrator is established through a registration process.
In the Administrator web interface all runtime objects and applications have the following properties that reflect their state: Synchronization, Runtime State, and Action History. Although applications do not exist in the runtime, the application's components and bindings have a runtime manifestation. An application's state properties are a roll-up summary of the state of its components and bindings.
Runtime State
Hosts and Nodes are the runtime processes that Administrator interacts with. They have a state that is displayed in Administrator under the Runtime State column. The runtime state typically changes when you invoke an action in Administrator. For example, a node goes into a Running state shortly after you execute the Start action on it.
The runtime state can also sometimes change due to events that occur outside of Administrator, for instance, if you power-down or boot up a machine, it will stop nodes or start them. Or if you kill the node process, then it goes to Not Running state.
As the runtime state changes dynamically, Administrator tracks such state changes in real-time, through notification messages that it receives through the Notification Server. The notification messages makes it possible for Administrator to be informed, in real-time, about the state changes. The Administrator UI must be periodically refreshed to display the updated status of the objects.
Even applications have a runtime state. Administrator displays the state of your application by aggregating and summarizing the state based on all its components (including the bindings) that might have been distributed on multiple nodes. If your application failed to start, for example, the runtime state will show Start Failed. Or if some components are running and some are stopped, you will see Partially Running as the runtime state of your application. Whenever a runtime action has completed for some components, you will see Partially runtime action. For example, when undeploying an application you could see Partially Undeployed.
The following table displays the valid states for runtime objects.
Table 3: Runtime States Runtime States Object
Application • Not Deployed - before an application is deployed.
• Deployed - after the first time the application is deployed.
• Partially Undeployed - while an application is being undeployed.
• Partially Running - the application is deployed to more than one node and not all the nodes are running.
• Starting
• Start Failed - click the Action History link to get more information.
• Running
• Stopped - after the application has been started and stopped.
• Stopping
Runtime States Object
• Partially Stopped - the application's components and bindings are in different states.
• Uninstalling
• Partially Uninstalled - not all the components and bindings of the application have been uninstalled.
• Waiting for Dependencies - Either a resource instance or application that this application depends upon is not running. Once all dependencies are running, the components which are waiting will automatically be started.
• Preparing for Undeploy - the process of undeploying the application has started.
• Partially Ready for Undeploy - Some components have completed processing and have been marked as ready for undeploy, but other components in the application have yet to complete processing.
• Unknown
The runtime state is a roll-up value for all the application's components and bindings.
Partial states mean that some of an application's components and bindings are in a different state than others.
Feature • Marked for Install - after a feature has been added to a node and before the change has been applied to runtime.
• Marked for Uninstall - after a feature is removed and before the change is applied to runtime.
• Installed - after a feature has been applied to runtime.
Host • Initializing
• Initializing_Failed - click the Action History link to get more information.
• Initialized
• Lost_Contact - when the host has lost contact with the Administrator server.
• Starting
• Starting_Failed - click the Action History link to get more information.
• Running
• Stopping
• Stopped - when the host is explicitly stopped and has completed the shutdown process.
• Unknown
Node • Not Installed - after a node has been created and before is has been installed
• Not Running - after a node has been installed or when it was detected that the node ended without being stopped by the host. This applies when the process is detected as stopped.
• Stopping - Stopping a node is expected to be a quick activity. If the node is stuck at Stopping for more than a few minutes, checking the logs may indicate the problem.
• Stopped - the node was explicitly stopped. This is a normal and expected condition.
• Starting - Starting a node is expected to be a quick activity. If the node is stuck at Starting for more than a few minutes, checking the logs may indicate the problem.
• Start Failed - The host was not able to start the node process. Possible causes are that the
node_classpath.tra file contains errors, the JRE libraries are not found, or the OS is unable spawn additional processes. After this state ,the node is disabled and must be manually enabled.
• Running
Runtime States Object
Resource
Instance • Not Installed - after a resource instance has been added to a node and before it has been installed
• Running - after a resource instance has been installed and the node on which it has been installed is Running
• Uninstalled - either the resource instance is uninstalled or the node on which the resource instance is installed is Not Running
If the Runtime State column of applications is Lost Contact or Unknown, the connection to theEnterprise Message Service server acting as the notification server and Messaging Bus has been lost.
After you upgrade an Administrator server, the runtime state of applications running on a node managed by a TIBCO Host instance that has not been upgraded is Partially Running.
Action History
The Action History property provides information about the outcome of the last explicitly performed action performed with the intent of affecting the runtime state. For example, Start, Stop, Install, Uninstall, Deploy, Undeploy are actions.
For an application, the Action History is a roll-up value for all the application's components and bindings.
Because the Action History column displays historical information about previously performed actions, sometimes the Action History column may display a value that seems to conflict with the Runtime State. For example, you may have deployed and started an application and the Action History column correctly shows the outcome as Deploy and Start Successful. At some later point the nodes on which the applications were deployed are restarted and some components could fail to start due to the unavailability of a required resource.
The Runtime State column for the application would then show Start Failed, but the Action History reflecting the outcome of the action would continue to display Deploy and Start Successful.
The Action History value is displayed as a link that you can click to get more information about the outcome of the action. When you click the link a dialog with two sections—Pending Tasks and Actions and Outcome of Recently Completed Tasks and Actions—displays. For example, the following screen shows some of the tasks for a deploy action:
The following screen shows the outcome of a recently completed install action on a resource instance:
Sometimes actions that modify the runtime state of an object fail. To display detailed information about the failure, move the mouse cursor over the message in the Detail column and a popup containing the information displays or click the failure link to open a dialog box.
When an action is executed by Administrator, the action is initiated in the runtime, but the runtime processes the action in the background. While an action is being processed, the Action History column will display In Progress. For asynchronous actions, there may be a time delay between the initiation and its completion. For example, Administrator can instruct the runtime to gracefully stop a component, but the component may take several minutes to stop. In this case, the runtime state will display Stopped only after the component stops.
The Action History property complements the Runtime State property. Together these properties indicate the cause and effect of an action, which can help you and support engineers isolate problems faster.
Outstanding Actions
Actions are intended to affect runtime objects, so the objects must be available to execute the actions. For example, if a machine is down, actions targeted to objects running on that machine will fail. However, Administrator supports an offline mode for many actions. This means that actions in Administrator are queued up while runtime objects are offline and executed when they comes back online.
While a target runtime object is offline (either not running or unreachable) queued actions in Administrator wait their turn for execution. For example, if a host is offline, actions performed against the host will remain queued, and will execute as soon as the host comes back online.
An application distributed to several runtime nodes may be deployed while some nodes are online and some are offline. Administrator will split the deployment action into multiple tasks, some of which are executed right away and others put on a queue for future execution when their target node comes online.
An action is complete when all its tasks, including those placed on the queue, are done executing. For the offline case, an action may take a very long time to complete. Even in the online case, certain asynchronous actions may take a long time to complete.
Synchronization
The Synchronization property indicates whether the runtime has the latest configuration for an object. An object is shown as Out of Sync when the runtime is not running the latest configuration and otherwise is shown as In sync. For example, if you modify a port number of a node after its installation, the runtime would have the older port number, and node will show as Out of sync. To sync the runtime node with the latest configuration, you must execute one or more actions.
Only the properties that change the behavior of an object at runtime are tracked using the synchronization flag. For example, modifying an object's permissions does not make the object go out of sync because permissions are used only by Administrator and are not sent to the runtime.
Administrator displays only whether an object is in sync or not. Hover over the Out of Sync text to see the change that caused it to have a different configuration than what is in the runtime. For example if you distribute the application to a second node the hover text will say Distribution Config. If more than one type of change is causing the object to be out of sync, all of them will be displayed separated by semicolons. You
may need to refresh the master list to observe a change to the synchronization state or reason. Clicking the Out of Sync text opens a dialog box Synchronization Details that provides more information about the changes.
Related Topics
Hosts Reference on page 89 Nodes Reference on page 111 Applications Reference on page 138
Action History Reference
Table 4: Pending Tasks and Actions Description
Column
The type of the action.
Action
Dynamically allocated identifiers used to correlate task dependencies.
Task ID
A description of the action.
Description
The node or application to which the action is applied.
Node or Application
The task IDs on which the action depends.
Dependency
The time that the action was started.
Start Time
Table 5: Outcome of Recently Completes Tasks and Actions Description
Column
The outcome of the action: Success or Failure.
Result
The type of the action.
Action
The node or application to which the action is applied.
Node or Application
Details of the result in case the outcome of the action is an error.
Detail
The time that the action completed.
End Time
The time taken, in seconds, to complete the action.
Time Taken (s)
Show only those tasks that have failed.
This button toggles between Show Only Failed and Show All.
Show Only Failed
Shows detailed information for the error.
Print Error
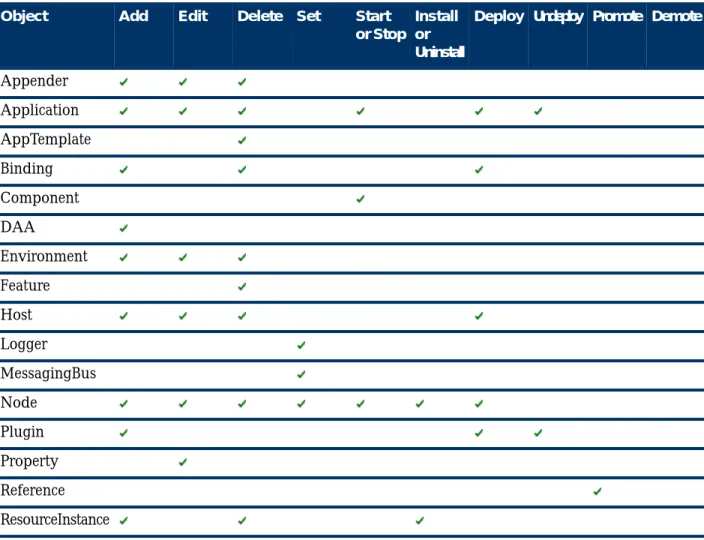
Command-Line Interface
The Administrator command-line interface (CLI) provides access to most TIBCO ActiveMatrix Administrator functions that change the state of Administrator objects. In particular, it supports adding, editing, and deleting, installing and uninstalling, and starting and stopping objects, setting properties and substitution variables, and distributing application components to nodes. You can use the CLI for repetitive application of standard actions on large numbers of objects.
The CLI is based on the Ant open source build tool and is implemented in an Ant task named AMXAdminTask.
You specify the Ant task in a build target within an Ant build file. Each instance of AMXAdminTask in the build file specifies an action to be performed on one or more objects specified in a data file.
The CLI invokes web services exposed by the Administrator server. You specify the Administrator server location and user credentials in a property file.
Sample Build, Data, and Property Files
Sample build and data files for many of the objects supported by the command-line interface are provided in CONFIG_HOME/admin/enterpriseName/samples. A sample property file is provided in
CONFIG_HOME/admin/enterpriseName/samples/remote_props.properties, where enterpriseName is the name specified for the Administrator enterprise when you created the Administrator server. Before using this sample file, replace the host portion of the adminURL property with the address of your TIBCO ActiveMatrix Administrator server and the username and password properties with the credentials of a user that has been granted the permissions required to execute the actions in the script.
Invoking the Command-Line Interface
Before you begin
1. Download Ant from http://ant.apache.org, install as directed in the Ant documentation.
2. Increase the JVM permgen size:
– Windows - Add set ANT_OPTS=-Xmx1024m -XX:MaxPermSize=256m -XX:PermSize=128m to
%USERPROFILE%\antrc_pre.bat
– UNIX - Add export ANT_OPTS="-Xmx1024m -XX:MaxPermSize=256m -XX:PermSize=128m to
~/.antrc
3. Confirm the value of ANT_OPTS before executing CLI scripts from the command prompt.
About this task
To invoke the command-line interface:
Procedure
1. Add the Ant executable to your path.
2. Run ant -f build.xml, where build is the name of the build configuration file.
Results
The output states the results of each action specified in the default target in the build file.
Build Files
The Ant build file for the command-line interface must contain the following elements: import, project,
target, and AMXAdminTask.
import Element
The import element identifies the task definition file, which defines the path to the libraries required by AMXAdminTask.
Set the file attribute to CONFIG_HOME/admin/amxadmin/samples/admin-scripts-base.xml. For example:
<import file="C:/Documents and
Settings/AMX-User/ApplicationData/amx-3/data/admin/amxadmin/samples/admin-scripts-base.xml"/>
project Element
The project element declares the default build target for the build.xml file. taskdef and target are subelements of the project. The optional default attribute allows you to specify a default target. You can choose any target from the build file to be the default target.
<project default="target">
<taskdef ... />
<target name="target" ... />
</project>
target Element
The target element specifies the actions performed for an execution of the command line interface via the AMXAdminTask subelement. In a target you can provide a depends attribute containing a list of targets.
Each target will be run in order until one fails or the list completes.
<target name="target">
<AMXAdminTask ... />
</target>
Example Build File
The following build file defines targets to upload a distributed application archive, create an application, map an application to a node, create a resource template, create a resource instance and install it in a node, and deploy an application.
<project default="all">
<!-- TIBCO ActiveMatrix installation location-->
<property name="TIBCO-HOME" value="C:\bs"/>
<property name="ADMIN-VERSION" value="3.1"/>
<property name="remote-properties.file" value="${basedir}/Server.properties"/>
<!-- Import TIBCO Administrator CLI tasks and classes -->
<import file="${TIBCO-HOME}/administrator/${ADMIN-VERSION}/scripts/basic_cli.xml" />
<!-- Default task for this build file -->
<target name="all"
depends="upload.daa, create.app, edit.properties, wire.application, distribute.app, deploy.app, start.app"
description="Default target group, execute following targets: upload.daa, create.app, edit.properties, wire.application, distribute.app, deploy.app, start.app"/>
<!-- Upload DAA specified in the data file -->
<target name="upload.daa" description="Uploading Application">
<AMXAdminTask action="add"
objectSelector="DAA"
remote="true"
propsFile="${remote-properties.file}"
dataFile="${basedir}/jv.phonebook.soa.deployment-config.xml"
overwrite="false" merge="true" createIfNotExists="true"
force="false" failOnError="false" />
</target>
<!-- create the application -->
<target name="create.app" description="Creating Application">
<AMXAdminTask remote="true" propsFile="${remote-properties.file}"
action="add" dataFile="${basedir}/jv.phonebook.soa.deployment-config.xml"
objectSelector="Environment//Application"
overwrite="false" merge="true"
createIfNotExists="true" force="false" failOnError="true" />
</target>
<!-- configure properties of the application, and create resource instances if needed