Administration
Software Release 3.5 April 2018
Two-Second Advantage®
Important Information
SOME TIBCO SOFTWARE EMBEDS OR BUNDLES OTHER TIBCO SOFTWARE. USE OF SUCH EMBEDDED OR BUNDLED TIBCO SOFTWARE IS SOLELY TO ENABLE THE FUNCTIONALITY (OR PROVIDE LIMITED ADD-ON FUNCTIONALITY) OF THE LICENSED TIBCO SOFTWARE. THE EMBEDDED OR BUNDLED SOFTWARE IS NOT LICENSED TO BE USED OR ACCESSED BY ANY OTHER TIBCO SOFTWARE OR FOR ANY OTHER PURPOSE.
USE OF TIBCO SOFTWARE AND THIS DOCUMENT IS SUBJECT TO THE TERMS AND CONDITIONS OF A LICENSE AGREEMENT FOUND IN EITHER A SEPARATELY EXECUTED SOFTWARE LICENSE AGREEMENT, OR, IF THERE IS NO SUCH SEPARATE AGREEMENT, THE CLICKWRAP END USER LICENSE AGREEMENT WHICH IS DISPLAYED DURING DOWNLOAD OR INSTALLATION OF THE SOFTWARE (AND WHICH IS DUPLICATED IN THE LICENSE FILE) OR IF THERE IS NO SUCH SOFTWARE LICENSE AGREEMENT OR CLICKWRAP END USER LICENSE AGREEMENT, THE LICENSE(S) LOCATED IN THE “LICENSE” FILE(S) OF THE
SOFTWARE. USE OF THIS DOCUMENT IS SUBJECT TO THOSE TERMS AND CONDITIONS, AND YOUR USE HEREOF SHALL CONSTITUTE ACCEPTANCE OF AND AN AGREEMENT TO BE BOUND BY THE SAME.
ANY SOFTWARE ITEM IDENTIFIED AS THIRD PARTY LIBRARY IS AVAILABLE UNDER SEPARATE SOFTWARE LICENSE TERMS AND IS NOT PART OF A TIBCO PRODUCT. AS SUCH, THESE SOFTWARE ITEMS ARE NOT COVERED BY THE TERMS OF YOUR AGREEMENT WITH TIBCO, INCLUDING ANY TERMS CONCERNING SUPPORT, MAINTENANCE, WARRANTIES, AND INDEMNITIES. DOWNLOAD AND USE THESE ITEMS IS SOLELY AT YOUR OWN
DISCRETION AND SUBJECT TO THE LICENSE TERMS APPLICABLE TO THEM. BY PROCEEDING TO DOWNLOAD, INSTALL OR USE ANY OF THESE ITEMS, YOU ACKNOWLEDGE THE
FOREGOING DISTINCTIONS BETWEEN THESE ITEMS AND TIBCO PRODUCTS.
This document contains confidential information that is subject to U.S. and international copyright laws and treaties. No part of this document may be reproduced in any form without the written
authorization of TIBCO Software Inc.
TIBCO, Two-Second Advantage, ActiveSpaces, and FTL are either registered trademarks or trademarks of TIBCO Software Inc. in the United States and/or other countries.
TIBCO FTL® is an embedded and bundled component of TIBCO ActiveSpaces® - Enterprise Edition.
Enterprise Java Beans (EJB), Java Platform Enterprise Edition (Java EE), Java 2 Platform Enterprise Edition (J2EE), and all Java-based trademarks and logos are trademarks or registered trademarks of Oracle Corporation in the U.S. and other countries.
All other product and company names and marks mentioned in this document are the property of their respective owners and are mentioned for identification purposes only.
THIS SOFTWARE MAY BE AVAILABLE ON MULTIPLE OPERATING SYSTEMS. HOWEVER, NOT ALL OPERATING SYSTEM PLATFORMS FOR A SPECIFIC SOFTWARE VERSION ARE RELEASED AT THE SAME TIME. SEE THE README FILE FOR THE AVAILABILITY OF THIS SOFTWARE VERSION ON A SPECIFIC OPERATING SYSTEM PLATFORM.
THIS DOCUMENT IS PROVIDED “AS IS” WITHOUT WARRANTY OF ANY KIND, EITHER EXPRESS OR IMPLIED, INCLUDING, BUT NOT LIMITED TO, THE IMPLIED WARRANTIES OF
MERCHANTABILITY, FITNESS FOR A PARTICULAR PURPOSE, OR NON-INFRINGEMENT.
THIS DOCUMENT COULD INCLUDE TECHNICAL INACCURACIES OR TYPOGRAPHICAL ERRORS. CHANGES ARE PERIODICALLY ADDED TO THE INFORMATION HEREIN; THESE
Copyright © 2009–2018 TIBCO Software Inc. All rights reserved.
Contents
TIBCO Documentation and Support Services. . . .7
About This Product. . . .8
Who Should Read This Document. . . .9
Administrative Concepts. . . . 10
Copysets. . . .11
State Keeper. . . .11
Development Environment. . . .13
Production Environment. . . .14
Security. . . .15
Enabling Authentication. . . .15
Enabling Encryption. . . .16
Password File. . . .16
Trust File. . . .17
String Encoding. . . .18
Starting a Realm Server. . . . 19
Administration Tool. . . .20
Administration Tool Reference. . . .21
Environment Variables for the Administration Tool. . . .21
tibdg Status. . . .22
tibdg Table Stats. . . .23
tibdg Grid Generate and tibdg Table Generate. . . .23
tibdgadmind. . . .25
Designing a Data Grid. . . .26
Defining a Data Grid. . . .27
Grid Create Configuration Options. . . .28
Memory Usage Considerations with the node_read_cache_size Option. . . .29
Configuration Options to Use Specific Ports and Network Interfaces. . . .30
Configure Ports. . . .30
Configuration Options when the Proxy and Client are on Different Subnets. . . .30
Configuring a Proxy That Can Be Accessed from Different Subnets. . . .30
Configure Network Interfaces. . . .31
Configure Internal Subnet Masks. . . .32
Starting a Node. . . .35
Node Reference. . . .35
Starting Multiple Nodes. . . .35
three_copysets.tibdg. . . .36
one_copyset_two_replicas.tibdg. . . .36
Starting a Proxy. . . .37
Proxy Reference. . . .37
Starting a Proxy with an External Host and Port. . . .37
Adding Copysets. . . .39
Data Redistribution. . . .39
Defining a Table. . . .40
Column Names. . . .41
Secondary Indexes. . . .41
Enabling Statistics. . . .41
Row Expiration. . . .42
Defining a Table with Row Expiration. . . .42
Overriding the Default TTL for a Single Row. . . .43
Deletion of Expired Rows. . . .43
Defining a Table Using SQL DDL Commands. . . .44
Creating a New Table. . . .44
Dropping a Table. . . .45
Creating an Index. . . .45
Dropping an Index. . . .46
SQL Data Type Mapping. . . .46
The ActiveSpaces JDBC Driver . . . .48
Connecting to the Data Grid by Using ActiveSpaces JDBC Driver. . . .48
Setting up the Environment. . . .48
Registering the ActiveSpaces JDBC Driver with the Driver Manager. . . .48
Creating the ActiveSpaces JDBC Connection. . . .49
JDBC URL Format. . . .50
ActiveSpaces Connection Properties . . . .50
JDBC Implementation Notes. . . .51
JDBC Data Types. . . .51
DatabaseMetaData Pattern Parameters. . . .52
JDBC Compliance. . . .52
ActiveSpaces Monitoring Service. . . . 54
Data Flow of Monitoring Metrics. . . .55
Starting ActiveSpaces Monitoring Service. . . .55
Stopping ActiveSpaces Monitoring Service . . . .56
Data and Log Files. . . .56 Stopping a Data Grid Gracefully. . . .57 Clearing a Grid Definition. . . .58
TIBCO Documentation and Support Services
How to Access TIBCO Documentation
Documentation for TIBCO products is available on the TIBCO Product Documentation website, mainly in HTML and PDF formats.
The TIBCO Product Documentation website is updated frequently and is more current than any other documentation included with the product. To access the latest documentation, visit https://
docs.tibco.com.
Product-Specific Documentation
Documentation for TIBCO ActiveSpaces® is available on the TIBCO ActiveSpaces® Product Documentation page. The following documents for this product can be found on the TIBCO Documentation site:
● TIBCO ActiveSpaces® Concepts
● TIBCO ActiveSpaces® Administration
● TIBCO ActiveSpaces® Release Notes
● TIBCO ActiveSpaces® Installation
● TIBCO ActiveSpaces® API Reference
How to Contact TIBCO Support
You can contact TIBCO Support in the following ways:
● For an overview of TIBCO Support, visit http://www.tibco.com/services/support.
● For accessing the Support Knowledge Base and getting personalized content about products you are interested in, visit the TIBCO Support portal at https://support.tibco.com.
● For creating a Support case, you must have a valid maintenance or support contract with TIBCO.
You also need a user name and password to log in to https://support.tibco.com. If you do not have a user name, you can request one by clicking Register on the website.
How to Join TIBCO Community
TIBCO Community is the official channel for TIBCO customers, partners, and employee subject matter experts to share and access their collective experience. TIBCO Community offers access to Q&A forums, product wikis, and best practices. It also offers access to extensions, adapters, solution accelerators, and tools that extend and enable customers to gain full value from TIBCO products. In addition, users can submit and vote on feature requests from within the TIBCO Ideas Portal. For a free registration, go to https://community.tibco.com.
About This Product
TIBCO ActiveSpaces® software is a distributed in-memory data grid product. ActiveSpaces® features familiar database concepts, high I/O capacity, and network scalability.
ActiveSpaces software features a complete redesign and re-implementation of the product and is straightforward to understand, use, and administer.
Product Editions
ActiveSpaces is now available in a community edition and an enterprise edition.
ActiveSpaces Community Edition
ActiveSpaces - Community Edition is ideal for getting started with ActiveSpaces, for implementing application projects, including proof of concept projects, for testing, and for deploying applications in a production environment. Although the community license limits the number of production instances, you can easily upgrade to the enterprise edition as your use of ActiveSpaces expands.
The community edition is available free of charge. It is a full installation of the ActiveSpaces product.
The limitation of using the community edition is that the users can run up to 25 nodes (a total of the copyset nodes or proxies in your data grid).
ActiveSpaces - Community Edition is compatible with both the enterprise and community editions of TIBCO FTL®.
ActiveSpaces Enterprise Edition
ActiveSpaces is now available in a community edition and an enterprise edition.
ActiveSpaces - Enterprise Edition is ideal for all application development projects, and for deploying and managing applications in an enterprise production environment. It includes all features presented in this documentation set, and access to TIBCO Support. Choose the enterprise edition for production deployments with more than 25 nodes (a total of the copyset nodes or proxies in your data grid) and for enterprise monitoring using dashboards.
ActiveSpaces - Enterprise Edition depends on the enterprise edition of TIBCO FTL.
Who Should Read This Document
The document is primarily focused on administrators. However, some portions of this document cater to the needs of a developer. In such scenarios, the roles are identified at the beginning of a section.
Unless specified otherwise, the procedures in the document are meant for administrators.
Administrative Concepts
These concepts and definitions pave the way to a more detailed understanding of ActiveSpaces administration.
Data Grid
A set of cooperating processes that distribute data across a set of host computers.
Three kinds of cooperating processes implement a data grid: nodes, proxies, and state keepers.
Copyset
A data grid partitions the complete set of data into copysets. Each copyset contains a portion of the full data set.
Each table row resides within only one copyset.
For more information, see Copysets.
Partitioning
The data grid horizontally partitions the rows of a table across copysets. So a query or a transaction could span many copysets.
Node
Nodes are processes that implement a copyset. Administrators define nodes and assign them to copysets.
Each copyset requires a primary node. Secondary nodes can provide optional backup protection.
Each node of a copyset maintains one copy of the data (that is, one copy of all the rows in that copyset).
Each node is part of only one copyset.
Replica
The number of replicas in a copyset is identical to the number of nodes that implement that copyset.
Replicas provide fault tolerance and protect data against hardware failures. More replicas yield greater protection.
● In a prototyping or testing environment, you can implement a copyset using only one node.
● In most production environments, two nodes provide adequate protection.
● For even stronger fault tolerance, you can use three nodes.
Replication
The replication feature, when used, provides fault tolerance by preventing data loss when a node (or the machine running the node) fails and cannot be accessed.
All nodes in a given copyset are replicas of each other and they all have the exact same set of data.
There is a single primary replica in a copyset and the other nodes in that copyset are secondary replicas.
Every copyset in the data grid is organized to make sure the slice of data owned by that copyset is
Proxy processes are independent of one another and do not require persistent state, so you can share the load of operations among multiple proxies.
State Keeper
Fault-tolerant state keeper processes determine and record the crucial internal governing information by which a data grid operates, and supply this information to the proxies and copyset nodes.
For more information, see State Keeper.
Using Multiple Nodes
There are several use cases for using multiple nodes:
● Nodes in different copysets are created with the goal of scaling horizontally.
As a result multiple copysets are created, each with a slice of the data.
● Nodes in the same copyset are created to provide multiple replicas for fault tolerance.
These contain identical copies of the data.
● In a product environment a combination of the previously described use cases can be used.
For example, you might choose to have two replicas per copyset and multiple copysets (say three) to scale horizontally.
In this example, your environment would have a total of six nodes.
Copysets
A data grid partitions the complete set of data into copysets. Each copyset contains a portion of the full data set.
The data grid horizontally partitions each table, assigning each row to one specific copyset. This partitioning is transparent to application programs.
Programs explicitly interact with tables, but do not refer to copysets.
Tables and Copysets
Tables and copysets are independent concepts.
Tables organize data in a way that makes sense to users of the data. Tables consist of rows, structured by columns.
Copysets store table rows, distributing them across a network in a way that facilitates fast access, fault tolerance, data replication, and flexibility.
State Keeper
The state keeper determines and records the crucial internal governing information by which a data grid operates, and supplies this information to the proxies and copyset nodes.
Governing Information in the State Keeper Primary Nodes
Within each copyset, one node is the primary copy, which both stores data and provides read access.
Other nodes are secondaries that store backup copies of the data. The state keeper records which node is the primary.
Data Distribution Mapping
The state keeper determines the mapping that assigns each table row to a copyset.
State Keeper Fault Tolerance
A set of fault-tolerant state keeper processes protect this crucial information and ensure nonstop access to it. One state keeper process supplies this information to the proxies and copyset nodes.
In production environments, use three processes. In a prototyping or testing environment, only one process suffices.
For added protection, each state keeper process also maintains a copy of the governing decisions in a disk file.
Development Environment
In many enterprises programmers act as administrators during the development and test phases of a project. To develop and test application programs that use ActiveSpaces software, deploy the following processes.
● Realm server One process
● State keeper One process
● Node One process
● Proxy One process
● Your application programs One or more processes, as appropriate
In a development environment you can run all of these processes on the same host computer.
Sample Scripts
Refer to the TIBCO_HOME/as/<version>/samples/readme.md before using the sample scripts.
The following scripts are available:
● TIBCO_HOME/as/<version>/samples/scripts/as-start defines a simple data grid and starts its component processes.
● TIBCO_HOME/as/<version>/samples/scripts/as-stop stops those component processes.
Copyset Partitioning Test
To test the partitioning of data rows into copysets, you can define a data grid with more than one copyset, each with its own node process running on a separate host computer.
For more information see "Defining a Data Grid" in the TIBCO ActiveSpaces® Administration guide.
Sample Docker Environment
A sample docker-compose environment is provided to demonstrate how to deploy an ActiveSpaces data grid in Docker. For more information, see TIBCO_HOME/as/<version>/samples/docker/
README.md.
Production Environment
To use ActiveSpaces software in a production environment, deploy the following processes.
● Realm server The minimum arrangement consists of one primary realm server.
Optionally, you can run a backup realm server. The primary realm server and its backup must run on two separate host computers.
● State keeper The minimum production arrangement consists of three state keeper processes. To ensure high availability during a network partition or hardware failure, each state keeper process must run on a separate host computer. Not doing so might result in grid-wide data loss.
At any given time, you must maintain a quorum of running state keepers. If you want to run more than one state keeper, configure three state keepers and make sure you have at least two running state keepers.
● Node The minimum production arrangement consists of two node processes per copyset.
Optional. For greater data protection you can run three nodes per copyset.
Additional copies can become expensive in two ways:
● Increasing the node count by one adds one complete copy of all the data.
● Every node process must run on a separate host computer. Usually this requirement determines the number of host computers you must maintain. For example, a data grid with three copysets and two nodes per copyset requires six nodes, all on separate hosts. Increasing to three nodes per copyset would require nine nodes, all on separate hosts.
● Proxy The minimum production arrangement consists of one proxy process.
Optional. You can run additional proxies to increase the capacity for client programs and to improve response time. For best results, run proxy processes on a separate host computers.
● Your application programs Run processes as appropriate.
Components Sharing a Host Computer
You can reduce number of host computers in a production environment by running more than one component per host.
For example, you can run a realm server, a state keeper, a node, and a proxy, all on one host. (In contrast, do not run two state keepers on the same host.)
For effective fault tolerance, run the nodes of each copyset on separate host computers.
Combining component processes on a host computer increases the risk that a single point of failure on the host could disrupt all those processes simultaneously. Assess the risk tolerance of your enterprise.
Security
ActiveSpaces security provides the following features:
● Authentication and Authorization
● Transport Encryption ActiveSpaces lets you:
● Prevent unauthorized access to your data grid.
● Secure data during transmission within the data grid .
ActiveSpaces allows you to authenticate the users of the data grid. This feature uses username and password authentication. Each ActiveSpaces process authenticates itself to the secure realm server using credentials contained in a password file. Additionally, the ActiveSpaces processes use a trust file to trust a secure realm server. For more information, see Enabling Authentication.
Network communication between processes in a data grid can be encrypted to further protect your data from packet sniffing by unauthorized processes. For more information, see Enabling Encryption.
Enabling Authentication
Follow these steps to enable authentication and authorization in ActiveSpaces.
Prerequisites
● Set up the realm server.
For more information, see "Secure Realm Server" in TIBCO FTL Administration.
● Set up realm server authentication.
For more information, see "Realm Server Authentication" in TIBCO FTL Administration.
Procedure
1. For the tibdg administration tool and tibdgadmind to connect to a secure realm server with authentication credentials:
a) The username using the -user option.
b) The password file using the -password option.
Use one of the following options:
● pass:<password>
-password pass:mypassword
● file:<password file>
-password file:mypasswordfile
● env:<environment variable>
-password env:%myPassword%
● stdin
You are prompted for the password when the command executes.
c) The location of the trusted realm server using the -trustfile option:
-trustfile %TRUST_FILE%
For details, see Trust File.
Example
tibdg -r %REALM_URL% -s my_script_file.tibdg -user all -password pass:mypasswords -trustfile %TRUST_FILE%
2. For the tibdgnode, tibdgkeeper, and tibdgproxy processes to connect to a secure realm server with authentication credentials:
a) Specify the password file that these processes uses to connect to the grid.
The password file is specified using the --user-password-file option.
For details, see Password File.
b) Specify the location of the trusted realm server using one of the following options:
● --trust-file: The contents of the specified trust file instructs clients to trust the realm server's certificate.
For details, see Trust File.
● --trust-all: The client trusts any realm server without verifying trust in the server's certificate.
This option should only be used for development and testing.
Example
tibdgproxy -r %REALM_URL% --user-password-file c:\AS\tests\myPasswordfile.txt -- trust-all
Enabling Encryption
Prerequisites
Set up authentication. See Enabling Authentication.
Procedure
● To encrypt your data grid connections create the grid using the encrypted_connections option.
Valid values are none and all. For example,
grid create encrypted_connections=all
Password File
If the realm server enables authentication and authorization, then you must configure credentials for ActiveSpaces processes such as tibdgnode, tibdgkeeper, tibdgproxy, and tibdgadmind.
Each service process authenticates itself to the realm server using credentials that it reads from an ASCII password file. Specify the name and location of that file using the client’s --user-password- file command line parameter.
The password file consists of two lines. The first line contains the user name. The second line contains the password string. On all platforms (including Windows) the lines must be separated by the new line character \n.
Trust File
A secure realm server automatically generates a trust file. The content of the trust file instructs clients to trust the realm server's certificate. Administrators and developers coordinate to supply the trust file to application programs.
A secure realm server generates the trust file in its data directory. The trust file is named ftl-
trust.pem. The file contains one or more PEM-encoded public certificates, each of which is typically 1 - 2 kilobytes of data.
Realm administrators give the trust file to the clients: that is, developers and application administrators coordinate so that client programs can access the trust file at run time.
Administrators also supply the trust file directly to ActiveSpaces processes such as tibdgnode,
tibdgkeeper, tibdgproxy, and tibdgadmind.
Users can load the trust file into a web browser’s trust store.
Affiliated Realm Servers and the Trust File
An affiliated realm server uses the same trust file as its primary realm server. That is, although a backup or satellite server generates its own keystore file, nonetheless the trust file it generates is an exact copy of the primary server's trust file. As a consequence, you do not need to distribute separate trust files to clients of a family of affiliated servers: one trust file suffices for the whole family.
Regeneration and Redistribution of the Trust File
If a realm server cannot access its TLS data files, or it cannot decrypt the keystore file, then it generates new TLS data files. The newly generated data files replace any existing data files.
If a primary realm server generates new TLS data files, you must redistribute the new trust file to all clients, including affiliated realm servers, other TIBCO FTL components, application programs, and browsers that access the realm server GUI.
Two scenarios can trigger this requirement:
● No Access: A primary realm server restarts and cannot access its TLS data files: for example, they have been deleted or moved, or their file access permissions have changed.
● New Password: An administrator restarts the primary realm server, supplying a different password.
The server cannot decrypt the existing keystore file using the new password.
If a secondary realm server generates new TLS data files, you need not redistribute its trust file.
String Encoding
To preserve interoperability throughout your enterprise, all strings must use UTF-8 encoding
● When the TIBCO FTL Java and .NET libraries send messages, all strings are automatically UTF-8 encoded.
● C programs must treat strings in inbound messages as UTF-8 encoded strings.
● C programs must send only UTF-8 encoded strings.
Strings cannot include embedded null characters.
Starting a Realm Server
Each ActiveSpaces data grid depends on a TIBCO FTL realm server to supply configuration data to its components. To start a realm server process, complete this task.
Dedicate a separate family of realm servers for each data grid. If your application programs also use FTL communications, arrange a separate family of realm servers for them.
At minimum, a family of affiliated realm servers must include a primary realm server process. It can also include a backup realm server, as appropriate for your enterprise. (For more information, see
"Affiliated Realm Servers" in TIBCO FTL Administration.) Prerequisites
TIBCO FTL software must already be installed on realm server hosts.
Procedure
1. Navigate to the realm configuration data directory.
cd my_data_dir_1
The realm server uses the current directory as the default location to store its working data files.
● The first time you start a realm server for a data grid, navigate to an empty directory. When the realm server detects an empty working directory, it begins with a default realm definition. As you configure the realm definition, in subsequent tasks, the realm server stores that definition in its data directory.
● If you have already begun to configure the realm definition, then navigate to the same data directory. The realm server reads the realm definition from the working directory.
2. Run the realm server executable.
tibrealmserver -ht my_host:my_port
Specify the HTTP port using the -ht parameter. The port must not be bound by any other process.
ActiveSpaces® component processes initiate contact with the realm server at this address.
Application programs must supply this realm server URL (host:port) to data grid connect call.
Administration Tool
tibdg is an administrative command line tool for ActiveSpaces. You can use it to define data grid components, tables, and indexes; to see the status of data grid components; and to save and restore the definitions of a data grid.
Usage Help
To see a summary of commands, run the administration tool with the help command:
tibdg help
To see information about a specific command or command area, run the administration tool with the help command and the command as an argument. For example:
tibdg help copyset tibdg help table tibdg help status
Realm Server Interactions
Administration tool commands interact with the realm server:
● Storing definitions in the realm server
● Retrieving definitions from the realm server
● Retrieving status information from the realm server
Every interaction command requires the location of the realm server, either as an argument or as the value of an environment variable.
Modes of Operation
You can use the administration tool in two ways:
● Immediate command execution When you execute a tibdg command line, the tool makes the change in the realm server workspace, and immediately deploys that change to the realm server's clients (namely, data grid component processes).
This mode is convenient for changes to a running data grid (such as adding a new table), for saving the data grid definition to a file, and for requesting status information about a running data grid.
● Command script Alternatively, you can create a command script file containing several commands.
Then tibdg executes that batch of commands, accumulating those changes in the realm server workspace. Finally, the tool deploys all the workspace changes to the realm server's clients before exiting.
This mode is convenient for a series of related changes, such as defining a data grid, or creating a table and its columns.
Consider the following two examples, which accomplish the same goal: defining a data grid. The first example executes five separate command lines, deploying each change immediately.
tibdg grid create
tibdg copyset create my_copyset tibdg node create my_node
Then it executes the script with one command line, deploying all the changes at the end.
tibdg -s my_script_file.tibdg
For more information about the realm server and its workspace, see TIBCO FTL Administration.
Administration Tool Reference
Administrators use tibdg to configure and monitor a data grid.
Syntax
tibdg [-r realm_server_URL] [-c path] [-s path] [Command Command_Args] [ConfigurationOption=value]
Command Line Parameters
See also Environment Variables for the Administration Tool.
Parameter Description
-h --help
Output help text about tibdg and its command line parameters.
Environment Variables for the Administration Tool
The following environment variables can be used with the tibdg command line administrative tool.
Values on the command line override the values of these environment variables.
Environment Variable Description
TIBDG_FTL The administration tool contacts the realm server at this URL (host and port).
TIBDG_PARAM_FILE The administration tool reads parameters from this file path.
Values in this file override the tool's default values.
Individual values on the command line override values in this file.
If this variable is not set, the tool reads
parameters from the file it finds in either of these two default locations:
● ./.tibdg
● ~/.tibdg
For syntax of the configuration file, see the output of the command tibdg config.
TIBDG_FTL_USER The user name and password used to connect to the secure realm server.
TIBDG_FTL_PASSWD
Environment Variable Description
TIBDG_FTL_TRUSTFILE The value of this property is the location of the trust file.
tibdg Status
Run the administrative tool with the status command to view the status of the data grid components.
The following information is displayed when you execute the tibdg status command:
The PROCESSES section displays the status of the tibdgnode, tibdgkeeper, and tibdgproxy processes.
The value in the EST SIZE column represents how much data that node has written to the disk.
EST SIZE is updated infrequently and should be interpreted as an approximate value.
The REINDEXING section displays information for any table that is currently being reindexed or is pending a reindex. If there is no reindexing in progress or pending, this section is not displayed.
To get a more detailed status from a specific process, include a process type and a process name when executing the status command.
For example:
tibdg node status t1
The following is an example of a tibdg node status:
user@user-mbp:[~/home]:tibdg -r http://users-mbp.na.tibco.com:7715 node status s1 Node Name: s1
Node ID: 6B97B5D0-EA30-4A63-AD64-781378D5848B
Data Dir: /Users/home/ftl_src/firefly/src/auto/store/C_TIBDG_DEL_IDX_LEAK/asnodedb Copyset Name: set1
Copyset ID: 796878AB-5BE8-4905-B4B3-2FDE19A64292 Running: true (1 instances)
Instance 1:
Host: users-mbp.na.tibco.com IP: 10.97.128.112
PID: 31344 Is Primary: true Active Transactions: 0 Active Requests: 0 Epoch: 0 Live Data Size (est): 0.0B
Instance 1:
Host: users-mbp.na.tibco.com IP: 10.97.128.112
PID: 31335 Clients: 0 Client Ops: 502 Iterators: 0 Statemements: 0 Queries: 0 Listeners: 0
The following is an example of tibdg keeper status:
mtiddens@users-mbp:[~/home]:tibdg -r http://users-mbp.na.tibco.com:7715 keeper status k1
State Keeper Name: k1
State Keeper ID: E9BFE22A-4271-4279-9007-5A7603BC449E
State Dir: /Users/home/ftl_src/firefly/src/auto/store/C_TIBDG_DEL_IDX_LEAK/k1_data Running: true (1 instances)
Instance 1:
Host: users-mbp.na.tibco.com IP: 10.97.128.112
PID: 31331 Is Leader: true Grid Status Vote: true Primaries: 1
Copyset ID Primary Node ID 796878AB-5BE8-4905-B4B3-2FDE19A64292 6B97B5D0-EA30-4A63- AD64-781378D5848B
Copysets: 1
Copyset ID Epoch Primary Bins Nodes
796878AB-5BE8-4905-B4B3-2FDE19A64292 0 6B97B5D0- EA30-4A63-AD64-781378D5848B 0-4095 6B97B5D0-EA30-4A63-AD64-781378D5848B (alive)
tibdg Table Stats
Run the tibdg table stats <table-name> command to view statistics such as row counts or overall table size for a table and all of its indexes.
The following is an example that shows statistics for a table named t1:
$ tibdg table stats t1 Table 't1' statistics:
Rows: 10 (exact) Size by Index:
primary: 103.0B (exact)
In this example, t1 contains 10 rows. The (exact) after the row count indicates that this is an exact count. The table has one index named primary that takes up 103 bytes of space which is also exact. The size reported for the primary index is the size of data in all of the rows in the table, which includes all the data for the primary index. The size reported for a secondary index is the additional data size of that index. The total data size for a given table, is the sum of the sizes of all its indexes.
The sizes reported by this command are the sizes of the uncompressed data, so they might not reflect the disk usage for the table due to other factors such as compression of the data when it is written to the disk.
If a table or index does not have statistics enabled, the values for row count and sizes is 0, and (off) is displayed next to the values. See Enabling Statistics to set the row_counts attribute during table or index create to exact.
tibdg Grid Generate and tibdg Table Generate
The tibdg grid generate command can be used to generate a sequence of commands that can later be executed to create a specific grid configuration. The tibdg table generate command is similar to
the tibdg grid generate command except it only generates the commands required to create a single table.
When you execute the tibdg grid generate command, you are asked a series of questions regarding the design of the grid. After you have provided the necessary input values, the command generates the sequence of necessary commands to create that data grid. These commands can either be output to the console or written to a file. Then you can make any modifications to the commands and execute them either one at a time or by using the -s option to execute all the commands in a file.
tibdg Grid Generate Example
The following example shows a record using the tibdg grid generate command to generate the necessary commands to create a grid with five copysets, three nodes per copyset, three state keepers, five proxies, and two tables:
ad:install ad$ ./bin/tibdg grid generate my_grid.tibdg Enter the number of copysets[1]: 5
Enter the number of nodes per copyset[1]: 3 Enter the number of statekeepers[1]: 3 Enter the number of proxies[1]: 5 Create a table (y|n) [y]: y Table name: customers
Enter the name and type for column 1 in the primary index (columnName columnType):
cust_id long
Create more columns to be used in the primary index (y|n) [n]: n Create more columns (y|n) [y]: y
Enter the name and type for the column (columnName columnType): name string Create more columns (y|n) [y]:
Enter the name and type for the column (columnName columnType): address string Create more columns (y|n) [y]:
Enter the name and type for the column (columnName columnType): phone long Create more columns (y|n) [y]: n
Create a secondary index (y|n) [n]: y Enter index name: phone_index
Columns defined:
1. cust_id 2. name 3. address 4. phone
Select the ids of the columns in the order that is used in the index (# # #...): 4 Create another secondary index (y|n) [n]:
Create another table (y|n) [n]: y Table name: orders
Enter the name and type for column 1 in the primary index (columnName columnType):
order_id long
Create more columns to be used in the primary index (y|n) [n]: n Create more columns (y|n) [y]: y
Enter the name and type for the column (columnName columnType): cust_id long Create more columns (y|n) [y]:
Enter the name and type for the column (columnName columnType): date datetime Create more columns (y|n) [y]:
Enter the name and type for the column (columnName columnType): value long Create more columns (y|n) [y]:
Enter the name and type for the column (columnName columnType): description string Create more columns (y|n) [y]: n
Create a secondary index (y|n) [n]: y Enter index name: cust_index
Columns defined:
1. order_id 2. cust_id 3. date 4. value
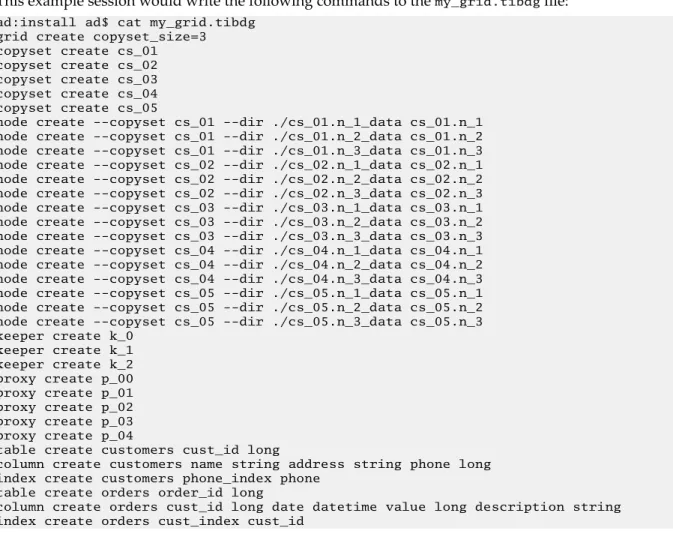
This example session would write the following commands to the my_grid.tibdg file:
ad:install ad$ cat my_grid.tibdg grid create copyset_size=3 copyset create cs_01 copyset create cs_02 copyset create cs_03 copyset create cs_04 copyset create cs_05
node create --copyset cs_01 --dir ./cs_01.n_1_data cs_01.n_1 node create --copyset cs_01 --dir ./cs_01.n_2_data cs_01.n_2 node create --copyset cs_01 --dir ./cs_01.n_3_data cs_01.n_3 node create --copyset cs_02 --dir ./cs_02.n_1_data cs_02.n_1 node create --copyset cs_02 --dir ./cs_02.n_2_data cs_02.n_2 node create --copyset cs_02 --dir ./cs_02.n_3_data cs_02.n_3 node create --copyset cs_03 --dir ./cs_03.n_1_data cs_03.n_1 node create --copyset cs_03 --dir ./cs_03.n_2_data cs_03.n_2 node create --copyset cs_03 --dir ./cs_03.n_3_data cs_03.n_3 node create --copyset cs_04 --dir ./cs_04.n_1_data cs_04.n_1 node create --copyset cs_04 --dir ./cs_04.n_2_data cs_04.n_2 node create --copyset cs_04 --dir ./cs_04.n_3_data cs_04.n_3 node create --copyset cs_05 --dir ./cs_05.n_1_data cs_05.n_1 node create --copyset cs_05 --dir ./cs_05.n_2_data cs_05.n_2 node create --copyset cs_05 --dir ./cs_05.n_3_data cs_05.n_3 keeper create k_0
keeper create k_1 keeper create k_2 proxy create p_00 proxy create p_01 proxy create p_02 proxy create p_03 proxy create p_04
table create customers cust_id long
column create customers name string address string phone long index create customers phone_index phone
table create orders order_id long
column create orders cust_id long date datetime value long description string index create orders cust_index cust_id
tibdgadmind
tibdgadmind is an administrative daemon for ActiveSpaces. The SQL ExecuteUpdate command requires tibdgadmind running in the data grid.
Syntax
tibdgadmind [-r realm_server_URL] [-l listen_URL]
By default, tibdgadmind listens on http://localhost:7171.
If more than one tibdgadmind needs to run on the same host or in a production environment where processes on other hosts need to be able to communicate with the tibdgadmind, the listen URL must be specified and must be something other than the default value localhost:7171. The value can be changed by specifying -l listen_URL.
More than one realm server URL can be specified by separating the URLs with the pipe (|) character when starting the tibdgadmind process.
After connecting to the realm server, tibdgadmind is able to process requests for table configuration changes such as creating a table, dropping a table, creating an index, and deleting an index.
To make table and index configuration updates to your data grid, you must run a realm server and an active data grid, a tibdgadmind process, and you must use the ExecuteUpdate API of the tibdgSession object. For more information, see Defining a Table Using SQL DDL Commands.
To provide fault tolerance, multiple tibdgadmind processes can be run.
Designing a Data Grid
This task guides you through the design decisions that characterize the structure of a data grid.
Fundamental Decisions
The decisions you make in the following steps define the fundamental characteristics of the data grid.
After completing this task, you cannot change these parameters except by deleting the data grid definition and starting over again.
As you make these design decisions, record them for later reference.
Procedure
1. Determine the number of copysets in the data grid.
The amount of data that the grid can contain depends on the capacity of the host computers and the number of copysets.
A single copyset could suffice for prototyping and development.
2. Determine the number of nodes per copyset.
● For development, use one node per copyset.
● For fault tolerance, use two nodes per copyset.
● For stronger fault tolerance protection, use three nodes per copyset.
Each copyset consists of the same number of nodes.
3. Determine the number of state keeper processes.
● For development, use one state keeper process.
● For fault tolerance, use three state keeper processes.
4. Determine the number of proxy processes.
5. Determine unique process names.
Assign a unique name to each component process of the data grid. You can use these unique names to address the individual processes as you monitor and manage them.
a) Compose a name for each copyset.
For example, DG.CS-A, DG.CS-B, DG.CS-C.
b) Compose a name for each node, incorporating the copyset name.
For example, DG.CS-A.N1, DG.CS-A.N2. c) Compose a name for each state keeper process.
For example, DG.SK-1, DG.SK-2, DG.SK-3. d) Compose a name for each proxy process.
For example, DG.PX-1, DG.PX-2, DG.PX-3. What to do next
Defining a Data Grid
Defining a Data Grid
To define and configure a data grid, complete the steps in this task.
This task implements decisions about the structure of your data grid, creating a data grid definition within a TIBCO FTL realm server. The realm server delivers the information to the component processes of the data grid and your application processes that use the grid.
The examples in these steps illustrate adding commands to a configuration script. When the script is complete, the administration tool executes the script to define the data grid.
Alternatively, you could execute each step immediately as a separate administration tool command, instead of accumulating them in a script.
You have already completed the task Designing a Data Grid. This task refers to decisions you recorded during that task.
Prerequisites
A realm server must be running and reachable.
Procedure
1. In a text editor, begin editing a script file.
Follow the convention of naming your script with the .tibdg file name extension.
2. Add a script command to create the data grid. For example:
grid create
For more information on grid create options, see Grid Create Configuration Options.
You can run the following command for a list of all the options for the grid create script command:
tibdg help grid create
Define the Component Processes of the Data Grid
3. For each copyset, add a script command to create that copyset. For example:
copyset create copyset_name
4. For each node, add a script command to create that node. For example:
node create --copyset copyset_name node_name
5. For each state keeper, add a script command to create that state keeper. For example:
keeper create keeper_name
6. For each proxy, add a script command to create that proxy. For example:
proxy create proxy_name
7. Optional. Run the script to create the data grid.
Alternatively, you might postpone this step until you have defined the tables of the data base (see the task Defining a Table).
tibdg -s script_file_path -r http://<host>:<port>>
where <host> and <port> refer to the realm server URL.
What to do next
Starting the Data Grid Processes
Grid Create Configuration Options
The following configuration options can be used with the tibdg grid create command.
Option Description
Default
Value Valid Values
client_req_timeout The time (in seconds) the client API synchronously waits for completion of a request (such as GET or PUT
operation), before timing out.
5.0 Minimum:
0.0
compaction A value less than six indicates more emphasis on performance and less on the compaction of the disk space.
Conversely, a higher value indicates more emphasis on the compaction of the disk space than performance.
7 Minimum: 0
Maximum:
10
consistent_query_limit The maximum number of iterators and statements (queries) that a node can handle concurrently.
64 Minimum: 0
copyset_size The number of nodes in a copyset. 2 Minimum: 1
encrypted_connections Specifies which connections in the
data grid get encrypted. none all or none
grid_internal_subnet_mas k
See Configure Internal Subnet Masks. none See Configure Internal Subnet Masks.
iter_inactivity_timeout The time (in seconds) the proxy waits for the next client request on a table iterator or statement query before automatically closing the table iterator or statement query.
600.0 Minimum:
0.0
minimum_replication_fact or
The minimum number of nodes (including the primary and any secondary nodes) in a copyset that must be in an Alive state before WRITE operations are allowed.
1 Minimum: 1
Option Description
Default
Value Valid Values
node_read_cache_size Every node, stores a read cache that holds uncompressed blocks of data in memory. The size of a read cache is specified in bytes.
There are some memory usage
considerations to be made when using this option. For details, see Memory Usage Considerations with the node_read_cache_size Option.
1073741 824 (1 gigabyt e)
Minimum: 0 Maximum:
92233720368 54775806
(LLONG_MAX
- 1)
node_storage_timeout The time (in seconds) a node waits for a successful response from a READ or WRITE operation to complete before timing it out.
60 Minimum: 0
proxy_client_listen_subn et_mask
See . none See
Configure Network Interfaces.
proxy_client_listen_port See Configure Ports. none See Configure Ports.
statekeeper_count The number of state keeper processes expected to be run.
Due to the requirement that state keepers must be run in a quorum, the supported values are 1 or 3.
3 Minimum: 1
Memory Usage Considerations with the node_read_cache_size Option
The tibdg grid create command comes with the node_read_cache_size option. This property governs the size of the read cache allotted to a node.
Here are some memory usage considerations when you are assigning a size to the read cache:
● If the RAM on a node's host exceeds the amount of data persisted by the node, increasing the
node_read_cache_size value to match the size of the uncompressed data set yields an improved random read performance.
● If the data set is larger than the host's RAM, increasing the node_read_cache_size value can have an negatively affect the random read performance. In such instances, the read cache of the
application comes at the expense of the page cache of the operating system.
● If node_read_cache_size is a significant percentage of the host RAM, the operating system must be configured to prevent swapping of the node application for optimal performance. Example:
● On Linux, you might have to reduce the value of /proc/sys/vm/swappiness or disable swap.
● In Docker, you can modify the --memory-swappiness run parameter to prevent swapping.
Configuration Options to Use Specific Ports and Network Interfaces
TIBCO ActiveSpaces leverages TIBCO FTL internally to aid in connecting the different TIBCO ActiveSpaces processes so that they can communicate over the network. In certain cases, you might need to specify additional configuration information when initially setting up the data grid processes to help influence what ports and network interfaces should be chosen when the processes are started.
For example, a TIBCO ActiveSpaces client application might need to connect to a TIBCO ActiveSpaces
tibdgproxy that is running on a server which has a firewall. In that case, a network administrator might need to open a specific port or ports in the firewall so that the TCP connections can be made to the tibdgproxy running behind the firewall. After the tibdgproxy is started, it reads from its data grid configuration what port it should bind to when listening for incoming TCP connections to ensure that traffic can pass through the firewall.
Configure Ports
Regarding ports, the configuration option proxy_client_listen_port can be specified when creating a grid or proxy. This is the port that a proxy binds to when listening for incoming TCP connections.
When specified at the grid level, all proxies inherit this value and listen for clients on this port.
For example:
grid create copyset_size=1 proxy_client_listen_port=8890 proxy create p1
This works as long as there is only one proxy running on each machine. If two proxies are started on the same machine and both try to bind to port 8890, the second proxy fails to start due to an error. To avoid this, override the configuration option at the proxy level when creating a specific proxy to override the listen port specified at the grid level.
For example, in the following grid configuration, p1 inherits and listen on port 8890, p2 overrides its listen port with the specified port 8891, and both proxies are able to run on the same machine:
proxy create proxy_client_listen_port=8891 p2
Configuration Options when the Proxy and Client are on Different Subnets
When the realm server and proxy are running on a subnet that is different from the one on which the client application is running, the proxy might need additional configuration. This is a requirement when you are dealing with a Network Address Translation (NAT) setup as is common with cloud environments or Docker.
For example, if the realm server and proxy are on subnet 10.0.75.0/24 and the ActiveSpaces client application is on the subnet 192.168.1.0/24, the client application often cannot route to the
10.0.75.0/24 subnet (the proxy's subnet). In such a situation, in addition to
proxy_client_listen_port, configure the proxy_client_listen_external_host option.
If the port that the proxy is listening on is mapped to a different external port, use
proxy_client_listen_external_port to specify the correct external port.
If you are in a dynamic environment, use the -e <ip:port> command-line parameter when you run the tibdgproxy process. For more information, see Starting a Proxy with an External Host and Port.
Configuring a Proxy That Can Be Accessed from Different Subnets
The Network Address Translation (NAT) is possible with the use of the options,
Procedure
1. Set proxy_client_listen_port to the internal port for the proxy.
2. Determine the external host IP address that a client could use to connect to the proxy.
a) Set proxy_client_listen_external_host to this external host IP address.
3. Optional: Determine if the internal port the proxy is listening on is the same as the one that is exposed externally.
If a different port is exposed externally, you must set up port forwarding outside of ActiveSpaces to map the external port to the internal port.
a) If the external port is different from the internal port, set
proxy_client_listen_external_port to the external value.
If you are in a dynamic environment, use the command-line parameter -e <ip:port>
when you run the tibdgproxy process. For more information, see Starting a Proxy with an External Host and Port.
An Example of Creating a Proxy That Can Be Accessed from a Different Subnet
tibdg -r http://localhost:8080 proxy create proxy_client_listen_port=8999 proxy_client_listen_external_host=192.168.1.136 p2
An Example of Creating a Proxy with an External Port
tibdg -r http://localhost:8080 proxy create proxy_client_listen_port=8999 proxy_client_listen_external_host=192.168.1.136
proxy_client_listen_external_port=7999 p2
In this example, when the client application attempts to connect, it first connects to the realm server (which needs ports 8080 and 8083 opened or forwarded). The realm server informs the client about the proxies that are running and includes the external host and port (if configured) so that the client can connect to the proxy that is on a different subnet. For the connection to succeed, the administrator must set up port forwarding correctly. In Docker, this might be with the -p 8999:8999 syntax or -p 7999:8999 to forward a port on the host to a port in a specific container.
Configure Network Interfaces
You can use the configuration option proxy_client_listen_subnet_mask to configure network interfaces. This can be specified at both the grid and proxy level to control which network interface the proxy binds to when listening for connections from clients.
If a machine has multiple network interfaces, a specific subnet mask can be provided in a standard CIDR notation to control which interface should be selected. When specified at the grid level, all proxies inherit this value and attempt to use the specified subnet mask.
For example, in the following grid configuration, all proxies attempt to use the subnet mask 10.0.1.0/24:
grid create copyset_size=1 proxy_client_listen_subnet_mask=10.0.1.0/24 proxy create p3
If there is a need to override this value for a specific proxy, it can also be specified at the proxy level.
The options for proxy ports and proxy listen subnet masks can be combined at both the grid and proxy level.
For example:
proxy create proxy_client_listen_subnet_mask=10.0.2.0/24 p4 proxy create proxy_client_listen_subnet_mask=10.0.2.0/24 proxy_client_listen_port=8892 p5
Configure Internal Subnet Masks
For internal communication between the TIBCO ActiveSpaces server processes (tibdgproxy,
tibdgnode, and tibdgkeeper), you can specify the subnet mask to be used for this internal communication between server processes by using the configuration option
grid_internal_subnet_mask. This option is different from the other configuration options described because it does not influence the client to proxy communication. It also can only be specified at the grid level.
For example:
grid create copyset_size=1 grid_internal_subnet_mask=10.0.10.0/24
Setting this configuration option causes all communication between proxy, node, and state keeper processes to occur on the specified interface. This option can also be combined with the two proxy configuration options proxy_client_listen_subnet_mask and proxy_client_listen_port. The following is an example of specifying all 3 options at the grid level:
grid create copyset_size=1 proxy_client_listen_subnet_mask=10.0.1.0/24 proxy_client_listen_port=8890 grid_internal_subnet_mask=10.0.10.0/24
Starting the Data Grid Processes
To start the data grid, start its component processes in this order.
See also, Sample Scripts.
Prerequisites
● The realm server must be running and reachable.
● The data grid components must be defined.
● It is not required to define your tables prior to starting the data grid processes. However, your tables must be defined before they can be used by a client application.
Procedure
1. Start the state keeper processes.
See Starting a State Keeper.
2. Start the node processes.
See Starting a Node.
3. Start the proxy processes.
See Starting a Proxy.
Result
The data grid is ready to use. You can start application processes.
Component Command Line Parameters
All three executable components -- state keeper, node, and proxy -- accept the same set of command line parameters, as documented here.
Parameter Description
-n name
--name name
Required. Process name.
Supply one of the names you assigned in Defining a Data Grid.
-r realm_server_URL
-rs realm_server_URL
--realmserver realm_server_URL
Required. Realm server location.
Supply the realm server URL in the form
http://host:port. Use the values of host and port that you supplied as the -ht argument in Starting a Realm Server.
-s realm_server_URL
--secondary-realmserver realm_server_URL
Optional.
URL of the backup realm server.
If the regular realm server is unavailable, the process contacts the backup realm server at this location.
Starting a State Keeper
Start state keeper processes first, because all other ActiveSpaces component processes depend on them.
Prerequisites
● The realm server must be running and reachable.
● The data grid definition in the realm server must be complete and valid.
Procedure
1. Start the state keeper process.
tibdgkeeper -n name -r realm_server_URL
2. Repeat the previous step for all the state keeper names assigned in the data grid definition.
3. Verify that the state keeper processes are ready.
Check the status using the administration tool.
Keeper Reference
Administrators use tibdgkeeper to start a keeper process.
Syntax
tibdgkeeper -n name -r realm_server_URL [-s realm_server_URL]
For further explanation, see Component Command Line Parameters.