Amazon MemoryDB for Redis
Developer Guide
Amazon MemoryDB for Redis: Developer Guide
Copyright © Amazon Web Services, Inc. and/or its affiliates. All rights reserved.
Amazon's trademarks and trade dress may not be used in connection with any product or service that is not Amazon's, in any manner that is likely to cause confusion among customers, or in any manner that disparages or discredits Amazon. All other trademarks not owned by Amazon are the property of their respective owners, who may or may not be affiliated with, connected to, or sponsored by Amazon.
Table of Contents
What is MemoryDB for Redis? ... 1
Features of MemoryDB ... 1
MemoryDB core components ... 2
Clusters ... 2
Nodes ... 3
Shards ... 3
Parameter groups ... 3
Subnet groups ... 4
Access control lists ... 4
Users ... 4
Related services ... 4
Choosing Regions and Availability Zones ... 4
Locating your nodes ... 6
Supported Regions & endpoints ... 7
Accessing MemoryDB ... 8
MemoryDB security ... 9
Before you begin ... 10
Sign up for AWS ... 10
Create an IAM user ... 10
Getting started with MemoryDB ... 12
Setting up ... 12
Getting an AWS Access Key ... 12
Configuring Your Credentials ... 13
Downloading and Configuring the AWS CLI ... 13
Set up your permissions (new MemoryDB users only) ... 13
Step 1: Create a cluster ... 14
Creating a MemoryDB cluster ... 14
Step 2: Authorize access to the cluster ... 19
Step 3: Connect to the cluster ... 21
Find your cluster endpoint ... 21
Connect to a MemoryDB cluster (Linux) ... 21
Step 4: Deleting a cluster ... 22
Where do I go from here? ... 23
Managing nodes ... 24
MemoryDB nodes and shards ... 24
Supported node types ... 25
Replacing nodes ... 26
Managing clusters ... 27
Preparing a cluster ... 28
Determining your requirements ... 28
Viewing a cluster's details ... 30
Modifying a cluster ... 33
Adding / Removing nodes from a cluster ... 35
Accessing your cluster ... 37
Grant access to your cluster ... 37
Accessing MemoryDB from outside AWS ... 38
Finding connection endpoints ... 42
Shards ... 44
Finding a shard's name ... 44
Managing your MemoryDB implementation ... 47
Engine versions and upgrading ... 47
Supported Redis versions ... 48
Upgrading engine versions ... 49
Tagging your MemoryDB resources ... 50
Monitoring costs with tags ... 53
Managing tags using the AWS CLI ... 54
Managing tags using the MemoryDB API ... 56
Managing maintenance ... 58
Best practices ... 59
Restricted Redis Commands ... 60
Resilience ... 61
Best practices: Online cluster resizing ... 62
Understanding MemoryDB replication ... 62
Consistency ... 63
Replication in a cluster ... 63
Minimizing downtime with Multi-AZ ... 64
Changing the number of replicas ... 70
Snapshot and restore ... 78
Constraints ... 78
Costs ... 78
Scheduling automatic snapshots ... 79
Making manual snapshots ... 80
Creating a final snapshot ... 82
Describing snapshots ... 84
Copying a snapshot ... 86
Exporting a snapshot ... 88
Restoring from a snapshot ... 94
Seeding a cluster with a snapshot ... 97
Tagging snapshots ... 101
Deleting a snapshot ... 102
Scaling ... 103
Scaling MemoryDB clusters ... 104
Configuring engine parameters using parameter groups ... 118
Parameter management ... 119
Parameter group tiers ... 120
Creating a parameter group ... 120
Listing parameter groups by name ... 124
Listing a parameter group's values ... 128
Modifying a parameter group ... 128
Deleting a parameter group ... 131
Redis specific parameters ... 133
Security ... 140
Data protection ... 140
Data security in MemoryDB for Redis ... 141
At-Rest Encryption ... 142
In-transit encryption (TLS) ... 143
Authenticating users with ACLs ... 144
Identity and access management ... 153
Authentication ... 153
Access control ... 154
Overview of managing access ... 155
Logging and monitoring ... 174
Monitoring with CloudWatch ... 174
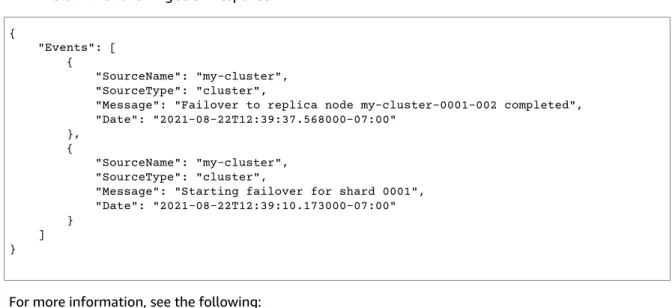
Monitoring events ... 185
Logging MemoryDB for Redis API calls with AWS CloudTrail ... 193
Infrastructure security ... 197
Internetwork traffic privacy ... 198
Subnets and subnet groups ... 198
MemoryDB and Amazon VPC ... 207
MemoryDB for Redis API and interface VPC endpoints (AWS PrivateLink) ... 216
Service updates ... 217
Managing the service updates ... 218
Reference ... 220
Using the MemoryDB API ... 221
Using the query API ... 221
Available libraries ... 223
Troubleshooting applications ... 223
Quotas ... 225
Document history ... 226
Features of MemoryDB
What is MemoryDB for Redis?
MemoryDB for Redis is a durable, in-memory database service that delivers ultra-fast performance. It is purpose-built for modern applications with microservices architectures.
MemoryDB is compatible with Redis, a popular open source data store, enabling you to quickly build applications using the same flexible and friendly Redis data structures, APIs, and commands that they already use today. With MemoryDB, all of your data is stored in memory, which enables you to achieve microsecond read and single-digit millisecond write latency and high throughput. MemoryDB also stores data durably across multiple Availability Zones (AZs) using a Multi-AZ transactional log to enable fast failover, database recovery, and node restarts.
Delivering both in-memory performance and Multi-AZ durability, MemoryDB can be used as a high- performance primary database for your microservices applications, eliminating the need to separately manage both a cache and durable database.
Topics
• Features of MemoryDB (p. 1)
• MemoryDB core components (p. 2)
• Related services (p. 4)
• Choosing Regions and Availability Zones (p. 4)
• Accessing MemoryDB (p. 8)
• MemoryDB security (p. 9)
Features of MemoryDB
MemoryDB for Redis is a durable, in-memory database service that delivers ultra-fast performance.
Features of MemoryDB include:
• Strong consistency for primary nodes and guaranteed eventual consistency for replica nodes. For more information, see Consistency (p. 63).
• Microsecond read and single-digit millisecond write latencies with up to 160 million TPS per cluster.
• Flexible and friendly Redis data structures and APIs. Easily build new applications or migrate existing Redis applications with almost no modification.
• Data durability using a Multi-AZ transactional log providing fast database recovery and restart.
• Multi-AZ availability with automatic failover, and detection of and recovery from node failures.
• Easily scale horizontally by adding and removing nodes or vertically by moving to larger or smaller node types. You can scale write throughput by adding shards and scale read throughput by adding replicas.
• Read-after-write consistency for primary nodes and guaranteed eventual consistency for replica nodes.
• MemoryDB supports encryption in transit, encryption at rest and authentication of users via Authenticating users with Access Control Lists (ACLs) (p. 144).
• Automatic snapshots in Amazon S3 with retention for up to 35 days.
• Support for up to 500 nodes and more than 100 TB of storage per cluster (with 1 replica per shard).
• Encryption in-transit with TLS and encryption at-rest with AWS KMS keys.
• User authentication and authorization with Redis Authenticating users with Access Control Lists (ACLs) (p. 144).
MemoryDB core components
• Support for AWS Graviton2 instance types.
• Integration with other AWS services such as CloudWatch, Amazon VPC, CloudTrail, and Amazon SNS for monitoring, security, and notifications.
• Fully-managed software patching and upgrades.
• AWS Identity and Access Management (IAM) integration and tag-based access control for management APIs.
MemoryDB core components
Following, you can find an overview of the major components of a MemoryDB deployment.
Topics
• Clusters (p. 2)
• Nodes (p. 3)
• Shards (p. 3)
• Parameter groups (p. 3)
• Subnet Groups (p. 4)
• Access Control Lists (p. 4)
• Users (p. 4)
Clusters
A cluster is a collection of one or more nodes serving a single dataset. A MemoryDB dataset is
partitioned into shards, and each shard has a primary node and up to 5 optional replica nodes. A primary node serves read and write requests, while a replica only serves read requests. A primary node can failover to a replica node, promoting that replica to the new primary node for that shard. MemoryDB runs Redis as its database engine, and when you create a cluster, you specify the Redis version for your cluster. You can create and modify a cluster using the AWS CLI, the MemoryDB API, or the AWS Management Console.
Each MemoryDB cluster runs a Redis engine version. Each Redis engine version has its own supported features. Additionally, each Redis engine version has a set of parameters in a parameter group that control the behavior of the clusters that it manages.
The computation and memory capacity of a cluster is determined by its node type. You can select the node type that best meets your needs. If your needs change over time, you can change node types. For information, see Supported node types (p. 25).
NoteFor pricing information on MemoryDB node types, see MemoryDB pricing.
You run a cluster on a virtual private cloud (VPC) using the Amazon Virtual Private Cloud (Amazon VPC) service. When you use a VPC, you have control over your virtual networking environment. You can choose your own IP address range, create subnets, and configure routing and access control lists. MemoryDB manages snapshots, software patching, automatic failure detection, and recovery. There's no additional cost to run your cluster in a VPC. For more information on using Amazon VPC with MemoryDB, see MemoryDB and Amazon VPC (p. 207).
Many MemoryDB operations are targeted at clusters:
• Creating a cluster
• Modifying a cluster
Nodes
• Taking snapshots of a cluster
• Deleting a cluster
• Viewing the elements in a cluster
• Adding or removing cost allocation tags to and from a cluster
For more detailed information, see the following related topics:
• Managing clusters (p. 27) and Managing nodes (p. 24) Information about clusters, nodes, and related operations.
• Resilience in MemoryDB for Redis (p. 61)
Information about improving the fault tolerance of your clusters.
Nodes
A node is the smallest building block of a MemoryDB deployment and runs using an Amazon EC2 instance. Each node runs the Redis version that was chosen when you created your cluster. A node belongs to a shard which belongs to a cluster.
Each node runs an instance of the engine at the version chosen when you created your cluster. If necessary, you can scale the nodes in a cluster up or down to a different type. For more information, see Scaling (p. 103).
Every node within a cluster is the same node type. Multiple types of nodes are supported, each with varying amounts of memory. For a list of supported node types, see Supported node types (p. 25).
For more information on nodes, see Managing nodes (p. 24).
Shards
A shard is a grouping of one to 6 nodes, with one serving as the primary write node and the other 5 serving as read replicas. A MemoryDB cluster always has at least one shard.
MemoryDB clusters can have up to 500 shards, with your data partitioned across the shards. For example, you can choose to configure a 500 node cluster that ranges between 83 shards (one primary and 5 replicas per shard) and 500 shards (single primary and no replicas). Make sure there are enough available IP addresses to accommodate the increase. Common pitfalls include the subnets in the subnet group have too small a CIDR range or the subnets are shared and heavily used by other clusters.
A multiple node shard implements replication by having one read/write primary node and 1–5 replica nodes. For more information, see Understanding MemoryDB replication (p. 62).
For more information on shards, see Working with shards (p. 44).
Parameter groups
Parameter groups are an easy way to manage runtime settings for Redis on your cluster. Parameters are used to control memory usage, item sizes, and more. A MemoryDB parameter group is a named collection of engine-specific parameters that you can apply to a cluster, and all of the nodes in that cluster are configured in exactly the same way.
For more detailed information on MemoryDB parameter groups, see Configuring engine parameters using parameter groups (p. 118).
Subnet groups
Subnet Groups
A subnet group is a collection of subnets (typically private) that you can designate for your clusters running in an Amazon Virtual Private Cloud (VPC) environment.
When you create a cluster in an Amazon VPC, you can specify a subnet group or use the default one provided. MemoryDB uses that subnet group to choose a subnet and IP addresses within that subnet to associate with your nodes.
For more detailed information on MemoryDB subnet groups, see Subnets and subnet groups (p. 198).
Access Control Lists
An Access control list is a collection of one or more users. Access strings follow the Redis ACL rules to authorize user access to Redis commands and data.
For more detailed information on MemoryDB Access Control Lists, see Authenticating users with Access Control Lists (ACLs) (p. 144).
Users
A user has a user name and password, and is used to access data and issue commands on your
MemoryDB cluster. A user is a member of an Access Control List (ACL), which you can use to determine permissions for that user on MemoryDB clusters. For more information, see Authenticating users with Access Control Lists (ACLs) (p. 144)
Related services
ElastiCache for Redis
When deciding whether to use MemoryDB for Redis or ElastiCache for Redis consider the following comparisons:
• MemoryDB for Redis is a durable, in-memory database for workloads that require an ultra-fast, primary database. You should consider using MemoryDB if your workload requires a durable database that provides ultra-fast performance (microsecond read and single-digit millisecond write latency).
MemoryDB may also be a good fit for your use case if you want to build an application using Redis data structures and APIs with a primary, durable database. Finally, you should consider using
MemoryDB to simplify your application architecture and lower costs by replacing usage of a database with a cache for durability and performance.
• ElastiCache for Redis is a service that is commonly used to cache data from other databases and data stores using Redis. You should consider ElastiCache for Redis for caching workloads where you want to accelerate data access with your existing primary database or data store (microsecond read and write performance). You should also consider ElastiCache for Redis for use cases where you want to use the Redis data structures and APIs to access data stored in a primary database or data store.
Choosing Regions and Availability Zones
AWS Cloud computing resources are housed in highly available data center facilities. To provide
additional scalability and reliability, these data center facilities are located in different physical locations.
These locations are categorized by regions and Availability Zones.
Choosing Regions and Availability Zones
AWS Regions are large and widely dispersed into separate geographic locations. Availability Zones are distinct locations within an AWS Region that are engineered to be isolated from failures in other Availability Zones. They provide inexpensive, low-latency network connectivity to other Availability Zones in the same AWS Region.
Important
Each region is completely independent. Any MemoryDB activity you initiate (for example, creating clusters) runs only in your current default region.
To create or work with a cluster in a specific region, use the corresponding regional service endpoint. For service endpoints, see Supported Regions & endpoints (p. 7).
Locating your nodes
Locating your nodes
Any cluster that has at least one replica must be spread across AZs. The only way you can locate everything within a single AZ is with a cluster comprised of single-node shards.
By locating the nodes in different AZs, MemoryDB eliminates the chance that a failure, such as a power outage, in one AZ will cause loss of availability.
• Creating a MemoryDB cluster (p. 14)
• Modifying a MemoryDB cluster (p. 33)
Supported Regions & endpoints
Supported Regions & endpoints
MemoryDB for Redis is available in multiple AWS Regions. This means that you can launch MemoryDB clusters in locations that meet your requirements. For example, you can launch in the AWS Region closest to your customers, or launch in a particular AWS Region to meet certain legal requirements.
By default, the AWS SDKs, AWS CLI, MemoryDB API, and MemoryDB console reference the US-East (N.
Virginia) Region. As MemoryDB expands availability to new regions, new endpoints for these regions are also available to use in your HTTP requests, the AWS SDKs, AWS CLI, and the console.
Each Region is designed to be completely isolated from the other Regions. Within each region are multiple Availability Zones (AZ). By launching your nodes in different AZs you achieve the greatest possible fault tolerance. For more information on regions and Availability Zones, see Choosing Regions and Availability Zones (p. 4) at the beginning of this topic.
Regions where MemoryDB is supported
Region Name/Region Endpoint Protocol
US East (Ohio) Region us-east-2
memory-db.us-
east-2.amazonaws.com HTTPS
US East (N. Virginia) Region
us-east-1
memory-db.us-
east-1.amazonaws.com HTTPS
US West (N. California) Region
us-west-1
memory-db.us-
west-1.amazonaws.com HTTPS
US West (Oregon) Region
us-west-2
memory-db.us-
west-2.amazonaws.com HTTPS
Canada (Central) Region ca-central-1
memory-db.ca-
central-1.amazonaws.com HTTPS
Asia Pacific (Hong Kong) Region ap-east-1
memory-db.ap-
eastl-1.amazonaws.com HTTPS
Asia Pacific (Mumbai) Region
ap-south-1
memory-db.ap-
south-1.amazonaws.com HTTPS
Asia Pacific (Tokyo) Region
ap-northeast-1
memory-db.ap-
northeast-1.amazonaws.com HTTPS
Asia Pacific (Seoul) Region
ap-northeast-2
memory-db.ap-
northeast-2.amazonaws.com HTTPS
Accessing MemoryDB
Region Name/Region Endpoint Protocol
Asia Pacific (Singapore) Region
ap-southeast-1
memory-db.ap-
southeast-1.amazonaws.com HTTPS
Asia Pacific (Sydney) Region
ap-southeast-2
memory-db.ap-
southeast-2.amazonaws.com HTTPS
Europe (Frankfurt) Region
eu-central-1
memory-db.eu-
central-1.amazonaws.com HTTPS
Europe (Ireland) Region eu-west-1
memory-db.eu-
west-1.amazonaws.comHTTPS
Europe (London) Region eu-west-2
memory-db.eu-
west-2.amazonaws.com HTTPS
Europe (Stockholm) Region
eu-north-1
memory-db.eu-
north-1.amazonaws.com HTTPS
South America (São Paulo) Region sa-east-1
memory-db.sa-
east-1.amazonaws.com HTTPS
China (Beijing) Region cn-north-1
memory-db.cn-
north-1.amazonaws.com.cn HTTPS
China (Ningxia) Region cn-northwest-1
memory-db.cn-
northwest-1.amazonaws.com.cn HTTPS
For a table of AWS products and services by region, see Products and services by Region.
For a table of supported Availability Zones within Regions, see Subnets and subnet groups (p. 198).
Accessing MemoryDB
Each MemoryDB cluster endpoint contains an address and a port. This cluster endpoint supports the Redis Cluster protocol to allow clients to discover the specific roles, ip addresses and slots for each node in the cluster. When a primary node fails and a replica is promoted in its place, you can connect to cluster endpoint to discover the new primary using Redis Cluster protocol.
You need to connect to the cluster endpoint to discover node endpoints using cluster nodes or cluster slots command. After discovering the right node for a key, you can connect directly to the node for read/
write requests. A Redis client can use the cluster endpoint to automatically connect to the correct node.
MemoryDB security
To troubleshoot specific nodes in a cluster, you can also use node-specific endpoints, but these are not necessary for normal usage.
To find a cluster's endpoint, see the following:
• Finding the Endpoint for a MemoryDB Cluster (AWS CLI) (p. 43)
• Finding the Endpoint for a MemoryDB Cluster (MemoryDB API) (p. 44)
For connecting to nodes or clusters, see Connecting to MemoryDB nodes using redis-cli (p. 21).
MemoryDB security
Security for MemoryDB is managed at three levels:
• To control who can perform management actions on MemoryDB clusters and nodes, you use AWS Identity and Access Management (IAM). When you connect to AWS using IAM credentials, your AWS account must have IAM policies that grant the permissions required to perform operations. For more information, see Identity and access management in MemoryDB for Redis (p. 153)
• To control access levels to clusters, you create users with specified permissions and assign them to the Access Control Lists (ACL). The ACL, in turn, is then associated with one or more clusters. For more information, see Authenticating users with Access Control Lists (ACLs) (p. 144).
• MemoryDB clusters must be created in a virtual private cloud (VPC) based on the Amazon VPC service.
To control which devices and Amazon EC2 instances can open connections to the endpoint and port of the node for MemoryDB clusters in a VPC, you use a VPC security group. You can make these endpoint and port connections using Transport Layer Security (TLS)/Secure Sockets Layer (SSL). In addition, firewall rules at your company can control whether devices running at your company can open connections to a MemoryDB cluster. For more information on VPCs, see MemoryDB and Amazon VPC (p. 207).
For information about configuring security, see Security in MemoryDB for Redis (p. 140).
Sign up for AWS
Before you begin
If you haven't already done so, the following topics describe one-time actions you must take to start using MemoryDB for Redis.
Topics
• Sign up for AWS (p. 10)
• Create an IAM user (p. 10)
Sign up for AWS
If you do not have an AWS account, complete the following steps to create one.
To sign up for an AWS account
1. Open https://portal.aws.amazon.com/billing/signup.
2. Follow the online instructions.
Part of the sign-up procedure involves receiving a phone call and entering a verification code on the phone keypad.
Create an IAM user
To create an administrator user for yourself and add the user to an administrators group (console)
1. Sign in to the IAM console as the account owner by choosing Root user and entering your AWS account email address. On the next page, enter your password.
Note
We strongly recommend that you adhere to the best practice of using the Administrator IAM user that follows and securely lock away the root user credentials. Sign in as the root user only to perform a few account and service management tasks.
2. In the navigation pane, choose Users and then choose Add user.
3. For User name, enter Administrator.
4. Select the check box next to AWS Management Console access. Then select Custom password, and then enter your new password in the text box.
5. (Optional) By default, AWS requires the new user to create a new password when first signing in. You can clear the check box next to User must create a new password at next sign-in to allow the new user to reset their password after they sign in.
6. Choose Next: Permissions.
7. Under Set permissions, choose Add user to group.
8. Choose Create group.
9. In the Create group dialog box, for Group name enter Administrators.
10. Choose Filter policies, and then select AWS managed - job function to filter the table contents.
11. In the policy list, select the check box for AdministratorAccess. Then choose Create group.
Create an IAM user
NoteYou must activate IAM user and role access to Billing before you can use the
AdministratorAccess permissions to access the AWS Billing and Cost Management console. To do this, follow the instructions in step 1 of the tutorial about delegating access to the billing console.
12. Back in the list of groups, select the check box for your new group. Choose Refresh if necessary to see the group in the list.
13. Choose Next: Tags.
14. (Optional) Add metadata to the user by attaching tags as key-value pairs. For more information about using tags in IAM, see Tagging IAM entities in the IAM User Guide.
15. Choose Next: Review to see the list of group memberships to be added to the new user. When you are ready to proceed, choose Create user.
You can use this same process to create more groups and users and to give your users access to your AWS account resources. To learn about using policies that restrict user permissions to specific AWS resources, see Access management and Example policies.
Once you have done the preceding, you can find more information on setting up permissions and access specific to MemoryDB, see Overview of managing access permissions to your MemoryDB resources (p. 155).
Setting up
Getting started with MemoryDB
This exercise leads you through the steps to create, grant access to, connect to, and finally delete a MemoryDB cluster using the MemoryDB Management Console.
Topics
• Setting up (p. 12)
• Step 1: Create a cluster (p. 14)
• Step 2: Authorize access to the cluster (p. 19)
• Step 3: Connect to the cluster (p. 21)
• Step 4: Deleting a cluster (p. 22)
• Where do I go from here? (p. 23)
Setting up
Following, you can find topics that describe the one-time actions you must take to start using MemoryDB.
Topics
• Getting an AWS Access Key (p. 12)
• Configuring Your Credentials (p. 13)
• Downloading and Configuring the AWS CLI (p. 13)
• Set up your permissions (new MemoryDB users only) (p. 13)
Getting an AWS Access Key
Before you can access MemoryDB programmatically or through the AWS Command Line Interface (AWS CLI), you must have an AWS access key. You don't need an access key if you plan to use the MemoryDB console only. Access keys consist of an access key ID and secret access key, which are used to sign programmatic requests that you make to AWS. If you don't have access keys, you can create them from the AWS Management Console. As a best practice, do not use the AWS account root user access keys for any task where it's not required. Instead, create a new administrator IAM user with access keys for yourself. The only time that you can view or download the secret access key is when you create the keys.
You cannot recover them later. However, you can create new access keys at any time. You must also have permissions to perform the required IAM actions. For more information, see Permissions Required to Access IAM Resources in the IAM User Guide.
To create access keys for an IAM user
1. Sign in to the AWS Management Console and open the IAM console at https://
console.aws.amazon.com/iam/.
2. In the left navigation pane, choose Users.
3. Choose the name of the user whose access keys you want to create, and then choose the Security credentials tab.
4. In the Access keys section, choose Create access key.
5. To view the new access key pair, choose Show. You will not have access to the secret access key again after this page closes. Your credentials will look something like this:
Configuring Your Credentials
• Access key ID: AKIAIOSFODNN7EXAMPLE
• Secret access key: wJalrXUtnFEMI/K7MDENG/bPxRfiCYEXAMPLEKEY
6. To download the key pair, choose Download .csv file. Store the keys in a secure location. You will not have access to the secret access key again after this page closes.
7. Keep the keys confidential in order to protect your AWS account and never email them. Do not share them outside your organization, even if an inquiry appears to come from Amazon or Amazon.com.
No one who legitimately represents Amazon will ever ask you for your secret key.
8. After you download the .csv file, choose Close. When you create an access key, the key pair is active by default, and you can use the pair right away.
Related topics:
• What is IAM in the IAM User Guide.
• AWS Security Credentials in AWS General Reference.
Configuring Your Credentials
Before you can access MemoryDB programmatically or through the AWS CLI, you must configure your credentials to enable authorization for your applications.
There are several ways to do this. For example, you can manually create the credentials file to store your access key ID and secret access key. You also can use the aws configure command of the AWS CLI to automatically create the file. Alternatively, you can use environment variables. For more information about configuring your credentials, see the programming-specific AWS SDK developer guide at Tools to Build on AWS.
Downloading and Configuring the AWS CLI
The AWS CLI is available at http://aws.amazon.com/cli. It runs on Windows, MacOS and Linux. After you download the AWS CLI, follow these steps to install and configure it:
1. Go to the AWS Command Line Interface User Guide.
2. Follow the instructions for Installing the AWS CLI and Configuring the AWS CLI.
Set up your permissions (new MemoryDB users only)
MemoryDB for Redis creates and uses service-linked roles to provision resources and access other AWS resources and services on your behalf. For MemoryDB to create a service-linked role for you, use the AWS-managed policy named AmazonMemoryDBFullAccess. This role comes preprovisioned with permission that the service requires to create a service-linked role on your behalf.
You might decide not to use the default policy and instead to use a custom-managed policy. In this case, make sure that you have either permissions to call iam:createServiceLinkedRole or that you have created the MemoryDB service-linked role.
For more information, see the following:
• Creating a New Policy (IAM)
• AWS-managed (predefined) policies for MemoryDB for Redis (p. 172)
• Using Service-Linked Roles for Amazon MemoryDB for Redis (p. 163)
Step 1: Create a cluster
Step 1: Create a cluster
Before creating a cluster for production use, you obviously need to consider how you will configure the cluster to meet your business needs. Those issues are addressed in the Preparing a cluster (p. 28)
section. For the purposes of this Getting Started exercise, you can accept the default configuration values where they apply.
The cluster you create will be live, and not running in a sandbox. You will incur the standard MemoryDB usage fees for the instance until you delete it. The total charges will be minimal (typically less than a dollar) if you complete the exercise described here in one sitting and delete your cluster when you are finished. For more information about MemoryDB usage rates, see MemoryDB.
Your cluster is launched in a virtual private cloud (VPC) based on the Amazon VPC service.
Creating a MemoryDB cluster
The following examples show how to create a cluster using the AWS Management Console, AWS CLI and MemoryDB API.
Creating a cluster (Console)
To create a cluster using the MemoryDB console
1. Sign in to the AWS Management Console and open the MemoryDB for Redis console at https://
console.aws.amazon.com/memorydb/.
2. Choose Clusters In the left navigation pane and then choose Create cluster.
3. Complete the Cluster info section.
a. In Name, enter a name for your cluster.
Cluster naming constraints are as follows:
• Must contain 1–40 alphanumeric characters or hyphens.
• Must begin with a letter.
• Can't contain two consecutive hyphens.
• Can't end with a hyphen.
b. In the Description box, enter a description for this cluster.
4. Complete the Subnet groups section:
• For Subnet groups, create a new subnet group or choose an existing one from the available list that you want to apply to this cluster. If you are creating a new one:
• Enter a Name
• Enter a Description
• If you enabled Multi-AZ, the subnet group must contain at least two subnets that reside in different availability zones. For more information, see Subnets and subnet groups (p. 198).
• If you are creating a new subnet group and do not have an existing VPC, you will be asked to create a VPC. For more information, see What is Amazon VPC? in the Amazon VPC User Guide.
5. Complete the Cluster settings section:
a. For Redis version compatibility, accept the default 6.2.
b. For Port, accept the default Redis port of 6379 or, if you have a reason to use a different port, enter the port number..
c. For Parameter group, accept the default.memorydb-redis6 parameter group.
Creating a MemoryDB cluster
Parameter groups control the runtime parameters of your cluster. For more information on parameter groups, see Redis specific parameters (p. 133).
d. For Node type, choose a value for the node type (along with its associated memory size) that you want.
e. For Number of shards, choose the number of shards that you want for this cluster. For higher availability of your clusters, we recommend that you add at least 2 shards.
You can change the number of shards in your cluster dynamically. For more information, see Scaling MemoryDB clusters (p. 104).
f. For Replicas per shard, choose the number of read replica nodes that you want in each shard.
The following restrictions exist:
• If you have Multi-AZ enabled, make sure that you have at least one replica per shard.
• The number of replicas is the same for each shard when creating the cluster using the console.
g. Choose Next
h. Complete the Advanced settings section:
i. For Security groups, choose the security groups that you want for this cluster. A security group acts as a firewall to control network access to your cluster. You can use the default security group for your VPC or create a new one.
For more information on security groups, see Security groups for your VPC in the Amazon VPC User Guide.
ii. To encrypt your data, you have the following options:
• Encryption at rest – Enables encryption of data stored on disk. For more information, see Encryption at Rest.
NoteYou have the option to supply an encryption key other than default by choosing Customer Managed AWS-owned KMS key and choosing the key.
• Encryption in-transit – Enables encryption of data on the wire. If you select no encryption, then an open Access control list called “open access” will be created with a default user. For more information, see Authenticating users with Access Control Lists (ACLs) (p. 144).
iii. For Snapshot, optionally specify a snapshot retention period and a snapshot window. By default, Enable automatic snapshots is pre-selected.
iv. For Maintenance window optionally specify a maintenance window. The maintenance window is the time, generally an hour in length, each week when MemoryDB schedules system maintenance for your cluster. You can allow MemoryDB to choose the day and time for your maintenance window (No preference), or you can choose the day, time, and duration yourself (Specify maintenance window). If you choose Specify maintenance window from the lists, choose the Start day, Start time, and Duration (in hours) for your maintenance window. All times are UCT times.
For more information, see Managing maintenance (p. 58).
v. For Notifications, choose an existing Amazon Simple Notification Service (Amazon SNS) topic, or choose Manual ARN input and enter the topic's Amazon Resource Name (ARN).
Amazon SNS allows you to push notifications to Internet-connected smart devices. The default is to disable notifications. For more information, see https://aws.amazon.com/sns/.
vi. For Tags, you can optionally apply tags to search and filter your clusters or track your AWS costs.
Creating a MemoryDB cluster
i. Review all your entries and choices, then make any needed corrections. When you're ready, choose Create cluster to launch your cluster, or Cancel to cancel the operation.
As soon as your cluster's status is available, you can grant EC2 access to it, connect to it, and begin using it. For more information, see Step 2: Authorize access to the cluster (p. 19)
Important
As soon as your cluster becomes available, you're billed for each hour or partial hour that the cluster is active, even if you're not actively using it. To stop incurring charges for this cluster, you must delete it. See Step 4: Deleting a cluster (p. 22).
Creating a MemoryDB cluster
Creating a cluster (AWS CLI)
To create a cluster using the AWS CLI, see create-cluster. The following is an example:
For Linux, macOS, or Unix:
aws memorydb create-cluster \ --cluster-name my-cluster \ --node-type db.r6g.large \ --acl-name my-acl \
--subnet-group my-sg
For Windows:
aws memorydb create-cluster ^ --cluster-name my-cluster ^ --node-type db.r6g.large ^ --acl-name my-acl ^ --subnet-group my-sg
You should get the following JSON response:
{ "Cluster": {
"Name": "my-cluster", "Status": "creating", "NumberOfShards": 1,
"AvailabilityMode": "MultiAZ", "ClusterEndpoint": {
"Port": 6379 },
"NodeType": "db.r6g.large", "EngineVersion": "6.2", "EnginePatchVersion": "6.2.4",
"ParameterGroupName": "default.memorydb-redis6", "ParameterGroupStatus": "in-sync",
"SubnetGroupName": "my-sg", "TLSEnabled": true,
"ARN": "arn:aws:memorydb:us-east-1:xxxxxxxxxxxxxx:cluster/my-cluster", "SnapshotRetentionLimit": 0,
"MaintenanceWindow": "wed:03:00-wed:04:00", "SnapshotWindow": "04:30-05:30",
"ACLName": "my-acl",
"AutoMinorVersionUpgrade": true }
}
You can begin using the cluster once its status changes to available.
Important
As soon as your cluster becomes available, you're billed for each hour or partial hour that the cluster is active, even if you're not actively using it. To stop incurring charges for this cluster, you must delete it. See Step 4: Deleting a cluster (p. 22).
Creating a cluster (MemoryDB API)
To create a cluster using the MemoryDB API, use the CreateCluster action.
Creating a MemoryDB cluster
Important
As soon as your cluster becomes available, you're billed for each hour or partial hour that the cluster is active, even if you're not using it. To stop incurring charges for this cluster, you must delete it. See Step 4: Deleting a cluster (p. 22).
Step 2: Authorize access to the cluster
Step 2: Authorize access to the cluster
This section assumes that you are familiar with launching and connecting to Amazon EC2 instances. For more information, see the Amazon EC2 Getting Started Guide.
All MemoryDB clusters are designed to be accessed from an Amazon EC2 instance. The most common scenario is to access a MemoryDB cluster from an Amazon EC2 instance in the same Amazon Virtual Private Cloud (Amazon VPC), which will be the case for this exercise.
Before you can connect to a cluster from an EC2 instance, you must authorize the EC2 instance to access the cluster.
The most common use case is when an application deployed on an EC2 instance needs to connect to a cluster in the same VPC. The simplest way to manage access between EC2 instances and clusters in the same VPC is to do the following:
1. Create a VPC security group for your cluster. This security group can be used to restrict access to the clusters. For example, you can create a custom rule for this security group that allows TCP access using the port you assigned to the cluster when you created it and an IP address you will use to access the cluster.
The default port for MemoryDB clusters is 6379.
2. Create a VPC security group for your EC2 instances (web and application servers). This security group can, if needed, allow access to the EC2 instance from the Internet via the VPC's routing table. For example, you can set rules on this security group to allow TCP access to the EC2 instance over port 22.
3. Create custom rules in the security group for your cluster that allow connections from the security group you created for your EC2 instances. This would allow any member of the security group to access the clusters.
To create a rule in a VPC security group that allows connections from another security group 1. Sign in to the AWS Management Console and open the Amazon VPC console at https://
console.aws.amazon.com/vpc.
2. In the left navigation pane, choose Security Groups.
3. Select or create a security group that you will use for your clusters. Under Inbound Rules, select Edit Inbound Rules and then select Add Rule. This security group will allow access to members of another security group.
4. From Type choose Custom TCP Rule.
a. For Port Range, specify the port you used when you created your cluster.
The default port for MemoryDB clusters is 6379.
b. In the Source box, start typing the ID of the security group. From the list select the security group you will use for your Amazon EC2 instances.
5. Choose Save when you finish.
Once you have enabled access, you are now ready to connect to the cluster, as discussed in the next section.
For information on accessing your MemoryDB cluster from a different Amazon VPC, a different AWS Region, or even your corporate network, see the following:
• Access Patterns for Accessing a MemoryDB Cluster in an Amazon VPC (p. 210)
Step 2: Authorize access to the cluster
• Accessing MemoryDB resources from outside AWS (p. 38)
Step 3: Connect to the cluster
Step 3: Connect to the cluster
Before you continue, complete Step 2: Authorize access to the cluster (p. 19).
This section assumes that you've created an Amazon EC2 instance and can connect to it. For instructions on how to do this, see the Amazon EC2 Getting Started Guide.
An Amazon EC2 instance can connect to a cluster only if you have authorized it to do so.
Find your cluster endpoint
When your cluster is in the available state and you've authorized access to it, you can log in to an Amazon EC2 instance and connect to the cluster. To do so, you must first determine the endpoint.
To further explore how to find your endpoints, see the following:
• Finding the Endpoint for a MemoryDB Cluster (AWS CLI) (p. 43)
• Finding the Endpoint for a MemoryDB Cluster (MemoryDB API) (p. 44)
Connect to a MemoryDB cluster (Linux)
Now that you have the endpoint you need, you can log in to an EC2 instance and connect to the cluster.
In the following example, you use the cli utility to connect to a cluster. The latest version of cli also supports SSL/TLS for connecting encryption/authentication enabled clusters.
Connecting to MemoryDB nodes using redis-cli
To access data from MemoryDB nodes, you use clients that work with Secure Socket Layer (SSL). You can also use redis-cli with TLS/SSL on Amazon Linux and Amazon Linux 2.
To use redis-cli to connect to a MemoryDB cluster on Amazon Linux 2 or Amazon Linux 1. Download and compile the redis-cli utility. This utility is included in the Redis software distribution.
2. At the command prompt of your EC2 instance, type the following commands:
Amazon Linux 2
$ sudo yum -y install openssl-devel gcc
$ wget http://download.redis.io/redis-stable.tar.gz
$ tar xvzf redis-stable.tar.gz
$ cd redis-stable
$ make distclean
$ make redis-cli BUILD_TLS=yes
$ sudo install -m 755 src/redis-cli /usr/local/bin/
Amazon Linux
$ sudo yum install gcc jemalloc-devel openssl-devel tcl tcl-devel clang wget
$ wget http://download.redis.io/redis-stable.tar.gz
$ tar xvzf redis-stable.tar.gz
$ cd redis-stable
$ make redis-cli CC=clang BUILD_TLS=yes
$ sudo install -m 755 src/redis-cli /usr/local/bin/
Step 4: Deleting a cluster
3. After this, it is recommended that you run the optional make-test command.
4. At the command prompt of your EC2 instance, type the following command, substituting the endpoint of your cluster and port for what is shown in this example.
src/redis-cli -c -h Cluster Endpoint --tls -p 6379
Step 4: Deleting a cluster
As long as a cluster is in the available state, you are being charged for it, whether or not you are actively using it. To stop incurring charges, delete the cluster.
Warning
When you delete a MemoryDB cluster, your manual snapshots are retained. You can also create a final snapshot before the cluster is deleted. Automatic snapshots are not retained. For more information, see Snapshot and restore (p. 78).
Using the AWS Management Console
The following procedure deletes a single cluster from your deployment. To delete multiple clusters, repeat the procedure for each cluster that you want to delete. You do not need to wait for one cluster to finish deleting before starting the procedure to delete another cluster.
To delete a cluster
1. Sign in to the AWS Management Console and open the MemoryDB for Redis console at https://
console.aws.amazon.com/memorydb/.
2. To choose the cluster to delete, choose the radio button next to the cluster's name from the list of clusters. In this case, the name of the cluster you created at Step 1: Create a cluster (p. 14).
3. For Actions, choose Delete.
4. First choose whether to create a snapshot of the cluster before deleting it and then enter delete in the confirmation box and Delete to delete the cluster, or choose Cancel to keep the cluster.
If you chose Delete, the status of the cluster changes to deleting.
As soon as your cluster is no longer listed in the list of clusters, you stop incurring charges for it.
Using the AWS CLI
The following code deletes the cluster my-cluster. In this case, substitute my-cluster with the name of the cluster you created at Step 1: Create a cluster (p. 14).
aws memorydb delete-cluster --cluster-name my-cluster
The delete-cluster CLI operation only deletes one cluster. To delete multiple clusters, call delete- cluster for each cluster that you want to delete. You do not need to wait for one cluster to finish deleting before deleting another.
For Linux, macOS, or Unix:
aws memorydb delete-cluster \ --cluster-name my-cluster \ --region us-east-1
Where do I go from here?
For Windows:
aws memorydb delete-cluster ^ --cluster-name my-cluster ^ --region us-east-1
For more information, see delete-cluster.
Using the MemoryDB API
The following code deletes the cluster my-cluster. In this case, substitute my-cluster with the name of the cluster you created at Step 1: Create a cluster (p. 14).
https://memory-db.us-east-1.amazonaws.com/
?Action=DeleteCluster &ClusterName=my-cluster &Region=us-east-1 &SignatureVersion=4
&SignatureMethod=HmacSHA256 &Timestamp=20210802T220302Z
&X-Amz-Algorithm=Amazon4-HMAC-SHA256 &X-Amz-Date=20210802T220302Z
&X-Amz-SignedHeaders=Host &X-Amz-Expires=20210802T220302Z &X-Amz-Credential=<credential>
&X-Amz-Signature=<signature>
The DeleteCluster API operation only deletes one cluster. To delete multiple clusters, call
DeleteCluster for each cluster that you want to delete. You do not need to wait for one cluster to finish deleting before deleting another.
For more information, see DeleteCluster.
Where do I go from here?
Now that you have tried the Getting Started exercise, you can explore the following sections to learn more about MemoryDB and available tools:
• Getting started with AWS
• Tools for Amazon Web Services
• AWS Command Line Interface
• MemoryDB for Redis API Reference.
MemoryDB nodes and shards
Managing nodes
A node is the smallest building block of a MemoryDB for Redis deployment. A node belongs to a shard which belongs to a cluster. Each node runs the engine version that was chosen when the cluster was created or last modified. Each node has its own Domain Name Service (DNS) name and port. Multiple types of MemoryDB nodes are supported, each with varying amounts of associated memory and computational power.
Topics
• MemoryDB nodes and shards (p. 24)
• Supported node types (p. 25)
• Replacing nodes (p. 26)
Some important operations involving nodes are the following:
• Adding / Removing nodes from a cluster (p. 35)
• Scaling (p. 103)
• Finding connection endpoints (p. 42)
MemoryDB nodes and shards
A shard is a hierarchical arrangement of nodes, each wrapped in a cluster. Shards support replication.
Within a shard, one node functions as the read/write primary node. All the other nodes in a shard function as read-only replicas of the primary node. MemoryDB supports multiple shards within a cluster.
This support enables partitioning of your data in a MemoryDB cluster.
MemoryDB supports replication via shards. The API operation DescribeClusters lists the shards with the member nodes, the node names, endpoints and also other information.
After a MemoryDB cluster is created, it can be altered (scaled in or out). For more information, see Scaling (p. 103) and Replacing nodes (p. 26).
When you create a new cluster, you can seed it with data from the old cluster so it doesn't start out empty. Doing this can be helpful if you need change your node type, engine version or migrate from Amazon ElastiCache for Redis. For more information, see Making manual snapshots (p. 80) and Restoring from a snapshot (p. 94).
Supported node types
Supported node types
MemoryDB supports the following node types.
• General purpose Current generation:
Node
typevCPUs Memory (GiB) Network performance
db.t4g.small2 1.37 Up to 5 gigabit
db.t4g.medium2 3.09 Up to 5 gigabit
• Memory optimized Current generation:
NodetypevCPUs Memory (GiB) Network performance
db.r6g.large2 13.07 Up to 10 gigabit
db.r6g.xlarge4 26.32 Up to 10 gigabit
db.r6g.2xlarge8 52.82 Up to 10 gigabit
db.r6g.4xlarge16 105.81 Up to 10 gigabit
db.r6g.8xlarge32 209.55 12 gigabit
db.r6g.12xlarge48 317.77 20 gigabit
db.r6g.16xlarge64 419.10 25 gigabit
All node types are created in a virtual private cloud (VPC).
Replacing nodes
Replacing nodes
MemoryDB frequently upgrades its fleet with patches and upgrades, usually seamlessly. However, from time to time we need to relaunch your MemoryDB nodes to apply mandatory OS updates to the underlying host. These replacements are required to apply upgrades that strengthen security, reliability, and operational performance.
You have the option to manage these replacements yourself at any time before the scheduled node replacement window. When you manage a replacement yourself, your instance receives the OS update when you relaunch the node and your scheduled node replacement is canceled. You might continue to receive alerts indicating that the node replacement is to take place. If you've already manually mitigated the need for the maintenance, you can ignore these alerts.
Note
Replacement nodes automatically generated by MemoryDB for Redis may have different IP addresses. You are responsible for reviewing your application configuration to ensure that your nodes are associated with the appropriate IP addresses.
The following list identifies actions you can take when MemoryDB schedules one of your nodes for replacement:
MemoryDB node replacement options
• Do nothing – If you do nothing, MemoryDB replaces the node as scheduled.
If the node is a member of a Multi-AZ cluster, MemoryDB provides improved availability during patching, updates, and other maintenance-related node replacements.
Replacement completes while the cluster serves incoming write requests.
• Change your maintenance window – For scheduled maintenance events, you receive an email or a notification event from MemoryDB. In these cases, if you change your maintenance window before the scheduled replacement time, your node now is replaced at the new time. For more information, see Modifying a MemoryDB cluster (p. 33).
NoteThe ability to change your replacement window by moving your maintenance window is only available when the MemoryDB notification includes a maintenance window. If the notification does not include a maintenance window, you cannot change your replacement window.
For example, let's say it's Thursday, November 9, at 15:00 and the next maintenance window is Friday, November 10, at 17:00. Following are three scenarios with their outcomes:
• You change your maintenance window to Fridays at 16:00, after the current date and time and before the next scheduled maintenance window. The node is replaced on Friday, November 10, at 16:00.
• You change your maintenance window to Saturday at 16:00, after the current date and time and after the next scheduled maintenance window. The node is replaced on Saturday, November 11, at 16:00.
• You change your maintenance window to Wednesday at 16:00, earlier in the week than the current date and time. The node is replaced next Wednesday, November 15, at 16:00.
For instructions, see Managing maintenance (p. 58).
Managing clusters
Most MemoryDB operations are performed at the cluster level. You can set up a cluster with a specific number of nodes and a parameter group that controls the properties for each node. All nodes within a cluster are designed to be of the same node type and have the same parameter and security group settings.
Every cluster must have a cluster identifier. The cluster identifier is a customer-supplied name for the cluster. This identifier specifies a particular cluster when interacting with the MemoryDB API and AWS CLI commands. The cluster identifier must be unique for that customer in an AWS Region.
MemoryDB clusters are designed to be accessed using an Amazon EC2 instance. You can only launch your MemoryDB cluster in a virtual private cloud (VPC) based on the Amazon VPC service, but you can access it from outside AWS. For more information, see Accessing MemoryDB resources from outside AWS (p. 38).
Preparing a cluster
Preparing a cluster
Following, you can find instructions on creating a cluster using the MemoryDB console, the AWS CLI, or the MemoryDB API.
Whenever you create a cluster, it is a good idea to do some preparatory work so you won't need to upgrade or make changes right away.
Topics
• Determining your requirements (p. 28)
Determining your requirements
Preparation
Knowing the answers to the following questions helps make creating your cluster go smoother:
• Make sure to create a subnet group in the same VPC before you start creating a cluster. Alternatively, you can use the default subnet group provided. For more information, see Subnets and subnet groups (p. 198).
MemoryDB is designed to be accessed from within AWS using Amazon EC2. However, if you launch in a VPC based on Amazon VPC, you can provide access from outside AWS. For more information, see Accessing MemoryDB resources from outside AWS (p. 38).
• Do you need to customize any parameter values?
If you do, create a custom parameter group. For more information, see Creating a parameter group (p. 120).
• Do you need to create a VPC security group?
For more information, see Security in Your VPC.
• How do you intend to implement fault tolerance?
For more information, see Mitigating Failures (p. 61).
Topics
• Memory and processor requirements (p. 28)
• MemoryDB cluster configuration (p. 28)
• Scaling requirements (p. 29)
• Access requirements (p. 29)
• Region and Availability Zones (p. 29)
Memory and processor requirements
The basic building block of MemoryDB for Redis is the node. Nodes are configured in shards to form clusters. When determining the node type to use for your cluster, take the cluster’s node configuration and the amount of data you have to store into consideration.
MemoryDB cluster configuration
MemoryDB clusters are comprised of from 1 to 500 shards. The data in a MemoryDB cluster is
partitioned across the shards in the cluster. Your application connects with a MemoryDB cluster using a
Determining your requirements
network address called an Endpoint. In addition to the node endpoints, the MemoryDB cluster itself has an endpoint called the cluster endpoint. Your application can use this endpoint to read from or write to the cluster, leaving the determination of which node to read from or write to up to MemoryDB.
Scaling requirements
All clusters can be scaled up a larger node type. When you scale up a MemoryDB cluster, you can do it online so the cluster remains available or you can seed a new cluster from a snapshot and avoid having the new cluster start out empty.
For more information, see Scaling (p. 103) in this guide.
Access requirements
By design, MemoryDB clusters are accessed from Amazon EC2 instances. Network access to a MemoryDB cluster is limited to the user account that created the cluster. Therefore, before you can access a cluster from an Amazon EC2 instance, you must authorize ingress to the cluster. For detailed instructions, see Step 2: Authorize access to the cluster (p. 19) in this guide.
Region and Availability Zones
By locating your MemoryDB clusters in an AWS Region close to your application you can reduce latency.
If your cluster has multiple nodes, locating your nodes in different Availability Zones can reduce the impact of failures on your cluster.
For more information, see the following:
• Choosing Regions and Availability Zones (p. 4)
• Mitigating Failures (p. 61)
Viewing a cluster's details
Viewing a cluster's details
You can view detail information about one or more clusters using the MemoryDB console, AWS CLI, or MemoryDB API.
Viewing details for a MemoryDB cluster (Console)
The following procedure details how to view the details of a MemoryDB cluster using the MemoryDB console.
1. Sign in to the AWS Management Console and open the MemoryDB for Redis console at https://
console.aws.amazon.com/memorydb/.
2. To see details of a cluster, choose the radio button to the left of the cluster's name and then choose View details. You can also click directly on the cluster to view the cluster details page.
The Cluster details page displays details about the cluster, including the cluster endpoint. You can view more details using the multiple tabs available in the Cluster details page.
3. Choose the Shards and nodes tab to see a listing of the cluster's shards and the number of nodes in each shard.
4. To view specific information on a node, expand the shard in the table below. Alternatively you can also search for the shard using the search box.
Doing this displays information about each node, including its Availability Zone, slots/keyspaces and status.
5. Choose the Metrics tab to monitor their respective processes, such as CPU Utilization and Engine CPU Utilization. For more information, see Metrics for MemoryDB (p. 175).
6. Choose the Network and security tab to see details of the subnet group and security groups.
a. In Subnet group, you can see the subnet group's name, a link to the VPC that subnet belongs to and the subnet group's Amazon Resource Name (ARN).
b. In Security groups, you can see the security group ID, name and description.
7. Choose the Maintenace and snapshot tab to see details of the snapshot settings.
a. In Snapshot, you can see whether Automated Snapshots are enabled, the snapshot retention period and the snapshot window.
b. In Snapshots, you will see a list of any snapshots to this cluster, including the snapshot name, size, number of shards and status.
For more information, see Snapshot and restore (p. 78).
8. Choose the Maintenace and snapshot tab to see details of the Maintenance Window, along with any pending ACL, Resharding or Service updates. For more information, see Managing maintenance (p. 58).
9. Choose the Service Updates tab to see details of the any service updates that are applicable to this cluster. For more information, see Service updates in MemoryDB for Redis (p. 217).
10. Choose the Tags tab to see details of any resource or cost-allocation tags that are associated with this cluster. For more information, see Tagging snapshots (p. 101).
Viewing a cluster's details (AWS CLI)
You can view the details for a cluster using the AWS CLI describe-clusters command. If the -- cluster-name parameter is omitted, details for multiple clusters, up to --max-results, are returned.
Viewing a cluster's details
If the --cluster-name parameter is included, details for the specified cluster are returned. You can limit the number of records returned with the --max-results parameter.
The following code lists the details for my-cluster.
aws memorydb describe-clusters --cluster-name my-cluster
The following code list the details for up to 25 clusters.
aws memorydb describe-clusters --max-results 25
Example
For Linux, macOS, or Unix:
aws memorydb describe-clusters \ --cluster-name my-cluster \ --show-shard-details
For Windows:
aws memorydb describe-clusters ^ --cluster-name my-cluster ^ --show-shard-details
The following JSON output shows the response:
{
"Clusters": [ {
"Name": "my-cluster",
"Description": "my cluster", "Status": "available", "NumberOfShards": 1, "Shards": [
{
"Name": "0001", "Status": "available", "Slots": "0-16383", "Nodes": [
{
"Name": "my-cluster-0001-001", "Status": "available",
"AvailabilityZone": "us-east-1a", "CreateTime": 1629230643.961, "Endpoint": {
"Address": "my-cluster-0001-001.my- cluster.abcdef.memorydb.us-east-1.amazonaws.com",
"Port": 6379 }
}, {
"Name": "my-cluster-0001-002", "Status": "available",
"CreateTime": 1629230644.025, "Endpoint": {
"Address": "my-cluster-0001-002.my- cluster.abcdef.memorydb.us-east-1.amazonaws.com",
"Port": 6379 }
Viewing a cluster's details
} ],
"NumberOfNodes": 2 }
],
"ClusterEndpoint": {
"Address": "clustercfg.my-cluster.abcdef.memorydb.us-east-1.amazonaws.com", "Port": 6379
},
"NodeType": "db.r6g.large", "EngineVersion": "6.2", "EnginePatchVersion": "6.2.4",
"ParameterGroupName": "default.memorydb-redis6", "ParameterGroupStatus": "in-sync",
"SubnetGroupName": "default", "TLSEnabled": true,
"ARN": "arn:aws:memorydb:us-east-1:000000000:cluster/my-cluster", "SnapshotRetentionLimit": 0,
"MaintenanceWindow": "sat:06:30-sat:07:30", "SnapshotWindow": "04:00-05:00",
"ACLName": "open-access", "AutoMinorVersionUpgrade": true }
For more information, see the AWS CLI for MemoryDB topic describe-clusters.
Viewing a cluster's details (MemoryDB API)
You can view the details for a cluster using the MemoryDB API DescribeClusters action. If the ClusterName parameter is included, details for the specified cluster are returned. If the ClusterName parameter is omitted, details for up to MaxResults (default 100) clusters are returned. The value for MaxResults cannot be less than 20 or greater than 100.
The following code lists the details for my-cluster.
https://memory-db.us-east-1.amazonaws.com/
?Action=DescribeClusters &ClusterName=my-cluster &Version=2021-01-01 &SignatureVersion=4
&SignatureMethod=HmacSHA256 &Timestamp=20210802T192317Z &X-Amz-Credential=<credential>
The following code list the details for up to 25 clusters.
https://memory-db.us-east-1.amazonaws.com/
?Action=DescribeClusters &MaxResults=25
&Version=2021-02-02 &SignatureVersion=4
&SignatureMethod=HmacSHA256 &Timestamp=20210802T192317Z &X-Amz-Credential=<credential>
For more information, see the MemoryDB API reference topic DescribeClusters.
Modifying a cluster
Modifying a MemoryDB cluster
In addition to adding or removing nodes from a cluster, there can be times where you need to make other changes to an existing cluster, such as adding a security group, changing the maintenance window or a parameter group.
We recommend that you have your maintenance window fall at the time of lowest usage. Thus it might need modification from time to time.
When you change a cluster's parameters, the change is applied to the cluster immediately. This is true whether you change the cluster's parameter group itself or a parameter value within the cluster's parameter group.
You can also update your clusters' engine version. For example, you can select a new engine minor version and MemoryDB will start updating your cluster immediately. For more information, see Upgrading engine versions (p. 49).
Using the AWS Management Console
To modify a cluster
1. Sign in to the AWS Management Console and open the MemoryDB for Redis console at https://
console.aws.amazon.com/memorydb/.
2. From the list in the upper-right corner, choose the AWS Region where the cluster that you want to modify is located.
3. From the left navigation, go to Clusters. From Clusters detail, select the cluster using the radio button and go to Actions and then Modify.
4. The Modify page appears.
5. In the Modify window, make the modifications that you want. Options include:
• Description
• Subnet groups
• VPC Security Group(s)
• Node type
• Redis version compatibility
• Enable Automatic snapshots
• Snapshot Retention Period
• Snapshot Window
• Maintenance window
• Topic for SNS Notification 6. Choose Save changes.
You can also go to the Cluster details page and click on modify to make modifications to the cluster. If you want to modify specific sections of the cluster, you can go to the respective tab in the Cluster details page and click Modify.
Using the AWS CLI
You can modify an existing cluster using the AWS CLI update-cluster operation. To modify a cluster's configuration value, specify the cluster's ID, the parameter to change and the parameter's new value. The following example changes the maintenance window for a cluster named my-cluster and applies the change immediately.
Modifying a cluster
For Linux, macOS, or Unix:
aws memorydb update-cluster \ --cluster-name my-cluster \
--preferred-maintenance-window sun:23:00-mon:02:00
For Windows:
aws memorydb update-cluster ^ --cluster-name my-cluster ^
--preferred-maintenance-window sun:23:00-mon:02:00
For more information, see update-cluster in the AWS CLI Command Reference.
Using the MemoryDB API
You can modify an existing cluster using the MemoryDB API UpdateCluster operation. To modify a cluster's configuration value, specify the cluster's ID, the parameter to change and the parameter's new value. The following example changes the maintenance window for a cluster named my-cluster and applies the change immediately.
https://memory-db.us-east-1.amazonaws.com/
?Action=UpdateCluster &ClusterName=my-cluster
&PreferredMaintenanceWindow=sun:23:00-mon:02:00 &SignatureVersion=4
&SignatureMethod=HmacSHA256 &Timestamp=20210801T220302Z
&X-Amz-Algorithm=Amazon4-HMAC-SHA256 &X-Amz-Date=20210802T220302Z
&X-Amz-SignedHeaders=Host &X-Amz-Expires=20210801T220302Z &X-Amz-Credential=<credential>
&X-Amz-Signature=<signature>