TIBCO ActiveMatrix ® Service Grid Installation and Configuration
Software Release3.2.0
August 2012
Important Information
SOME TIBCO SOFTWARE EMBEDS OR BUNDLES OTHER TIBCO SOFTWARE. USE OF SUCH EMBEDDED OR BUNDLED TIBCO SOFTWARE IS SOLELY TO ENABLE THE FUNCTIONALITY (OR PROVIDE LIMITED ADD-ON FUNCTIONALITY) OF THE LICENSED TIBCO SOFTWARE. THE EMBEDDED OR BUNDLED SOFTWARE IS NOT LICENSED TO BE USED OR ACCESSED BY ANY OTHER TIBCO SOFTWARE OR FOR ANY OTHER PURPOSE.
USE OF TIBCO SOFTWARE AND THIS DOCUMENT IS SUBJECT TO THE TERMS AND CONDITIONS OF A LICENSE AGREEMENT FOUND IN EITHER A SEPARATELY EXECUTED SOFTWARE LICENSE AGREEMENT, OR, IF THERE IS NO SUCH SEPARATE AGREEMENT, THE CLICKWRAP END USER LICENSE AGREEMENT WHICH IS DISPLAYED DURING DOWNLOAD OR INSTALLATION OF THE SOFTWARE (AND WHICH IS DUPLICATED IN THE LICENSE FILE) OR IF THERE IS NO SUCH SOFTWARE LICENSE AGREEMENT OR CLICKWRAP END USER LICENSE AGREEMENT, THE LICENSE(S) LOCATED IN THE “LICENSE” FILE(S) OF THE SOFTWARE. USE OF THIS DOCUMENT IS SUBJECT TO THOSE TERMS AND CONDITIONS, AND YOUR USE HEREOF SHALL CONSTITUTE ACCEPTANCE OF AND AN AGREEMENT TO BE BOUND BY THE SAME.
This document contains confidential information that is subject to U.S. and international copyright laws and treaties.
No part of this document may be reproduced in any form without the written authorization of TIBCO Software Inc.
TIBCO, The Power of Now, TIBCO ActiveMatrix, and TIBCO Enterprise Message Service are either registered trademarks or trademarks of TIBCO Software Inc. in the United States and/or other countries.
EJB, Java EE, J2EE, and all Java-based trademarks and logos are trademarks or registered trademarks of Sun Microsystems, Inc. in the U.S. and other countries.
All other product and company names and marks mentioned in this document are the property of their respective owners and are mentioned for identification purposes only.
THIS SOFTWARE MAY BE AVAILABLE ON MULTIPLE OPERATING SYSTEMS. HOWEVER, NOT ALL OPERATING SYSTEM PLATFORMS FOR A SPECIFIC SOFTWARE VERSION ARE RELEASED AT THE SAME TIME. SEE THE README FILE FOR THE AVAILABILITY OF THIS SOFTWARE VERSION ON A SPECIFIC OPERATING SYSTEM PLATFORM.
THIS DOCUMENT IS PROVIDED “AS IS” WITHOUT WARRANTY OF ANY KIND, EITHER EXPRESS OR IMPLIED, INCLUDING, BUT NOT LIMITED TO, THE IMPLIED WARRANTIES OF MERCHANTABILITY, FITNESS FOR A PARTICULAR PURPOSE, OR NON-INFRINGEMENT.
THIS DOCUMENT COULD INCLUDE TECHNICAL INACCURACIES OR TYPOGRAPHICAL ERRORS. CHANGES ARE PERIODICALLYADDED TO THE INFORMATION HEREIN; THESE CHANGES WILL BE INCORPORATED IN NEW EDITIONS OF THIS DOCUMENT. TIBCO SOFTWARE INC. MAY MAKE IMPROVEMENTS AND/OR CHANGES IN THE PRODUCT(S) AND/OR THE PROGRAM(S) DESCRIBED IN THIS DOCUMENT AT ANY TIME.
THE CONTENTS OF THIS DOCUMENT MAY BE MODIFIED AND/OR QUALIFIED, DIRECTLY OR INDIRECTLY, BY OTHER DOCUMENTATION WHICH ACCOMPANIES THIS SOFTWARE, INCLUDING BUT NOT LIMITED TO ANY RELEASE NOTES AND "READ ME" FILES.
Copyright (c) 2005-2012 TIBCO Software Inc. ALL RIGHTS RESERVED.
TIBCO Software Inc. Confidential Information
TIBCO ActiveMatrix Service Grid Installation and Configuration
Contents
Preface...7
TIBCO Product Documentation...8
Typographical Conventions...9
Connecting with TIBCO Resources...12
Chapter 1 Setting up an Enterprise...13
Chapter 2 Installation Requirements and Pre-Installation Tasks.15
Installation Requirements...16Installation Account Requirements...16
Hardware Requirements...16
Software Requirements...17
Pre-installation Tasks...20
Configuring External Databases...20
Configuring Ant...21
Configuring Red Hat Linux 6 and AIX 5.3 Platforms...21
Configuring AIX Platforms...22
Configuring the Maximum Number of Open Files on Linux Platforms...22
Downloading Software Assemblies if No Internet Access is Available...22
Chapter 3 Installation...25
Preparing for Installation...26
Installing in GUI Mode...27
Installing in Console Mode...29
Installing in Silent Mode...30
Moving an Installation to a Destination Machine...31
Chapter 4 Post-Installation Tasks...33
Configuring Linux Platforms for TIBCO Business Studio...34
Troubleshooting Installation...35
Uninstalling TIBCO ActiveMatrix Service Grid...36
Chapter 5 Configuration...37
Configuration Setup and Overview...38
Networking...38
TIBCO Configuration Tool Requirements...47
TIBCO ActiveMatrix Service Grid Installation and Configuration TOC | 5
Running TIBCO Configuration Tool...50
Using TIBCO Configuration Tool Scripts and Property Files...53
Configuration Tool Wizards and Screens...60
Create Express Developer Environment...60
Create TIBCO ActiveMatrix Administrator Server...62
Create TIBCO Host Instance...80
Configure Third-Party Driver...83
Replicate TIBCO ActiveMatrix Administrator Server...85
Edit ActiveMatrix Administrator Server Configuration...91
DDL Script Generator...95
DDLGeneratorTask...95
Invoking the DDL Script Generator...96
Chapter 6 Upgrade...97
Upgrade Overview...98
Upgrade Impact...98
Runtime Object State...99
Determining a Runtime Object's Version...100
Supported Upgrade Scenarios...101
Performing an Upgrade...102
Upgrading a Single TIBCO Host Instance Enterprise...102
Upgrading a Multiple TIBCO Host Instance Enterprise...102
Example Upgrade and Restore Scenarios...104
Single TIBCO Host Instance Upgrade Example...104
Single Host Instance Restore Example...105
Multiple TIBCO Host Instance Upgrade Example...106
Multiple Host Instance Restore Example...108
Upgrade Scripts...109
Upgrade Script Targets...109
Upgrade Script Properties...111
Running the Upgrade Script...112
Upgrading TIBCO Enterprise Message Service Server...113
Upgrading Runtime Objects...114
Upgrading Scripts...115
TIBCO ActiveMatrix Service Grid Installation and Configuration 6 | TOC
Preface
TIBCO ActiveMatrix®Service Grid is a scalable and extensible platform for developing, deploying, and managing applications that conform to a service-oriented architecture.
TIBCO ActiveMatrix Service Grid Installation and Configuration
TIBCO Product Documentation
This section lists documentation resources you may find useful.
The following documents form the TIBCO ActiveMatrix®Service Grid documentation set:
• Concepts: Read this manual before reading any other manual in the documentation set. This manual describes terminology and concepts of the TIBCO ActiveMatrix platform. The other manuals in the documentation set assume you are familiar with the information in this manual.
• Development Tutorials: Read this manual for a step-by-step introduction to the process of creating, packaging, and running composites in TIBCO Business Studio.
• Composite Development: Read this manual to learn how to develop and package composites.
• Java Component Development: Read this manual to learn how to configure and implement Java components.
• Mediation Component Development: Read this manual to learn how to configure and implement Mediation components.
• Mediation API Reference: Read this manual to learn how to develop custom Mediation tasks.
• Spring Component Development: Read this manual to learn how to configure and implement Spring components.
• WebApp Component Development: Read this manual to learn how to configure and implement Web Application components.
• Administration Tutorials: Read this manual for a step-by-step introduction to the process of creating and starting the TIBCO ActiveMatrix runtime, starting TIBCO ActiveMatrix servers, and deploying applications to the runtime.
• Administration: Read this manual to learn how to manage the runtime and deploy and manage applications.
• Installation and Configuration: Read this manual to learn how to install TIBCO ActiveMatrix Service Grid software and create and upgrade runtime objects.
• Release Notes: Read this manual for a list of new and changed features, steps for migrating from a previous release, and lists of known issues and closed issues for the release.
The documentation for the following features is installed separately:
• TIBCO ActiveMatrix Implementation Type for C++
• TIBCO ActiveMatrix Binding Type for EJB
• TIBCO ActiveMatrix Binding Type for Adapters
• TIBCO ActiveMatrix Implementation Type for Adapters
• TIBCO ActiveMatrix Implementation Type for Microsoft CLR
TIBCO ActiveMatrix Service Grid Installation and Configuration 8 | Preface
Typographical Conventions
Table 1: General Typographical Conventions Use
Convention
TIBCO products are installed into an installation environment. A product installed into an installation environment does not access components in other installation environments.
TIBCO_HOME ENV_NAME
Incompatible products and multiple instances of the same product must be installed into different installation environments. An installation environment consists of the following properties:
• Name - Identifies the installation environment. The name is appended to the name of Windows services created by the installer and is a component of the path to the product shortcut in the Windows Start > All Programs menu. This name is referenced in documentation as ENV_NAME.
• Path - The folder into which the product is installed. This folder is referenced in documentation as TIBCO_HOME.
The folder that stores configuration data generated by TIBCO products. Configuration data can include sample scripts, session data, configured binaries, logs, and so on. This folder is referenced in documentation as CONFIG_HOME.
CONFIG_HOME
Code font identifies commands, code examples, filenames, pathnames, and output displayed in a command window. For example:
code font
• Use MyCommand to start the foo process.
• Code example:
public class HelloWorldImpl extends AbstractHelloWorldImpl { ...
public HelloResponseDocument sayHello(HelloRequestDocument firstName) {
...
System.out.println("--> Generating Java Hello Component Response...");
String name =
firstName.getHelloRequest()==null||firstName.getHelloRequest().
equals("")?"Friend":firstName.getHelloRequest();
HelloResponseDocument resp =
HelloResponseDocument.Factory.newInstance();
resp.setHelloResponse("Hi " + name + "! " + "This is the Java component.\n");
System.out.println("--> Java Hello Component Response: \n\t\t"
+
resp.getHelloResponse());
...
} }
• CONFIG_HOME/admin/enterpriseName/samples/remote_props.properties
• Output example:
C:\Program Files\tibco\amx-3\studio\3.5\eclipse>amx_eclipse_ant.exe -buildfile "C:/helloworld1/build.xml" -data "C:/hws"
Buildfile: C:/helloworld1/build.xml createApplicationDAA:
[sds.createDAA] Waited for 47ms for workspace refreshes after building features.
all:
BUILD SUCCESSFUL BUILD SUCCESSFUL
Total time: 2 minutes 18 seconds
TIBCO ActiveMatrix Service Grid Installation and Configuration Preface | 9
Use Convention
Bold code font is used in the following ways:
bold code font
• In procedures, to indicate what a user types. For example: Type admin.
• In large code samples, to indicate the parts of the sample that are of particular interest.
• In command syntax, to indicate the default parameter for a command. For example, if no parameter is specified, MyCommand is enabled:
MyCommand [enable | disable]
Italic font is used in the following ways:
italic font
• To indicate a document title. For example: See TIBCO BusinessWorks Concepts.
• To define new terms. For example: A keystore is a database of keys and certificates.
• To indicate a variable in a command or code syntax that you must replace. For example:
MyCommandpathname.
Key name separated by a plus sign indicate keys pressed simultaneously. For example:
Ctrl+C.
Key names separated by a comma and space indicate keys pressed one after the other.
For example: Esc, Ctrl+Q.
Key
combinations
The note icon indicates information that is of special interest or importance, for example, an additional action required only in certain circumstances.
The tip icon indicates an idea that could be useful, for example, a way to apply the information provided in the current section to achieve a specific result.
The warning icon indicates the potential for a damaging situation, for example, data loss or corruption if certain steps are taken or not taken.
Table 2: Syntax Typographical Conventions Use
Convention
An optional item in command syntax.
For example:
[ ]
MyCommand [optional_parameter] required_parameter
A logical ’OR’ that separates multiple items of which only one may be chosen.
For example, you can select only one of the following parameters:
|
MyCommand param1 | param2 | param3
A logical group of items in a command. Other syntax notations may appear within each logical group.
For example, the following command requires two parameters, which can be either the pair param1 and param2, or the pair param3 and param4.
{ }
MyCommand {param1 param2} | {param3 param4}
In the next example, the command requires two parameters. The first parameter can be either param1 or param2 and the second can be either param3 or param4:
MyCommand {param1 | param2} {param3 | param4}
TIBCO ActiveMatrix Service Grid Installation and Configuration 10 | Preface
Use Convention
In the next example, the command can accept either two or three parameters. The first parameter must be param1. You can optionally include param2 as the second parameter.
And the last parameter is either param3 or param4.
MyCommand param1 [param2] {param3 | param4}
TIBCO ActiveMatrix Service Grid Installation and Configuration Preface | 11
Connecting with TIBCO Resources
How to Join TIBCOmmunity
TIBCOmmunity is an online destination for TIBCO customers, partners, and resident experts. It is a place to share and access the collective experience of the TIBCO community. TIBCOmmunity offers forums, blogs, and access to a variety of resources. To register, go to http://www.tibcommunity.com.
How to Access TIBCO Documentation
After you join TIBCOmmunity, you can access the documentation here: http://docs.tibco.com.
How to Contact TIBCO Support
For comments or problems with this manual or the software it addresses, contact TIBCO Support as follows:
• For an overview of TIBCO Support, and information about getting started with TIBCO Support, visit this site:
http://www.tibco.com/services/support
• If you already have a valid maintenance or support contract, visit this site:
https://support.tibco.com
Entry to this site requires a username and password. If you do not have a username, you can request one.
TIBCO ActiveMatrix Service Grid Installation and Configuration 12 | Preface
Chapter
1
Setting up an Enterprise
About this task
A TIBCO ActiveMatrix Service Grid enterprise consists of installed software components and TIBCO ActiveMatrix Service Grid runtime objects.
Procedure
1. Perform pre-installation tasks described in Installation Requirements and Pre-Installation Tasks on page 15.
2. Install TIBCO ActiveMatrix Service Grid software on disk as described in Installation on page 25.
If you are using the GUI installer, you can launch TIBCO Configuration Tool as part of the installation process.
If you do, make sure you meet all requirements for running the tool.
3. Perform post-installation tasks as described in Post-Installation Tasks on page 33.
4. Run TIBCO Configuration Tool to set up your environment.
The tool allows you to create, modify, or upgrade TIBCO ActiveMatrix runtime objects such as Administrator or TIBCO Hosts. You can run the tool in GUI mode, in console mode, or in silent mode. For each case, you can select to perform one or more configuration or upgrade tasks.
TIBCO ActiveMatrix Service Grid Installation and Configuration
Chapter
2
Installation Requirements and Pre-Installation Tasks
Before you start installation, you must make sure your environment meets the installation requirements, and you must perform pre-installation tasks.
Topics
• Installation Requirements
• Pre-installation Tasks
TIBCO ActiveMatrix Service Grid Installation and Configuration
Installation Requirements
Before you can run the installer on your Windows or Linux system, you must log in as a user with appropriate permissions, and your system must meet hardware and software requirements.
If you plan on installing in an existing installation environment, stop all processes that are using Java from TIBCO_HOME.
At the end of installation, the installer offers to launch TIBCO Configuration Tool. The tool allows you to create runtime objects such as an Administration server and perform other configuration tasks. Your environment must meet additional requirements to run the tool. See Configuration Setup and Overview on page 38 and Configuration Tool Wizards and Screens on page 60.
Installation Account Requirements
To install on Microsoft Windows or on UNIX, you must have the appropriate privileges.
The privileges differ for the different platforms.
• Microsoft Windows - Only users with administrator privileges can install TIBCO ActiveMatrixService Grid. If you do not have administrator privileges, the installer exits. If you intend to install the product on a network drive, ensure that the account used for installation has permission to access the network drive.
• UNIX - Any type of user—regular (non-root) user and super-user (root)—can perform installation. Use the same installer account to install all TIBCO products. A graphic environment such as CDE or X Windows is required to run the installer in GUI mode.
For configuration, the user who runs TIBCO Configuration Tool must also have administrator privileges on the TIBCO Enterprise Message Service servers that you want to use in your TIBCO ActiveMatrix enterprise. If you do not have administrator privileges, additional set up allows you to perform configuration. See Configuring TIBCO Enterprise Message Service Servers for Non-Admin Users on page 48.
Hardware Requirements
TIBCO ActiveMatrix Service Grid installation requires a substantial amount of system memory and disk space.
Review the system memory and disk space requirements before you start installation.
System Memory
A minimum of 2 GB of physical memory is required.
Disk Space
The installer requires space in the temporary directory before installation, and additional space in the temporary directory for running the installer. You must also make sure sufficient space is in the directory you want to use as the installation environment (TIBCO_HOME) directory.
While performing installation, avoid running other processes that consume disk space in the installation environment directory. If another process consumes disk space while the installer is copying the files, the installer might fail and display a failure message.
TIBCO ActiveMatrix Service Grid Installation and Configuration 16 | Installation Requirements and Pre-Installation Tasks
Disk Space Requirement Directory
Before you start the installation process, extract the contents of the installation archive to a temporary directory. The installer files consume up to 560 MB of disk space.
Temporary directory before installation
The installer requires at least 70 MB of free space in the temporary directory.
On Microsoft Windows, the default temporary directory location is Temporary directory during
installation
%SystemDrive%:\Documents and Settings\user_name\Local Settings\Temp.
If your system does not have sufficient free disk space in the default temporary directory, you can use the is:tempdir option when starting the installer to run the installer with a different temporary directory. For example:
TIBCOUniversalInstaller -is:tempdir \new_tmp
where \new_tmp has sufficient free disk space.
The installer calculates the disk space required in the installation environment directory for the selected components. The calculation is done before the Installation environment
directory
actual installation (copying of files to system) begins. The installer proceeds only if sufficient free disk space is available in the installation environment directory. TIBCO ActiveMatrix Service Grid can consume 1GB of free space under TIBCO_HOME.
Software Requirements
Your system must meet the software requirements before you run the installer. Some software is required, and some software is optional. An external database is required for production systems but not during development.
Before you run the installer, you must make sure you are running on a supported platform. See the readme file for information about the supported operating system platforms and versions and about required patches.
You must also have required software installed. Unless indicated otherwise, see the readme file for the supported products and versions.
Table 3: Required and Optional Software on page 17 lists required and optional software. Several of the required software components are downloaded by the installer.
Table 3: Required and Optional Software Description
Software
Required. If necessary, the TIBCO Universal Installer automatically downloads Hibernate during installation.
Hibernate
Required. On some operating system platforms, TIBCO Universal Installer automatically downloads certain Eclipse LGPL components during installation if necessary.
Eclipse components
TIBCO ActiveMatrix Service Grid software includes the following required and optional software components. See the readme file for details about required versions.
TIBCO Software
• Java Virtual Machine - Required. JDK 1.6.0 is packaged with TIBCO ActiveMatrix Service Grid.
• TIBCO Enterprise Message Service - Required. TIBCO Enterprise Message Service is used as the notification and messaging backbone for TIBCO ActiveMatrix Service Grid.
This software is distributed and installed separately from TIBCO ActiveMatrix Service Grid software.
TIBCO ActiveMatrix Service Grid Installation and Configuration Installation Requirements and Pre-Installation Tasks | 17
Description Software
TIBCO Enterprise Message Service can also be used by the TIBCO ActiveMatrix SOAP/JMS and JMS binding types. The TIBCO ActiveMatrix Service Grid license does not cover this usage of the included Enterprise Message Service software. You must separately license TIBCO Enterprise Message Service or another supported JMS product for this usage.
• TIBCO Runtime UDDI Server - Optional. TIBCO ActiveMatrix Runtime UDDI Server is a lightweight UDDI registry for discovering and registering services during service execution. This software is distributed and installed separately from TIBCO
ActiveMatrix Service Grid software.
• TIBCO ActiveMatrix Binding Type for Adapters - Optional. This software is distributed and installed separately from TIBCO ActiveMatrix Service Grid software.
• TIBCO ActiveMatrix Binding Type for EJB - Optional. This software is distributed and installed separately from TIBCO ActiveMatrix Service Grid software.
• TIBCO ActiveMatrix Implementation Type for C++ - Optional. This software is distributed and installed separately from TIBCO ActiveMatrix Service Grid software.
Required to store administration information.
An embedded version of HSQLDB 1.8.1 is included for development.
DBMS Software
HSQLDB 1.8.1 is not supported for production.
See the readme file for supported DBMS software for production.
Required by ActiveMatrix Administrator and services to access database resources. For supported drivers, see Third-Party Driver Details on page 83.
JDBC Drivers
JDBC connections to Microsoft SQL Server 2008 require updates from Microsoft.
See Microsoft Knowledge Base article 2653857.
If you use the embedded version of HSQLDB 1.8.1 during development, you do not have to install a third-party driver.
Optional. Supports the LDAP authentication realm that can be used by ActiveMatrix Administrator for authenticating users. As an alternative, you can configure a database authentication realm.
LDAP Servers
Optional. Supports SOAP/JMS and JMS binding types.
JMS Servers
Required to run the ActiveMatrix Administrator GUI.
Web Browser
Required to view the Enterprise Graphical view and the monitoring dashboards in the ActiveMatrix Administrator GUI.
Silverlight
Required to run TIBCO Configuration Tool, runtime object upgrade, and ActiveMatrix Administrator CLI scripts. The current supported version is 1.8.2.
Apache Ant
Optional. ActiveMatrix Administrator integrates with UDDI servers that comply with the UDDI V3 specification.
UDDI Registries
On some UNIX and Linux platforms, you must install the GTK2 libraries and their dependencies and make them available in the library path (LIBPATH). To determine the GTK2
full set of libraries required for installation, download and install the gtk2 rpm. When you do, all missing dependencies are listed. These dependencies should be available for download from the GTK2 download site.
Related Topics
Configuring Ant on page 21
TIBCO ActiveMatrix Service Grid Installation and Configuration 18 | Installation Requirements and Pre-Installation Tasks
The default setup of Ant might have an insufficient amount of memory available for running CLI scripts or configurations scripts from the TIBCO Configuration Tool. You can increase that value for your Windows or Linux system.
Configuring External Databases on page 20
During development, you can use the in-process HSQLDB database packaged with your ActiveMatrix installation. In a production environment, you must use an external database with your ActiveMatrix enterprise.
TIBCO ActiveMatrix Service Grid Installation and Configuration Installation Requirements and Pre-Installation Tasks | 19
Pre-installation Tasks
Pre-installation tasks include customizing your environment for certain platforms. In a production environment, you must set up an external database before installation because the database included with the installation is supported only for development.
Configuring External Databases
During development, you can use the in-process HSQLDB database packaged with your ActiveMatrix installation. In a production environment, you must use an external database with your ActiveMatrix enterprise.
About this task
If you are using an external database, you have to perform database-specific configuration before you can create runtime objects such as Administrator server or TIBCO Host instances.
Procedure
Set up your database, depending on the database vendor.
Configuration Notes Database
The database user must have be set up as follows:
Oracle 11gR2
• Must have connect and resource privileges
• Must be assigned to the default schema
• Cannot have dba privileges Microsoft SQL Server • Run the command
alter database DB Name set read_committed_snapshot on.
• Make sure that the database user is assigned the default database and has the db_owner role.
• Use the case insensitive collation setting.
Configure the database with a 32KB page size (instead of the default 4KB page size).
IBM DB2
What to do next
After installation, you have to use the TIBCO Configuration Tool to configure the third-party JDBC driver for your database.
Related Topics
Software Requirements on page 17
TIBCO ActiveMatrix Service Grid Installation and Configuration 20 | Installation Requirements and Pre-Installation Tasks
Your system must meet the software requirements before you run the installer. Some software is required, and some software is optional. An external database is required for production systems but not during development.
Configuring Ant
The default setup of Ant might have an insufficient amount of memory available for running CLI scripts or configurations scripts from the TIBCO Configuration Tool. You can increase that value for your Windows or Linux system.
About this task
Perform the following steps to ensure that Ant does not run out of memory when executing scripts.
Procedure
1. Increase the JVM permgen size.
– Windows Edit %USERPROFILE%\antrc_pre.bat and add following line:
set ANT_OPTS=-Xmx1024m -XX:MaxPermSize=256m -XX:PermSize=128m
– UNIX Edit ~/.antrc and add the following line:
export ANT_OPTS="-Xmx1024m -XX:MaxPermSize=256m -XX:PermSize=128m"
2. Confirm the value of ANT_OPTS before you execute scripts from the command prompt.
Related Topics
Software Requirements on page 17
Your system must meet the software requirements before you run the installer. Some software is required, and some software is optional. An external database is required for production systems but not during development.
Configuring Red Hat Linux 6 and AIX 5.3 Platforms
Before installing, configuring, and running AIX 5.3 or running a Red Hat 6 32-bit product package on a 64-bit platform, you must install a number of additional 32-bit packages.
About this task
You can use yum to install the packages. This example illustrates how to perform the task on Red Hat Linux 6.
Procedure
1. Mount a Red Hat 6 64-bit ISO file such as rhel-server-6.1-x86_64-dvd.iso.
mount /dev/cdrom /mnt/cdrom rhel-server-6.1-x86_64-dvd.iso
2. Back up the properties file /etc/yum.repos.d/rhel-source.repo.
cp /etc/yum.repos.d/rhel-source.repo /etc/yum.repos.d/rhel-source.repo.bak
3. Edit the following properties in /etc/yum.repos.d/rhel-source.repo.
baseurl=file:///mnt/cdrom/Server enabled=1
gpgcheck=0
4. Install the packages.
yum install glibc.i686 yum install gtk2.i686
yum install PackageKit-gtk-module.i686 yum install libcanberra-gtk2.i686
TIBCO ActiveMatrix Service Grid Installation and Configuration Installation Requirements and Pre-Installation Tasks | 21
yum install gtk2-engines.i686 yum install eclipse-swt*
yum install libstdc++.so.5
5. On AIX change the maximum allowable size of the ARG/ENV list. If you do not make this change, TIBCO Host instances cannot start. Open a terminal window and run the following command.
chdev -l sys0 -a ncargs=16
Configuring AIX Platforms
On AIX, change the maximum allowable size of the ARG/ENV list. If you do not make this change, TIBCO Host instances cannot start.
About this task
If you want to use AIX 5.3, you must install a number of prerequisite packages. See Configuring Red Hat Linux 6 and AIX 5.3 Platforms on page 21.
Procedure 1. Log in as root.
2. Open a terminal window and run chdev -l sys0 -a ncargs=16.
Configuring the Maximum Number of Open Files on Linux Platforms
Your Linux platform default settings might have a limit on the maximum number of open files and file descriptors that is too low for the product you want to install. You can change this number by editing the
limits.conf configuration file.
About this task
On all Linux systems, the operating system controls the maximum number of open files and file descriptors.
The threshold is typically too low and must be increased. The exact number depends on the features you select during installation and configuration and on the size of the workspace. In most cases, 10000 files is sufficient.
Procedure
1. Edit /etc/security/limits.conf and add the following line:
* hard nofile 10000
2. Log out of the system and log back in.
Downloading Software Assemblies if No Internet Access is Available
If your machine will not be connected to the Internet during installation, you must download several software assemblies from the TIBCO download site before you start the installation process. Download the assemblies after you download and extract the installer, but before you run the installer.
Procedure
1. Decide on the download location for the assemblies.
– To streamline the process, save the software assemblies to the assemblies subdirectory of the temporary directory that you extracted the installer package in.
– You can also download the assemblies to a different temporary directory.
TIBCO ActiveMatrix Service Grid Installation and Configuration 22 | Installation Requirements and Pre-Installation Tasks
2. To download the Hibernate software assembly, click
TIB_assembly_tibco_com_tibco_tpcl_org_hibernate_feature_3.2.4.001_all html on the TIBCO download site.
assembly_tibco_com_tibco_tpcl_org_hibernate_feature_3.2.400.001.zip is downloaded to the location you select.
3. On Linux or Solaris, download two Eclipse LGPL software assemblies from the TIBCO download site.
In the following steps, OSplatform is one of linux24gl23_x86, linux24gl23_x86_64, sol10_x86, sol10_x86_64, linux26gl24_s390x, sol9_sparc_64, sol9_sparc.
a) Click TIB_product_tibco_eclipse_lgpl_3.7.2.001_OSplatform.html.
product_tibco_eclipse_lgpl_3.7.2.001_OSplatform.zip is downloaded to the location you select.
b) Click TIB_product_tibco_eclipse_lgpl_rcp_3.7.2.001_OSplatform.html
product_tibco_eclipse_lgpl_rcp_3.7.2.001_OSplatform.zip is downloaded to the location you select.
TIBCO ActiveMatrix Service Grid Installation and Configuration Installation Requirements and Pre-Installation Tasks | 23
Chapter
3
Installation
You install TIBCO products with TIBCO Universal Installer. The installer runs on multiple platforms. You can run the installer in GUI mode, console mode, and silent mode.
After you have completed installation, you configure your environment using TIBCO Configuration Tool.
Configuration includes creating runtime objects such as a TIBCO Host instance or an ActiveMatrix Administrator server.
The GUI installer prompts you to run TIBCO Configuration Tool when you complete installation. You can also run the tool after you complete installation by launching it explicitly.
Topics
• Preparing for Installation
• Installing in GUI Mode
• Installing in Console Mode
• Installing in Silent Mode
• Moving an Installation to a Destination Machine
TIBCO ActiveMatrix Service Grid Installation and Configuration
Preparing for Installation
Before you start with installation, make sure your system meets all prerequisites, decide on the installation environment name and folder, and download and extract the installation package.
About this task
TIBCO_HOME is the top-level installation directory for TIBCO products. TIBCO_HOME is referred to as the installation environment. Installation environments isolate product installations; a product installed into an installation environment does not access components in other environments.
An installation environment consists of a name and a folder.
• The name identifies the environment, is appended to the name of Windows services created by the installer, and is a component of the path to the product in the Windows Start > All Programs menu.
• The folder contains the installed software. When you install you can choose a new installation environment or an existing installation environment.
If a previous installation of a TIBCO product did not use the TIBCO Universal Installer, then the TIBCO Universal Installer does not detect the folder those older products use as an installation environment folder.
If you wish to use the existing location as the installation folder, create a new installation environment and choose the folder where the other products exist. See the Release Notes for restrictions on the installation environment.
Procedure
1. Make sure your environment meets all requirements and perform pre-installation tasks.
See Installation Requirements on page 16 and Pre-installation Tasks on page 20.
If you do not have Internet access, be sure to download the required software assemblies. See Downloading Software Assemblies if No Internet Access is Available on page 22.
2. Decide on the installation environment (TIBCO_HOME) you want to use. The installer will prompt you for a name and a folder.
3. Set up your environment for the installation you are planning.
Action Choice
Stop all processes that are using Java from TIBCO_HOME.
If you plan on installing in an existing installation environment...
Stop all the processes corresponding to the objects.
If you plan on installing on a machine on which runtime objects (Administrator server, TIBCO Host instances, and nodes) are running...
Create a new installation environment.
If you plan on installing the SOA Development profile or a custom profile containing TIBCO Business Studio.
4. Open the physical media or download the TIBCO ActiveMatrix Service Grid archive file and extract the archive file to a temporary directory.
5. Perform installation based on the mode you selected.
– Installing in GUI Mode on page 27 – Installing in Console Mode on page 29 – Installing in Silent Mode on page 30
TIBCO ActiveMatrix Service Grid Installation and Configuration 26 | Installation
Installing in GUI Mode
When you run the installer in GUI mode, the installer prompts you for information about the installation environment, and allows other customizations.
Before you begin
Prepare your system. See Preparing for Installation on page 26.
Procedure
1. Run TIBCOUniversalInstaller. 2. Click Next in the Welcome screen.
3. Read through the license agreement, select I accept the terms of the license agreement, and click Next.
4. Choose a new installation environment (TIBCO_HOME) or an existing installation environment and click Next.
Procedure Option
Specify properties:
Create a New
TIBCO_HOME • Directory The directory into which the product is installed. The directory cannot be the same as the directory of an existing installation
environment.
The directory path cannot contain special characters such as "*", "#", "?",
">", "<", "%", "&", "$", "`" or "|".
• Name Identifies the installation environment. The name cannot contain special characters such as "*", "?", ">", "<", ":", "|", "/", "\", or quotes (").
Select an installation environment from the drop-down list.
Use an Existing TIBCO_HOME
5. Follow these steps to accept license agreements for third-party software and to optionally install that software.
a) When the Hibernate license agreement appears, read the text and click I accept the terms of the license agreement.
b) On Linux and Solaris, the LGPL License Agreement appears. Read the text and click I accept the terms of the license agreement.
c) If the Hibernate software is not in the assemblies subdirectory of your temporary directory, your are prompted for a Download Hibernate option.
• Download Hibernate assembly from TIBCO. Choose this option if you are connected to the Internet or you do not want to use a previously downloaded assembly. The assembly is automatically downloaded and stored into the assemblies subdirectory of the directory where you extracted the installer.
• Select the Hibernate assembly previously downloaded from TIBCO. Choose this option if you are not connected to the Internet. Click Browse to navigate to the directory where a Hibernate assembly that was previously downloaded is stored and click Open. See Downloading Software Assemblies if No Internet Access is Available on page 22.
If you choose to download Hibernate, the wizard displays the Hibernate download process.
d) On Linux and Solaris, if you choose to install Development Tool, and the
product_tibco_eclipse_lgpl_3.7.2.001 assembly is not in the assemblies subdirectory of your temporary directory, the LGPL Assembly Download screen displays. Choose a download option:
TIBCO ActiveMatrix Service Grid Installation and Configuration Installation | 27
• Download Gnome Binding assembly from TIBCO Choose this option if you are connected to the Internet or do not want to use a previously downloaded assembly. The assembly is automatically downloaded and stored into the assemblies subdirectory of the directory where you extracted the installer.
• Provide the location for the assembly previously downloaded from TIBCO Choose this option if you are not connected to the Internet. Click Browse to navigate to the directory where the
product_tibco_eclipse_lgpl_3.7.2.001 assembly that was previously downloaded is stored.
Select the assembly and click Open. See Downloading Software Assemblies if No Internet Access is Available on page 22.
e) On Linux and Solaris, if you choose to install TIBCO Host software and the
product_tibco_eclipse_lgpl_rcp_3.7.2.001 assembly is not in the assemblies subdirectory of your temporary directory, the LGPL Assembly Download screen displays. Choose a download option:
• Download Gnome Binding assembly from TIBCO - Choose this option if you are connected to the Internet or do not want to use a previously downloaded assembly. The assembly is automatically downloaded and stored into the assemblies subdirectory of the directory where you extracted the installer.
• Provide the location for the assembly previously downloaded from TIBCO - Choose this option if you are not connected to the Internet. Click Browse to navigate to the directory where the
product_tibco_eclipse_lgpl_rcp_3.5.2.001 assembly that was previously downloaded is stored. Select the assembly and click Open. See Downloading Software Assemblies if No Internet Access is Available on page 22.
6. In the Installation Profile Selection screen, select one or more of the preconfigured profiles, or click Customize Installation and explicitly select the components you want to install. Click Next.
The following profiles are preconfigured.
Description Option
Includes TIBCO ActiveMatrix Administrator, Mediation Runtime, and supporting documentation for each product. Install this profile to create TIBCO ActiveMatrix Administrator servers on the machine.
Administration
Includes TIBCO Host software and supporting documentation. Install this profile to create TIBCO Host instances on the machine.
Runtime Host
Includes TIBCO Business Studio, Composite Editor, Mediation Flow Editor, binding and implementation type editors, and supporting documentation.
Install this profile to develop TIBCO ActiveMatrix applications on the machine.
SOA Development
7. Shut down all TIBCO processes if the installer prompts you to do so.
The installer prompts if the features are already installed on the target system. Reinstalling features is not usually recommended.
8. In the Pre-Install summary screen, verify the list of products selected for installation, and click Install.
9. When installation completes, you can choose to launch TIBCO Configuration Tool to create TIBCO Host or Administrator server instances. Uncheck the Launch TIBCO Configuration Tool checkbox if you do not want to run TIBCO Configuration Tool right away.
TIBCO ActiveMatrix Service Grid Installation and Configuration 28 | Installation
Installing in Console Mode
After you prepare your system and the installation media, you can run the installer in console mode.
Before you begin
Prepare your system. See Preparing for Installation on page 26.
If you expect to have no Internet access when you perform installation, be sure to download software assemblies before you run the installer. See Downloading Software Assemblies if No Internet Access is Available on page 22.
Procedure
1. In a console window, navigate to the temporary directory to which you extracted the files.
2. Run TIBCOUniversalInstaller -console. The installer launches a second console window.
3. Respond to the prompts in the second console window.
The installer prompts for installation information and allows you to return to a previous selection periodically. The process is similar to Installing in GUI Mode on page 27.
4. When installation completes, press Enter to exit the installer.
The console installer does not prompt you to run TIBCO Configuration Tool. To create servers and other runtime objects, you can run TIBCO Configuration Tool explicitly.
What to do next
After you exit the installer, you perform post-installation tasks and configuration. To configure your environment, you can run TIBCO Configuration Tool in GUI mode, console mode, or silent mode.
1. Continue with Post-Installation Tasks on page 33.
2. Run TIBCO Configuration Tool. See Configuration Tool Wizards and Screens on page 60.
TIBCO ActiveMatrix Service Grid Installation and Configuration Installation | 29
Installing in Silent Mode
You can run the installer without user input by pointing the installer to a response file. A default preconfigured response file exists.
Before you begin
Prepare your system. See Preparing for Installation on page 26.
If you expect to have no Internet access when you perform installation, be sure to download software assemblies before you run the installer. See Downloading Software Assemblies if No Internet Access is Available on page 22. If you have Internet access, the installer silently installs the required assemblies and completes installation.
About this task
In silent mode, the installer does not prompt for inputs during installation but reads the inputs from a response file. By default, the installer for TIBCO ActiveMatrix 3.2.0 products uses the
TIBCOUniversalInstaller-product_3.2.0.silent file, which is included in the directory that contains the universal installer.
You can customize the silent installer as follows:
• Make a backup copy of the TIBCOUniversalInstaller-product_3.2.0.silent file and edit the file itself.
You can then run the silent installer with or without the response file argument.
• Make a copy of the TIBCOUniversalInstaller-product_3.2.0.silent file and name the copy. You can then run the silent installer, passing in your custom response file.
Procedure
1. Make a copy of the TIBCOUniversalInstaller.silent file and name the file, for example, myfilename.silent.
2. Using a text editor, open the copied file and update the installation location and features to install.
3. Run the silent installer with or without the optional response file.
– Windows: TIBCOUniversalInstaller.cmd -silent [-V responseFile="myfile.silent" ]
– UNIX: TIBCOUniversalInstaller.bin -silent [-V responseFile='myfile.silent']
What to do next
After you exit the installer, you perform post-installation tasks and configuration. You can run TIBCO Configuration Tool in GUI mode, console mode, or silent mode.
1. Continue with Post-Installation Tasks on page 33.
2. Run TIBCO Configuration Tool. See Configuration Tool Wizards and Screens on page 60.
TIBCO ActiveMatrix Service Grid Installation and Configuration 30 | Installation
Moving an Installation to a Destination Machine
You can install TIBCO ActiveMatrix Service Grid on a source machine and move the installed software and scripts to a destination machine. This procedure allows you to create TIBCO Host instances and ActiveMatrix Administrator server on destination machines without running the installer on each destination machine.
Procedure
1. Install TIBCO ActiveMatrix Service Grid on the source machine.
2. If you are using the GUI installer, uncheck the Launch TIBCO Configuration Tool checkbox on the final installer panel.
3. Package the contents of TIBCO_HOME using an archive utility.
4. Unpack the archive on the target machine. Use the same location on the destination machine as you did on the source machine. For example: C:\Program Files\tibco\amx-3.
5. On the destination machine, run TIBCO Configuration Tool to create TIBCO Host instances and an ActiveMatrix Administrator server.
What to do next
After you have moved the installation, you can run TIBCO Configuration Tool on each target machine to configure your setup.
TIBCO ActiveMatrix Service Grid Installation and Configuration Installation | 31
Chapter
4
Post-Installation Tasks
You must perform certain post-installation tasks before you can create and configure runtime objects such as Administrator.
Topics
• Configuring Linux Platforms for TIBCO Business Studio
• Troubleshooting Installation
• Uninstalling TIBCO ActiveMatrix Service Grid
TIBCO ActiveMatrix Service Grid Installation and Configuration
Configuring Linux Platforms for TIBCO Business Studio
On machines on which TIBCO Business Studio is installed, you have to edit the initialization script.
Procedure
1. Open the file TIBCO_HOME/studio/3.6/eclipse/TIBCOBusinessStudio.ini.
2. TIBCO Business Studio is not compatible with Xulrunner 1.9, which is used by Firefox v3.5 and above and typically installed as part of the Firefox browser. The compatible versions of Xulrunner are shown here: http://www.eclipse.org/swt/faq.php#browserlinux. On machines on which TIBCO Business Studio is installed, download a compatible version and add the following line to your TIBCOBusinessStudio.ini
file:
-Dorg.eclipse.swt.browser.XULRunnerPath=path_to_xulrunner_1_8
TIBCO ActiveMatrix Service Grid Installation and Configuration 34 | Post-Installation Tasks
Troubleshooting Installation
If you encounter problems with installation, make sure that your system meets all prerequisites. Next, check the installer log file for potential problems.
Installer Log File
The installer log file, tibco_universal_installer.timestamp.username_install.log is available in the following locations.
• Windows - Documents and Settings\username\.TIBCO\install_timestamp
• Linux - user_home_dir\.TIBCO\install_timestamp The installer log file captures the following information:
• Installation home details such as user that invoked the installer, hostname, Java home in the installation home, operating system details, and so on
• List of assemblies installed
• Information related to the Ant scripts that are executed by the installer
To change the location of the installer log file, specify the option -V logFile="myLogFile" when you run the installer.
TIBCO_JRE Error Message During Upgrade Problem
When you perform an upgrade, the installer sometimes displays an error that states TIBCO_JRE files are locked, even if JRE is not running and the installer is not using TIBCO_JRE.
Workaround
Reboot the system on which the installer is running.
TIBCO ActiveMatrix Service Grid Installation and Configuration Post-Installation Tasks | 35
Uninstalling TIBCO ActiveMatrix Service Grid
You can uninstall TIBCO ActiveMatrix Service Grid by running the Universal Installer. The installation manager allows you to uninstall all products in the TIBCO_HOME folder or choose the products to uninstall.
Procedure
1. Stop TIBCO Host instance processes, node processes, and TIBCO Business Studio.
2. Run the uninstaller.
a) In TIBCO_HOME/tools/universal_installer/, run TIBCOUniversalInstaller.
b) In the TIBCO Installation Manager, select Uninstall Products from Selected TIBCO Home Location, click Next, and click Next on the Welcome screen.
c) Choose an uninstall option and click Next:
• Custom Uninstall - Allows you to choose the products to uninstall.
• Typical Uninstall - Uninstalls all the products in the TIBCO_HOME folder.
d) If you selected Custom Uninstall, click the checkboxes next to the products to uninstall and click Uninstall.
e) Review the products and click Uninstall.
f) When prompted about clean up of the /tools directory, click Yes, clean it up.
g) Click Finish in the summary screen to exit the uninstall wizard.
3. If you have uninstalled all the software under TIBCO_HOME, delete the directories in the TIBCO_HOME and CONFIG_HOME directories.
TIBCO ActiveMatrix Service Grid Installation and Configuration 36 | Post-Installation Tasks
Chapter
5
Configuration
Configuration involves specifying the properties of ActiveMatrix Administrator servers and TIBCO Host instances and installing third-party drivers into ActiveMatrix Administrator servers.
Topics
• Configuration Setup and Overview
• Configuration Tool Wizards and Screens
• DDL Script Generator
TIBCO ActiveMatrix Service Grid Installation and Configuration
Configuration Setup and Overview
You can use TIBCO Configuration Tool to specify the properties of ActiveMatrix Administrator servers and TIBCO Host instances and the properties of third-party drivers you want to add to ActiveMatrix Administrator servers.
You can run TIBCO Configuration Tool in GUI mode, console mode, silent mode, or script mode.
Silent mode and script mode are for advanced users.
• In GUI mode, the tool prompts for configuration information with a set of wizards.
• In console mode, the tool prompts for configuration information on the command line.
• In silent mode, you generate a configuration file by running a wizard in GUI mode or console mode and responding to the prompts. You edit the configuration file, and then run the tool without user input.
• In script mode, you run a wizard in GUI mode or console mode and explicitly save the configuration file, or you edit one of the sample configurations. You then perform an Ant build from the command window of the folder in which your configuration is located.
Networking
Before you start configuration, check whether the default ports that TIBCO Configuration Tool expects to use are available. You must also decide whether you want to use SSL, and might have to set up keystores and trust stores.
Default Ports
The default ports in a ActiveMatrix environment must be available before you can start configuration with the default values. You can specify a different port during configuration, or change the ports explicitly later.
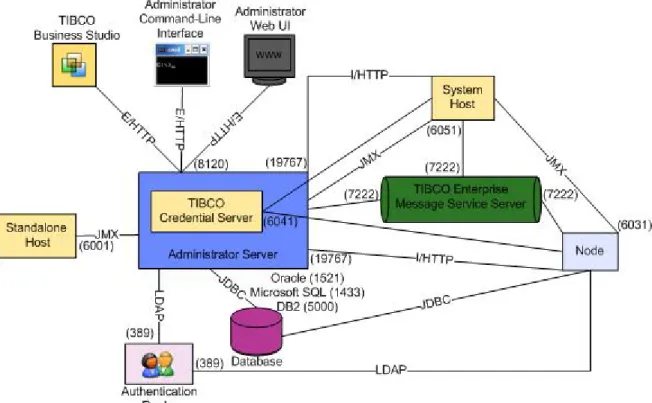
Figure 1: Default Ports on page 39, Table 4: TIBCO ActiveMatrix Runtime Object Default Ports on page 39, and Table 5: Server Default Ports on page 39 summarize the default values of the ports configured in TIBCO Configuration Tool. You can change the defaults in TIBCO Configuration Tool wizards. For information on how to change the ports after you have created runtime objects with TIBCO Configuration Tool, see Administration.
TIBCO ActiveMatrix Service Grid Installation and Configuration 38 | Configuration
Figure 1: Default Ports
Table 4: TIBCO ActiveMatrix Runtime Object Default Ports
Default Port Runtime Object
6051 SystemHost TIBCO Host instance management
6001 Standalone TIBCO Host instance management
6021 System node management
6031 Development node management
8120 TIBCO ActiveMatrix Administrator external HTTP
19767 TIBCO ActiveMatrix Administrator internal HTTP
6041 TIBCO Credential Server
Table 5: Server Default Ports
Default Port Server
7222 or 7243 (SSL) Enterprise Message Service
Oracle 1521 Database
Microsoft SQL 1433 IBM DB2 5000 LDAP 389
TIBCO ActiveMatrix Service Grid Installation and Configuration Configuration | 39
Secure Communication Channels
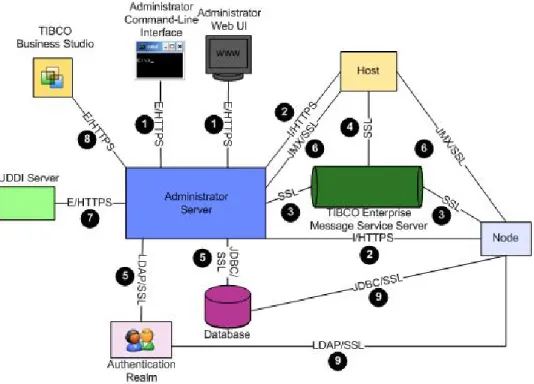
The ActiveMatrix platform is partitioned across many components. You can secure the corresponding communication channels during initial configuration or later.
ActiveMatrix components communicate with each other and with third-party applications over several communication protocols. Figure 2: Communication Channels on page 40 illustrates the components and communication protocols.
Figure 2: Communication Channels
By default, the communication channels are not secure. To secure them, you can configure the channels to use the Secure Sockets Layer (SSL) protocol. SSL is a cryptographic protocol that provides security and data integrity for communications over TCP/IP networks.
An SSL client and server negotiate a connection by using a handshaking procedure. During this handshake, the client and server agree on various parameters to establish the connection's security, as follows:
1. A client requests a secure connection from an SSL-enabled server requesting a secure connection.
2. The server sends back its identification in the form of a digital certificate.
The certificate usually contains the server name, the trusted certificate authority (CA), and the server's public encryption key.
You can specify the SSL configuration of the communication channels at different times in the life cycle of a deployment. Table 6: SSL Configuration Summary on page 41 lists how to perform the initial SSL configuration and how to upgrade, downgrade, and change the configuration of each channel. The Key column in the table points to the numbers in Figure 2: Communication Channels on page 40.
TIBCO ActiveMatrix Service Grid Installation and Configuration 40 | Configuration
Table 6: SSL Configuration Summary
Upgrade, Downgrade, or Change Configuration
Initial Configuration Channel
Key
Upgrade or downgrade: Administrator CLI
Change SSL configuration:
Administrator CLI When creating the Administrator
server in TIBCO Configuration Tool.
Administrator server (external HTTP port) - web and CLI clients 1
Upgrade or downgrade: Administrator web UI or CLI
Change SSL configuration:
Administrator web UI or CLI When creating the Administrator
server in TIBCO Configuration Tool.
Administrator server (internal HTTP port) - hosts and nodes
2
Upgrade or downgrade: Administrator web UI or CLI
Change SSL configuration:
Administrator web UI or CLI When creating the Administrator
server in TIBCO Configuration Tool.
Administrator server - Enterprise Message Service server
(Notification Server and Messaging Bus) 3
Upgrade or downgrade: Administrator CLI
Change SSL configuration:
Administrator CLI When creating the Administrator
server or TIBCO Host instance in TIBCO Configuration Tool.
TIBCO Host instance - TIBCO Enterprise Message Service 4
Change SSL configuration:
Administrator CLI When creating the Administrator
server in TIBCO Configuration Tool.
Administrator server - external database and LDAP servers 5
Upgrade: Administrator web UI or CLI Change SSL configuration:
Administrator CLI When creating Administrator in
TIBCO Configuration Tool.
Administrator server - hosts and nodes
(management) 6
Same procedure as initial configuration Manually import the UDDI server
certificate into the Administrator server trust store using keytool.
Enable secure communication in Administrator web UI or CLI.
Administrator -UDDI server 7
Administrator Upgrade or downgrade:
Administrator CLI
Change SSL configuration:
Administrator CLI Administrator - When creating
Administrator server in TIBCO Configuration Tool.
TIBCO Business Studio - When you connect to Administrator.
Administrator server (external HTTP port) - TIBCO Business Studio
8
Administrator web UI or CLI Administrator web UI or CLI
Resource instances (JDBC, JMS, 9
SMTP, LDAP,
TIBCO ActiveMatrix Service Grid Installation and Configuration Configuration | 41
Upgrade, Downgrade, or Change Configuration
Initial Configuration Channel
Key
HTTP) - external servers
Keystores
If you set up your environment to use SSL, you have to set up keystores.
SSL uses keys and certificates when it establishes the secure connection. A keystore is a database of keys and certificates. A keystore password is required to access or modify the keystore.
In ActiveMatrix, access to keystores is provided by a Keystore Provider resource instance.
Keystore Entries
A keystore has two types of entries:
• Private key - holds a cryptographic private key, which is optionally stored in a protected format to prevent unauthorized access. The private key is accompanied by a certificate chain for the corresponding public key. Private keys and certificate chains are used by a given entity for self-authentication.
• Trusted certificate - contains a single public key certificate. It is called a trusted certificate because the keystore owner trusts that the public key in the certificate belongs to the identity identified by the subject (owner) of the certificate. This type of entry can be used to authenticate other parties.
Certificates of trusted entities are typically imported into a keystore as trusted certificates.
Keystore Entries and Aliases
Each entry in a keystore is identified by an alias. In the case of private keys and their associated certificate chains, these aliases distinguish among the different ways in which the entity may authenticate itself. For example, the entity may authenticate itself using different certificate authorities, or using different public key algorithms. An alias might be named after the role in which the keystore owner uses the associated key, or might identify the purpose of the key.
Keystore Passwords and Private Key Passwords
The private keys in a keystore are encrypted with a keystore password, which should be several words long.
You can also protect each private key with its individual password, which may or may not be the same as the keystore password.
If a password is lost, the associated keys cannot be recovered.
Keystore Provider
If you set up your environment for SSL, you have to set up a keystore. As part of the process, you configure a keystore provider.
Provides access to a keystore. Keystores can be stored internally in Administrator or externally.
General
Description Accepts
SVars?
Editable?
Required?
Property
Location of the keystore:
N Y
Y Keystore Served
From • Administrator
• External location
TIBCO ActiveMatrix Service Grid Installation and Configuration 42 | Configuration