ptg
ptg
Jay Blanchard
Applied jQuery
DEVELOP AND DESIGN
ptg Applied jQuery: Develop and Design
Jay Blanchard
Peachpit Press 1249 Eighth Street Berkeley, CA 94710 510/524-2178 510/524-2221 (fax)
Find us on the Web at: www.peachpit.com
To report errors, please send a note to: [email protected] Peachpit Press is a division of Pearson Education.
Copyright © 2012 by Jay Blanchard
Editor: Rebecca Gulick
Development and Copy Editor: Anne Marie Walker Technical Reviewer: Jesse R. Castro
Production Coordinator: Myrna Vladic Compositor: Danielle Foster Proofreader: Patricia Pane Indexer: Valerie Haynes-Perry Cover design: Aren Straiger Interior design: Mimi Heft
Notice of Rights
All rights reserved. No part of this book may be reproduced or transmitted in any form by any means, electronic, mechanical, photocopying, recording, or otherwise, without the prior written permission of the publisher. For information on getting permission for reprints and excerpts, contact [email protected].
Notice of Liability
The information in this book is distributed on an “As Is” basis, without warranty. While every precaution has been taken in the preparation of the book, neither the author nor Peachpit Press shall have any liability to any person or entity with respect to any loss or damage caused or alleged to be caused directly or indirectly by the instructions contained in this book or by the computer software and hardware products described in it.
Trademarks
Many of the designations used by manufacturers and sellers to distinguish their products are claimed as trademarks. Where those designations appear in this book, and Peachpit was aware of a trademark claim, the designations appear as requested by the owner of the trademark. All other product names and services identified throughout this book are used in editorial fashion only and for the benefit of such companies with no intention of infringement of the trademark. No such use, or the use of any trade name, is intended to convey endorsement or other affiliation with this book.
ISBN 13: 978-0-321-77256-5 ISBN 10: 0-321-77256-3 9 8 7 6 5 4 3 2 1
Printed and bound in the United States of America
ptg To Mom, who taught me there was magic in books,
and to Dad, who taught me there was magic in me.
ptg Projects like this are not possible without the support and understanding of a lot of
people, something I really didn’t understand when first embarking on the journey to create a book. Saying “thank you” isn’t nearly enough, but I hope that you all understand how much I appreciate you!
Even with the blender of life roaring around us, Connie Kay, Kaitlyn, Brittany, Zach, Karla, and Morgan provided more love and support than you can imagine.
I love you all!
To Rebecca Gulick, thank you for believing in me and helping a dream to come true!
To Anne Marie Walker, enough cannot be said about your gentle firmness, guidance, and subtle humor. I am eternally grateful to you!
To Jesse Castro, thanks for keeping me on the straight and narrow. Your insight, technical abilities, and encouragement blow me away!
To Larry Ullman, thanks for being the Ford Prefect to my Arthur Dent and guid- ing me through the galaxy! I kept my towel on my desk the whole time!
To Francis Govers, the twists and turns in my life are made all the more bear- able by knowing that you are just a phone call or an e-mail away. Best friends don’t get any better!
To the folks who have made up the teams of developers that I have worked with day in and day out, thank you for making me a better programmer and a better person! Your willingness to look over my shoulder and teach me something new is treasured beyond measure.
To the jQuery community, you are an amazing group of people, and I am hon- ored to share electrons with you!
ACKNOWLEDGMENTS
ptg
Introduction . . . .viii
Welcome to jQuery . . . .xi
CHAPTER 1 INTRODUCING JQUERY. . . .XIV Making jQuery Work. . . .2
Working with the DOM. . . .6
Learning a Few jQuery Tips. . . .9
Selecting Elements Specifically . . . .9
Making Quick Work of DOM Traversal. . . .10
Troubleshooting with Firebug . . . .10
Packing Up Your Code. . . .11
Using Return False . . . .15
Fiddling with jQuery Code . . . 16
Combining jQuery with Other Code. . . .18
Starting with HTML. . . .18
Styling Web Pages with CSS. . . .18
Using PHP and MySQL. . . .18
Progressive Enhancement. . . .19
Planning Design and Interaction. . . .23
Wrapping Up. . . .23
CHAPTER 2 WORKING WITH EVENTS. . . .24
Using the Photographer’s Exchange Web site. . . .26
Making Navigation Graceful. . . .27
Creating and Calling Modal Windows. . . .27
Binding Events to Other Elements . . . .34
Building an Image Carousel. . . .34
Creating Sprite-based Navigation. . . .50
Wrapping Up. . . .57
CHAPTER 3 MAKING FORMS POP. . . .58
Leveraging Form Events. . . .60
Focusing on a Form Input. . . .60
Validating Email Addresses. . . .62
Making Sure an Input Is Complete. . . .66
Tackling Uploads . . . .69
Performing Client-side Validation. . . .69
CONTENTS
ptg
Developing Server-side Validation. . . .72
Uploading Files. . . .74
Wrapping Up. . . .89
CHAPTER 4 BEING EFFECTIVE WITH AJAX. . . .90
Using AJAX for Validation. . . .92
Building the PHP Registration and Validation File. . . .92
Setting Up the jQuery Validation and Registration Functions. . . .100
Logging in the User. . . .105
Using AJAX to Update Content. . . .108
Getting Content Based on the Current User . . . .108
Loading Content Based on Request . . . .110
Loading Scripts Dynamically . . . .112
Using jQuery’s AJAX Extras . . . .116
Using JSON . . . .126
Securing AJAX Requests. . . .134
Preventing Form Submission. . . .135
Using Cookies to Identify Users . . . .139
Cleansing User-supplied Data . . . .141
Transmitting Data Securely. . . .144
Wrapping Up. . . .145
CHAPTER 5 APPLYING JQUERY WIDGETS. . . .146
Using the jQuery UI Widgets. . . .148
Customizing the jQuery UI. . . .148
Including jQuery UI Widgets. . . .152
Using jQuery Plugins . . . .171
Beefing Up Your Apps with Plugins . . . 172
Pumping Up Your Sites. . . .188
Rolling Your Own Plugins . . . .200
Wrapping Up. . . .203
CHAPTER 6 CREATING APPLICATION INTERFACES. . . .204
Establishing the Foundation. . . .206
Creating the HTML. . . .207
Applying the CSS. . . .209
ptg
Improving the Application Interface . . . .217
Creating Better Sprites. . . .217
Loading Content with AJAX. . . .226
Configuring Additional Enhancements. . . .235
Wrapping up. . . .247
Index. . . .248
ptg As Web designers, you are painstakingly compelled to grab Web surfers’ attention
as quickly as possible and then keep them on your site to absorb the content. In addition to the product, service, or information that you are providing, the site must be visually attractive and offer stimulating (and valuable) interaction. The jQuery library is the main ingredient for providing the icing on your Web-site cake.
If applied well, the effects of jQuery will convince visitors and application users to click around and sample all of your content.
The trick is learning how to combine jQuery with other markup and languages effectively. You must gain knowledge in a wide range of disciplines, like HTML (HyperText Markup Language) and CSS (Cascading Style Sheets), to know how to properly mix in the right amount of jQuery. The goal of this book is to give you the knowledge to bring the HTML, CSS, and jQuery ingredients together to create compelling interactivity to your Web sites and applications.
Throughout the book, I’ll also show you ways to use PHP, a popular server- side scripting language, and MySQL, a relational database product, to enhance your overall development and supercharge your applications. Both technologies translate easily to other Web development languages.
WHAT IS JQUERY?
Announced in 2006 by its creator, John Resig, jQuery quickly gained popularity and support as a new way to use JavaScript to interact with HTML and CSS. jQuery’s simple selectors mimicked CSS selectors, making the library familiar and easy to learn for designers and developers alike. The jQuery library erased the worry that Web developers had suffered through when trying to create interactive sites across a wide range of browsers by handling most browser compatibility issues behind the scenes.
Topping off those two features is the shortened syntax used by jQuery. The fol- lowing example shows how you would select an element based on its id attribute using jQuery:
$(‘#foo’);
INTRODUCTION
ptg The jQuery selector is much shorter as opposed to the same example in old-
school JavaScript:
document.getElementByID(‘foo’);
It’s no wonder that the Web-development community embraced jQuery’s “write less, do more” mantra. Couple the simplicity of jQuery with its ability to support complex animations and achieve stupendous effects, and you get a JavaScript library that is flexible and capable of empowering you to provide your Web site visitors with an outstanding interactive experience.
WHO THIS BOOK IS FOR
This book is aimed at beginning to intermediate Web developers, but it doesn’t matter where you are in your journey as a designer or developer. You should find examples in this book that will help you to bring your Web pages and applications to life with jQuery. It helps if you have a basic knowledge of HTML, CSS, JavaScript, and jQuery, but it is not necessary because the examples are fully baked and ready to go.
WHAT I USED
As of this writing, jQuery 1.5 had been released and is used for all of the examples in the book. You can download it at www.jquery.com. It is also available on the book’s Web site at www.appliedjquery.com.
HTML, CSS, and JavaScript files are all plain-text files that you can create and edit in any plain-text editor.
Examples were all tested in Firefox 3 and Internet Explorer 8, with an occasional peek in Safari and Google Chrome.
WHERE TO FIND THE CODE
All of the code examples for the book are available from the Applied jQuery Web site at www.appliedjquery.com/downloads. There you can download a Zip file con- taining all of the examples, graphics, and other collateral needed to follow along.
The examples are arranged by chapter within the Zip file and include all of the necessary jQuery files to make the examples work right out of the box.
ptg However, even though all of the files are available for download, I encourage
you to type out each example as you progress through the book. Taking a hands-on approach will help you to learn how all of the technologies fit together and will reinforce the concepts in your brain.
LET’S GET STARTED
It’s time for you to jump right in and get started learning how to use jQuery. In the first chapter I’ll give you some good rules and tools to get you headed in the right direction for sweetening your Web development efforts with jQuery.
ptg
i
WELCOME TO
jQUERY
ptg
WELCOME TO jQUERY
jQuery is one of the most popular JavaScript libraries in use today because it lets you build JavaScript Web pages and Web applications quickly and easily, accomplishing in a single line of code something that would have required dozens of lines of JavaScript code.
Grab yourself a computer and the handful of tools outlined below, and then dig into the following six chapters.
jQUERY
jQuery, which is free to download and use, comes in the form of a single .js file that you link to from your Web page, and your code accesses the library by calling various jQuery functions. Go to jquery.
com and download the jQuery library.
jQUERY UI Next, you’ll want to download the jQuery UI library from jQueryUI.com.
This will equip you with some core interaction plugins as well as many UI widgets that I’ll discuss later in the book.
TEXT EDITOR You’ll be doing some scripting, so get yourself a good text editor. Windows users typically opt for Microsoft Notepad or Notepad++, while Mac users often rely on BBEdit from Bare Bones Software.
ptg BROWSER
Chances are you’ve already got a standards- compliant browser installed. Popular options are the latest versions of Microsoft Internet Explorer, Mozilla Firefox, Apple Safari, Google Chrome, and Opera.
TROUBLESHOOTER I rely heavily on the Firebug Web development tool for troubleshooting.
Go to http://getfirebug.
com and get a version that’s specific to your browser. It’s 100% free and open source, and you’ll be grateful you’ve got it installed when something goes wrong.
TESTING ENVIRONMENT Rather than using an actual hosted Web site to test your jQuery creations, use a testing environment that’s local on your own computer.
I use XAMPP, which you can download from http://apachefriends.org.
ptg
1
INTRODUCING
jQUERY
ptg
Rich, interactive Web sites that use semantic markup and unobtrusive technologies like Cas-
cading Style Sheets (CSS) and JavaScript are becoming the
de facto standard in Web development. Designers and developers are looking for new and better ways to bring their creations to life, and libraries like jQuery make this goal easily attainable.
To get started properly with jQuery, you need to equip yourself with the appropriate tools and concepts. So, I’ve gathered those tools for you and will help you to learn how to use them.
This chapter will give you a firm grasp of the basics of jQuery and
the tools that will make working with jQuery straightforward. Also
included are some tips for getting the most out of jQuery. But first
things first; let’s start with a “Hello World” example jQuery style.
ptg The strength of the jQuery library is its ability to interact with elements in your
Web pages that you are already familiar with. Markup tags, class declarations, and attribute information in your Web pages can be easily connected to jQuery by using the simple concept of selectors.
A jQuery selector will wrap an element or set of elements into an object. Once you have created the jQuery object, you can effectively apply a multitude of jQuery methods to that object to create animations, send information to and from the server, or perform object manipulation.
No book on programming is worth its salt if it doesn’t have a “Hello World!”
example. To illustrate the power and flexibility of jQuery’s selectors, let’s create a
“Hello World!” example.
1. Start by establishing the basic markup for the HTML page:
<!DOCTYPE>
<html lang=”en”>
<head>
<meta charset=”utf-8” />
<title>Hello World - jQuery Style</title>
2. Be sure to include the jQuery source file. Without this file none of the jQuery code will operate:
<script type=”text/javascript”
p src=”jquery-1.5.min.js”></script>
3. Open a script tag to give the jQuery code a place to live within the page:
<script type=”text/javascript”>
NOTE: The Hello World code is the only code example not available in the download from the book’s Web site. The reason is that I think it is very important that you type this one in yourself. Comments are also included in the example.
MAKING jQUERY WORK
ptg 4. The jQuery functions that you are creating need to be available to run after
the Web page has finished loading all of its elements. To accomplish this, you wrap the jQuery code in a document ready function. Just as it implies, the code wrapped in the function becomes available to run when the Web document is ready:
$(document).ready(function() {
5. Create the first selector. This selector will get the markup element in the page having an id attribute equal to first. All id attributes are selected in jQuery (and CSS) by prepending the hash (#) sign to the information contained within the id attribute. You’ll follow the selector with jQuery’s html method by chaining the html method to the selector. This method will place the markup <h1>Hello World!</h1> into the selected element:
/* write ‘Hello World! to the first div */
$(‘#first’).html(‘<h1>Hello World!</h1>’);
Chaining is the term used to describe applying one or more methods to jQuery objects. Chaining gives you a wide variety of possibilities to combine methods to create unique interactions for your Web-site visitors.
6. For this example, you’ll create one additional method that connects, or binds, an event handler to a selector to create an action. The event handler will accept an action and perform additional jQuery functions to other selected elements. Start this portion of the example by binding jQuery’s click handler to an element with an id of link:
/* a clickable ‘Hello World!’ example */
$(‘#link’).click(function() {
Theclick method exposes a handler function that allows you to build a string of actions that will be triggered by the click method.
7. Set up a selector for the element with an id of greeting and apply the html method to it:
$(‘#greeting’).html(‘<h1>Hello Again!</h1>’);
ptg 8. Close out the jQuery code with the proper braces, brackets, and script tags:
});
});
</script>
Pay close attention to braces and brackets when you create jQuery code. It is critically important that each opening bracket or brace have a matching closing bracket or brace.
9. Finish up the head section of the markup and open the body of the Web page:
</head>
<body>
10. Create an HTML div with an id of first. The initial jQuery selector that you created previously will interact with this element, adding the HTML markup that was specified between the div tags:
<div id=”first”></div>
11. Create another HTML div with an id of second. You did not write any selec- tors for this element; it is just being used as a container for other elements:
<div id=”second”>
12. Create an anchor tag and give it an id of link. You wrote jQuery code earlier that will handle the link when it is clicked by a user:
<a href=”#” id=”link”>Click Me!</a><br />
13. Create a span element with an id of greeting. When the link is clicked, the selector for greeting will apply the HTML markup you specified between thespan tags:
<span id=”greeting”></span>
14. Complete the page by closing out the markup tags properly:
</div>
ptg 15. Save the file as hello_world.html and load it into your Web browser. If you
have been diligent with your typing, you will be rewarded with a Web page identical to the one shown in Figure 1.1.
This example is just a small taste of how you can connect jQuery to elements in your Web pages to provide information and interactivity. The example also demonstrates how you can add elements to your Web pages using jQuery.
To work with jQuery effectively, you need to know how to work with all of the elements in a Web page and how they are assembled into a document.
A document?
That is absolutely correct: Web pages are documents that are intended for display in Web browsers. Because Web pages are documents, they follow some of the same rules that paper documents follow, and those rules are provided by the master document—the Document Object Model (DOM).
FIGURE 1.1 The “Hello World!”
message appears when the page loads, and the “Hello Again!” message appears when the link is clicked.
ptg
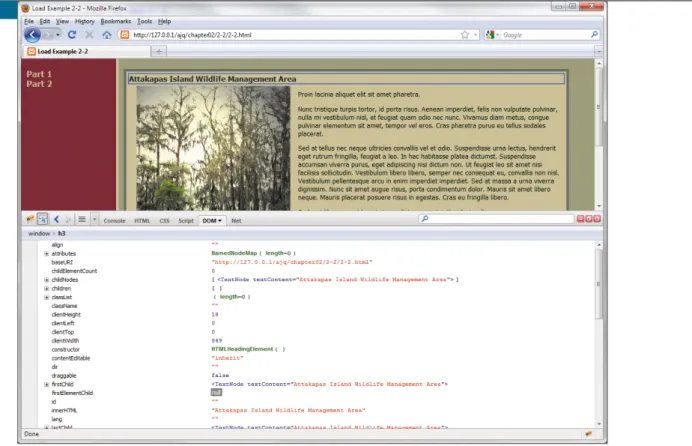
At the heart of all of your Web pages is an API (Application Programming Interface) that describes everything on the page. It is the DOM. The DOM provides informa- tion for each element on the page, including styles associated with elements. The information in the DOM is stored in a tree-like structure.
Several DOM inspector applications are available either as stand-alone appli- cations or as add-ins to many popular Web browsers. Figure 1.2 shows the DOM inspector available with Firebug.
FIGURE 1.2 Examining the DOM using Firebug with Firefox.
WORKING WITH THE DOM
ptg The DOM API is what allows languages like JavaScript and libraries like jQuery
to interact with elements in your Web pages. You can use libraries like jQuery to virtually climb up and down the DOM tree to locate, add, remove, and modify ele- ments. Because you’ll be using jQuery to interact with the DOM, including adding and removing elements from it, you need to become familiar with how the DOM is constructed. You don’t need to become an expert on the DOM, but you should know enough about the DOM to recognize what is going on when you manipulate it with jQuery.
Knowing the DOM becomes critically important when you start working with jQuery’s parent and child type selectors. You must understand the relationship between the elements in the DOM so that you can effectively manipulate those elements. Consider the following HTML markup:
<div id=”information”>
<ul>
<li><a href=”foo.html”><img src=”bar.jpg” /></a></li>
<li><a href=”glorp.html”><img src=”murkle.jpg” /></a></li>
</ul>
</div>
To know how to travel up and down the DOM tree, you must know what the relationships are between the elements. Figure 1.3 shows how those relationships are defined.
FIGURE 1.3 An outline of the relationships between the elements in the list.
ptg LINE BREAKS AND COMMENTS
Because JavaScript allows you to continue code through line breaks, jQuery will, too. This means that you can spread chained jQuery methods over sev- eral lines. Spreading lengthy chains over multiple lines makes the jQuery methods visually easier to follow and troubleshoot. Quite often you’ll see jQuery chains similar to the following example:
var nextImage = $(‘img[src=”bar.jpg”]’) // define the p starting point
.closest(‘li’) // travel up to the closest list item .next() // move to the next list item
.find(‘img’) // find the image tag in the next list item .attr(‘src’); // grab the source attribute of the found p image tag
I cannot stress enough the importance of commenting your code well.
Although I won’t be commenting a lot of the code in the book for space rea- sons, you can expect to see a lot of commentary within the code samples on the Web site. My personal style is to use the double slash at the end of a line when the comment is quick and use larger comment blocks (beginning with /* and ending with */) when I need to be more descriptive.
// is a short comment
/* this comment may span multiple lines and can be very p descriptive */
Armed with this knowledge, you can traverse the DOM elements for this list.
Given that you know the image source in the first list item, you can retrieve the source attribute from the second image in the list easily, like this:
var nextImage = $(‘img[src=”bar.jpg”]’) // define the starting point .closest(‘li’) // travel up to the closest list item
.next() // move to the next list item
.find(‘img’) // find the image tag in the next list item .attr(‘src’); // grab the sounrce attribute of the found
ptg As I use and continue to learn more about the jQuery library, I’ve accumulated
some good rules of thumb, including being specific about jQuery selectors, cach- ing selectors, and packing up code to make it more efficient. These and other tips provided here will make your code more effective, provide you with some good tools, and shorten your development time.
SELECTING ELEMENTS SPECIFICALLY
To find the elements that you want to act on, jQuery has to traverse the DOM tree.
Depending on the length and complexity of a page, the DOM can be quite large.
Using grossly formed selectors can slow performance and lead to frustration.
jQuery reads selectors right to left, so if you have a selector like this:
$(“div ul li a”);
jQuery will gather all the anchors first, determine if they are within list items, and then find out if the list item is contained within an unordered list that is contained within a <div>.
Whew! It would be better to give one group of these items a class or an id attribute that will allow you to more directly identify one or more of the elements involved. For instance, the anchor tags in this group can be navigation elements and given a class of navigation (<a href=”nav1.html” class=”navigation”>).
That will allow you to shorten the selector to $(“.navigation”). As an added bonus, the element can be more easily referred to and styled in CSS!
TIP: Thanks go out to the very supportive jQuery community for the tips included in this section. You can learn a lot by participating in the jQuery forums at http://forum.jquery.com. Forum participants are always willing to lend a hand to help you solve your jQuery and JavaScript problems.
LEARNING A FEW jQUERY TIPS
ptg MAKING QUICK WORK OF DOM TRAVERSAL
Sometimes, you might need to upgrade a poorly planned older site or application that was developed by someone else. The selector mentioned in the previous sec- tion,$(“div ul li a”), might have to be used repeatedly to achieve the results that you are trying to apply with jQuery. If that is the case, you should cache the selector so that you only need to traverse the DOM once for that selector:
var myNavLinks = $(“div ul li a”); // perform the traversal and p stores it
$(myNavLinks) // the new selector doesn’t have to traverse the p tree again
Caching becomes a valuable performance tool when you want to manipulate dozens or maybe even hundreds of table rows and cells.
TROUBLESHOOTING WITH FIREBUG
Available for nearly every browser, Firebug is the leading tool for debugging and profiling JavaScript. It should definitely be in your Web development toolbox.
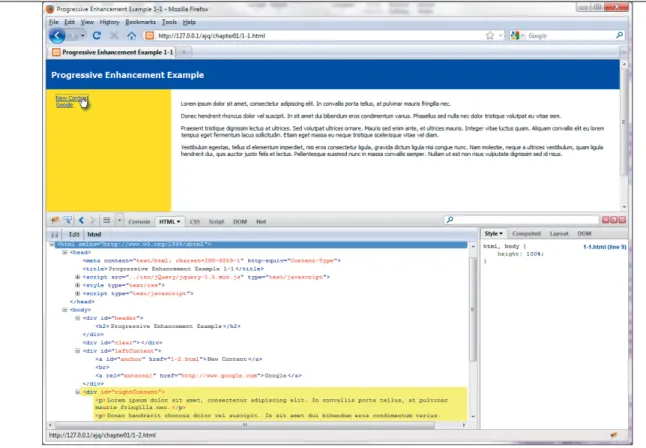
Firebug allows you to carry out several tasks, including watching your code “in action” to see how it behaves when events are triggered on your Web pages. For instance, in Figure 1.4 a link has been clicked. If you look closely, you can see that several lines of HTML have been highlighted in yellow. Those lines are the portion of the HTML affected by the clicked link.
One of Firebug’s handier features is its ability to identify JavaScript (and therefore jQuery) errors accurately, allowing you to quickly troubleshoot and correct problems.
I’ll use some of Firebug’s features throughout the book. To talk about and dem- onstrate all the features Firebug has to offer would take an entire book!
TIP: Firebug is a free download from http://getfirebug.com.
ptg
PACKING UP YOUR CODE
While you are working on writing your code, it helps to use lots of white space and comments. All of the comments and white space take up room, so it is best to pack up your code when you get ready to move your code into production. You may have noticed that the official jQuery site, as well as plugin developers, offer scripts in two versions: a normal version and a minified version. The minified version strips out most of the white space and comments. This ensures that your Web site is delivered more efficiently.
Several tools are available for packing up your code. One of my favorites is a freebie provided by Google, the Google Closure Compiler (http://code.google.com/
closure/compiler). Google’s Closure Compiler provides a quick method for minifying
FIGURE 1.4 Using Firebug, you can examine jQuery’s actions.
ptg For fun, let’s pack some code in the file spritenav.js, which you will use later in
the book. With white space and comments, the code looks like this:
/*
* NAME: SpriteNav(jQuery) * AUTHOR: Jay Blanchard * DATE: 2011-01-10
* BUSINESS RULE: <if applicable>
*
* REVISION: a20110110jb * STATUS: open
* USAGE: call from web interface page
*
* REVISION HISTORY *
* a20110110jb - create CSS and XHTML for initial testing layout *
*/
$(document).ready(function() {
$(function() {
/* set original values */
$(“#spriteNav span”).css(“opacity”, “0”);
$(“#spriteNav span.selected”).css(“opacity”, “1”);
/* how do we hover? let me count the ways... */
$(“#spriteNav span”).hover(function() {
ptg opacity: 1
}, 75); // end mousein } else {
$(this).css(“opacity”, “1”); // end mousein }; //end if
}, function(){
if($(this).attr(“class”).length == 0) { $(this).stop().animate({
opacity: 0 }, 250); // end mouseout } else {
$(this).css(“opacity”, “1”); // end mouseout }; //end if
}); // end hover function
/* click me! click me! */
$(“#spriteNav span”).click(function() {
/* we clicked, so remove the selected class from all */
$(“#spriteNav span”).removeClass(“selected”);
/* then add it to the selected one */
$(this).addClass(“selected”);
/* then fade out the previously selected item */
/* be specific about the ones to be faded out */
$(“#spriteNav span:not(.selected)”).stop().animate({
opacity: 0
}, 500);
}); // end click function }); // end function
}); // end document ready function
ptg
In Figure 1.5 you can see the side-by-side comparison of the code before and after packing. After packing the code with the Google Closure Compiler, it becomes:
$(document).ready(function(){$(function(){$(“#spriteNav span”).css p (“opacity”,”0”);$(“#spriteNav span.selected”).css(“opacity”, p ”1”);$(“#spriteNav span”).hover(function(){if($(this).attr p (“class”).length==0){$(this).stop().animate({opacity:1},75)}
p else{$(this).css(“opacity”,”1”)}},function(){if($(this).
p attr(“class”).length==0){$(this).stop().animate({opacity:0}, p 250)}else{$(this).css(“opacity”,”1”)}});$(“#spriteNav span”).
p click(function(){$(“#spriteNav span”).removeClass(“selected”);
FIGURE 1.5 The code before and then after packing, which also reveals warnings and errors that are encountered by the Closure Compiler.
ptg Reduced to 40 percent of its original size (1360 bytes originally; 567 bytes after
minifying), the code is very compact.
Although this is a good example of the gains to be made while minifying jQuery code, you really don’t need to minify small files. If you are using a number of small files, it is best to combine them and then run them through the reduction process.
If you plan to minify your files, be sure to keep one copy that you use for editing with all the white space and comments intact, and then minify when you are ready to use the file on a production Web site or application.
USING RETURN FALSE
Anyone who has done any amount of JavaScript programming, including program- ming with jQuery, has run into return false;. For the most part, many have used it improperly. Let’s look at an example, an HTML anchor tag link:
<div><a href=”inc/content.html”>Click Here!</a></div>
Typically, you might apply something similar to the following jQuery to handle the anchor tag:
$(“div a”).click(function() { var link = $(this).attr(“href”);
$(“#content”).load(link);
return false;
});
In this example you want to be able to click the link and have that link not perform as it normally would; you want it to just load the information from the link into the element with an id of content. So, you insert return false; into the function. It works! But do you really know how?
Because return false works so well, you may not realize when it trips you up later on. The return false function first calls preventDefault(); and then it calls stopPropogation(). The function stopPropogation() stops the click event in this case from bubbling up the DOM, which may prevent subsequent click events from working on the ancestors you may add later. You’ll end up scratching your head a lot when your seemingly perfect code fails to do what you ask of it with no errors lurking about to give you a clue as to what happened.
ptg More often than not what you should use is preventDefault(), as shown in
the following highlighted code:
$(“div a”).click(function(e) { var link = $(this).attr(“href”);
$(“#content”).load(link);
e.preventDefault();
});
Take a few minutes to become familiar with the other related functions, stopPropogation() and stopImmediatePropogation(), because you may find them handy and revealing!
FIDDLING WITH jQUERY CODE
One of the most useful and coolest tools I’ve seen in many years is a Web application called jsFiddle (http://jsFiddle.net). Developed by Piotr Zalewa as “a playground for Web developers,” jsFiddle is a great Web site where you can combine HTML and CSS while experimenting on that code with jQuery (Figure 1.6). The tool sup- ports several different versions of jQuery and is an excellent troubleshooting tool.
Using the jsFiddle Web site is a great way to share code with other developers for discussion, troubleshooting, or bragging rights. The Web site also allows you to include the latest jQuery UI (user interface) code in your experiments.
ptg
FIGURE 1.6 Using jsFiddle, you can test a jQuery code snippet.
ptg Throughout the book, you’ll be using several technologies to bring your Web
applications to life. To start, you’ll use HTML, CSS, and JavaScript, and then mix in PHP and MySQL to support further interaction.
STARTING WITH HTML
HTML is what you’ll use to start all of your Web pages. Use of the latest version of HTML, HTML5, is on the rise, and examples in the book use it where appropriate.
Because HTML5 is still in development, browser support is limited. I recommend plenty of cross-browser testing when using HTML5.
jQuery can select HTML DOM elements easily. For instance, if you have a form input element:
<input name=”username” type=”text” size=”48” />
you can use the jQuery selector $(‘input[name=”username”]’) to interact with the element.
STYLING WEB PAGES WITH CSS
CSS can be tricky territory because different browsers provide different levels of support for the properties that CSS has to offer. Cross-browser testing is still required to make sure that what displays in one also displays in another. It is very important to understand that it is OK if your sites do not look exactly the same from browser to browser.
jQuery will support the latest and greatest CSS version, CSS3, and all of its properties, but make sure that you test in many browsers because that is the only way you can determine if what you see is acceptable to you.
USING PHP AND MYSQL
As one of the most popular server-side languages on the Web, PHP has made its mark on the technology you know and use every day. For the examples and projects in this book, you’ll be using PHP not only for supporting asynchronous data requests to the server (AJAX), but also for shortening your development time with jQuery.
You will couple PHP with the MySQL database to support and enhance your jQuery projects.
COMBINING jQUERY
WITH OTHER CODE
ptg In 2003, Steve Champeon, speaking at the very popular SXSW Interactive conference
in Austin, Texas, coined the term progressive enhancement. The concept arrived at just about the same time as some earlier JavaScript libraries.
The process behind progressive enhancement is to first develop your markup, then add style to that markup (CSS), and finally bring into play enhanced interac- tion via JavaScript.
In the good old days of Web development, designers and coders were stuck with a paradigm called graceful degradation. Everyone designed their sites for the latest browsers using the latest technologies and then “fixed” their pages by inserting hacks or removing JavaScript functionality so that they would gracefully degrade and be usable by older, less-capable browsers or in situations where the user might have JavaScript disabled. Developers attempted to perform browser detection using JavaScript so that they could deliver flashy interaction in every browser available.
It was tiresome and frustrating. Steve Champeon’s concept changed all of that.
There is a better way to describe progressive enhancement. In his 2008 article, “Understanding Progressive Enhancement” (www.alistapart.com/articles/
understandingprogressiveenhancement), on the A List Apart Web site, Aaron Gustafson painted my favorite picture of what progressive enhancement is when he wrote, “If you’re a candy fan, think of it as a Peanut M&M: Start with your content peanut, marked up in rich, semantic (X)HTML. Coat that content with a layer of rich, creamy CSS. Finally, add JavaScript as the hard candy shell to make a wonderfully tasty treat (and keep it from melting in your hands).”
Let’s examine a quick example of progressive enhancement. Here is a portion of 1-1.html (available in the code download at www.appliedjquery.com in the folder chap1/1-1.html):
<body>
<div id=”header”><h2>Progressive Enhancement Example</h2></div>
<div id=”clear”></div>
<div id=”leftContent”>
<a href=”1-2.html” id=”anchor” >New Content</a><br />
<a href=”http://www.google.com” rel=”external”>Google</a>
</div>
<div id=”rightContent”></div>
</body>
PROGRESSIVE ENHANCEMENT
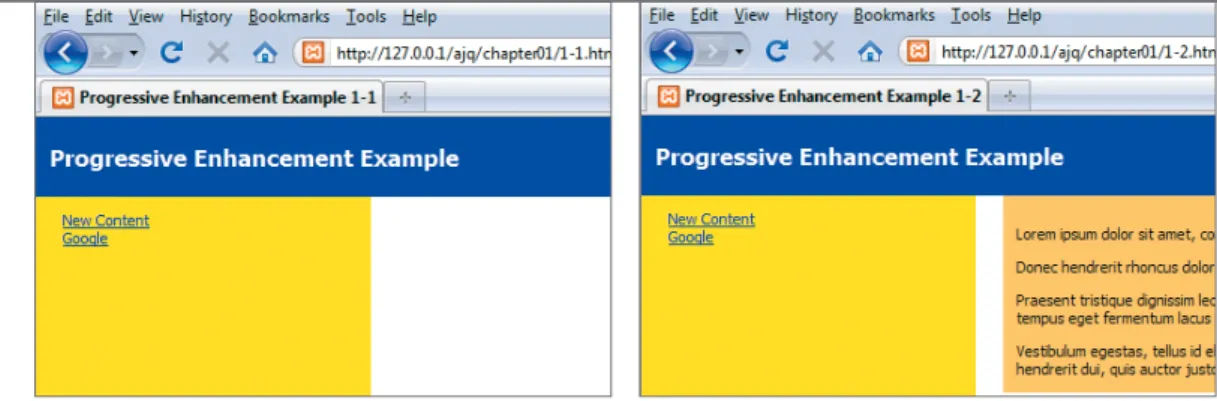
ptg The markup is pretty standard. Adding some basic CSS produces what you
see in Figure 1.7.
I’ve also produced the HTML and CSS for a second page called 1-2.html, which is in the folder chap1/1-2.html. If you click the link for New Content, that page will load normally (Figure 1.8). The only change made, other than adding some content for this example, is in the CSS that causes the content to be displayed in a burnt orange box:
#rightContent { width: 75%;
margin-left: 20px;
padding-top: 10px;
padding-left: 10px;
background-color: #FFCC66;
vertical-align: top;
float: left;
} FIGURE 1.7 The basic progres- sive enhancement page with HTML and CSS only.
FIGURE 1.8 The result of clicking the New Content link in 1-2.html.
ptg The site works perfectly, even though it is rather bland. Let’s add just a bit of
jQuery without touching any of the current markup.
1. Include the jQuery library by placing a tag in the <head> section of 1-1.html:
<head>
<meta http-equiv=”Content-Type” content=”text/html;
p charset=ISO-8859-1” />
<title>Progressive Enhancement Example 1-1</title>
<script type=”text/javascript” src=”../inc/jQuery/8 jquery-1.5.min.js"></script>
2. Add a code block also within the <head> tags, although it is not necessary to do so, as you will see in later examples:
<script type=”text/javascript”>
$(document).ready(function(e) { $(“#anchor”).click(function() {
$(“#rightContent”).load(“1-2.html #rightContent > p”);
e.preventDefault();
});
});
</script>
Basically, the code specifies, Anytime the element identified as anchor is clicked, load the paragraphs from 1-2.html file’s rightContent area into 1-1.
html file’s content area.
ptg Now when you click the New Content link, the page does not reload and the
content appears as you expect, without the yucky background color (Figure 1.9).
Adding jQuery without using inline JavaScript tags is known as unobtrusive JavaScript and adheres to the principles of progressive enhancement. None of the HTML tags had to be changed, and if JavaScript is disabled, the pages will continue to work as designed. No more embedding JavaScript calls within the HTML tags!
In addition, the CSS here is unobtrusive, too. There are no style attributes as part of the HTML tags, but jQuery does give you the ability to change styling on the fly by giving you ways to add and remove classes and directly manipulate the CSS of every element on the page. You’ll be using these functions frequently throughout the book.
FIGURE 1.9 The content from the second page appears with- out the distracting background color.
ptg Any good Web application begins on paper, perhaps with a few basic sketches.
By the end of the book, you’ll have the ability to greatly enhance your sites with jQuery, so planning is especially important. You don’t want to just throw jQuery code willy-nilly into your Web pages without a plan, or soon you’ll have interaction overload. So many page elements will change and move on the screen that you’ll get your visitor’s attention, but not in the ways that you want to gain that attention.
Creating a storyboard is a great way to plan how you will guide the visitor through your site. Drawing a storyboard doesn’t require any special skill. You can use sticky notes, sketches, flowcharts, or even the UML (Unified Modeling Language) to show how potential interactions behave and pages connect to each other. Be sure to ask lots of “what ifs.” What if the viewer clicks here? What if the mouse scrolls over this section of the page? What if the total is over $100? What if you put your spinning, flaming logo right in the center of the page?
Asking questions like these and creating a basic layout of the site will open your eyes to how your visitors will see and interact with your Web pages. It will also give you some ideas for how you can build more jQuery widgets that add value to your sites.
WRAPPING UP
In this chapter, you learned about the jQuery JavaScript library, how to write the proper syntax for jQuery, and how jQuery selectors are like CSS selectors. You learned how jQuery interacts with the DOM and how you can use jQuery to traverse the DOM. You gained knowledge of tools like Firebug, jsFiddle, and the Google Closure Compiler to help you troubleshoot, test, and make your jQuery scripts ready for use on live Web sites and applications. Finally, you learned how to combine jQuery with HTML, CSS, and other languages using Progressive Enhancement techniques to keep all of your code and scripts compartmentalized for easy maintenance and to let site visitors with less-capable browsers use your content with restriction.
Now that you are armed with some good tools and an understanding of the jQuery basics, it is time to jump right in. To learn how jQuery can interact with the browser and events associated with the browser, just turn the page!
PLANNING DESIGN
AND INTERACTION
ptg
2
WORKING WITH
EVENTS
ptg
The bread and butter of jQuery is its ability to inter- act with all kinds of browser and physical events,
including mouse movement, form interaction, and keyboard
events. You can take control of these events using jQuery to provide your Web-site visitors with a much richer interactive experience.
By binding events such as a mouse click or a keypress to text, links, images, and other DOM elements, you can call into action myriad functions from animation to AJAX. Functions can be combined to create complex chain reactions, a very cool thing.
In this chapter I’ll show you how to gain control over many of these
events while creating a fictional Web site called Photographer’s
Exchange. You will combine the events to create effects that will
make your Web audience sit up and take notice. Other events are
very subtle and will add flavor to your Web applications.
ptg
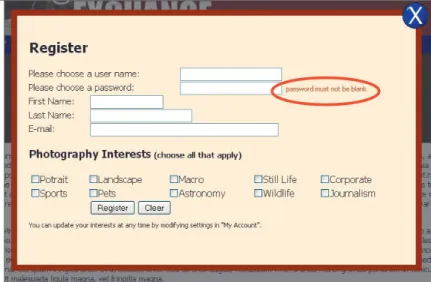
You will design the Photographer’s Exchange Web site to allow photographers to show off their pictures and techniques. Users will be able to upload pictures and edit information about those pictures. Additionally, users will be able to submit articles about photography. Visitors will be able to search the site using different criteria. The front page of the site will showcase featured photographs and articles from photographers. Figure 2.1 shows the basic layout of the site ready for editing.
FIGURE 2.1 The front page of Photographer’s Exchange.
The text is used as a place- holder for development you will add later.
NOTE: All of the code in this book is available as a download from the book’s Web site at www.appliedjquery.com/download.
USING THE PHOTOGRAPHER’S
EXCHANGE WEB SITE
ptg If you want to apply the principles of progressive enhancement—as discussed in
Chapter 1—to your site, you need to make your navigation as graceful as possible.
The easiest way to do this is to fully form your links as if JavaScript, and therefore jQuery, is not available for your visitors.
Open the chap2/2-1.php file. You’ll find an unordered HTML list containing three links:
<a href=”search.php” rel=”searchWindow” class=”modal”
p id="search"><span>Search</span></a>
<a href="register.php" rel="registerWindow" class="modal"
p id="register"><span>Register</span></a>
<a href="login.php" rel="loginWindow" class="modal"
p id="login"><span>Login</span></a>
Each link works properly in the absence of JavaScript. Clicking on any of them causes the respective page to be loaded into the browser.
This set of links will be used to call modal windows into the browser.
CREATING AND CALLING MODAL WINDOWS
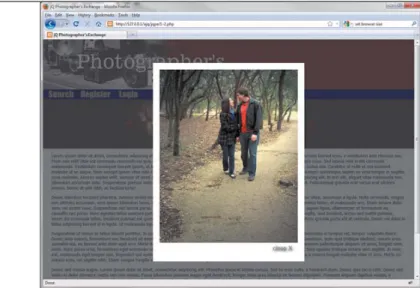
Modal windows are a clever way for users to interact with Web sites and applica- tions. They provide smooth transitions by placing content “above” the current Web page and can give users information, as well as receive information from users either in forms or a confirmation dialog. Once the modal window is closed, users return to the same content in the Web browser that they were viewing previously.
Each modal window is used to perform a specific action in the site: search, register, or login. You do not have to make any modifications to the HTML for the links; all you have to do is add the proper jQuery.
1. Create a jQuery statement that selects all of the anchor tags that have a class of modal:
$(‘a.modal’).click(function() {
NOTE:To save time and space in this book, I did not create the additional Web pages. The content for each modal window, which is contained in 1-1.php, can be placed in separate pages if you are concerned that users will not have JavaScript available.
MAKING NAVIGATION GRACEFUL
ptg You have now handed over control of the click event to jQuery or have
bound jQuery’s click event to the anchor tag. This binding allows jQuery to handle the click event and any functions assigned to that event.
The remainder of the function decides which modal window to open, where to place the window, and how to close the modal window. Additionally, the function places a semitransparent “shade” over the entire site to make the modal window stand out. You can find the complete code in chap2/inc/jqpe.js under the section commented /* modal windows */.
2. Store the value of the rel attribute from the currently clicked item in a variable that will be used later in the function:
var modalID = $(this).attr(‘rel’);
3. Fade in the modal window that you selected and add a link that allows you to close the modal window. A graphic element (close_button.png) is used to make the close button look nice:
$(‘#’ + modalID).fadeIn().prepend(‘<a href=”#”
p class=”close”><img src="grfx/close_button.png"
p class=”close_button” title="Close Window"alt=
p "Close" /></a>');
In the file chap2/inc/modal.css, the margins and padding were defined for each of the modal windows. To get them to center on the screen, you need to account for the extra space created by the padding and margins so that the proper offset can be applied. In this case there is a 20-pixel margin and 20 pixels of padding surrounding each modal window. That means that you must add 80 pixels to the height and width. With the height and width set, you then divide by 2 to get the proper margin.
4. Assign the horizontal and vertical margin calculated values to the variables modalMarginTop and modalMarginLeft:
var modalMarginTop = ($(‘#’ + modalID).height() + 80) / 2;
var modalMarginLeft = ($(‘#’ + modalID).width() + 80) / 2;
ptg
5. Now add the margin information to the modal window’s CSS to center it:
$(‘#’ + modalID).css({
‘margin-top’ : -modalMarginTop, ‘margin-left’ : -modalMarginLeft });
Figure 2.2 shows a model of the modal box and how much it must be offset to the top and left of the browser window to center the box.
If you don’t calculate where the center of the box should go, the upper- left corner of the box will be centered in the browser window, as shown in Figure 2.3.
FIGURE 2.2 The modal win- dow box, including padding and margins. The top-left corner of the modal window is located at 50 percent of the window height and width to begin. Setting the top and left margins with negative numbers moves the modal box to the center of the browser window.
0, 0
move -240 pixels
move -290 pixels 500 x 400 modal div with 20 pixels of padding and 20 pixels of margin.
Overall, the modal box is 580 pixels by 480 pixels.
SIZING UP ANIMATIONS ptg
When creating the modal window, you invoked the very first animation using the jQuery method fadeIn(). jQuery has a number of built-in ani- mation methods, including fadeIn and slideDown as well as the animate method that allows you to create custom animations.
What is an animation?
In jQuery an animation is the act of moving an element from one CSS state to another CSS state smoothly. Animation can only be used on CSS rules that have numerical properties. jQuery uses a set of algorithms to calculate each of the points from the start of one state to the end of another state. A simple example is opacity.
If an element is invisible, its opacity is 0. To make the element fully visible, you set its opacity to 1. Depending on the length of time assigned to the transition, jQuery will calculate discrete steps needed to make the element appear to fade in (or out), moving opacity from 0 to 1 or vice versa.
jQuery also supports queues so that you can combine animations to create complex movements and changes.
The jQuery user interface (UI) extends jQuery basic animation events and FIGURE 2.3 The modal box
without calculating where the center of the box should go. The top-left corner of the modal box is at 0, 0 for the browser window’s 50 percent height and width.
ptg CREATING A SHADED BACKGROUND
The last order of business for opening the modal window is creating a shaded background. The shade is actually a semitransparent div through which you can still see the Web site. It is a very cool effect and helps users to understand that they are still on your site but that their attention should be focused on the content highlighted for them. You’ll use a similar version of the see-through div for other widgets in the Web site.
1. Append a new div to the body to make the shade:
$(‘body’).append(‘<div id=”modalShade”></div>’);
2. Animate the shaded background to partial opacity to make it somewhat transparent:
$(‘#modalShade’).css(‘opacity’, 0.7).fadeIn();
3. Close the click function with the return false; method to keep the link from trying to load another page into the browser.
return false;
});
Once complete, the jQuery code opens the modal window in the center of the browser window with a shaded background that allows users to see the Web page beneath it (Figure 2.4).
FIGURE 2.4 The modal window for registration is opened and is properly centered with the shaded, see-through background.
ptg CONTROLLING THE FUTURE WITH LIVE( ) AND DELEGATE( )
jQuery provides two methods for binding events to elements created now or in the future: live and delegate. Both save you the additional work of add- ing new event bindings as you add new elements dynamically. The primary difference between the two is that live does not support DOM traversal, whereas delegate will support binding of events to specific DOM elements.
To use live, you must use it immediately after a selector to bind to an event, just as you did in the code for closing the modal window:
$(‘a.close, #modalShade’).live(‘click’, function() {...
On the other hand, delegate can be used as follows:
$(‘ul#myList’).delegate(‘li’, ‘click’, function() {...
This binds the click event to each of the list items (<li>) now and in the future. If you append more list items to the unordered list, they will all have the click function bound to them.
Don’t worry about handling form information or processing that information right now. I’ll cover form handling and processing in Chapter 3, “Making Forms Pop” and Chapter 4, “Being Effective with AJAX.”
CLOSING THE MODAL WINDOW
Users must be able to close the window and get rid of the shade, so you need to give users a way to get back to the Web site.
1. Start the close function by binding the close graphic and modal shade to a jQuery click method:
$(‘a.close, #modalShade’).live(‘click’, function() {
Neither of these elements existed in the DOM (see Chapter 1 for a short discussion of the DOM) originally, so you have to use a special jQuery func- tion,live, to bind the click to these elements.
ptg 2. Determine which modal window to close by getting the id of the parent
of a.close:
var thisModalID = $(‘a.close’).parent().attr(‘id’);
3. Now fade out the modal window and the shade. When the fade-out is complete, use the callback function fadeOut provides to remove the div that held the shade and the link that was prepended to the modal window:
$(‘#modalShade, #’+thisModalID).fadeOut(function() { $(‘#modalShade, a.close’).remove();
});
return false;
});
In simple terms a callback is a block of executable code that is passed as an argument to another function. The block of code in the callback will run when the original function is complete. You issue a callback to the fadeOut function as highlighted:
$(‘#modalShade, #’+thisModalID).fadeOut(function() { $(‘#modalShade, a.close’).remove();
});
The fade-out completes before issuing the callback to remove the #modal- Shade and a.close element from the DOM.
Combining multiple jQuery methods in this way makes a click on a link a pretty powerful event. Can you bind the click event, or any other event, to elements that are not links? Of course you can, and you already have. Look at the following line again:
$(‘a.close, #modalShade’).live(‘click’, function() {
The highlighted value is the id for the div that held the shade, which is also bound to the live click function. This allows users to click anywhere on the shade to fade out the modal window and perform the other items in the function.
Binding to nonlink-type elements is common when using jQuery.
ptg jQuery gives you the flexibility to bind events to any element available in the DOM.
This gives you the capability to set up highly interactive user interfaces. Creating a truly fun and intuitive user experience is easier than ever because you are not limiting your users to just clicking a link or a button on your Web site.
The Photographer’s Exchange Web site needs a way to feature members’ photo- graphs. A simple photo carousel will provide an excellent method of showcasing the members’ talents while allowing you, as the developer, to flex your creative muscles.
BUILDING AN IMAGE CAROUSEL
Let’s add a simple version of a photo carousel to the site now.
The concept for the carousel is very simple and is based on an unordered list of thumbnail images. You can see this list added to the site in chap2/2-2.php:
<div id=”carouselContainer”>
<div id=”carouselOuter”>
<div id=”scrollLeft”><img src=”photos/arrowLeft.jpg” /></div>
<div id=”carouselInner”>
<ul id=”carouselUL”>
<li><img class=”carThumb” src=”photos/thumb_ka1.jpg” /></li>
<li><img class=”carThumb” src=”photos/thumb_ka2.jpg” /></li>
<li><img class=”carThumb” src=”photos/thumb_ka3.jpg” /></li>
<li><img class=”carThumb” src=”photos/thumb_ka4.jpg” /></li>
<li><img class=”carThumb” src=”photos/thumb_ka11.jpg” /></li>
<li><img class=”carThumb” src=”photos/thumb_ka12.jpg” /></li>
<li><img class=”carThumb” src=”photos/thumb_ka13.jpg” /></li>
<li><img class=”carThumb” src=”photos/thumb_ka14.jpg” /></li>
</ul>
</div>
<div id=”scrollRight”><img src=”photos/arrowRight.jpg” /></div>
</div>
BINDING EVENTS TO
OTHER ELEMENTS
ptg Now that you have a list of images, you need to add the following carousel features:
䊏 Automatic scrolling.
䊏 Scrolling that stops when a mouse cursor hovers over any portion of the carousel.
䊏 Scrolling that continues when the mouse cursor is not hovering over any portion of the carousel.
䊏 Highlighting an image when the mouse cursor hovers over a thumbnail of that image.
䊏 Controlling manual scrolling.
䊏 Displaying a larger version of a picture when its respective thumbnail is clicked.
Before you can start adding these features, you need to create the container for the carousel using CSS. Let’s cover that first.
SETTING UP THE CAROUSEL CSS
To make the carousel effect work well, it must have a solid container. The container will be defined by the CSS along with the markup that you created earlier.
1. Set up the #carouselInner rule to allow only a certain number of thumbnails to be visible at any one time:
#carouselInner { float: left;
width: 510px;
overflow: hidden;
background: #000000;
}
The#carouselInner rule sets up a visible area of 510 pixels. Anything outside of the element assigned to this rule will not be visible. The 510-pixel area is calculated by adding the widths of three thumbnails (160 pixels each) plus 10 pixels for each thumbnail. The additional pixels allow for padding around each image.
ptg 2. Create a left margin that allows two images to be hidden off to the left of the
carousel. Setting this margin is the most important part of the #carouselUL rule. Having two images to the left of the carousel ensures that the scrolling will happen smoothly. Make sure that the whole carousel is wide enough to hold the number of thumbnails you plan to display. In this case #carouselUL is designed to hold a maximum of 50 thumbnails:
#carouselUL {
position: relative;
list-style-type: none;
left: -340px;
margin: 0px;
padding: 0px;
width: 8500px;
padding-bottom: 10px;
}
3. Now set the height and width of the list items:
#carouselUL li{
float: left;
width: 160px;
height: 128px;
padding: 0px;
background: #000000;
margin-top: 10px;
margin-bottom: 10px;
margin-left: 5px;
margin-right: 5px;
text-align: center;
}
ptg Figure 2.5 gives you an idea of how list items will be moved. As the carousel
scrolls to the left, the first list item is moved to the end of the list while the item is invisible. The reverse happens (the last list item is moved to the first spot) when the carousel scrolls to the right. The user gets the impression that the images are on a carousel going around and around.
Once the style information has been defined, you can begin working on adding the features to the carousel using jQuery.
ADDING AUTOMATIC SCROLLING
It is time for you to start adding the features defined for the carousel. You’ll first create a function that automatically scrolls the carousel. Create a file called carousel.
js and save it in the chap2/inc folder.
1. Create the function using the function keyword and call the function autoCarousel. Then set the variable itemWidth equal to the width of one of the list items in the carousel and add 10 to it to make space for the padding:
function autoCarousel() {
var itemWidth = $(‘#carouselUL li’).outerWidth() + 10;
FIGURE 2.5 The visible and invisible portions of the carousel. You can also see how the images will move to make the carousel “infinite.” The thumbnails will start over at the beginning of the list when the last one is displayed.
Invisible Scroll Direction Invisible
Visible Portion
NOTE: There is much more to the CSS (chap4/css/carousel.css) for the carousel, but it is mostly decorative or setting up space for the arrows that will be used for manual control of the carousel. Additionally, the style information for the modal window to display the larger pictures is defined.

![[CSIE 5521] Wireless Networking: Fundamentals and Applications](data:image/gif;base64,R0lGODlhAQABAIAAAP///wAAACH5BAEAAAAALAAAAAABAAEAAAICRAEAOw==)