TIBCO BusinessConnect™
Trading Partner Administration
Software Release 6.2 August 2014
Two-Second Advantage®
OR BUNDLED TIBCO SOFTWARE IS SOLELY TO ENABLE THE FUNCTIONALITY (OR PROVIDE LIMITED ADD-ON FUNCTIONALITY) OF THE LICENSED TIBCO SOFTWARE. THE EMBEDDED OR BUNDLED SOFTWARE IS NOT LICENSED TO BE USED OR ACCESSED BY ANY OTHER TIBCO SOFTWARE OR FOR ANY OTHER PURPOSE.
USE OF TIBCO SOFTWARE AND THIS DOCUMENT IS SUBJECT TO THE TERMS AND CONDITIONS OF A LICENSE AGREEMENT FOUND IN EITHER A SEPARATELY EXECUTED SOFTWARE LICENSE
AGREEMENT, OR, IF THERE IS NO SUCH SEPARATE AGREEMENT, THE CLICKWRAP END USER LICENSE AGREEMENT WHICH IS DISPLAYED DURING DOWNLOAD OR INSTALLATION OF THE SOFTWARE (AND WHICH IS DUPLICATED IN THE LICENSE FILE) OR IF THERE IS NO SUCH SOFTWARE LICENSE AGREEMENT OR CLICKWRAP END USER LICENSE AGREEMENT, THE LICENSE(S) LOCATED IN THE “LICENSE” FILE(S) OF THE SOFTWARE. USE OF THIS DOCUMENT IS SUBJECT TO THOSE TERMS AND CONDITIONS, AND YOUR USE HEREOF SHALL CONSTITUTE ACCEPTANCE OF AND AN AGREEMENT TO BE BOUND BY THE SAME.
This document contains confidential information that is subject to U.S. and international copyright laws and treaties. No part of this document may be reproduced in any form without the written authorization of TIBCO Software Inc.
TIBCO, Two-Second Advantage, TIBCO Hawk, TIBCO Rendezvous, TIBCO Runtime Agent, TIBCO ActiveMatrix BusinessWorks, TIBCO Administrator, and TIBCO Designer are either registered trademarks or trademarks of TIBCO Software Inc. in the United States and/or other countries.
Enterprise Java Beans (EJB), Java Platform Enterprise Edition (Java EE), Java 2 Platform Enterprise Edition (J2EE), and all Java-based trademarks and logos are trademarks or registered trademarks of Oracle Corporation in the U.S. and other countries.
All other product and company names and marks mentioned in this document are the property of their respective owners and are mentioned for identification purposes only.
THIS SOFTWARE MAY BE AVAILABLE ON MULTIPLE OPERATING SYSTEMS. HOWEVER, NOT ALL OPERATING SYSTEM PLATFORMS FOR A SPECIFIC SOFTWARE VERSION ARE RELEASED AT THE SAME TIME. SEE THE README FILE FOR THE AVAILABILITY OF THIS SOFTWARE VERSION ON A SPECIFIC OPERATING SYSTEM PLATFORM.
THIS DOCUMENT IS PROVIDED “AS IS” WITHOUT WARRANTY OF ANY KIND, EITHER EXPRESS OR IMPLIED, INCLUDING, BUT NOT LIMITED TO, THE IMPLIED WARRANTIES OF MERCHANTABILITY, FITNESS FOR A PARTICULAR PURPOSE, OR NON-INFRINGEMENT.
THIS DOCUMENT COULD INCLUDE TECHNICAL INACCURACIES OR TYPOGRAPHICAL ERRORS.
CHANGES ARE PERIODICALLY ADDED TO THE INFORMATION HEREIN; THESE CHANGES WILL BE INCORPORATED IN NEW EDITIONS OF THIS DOCUMENT. TIBCO SOFTWARE INC. MAY MAKE IMPROVEMENTS AND/OR CHANGES IN THE PRODUCT(S) AND/OR THE PROGRAM(S) DESCRIBED IN THIS DOCUMENT AT ANY TIME.
THE CONTENTS OF THIS DOCUMENT MAY BE MODIFIED AND/OR QUALIFIED, DIRECTLY OR
|
iiiContents
Figures . . . xi
Tables . . . xiii
Preface . . . .xv
Related Documentation . . . .xvi
TIBCO BusinessConnect Documentation. . . .xvi
Other TIBCO Product Documentation . . . .xvi
Typographical Conventions . . . xviii
Connecting with TIBCO Resources . . . .xxi
How to Join TIBCOmmunity . . . .xxi
How to Access TIBCO Documentation. . . .xxi
How to Contact TIBCO Support . . . .xxi
Chapter 1 Participants . . . .1
Participants Overview . . . 2
Hosts and Partners . . . 2
Managing Participants . . . 2
Creating a New Participant . . . 4
Exporting Participant Data . . . 5
Importing Participant Data . . . 5
Copying a Participant . . . 5
Deleting a Participant . . . 6
Searching for a Participant . . . 7
Editing Participant Data . . . 8
General Tab for Participants . . . 9
Business Locations Tab for Participants . . . 10
Credentials Tab for Participants . . . 12
PKI (Public Key Infrastructure) . . . 12
PGP (Pretty Good Privacy). . . 12
Managing Host Credentials . . . 12
Managing Partner Credentials . . . 17
Exporting PGP Keys . . . 20
Protocols Tab for Participants . . . 25
Enabling a Protocol. . . 25
Disabling a Protocol . . . 25
Configuring a Protocol . . . 26
Managing Transports for Participants . . . 26
Proxy Settings Tab for Partners. . . 27
User Access Tab for Participants . . . 29
All Authorized Users . . . 29
Adding Users with Access Rights . . . 30
Adding Groups with Access Rights . . . 30
Visibility Tab for Participants . . . 31
Configuring Participant Visibility Settings for tibbr . . . 31
Configuring Participant Visibility Settings for TIBCO BusinessEvents . . . 32
Chapter 2 Business Agreements . . . 33
Business Agreements Overview . . . 34
Identifying the Participants for a New Business Agreement . . . 35
Selecting Participants . . . 35
General Tab for Business Agreements . . . 36
Adding a Protocol Binding . . . 36
Configuring a Protocol . . . 37
User Access Tab for Business Agreements . . . 43
All Authorized Users . . . 43
Adding Internal Users . . . 44
Adding Groups . . . 44
Chapter 3 Operations Editor . . . 45
Operations Editor Overview . . . 46
Importing and Exporting Operations . . . 48
Importing an Operation . . . 48
Exporting an Operation . . . 49
File Specification Dialog . . . 50
Contents
|
vAdding a Proxy for a Host . . . 63
Selecting the Default Proxy for a Host . . . 66
Audit, Non-Repudiation and Runtime Database Configuration . . . 67
User Authentication Configuration . . . 68
Adding an Authentication Source . . . 68
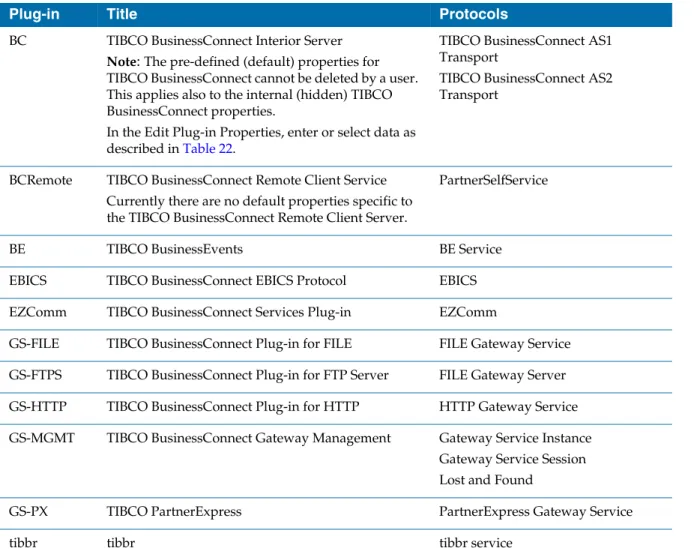
Activated Protocol Plug-ins and Properties . . . 71
Metadata Type Configuration . . . 83
Adding and Removing Metadata . . . 83
Private Process Smart Routing . . . 84
Creating Business Rules for Private Process Smart Routing . . . 84
Managing Business Rules for Private Process Smart Routing. . . 87
Credential Expiry Alerter . . . 88
Configuring the Credential Alerter . . . 88
User Access Audit Trail . . . 90
Grouping Search Results . . . 92
Utilities . . . 93
Exporting Schemas . . . 93
Visibility . . . 94
Configuring tibbr Settings . . . 94
Configuring TIBCO BusinessEvents Settings. . . 96
Configuring Application Monitoring and Management Settings . . . 98
Chapter 5 User Access Management . . . .105
Overview . . . 106
TIBCO Administrator User Categories . . . 106
User Management . . . 106
Using TIBCO Administrator User Management . . . 107
Setting TIBCO BusinessConnect Access Rights for a User . . . 108
Managing Users with TIBCO BusinessConnect User Management . . . 110
Adding Users . . . 111
Editing Users . . . 114
Authenticating External Users . . . 121
Editing LDAP Connection . . . 122
Removing Users . . . 124
Searching for Users . . . 124
Managing Groups with TIBCO BusinessConnect User Management . . . 125
Adding a Group . . . 125
Chapter 6 Log Viewer . . . .133
Overview . . . 134
Audit Logs. . . 134
Non-Repudiation Logs . . . 134
Resend Logs . . . 134
Performing Log Searches . . . 135
Setting Preferences . . . 136
Performing a Log Search . . . 138
Viewing Search Results . . . 141
Summary View. . . 141
Transaction Details View . . . 141
State Details View . . . 141
Cancelling Transactions . . . 144
Saving and Reusing Queries . . . 145
Saving a Query . . . 145
Reusing a Query . . . 145
Resending Transactions . . . 146
Resendable Transactions. . . 146
Viewing Resend History. . . 147
Chapter 7 Reporting . . . 149
Overview . . . 150
Generating Reports. . . 151
Inbound Transaction Per Protocol . . . 151
Outbound Transaction Per Protocol . . . 152
Chapter 8 Email Transport. . . 153
Email Overview . . . 154
Configuring POP3 and SMTP for Email . . . 157
Configuring the POP3 Server Polling Service . . . 157
Configuring an SMTP Server for a Host . . . 157
Configuring an SMTP Server for a Partner . . . 157
Setting Up Email for a Trading Host . . . 158
Contents
|
viiSetting Up FTP/S for a Trading Host . . . 170
Enabling FTP/S Inbound. . . 170
Selecting and Configuring FTP/S Inbound . . . 170
Setting Up FTP/S for a Trading Partner . . . 174
Configuring FTP/S Outbound . . . 174
Setting Up FTP Proxies . . . 177
Chapter 10 SSHFTP Transport . . . .179
SSHFTP Transport Overview. . . 180
Setting Up SSHFTP for a Trading Host . . . 181
Enabling SSHFTP Inbound. . . 181
Selecting and Configuring SSHFTP Inbound . . . 181
Setting Up SSHFTP for a Trading Partner . . . 189
Configuring SSHFTP Outbound . . . 189
Chapter 11 HTTP, HTTPS, and HTTPSCA Transports. . . .193
Overview . . . 194
Setting Up HTTP/S for a Trading Partner. . . 195
Configuring HTTP/S for a Trading Partner . . . 195
Setting Up HTTP Proxies. . . 199
Chapter 12 AS2 Transport . . . .201
AS2 Transport Overview . . . 202
AS2 Transport. . . 202
AS2 Identifiers . . . 207
Setting Up AS2-HTTP/S for a Trading Host . . . 208
Setting the Host’s AS2 Identifier for a Protocol. . . 208
Setting Up AS2-HTTP/S for a Trading Partner. . . 209
Configuring AS2-HTTP/S for a Trading Partner . . . 209
Synchronous and Asynchronous Receipts . . . 213
Chapter 13 AS1 Transport . . . .215
AS1 Transport Overview . . . 216
AS1 Transport. . . 216
Configuring POP3 and SMTP Servers for AS1 Email . . . 220
Configuring the POP3 AS1 Email Server . . . 220
Configuring an SMTP Server for a Host . . . 220
Configuring an SMTP Server for a Partner. . . 220
Setting Up AS1 Email for a Trading Host . . . 221
Selecting AS1 Email for the Trading Host . . . 221
Setting the Host’s Email Address for a Protocol . . . 221
Setting Up AS1 Email for a Trading Partner . . . 222
Configuring AS1 Email for a Trading Partner . . . 222
Setting Up the Partner’s Email for a Protocol. . . 224
Configuring AS1 Email for a Business Agreement . . . 225
Chapter 14 File Transport . . . 227
File Transport Overview . . . 228
Outbound File Transport . . . 229
Configuring Outbound File Transport for a Partner . . . 229
Outbound File Pollers . . . 230
Inbound File Pollers . . . 231
Enabling and Configuring Inbound File Poller . . . 231
Selecting File Inbound in the Business Agreement . . . 231
Chapter 15 Inbox Transport . . . 233
Inbox Transport Overview . . . 234
Outbound Inbox Transport. . . 235
Configuring Outbound Inbox Transport for a Partner . . . 235
Chapter 16 Message Disposition Notification Receipts . . . 237
Overview . . . 238
Configuring MDN Receipts . . . 239
MDN Receipts and Business Acknowledgments . . . 240
MDN Messages Sent to Private Processes . . . 240
Appendix A Troubleshooting . . . 243
Troubleshooting Transport Problems. . . 244
Contents
|
ixFTP and File Outbound . . . 252
Supported FTP Commands . . . 253
File Outbound . . . 255
Managing Errors . . . 256
Retrying Document Posting . . . 256
Returning Errors from Scripts . . . 256
Audit Logging in Scripts . . . 257
Appendix C Remote Client Service Audit Log . . . .259
Overview . . . 260
TIBCO BusinessConnect Remote Audit Log Viewer . . . 261
Appendix D Application Monitoring and Management by Processing Rulebases . . . .262
Overview . . . 263
Creating a Rulebase . . . 264
Building a Rule. . . 265
Specifying a Data Source . . . 266
Defining Tests . . . 268
Creating a New Test . . . 268
Building a Test Expression . . . 269
Building Compound Tests . . . 270
Using Advanced Test Features . . . 271
Defining Actions . . . 272
Using Advanced Action Features . . . 274
Saving a Rulebase. . . 275
Working with Rulebase Files . . . 276
Index . . . .277
Figures
|
xiFigures
Figure 1 Editing a Participant . . . 8
Figure 2 Editing Host Participant: Credentials Tab. . . 17
Figure 3 Editing Partner Participant, Credentials Tab . . . 20
Figure 4 All Authorized Users. . . 29
Figure 5 Editing Business Agreement: User Access Tab. . . . 43
Figure 6 All Authorized Users. . . 43
Figure 7 Imported Operations Listed . . . 48
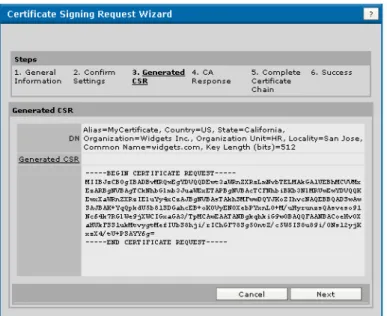
Figure 8 CSR Wizard Step 3, Generated CSR. . . 55
Figure 9 CSR Wizard Step 4, CA Response . . . 56
Figure 10 CSR Wizard Step 5, Complete Certificate Chain . . . 57
Figure 11 CSR Wizard Step 6, Success . . . 58
Figure 12 Imported Server Certificate . . . 59
Figure 13 Outbound HTTP/FTP Proxy Settings . . . 63
Figure 14 Selecting Outbound Proxy Settings for a Host . . . 66
Figure 15 Result of the Audit Trail Search . . . 91
Figure 16 Audit Trail Details . . . 92
Figure 17 BE Setting . . . 97
Figure 18 Message Type Configuration . . . 97
Figure 19 List of Users Created by TIBCO Administrator User Management . . . 107
Figure 20 Allow Permissions for TIBCO BusinessConnect Components. . . 108
Figure 21 Three Types of Users. . . 111
Figure 22 Editing Administrative Users: General Tab . . . 115
Figure 23 Editing Non-Administrative Users: General Tab. . . 116
Figure 24 Group Membership Tab . . . 116
Figure 25 Adding Groups . . . 117
Figure 26 Editing User Permissions . . . 118
Figure 27 Adding Participants . . . 118
Figure 28 Participant Permissions for Users . . . 119
Figure 29 Business Agreement Permissions. . . 120
Figure 30 Business Agreements Permissions for Users . . . 120
Figure 31 Setting Group Name . . . 125
Figure 32 New Group Dialog . . . 126
Figure 33 Members Tab for Groups . . . 126
Figure 34 Adding Users to Groups . . . 127
Figure 35 Participants Permissions for Groups . . . 127
Figure 36 Adding Participants . . . 128
Figure 37 Participant Permissions for Groups . . . 128
Figure 38 Business Agreements Permissions for Groups . . . 130
Figure 39 Adding BusinessAgreements for Groups . . . 130
Figure 40 Business Agreements Permissions for Groups . . . 131
Figure 41 Log Viewer . . . 135
Figure 42 Log Viewer . . . 139
Figure 43 State Details View . . . 142
Figure 44 Resend History Details . . . 147
Figure 45 No Key Configured . . . 186
Figure 46 The Configured Key is Different . . . 186
Figure 47 The Configured and Retrieved Keys Match. . . 187
Figure 48 Server is Not Available . . . 187
Figure 49 Server Did Not Respond to the SSH Query as Expected . . . 187
Figure 50 The Configured Server Hostname is not Valid . . . 187
Figure 51 TIBCO BusinessConnect Remote Audit Log Entries. . . 261
Figure 52 Creating a New Rule . . . 266
Tables
|
xiiiTables
Table 1 General Typographical Conventions . . . xviii
Table 2 Syntax Typographical Conventions . . . xix
Table 3 Business Location, New Dialog . . . 10
Table 4 Business Location, New Contact . . . 11
Table 5 Generating a New PGP Key Pair . . . 14
Table 6 Uploading a Private PGP Key from a File . . . 15
Table 7 Importing a PGP Key Pair from the ASCII Armor. . . 15
Table 8 Uploading from File . . . 19
Table 9 Importing from ASCII Armor . . . 19
Table 10 Selecting Proxy Settings for the Partner . . . 27
Table 11 Participant Visibility Settings for tibbr . . . 31
Table 12 Editing Protocol Bindings: Operation Binding Tab . . . 37
Table 13 Editing Protocol Bindings: Document Security Tab . . . 38
Table 14 Editing Protocol Bindings: Transports Tab . . . 40
Table 15 Protocol-Specific Terminology . . . 46
Table 16 Server Settings Fields . . . 52
Table 17 CSR Wizard, General Information . . . 54
Table 18 Inbound Mail POP3 Servers. . . 61
Table 19 New Proxy Connection. . . 64
Table 20 LDAP Server Settings . . . 68
Table 21 Activated Protocol Plug-ins and Properties . . . 71
Table 22 TIBCO BusinessConnect Server Properties Overview . . . 73
Table 23 Adding New Property . . . 81
Table 24 New Rule for the Private Process Smart Routing . . . 84
Table 25 Credential Alerter . . . 88
Table 26 User Audit Trail . . . 90
Table 27 tibbr Settings . . . 95
Table 28 Editing External User . . . 113
Table 29 Configuring the Authentication Source for the External User . . . 122
Table 30 Editing LDAP Connection . . . 122
Table 31 Log Viewer Preferences: All Protocols . . . 136
Table 32 Log Viewer Preferences: Selected Protocol TIBCO BusinessConnect Services Plug-in . . . 137
Table 33 Configuring Log Search. . . 139
Table 34 Data Reports . . . 151
Table 35 Email Transport Settings . . . 159
Table 36 Supported File Mask Options . . . 167
Table 37 Inbound FTP/S Settings . . . 171
Table 38 Outbound FTP/S Settings . . . 175
Table 39 Inbound SSH Settings . . . 182
Table 40 Outbound SSHFTP Settings . . . 189
Table 41 Configuring HTTP/S for a Trading Partner: General Tab . . . 195
Table 42 Configuring HTTP/S for a Trading Partner: Transports Tab . . . 196
Table 43 New Transport Dialog for AS2-HTTP/S. . . 209
Table 44 AS2-HTTP/S Transport . . . 210
Table 45 AS1_Email Transport Settings . . . 222
Table 46 Outbound File Transport . . . 229
Table 47 New Inbox Transport . . . 235
|
xvPreface
TIBCO BusinessConnect™ software is a B2B (business-to-business) gateway that allows your company to engage in electronic commerce with your business partners.
Topics
• Related Documentation, page xvi
• Typographical Conventions, page xviii
• Connecting with TIBCO Resources, page xxi
Related Documentation
This section lists documentation resources you may find useful.
TIBCO BusinessConnect Documentation
The following documents form the TIBCO BusinessConnect documentation set:
• TIBCO BusinessConnect™ Installation and Configuration Read this guide to learn how to install and configure TIBCO BusinessConnect.
• TIBCO BusinessConnect™ Concepts Read this guide to learn about TIBCO BusinessConnect architecture, deployment modes, protocols, and security.
• TIBCO BusinessConnect Interior Server™ Administration Read this guide in order to administer, operate, and manage TIBCO BusinessConnect Interior Server.
• TIBCO BusinessConnect Gateway Server™ Administration Read this guide in order to administer, operate, and manage TIBCO BusinessConnect Gateway Server.
• TIBCO BusinessConnect™ Trading Partner Administration Read this guide to configure and manage trading partners.
• TIBCO BusinessConnect™ Scripting Deployment User’s Guide Read this guide to configure and manage TIBCO BusinessConnect using the command line interface.
• TIBCO BusinessConnect™ Release Notes Read the release notes for a list of new and changed features. This document also contains lists of known issues and closed issues for this release.
Other TIBCO Product Documentation
Preface
|
xviiinterface (GUI) for defining business processes and an engine that executes the process.
• TIBCO Designer™: This graphical user interface is used for designing and creating integration project configurations and building an Enterprise Archive (EAR) for the project. The EAR can then be used by TIBCO Administrator for deploying and running the application.
• TIBCO Runtime Agent™: This software suite is a prerequisite for other TIBCO software products. In addition to TIBCO Runtime Agent components, the software suite includes the third-party libraries used by other TIBCO products such as TIBCO Designer, Java Runtime Environment (JRE), TIBCO Hawk®, and TIBCO Rendezvous®.
• TIBCO Rendezvous®: This software enables programs running on many different kinds of computers on a network to communicate seamlessly. It includes two main components: the Rendezvous programming language interface (API) in several languages, and the Rendezvous daemon.
• TIBCO Enterprise Message Service™: This software provides a message service that enables integration of applications within an enterprise based on the Java Message Service (JMS) specifications.
• TIBCO BusinessEvents®: This software helps companies identify and quantify the impact of events; it notifies people and systems about meaningful events so processes can be adapted on-the-fly. TIBCO BusinessEvents uses a unique model-driven approach to collect, filter, and correlate events and deliver real-time operational insight.
• TIBCO Hawk®: This software is a tool for monitoring and managing distributed applications and operating systems. The software is designed specifically for monitoring distributed systems, so there is no centralized console or frequent polling across the network.
• tibbr®, tibbr Service, tibbr Community, and tibbr Community Service: This software is the first workplace communication tool with which you can follow subjects that relate to your work and interests besides following people as you do in typical social networking applications. That way, you have much more flexibility in obtaining the right information at the right time in the right context. In fact, the information will find you.
• TIBCO BusinessConnect™ Palette: This software is about the resources available in the TIBCO BusinessConnect Palette for TIBCO ActiveMatrix BusinessWorks.
Typographical Conventions
The following typographical conventions are used in this manual.
Table 1 General Typographical Conventions Convention Use
ENV_NAME TIBCO_HOME BC_HOME
TIBCO products are installed into an installation environment. A product installed into an installation environment does not access components in other installation environments. Incompatible products and multiple instances of the same product must be installed into different installation environments.
An installation environment consists of the following properties:
• Name Identifies the installation environment. This name is referenced in documentation as ENV_NAME. On Microsoft Windows, the name is
appended to the name of Windows services created by the installer and is a component of the path to the product shortcut in the Windows Start > All Programs menu.
• Path The folder into which the product is installed. This folder is referenced in documentation as TIBCO_HOME.
TIBCO BusinessConnect installs into a directory within a TIBCO_HOME. This directory is referenced in documentation as BC_HOME. The default value of BC_HOME depends on the operating system. For example, on Windows systems, the default value is C:\tibco\bc\version.
code font Code font identifies commands, code examples, filenames, pathnames, and output displayed in a command window. For example:
Use MyCommand to start the foo process.
bold code font
Bold code font is used in the following ways:
• In procedures, to indicate what a user types. For example: Type .
Preface
|
xixitalic font Italic font is used in the following ways:
• To indicate a document title. For example: See TIBCO BusinessConnect Concepts.
• To introduce new terms. For example: A portal page may contain several portlets. Portlets are mini-applications that run in a portal.
• To indicate a variable in a command or code syntax that you must replace.
For example: MyCommandPathName Key
combinations
Key names separated by a plus sign indicate keys pressed simultaneously. For example: Ctrl+C.
Key names separated by a comma and space indicate keys pressed one after the other. For example: Esc, Ctrl+Q.
The note icon indicates information that is of special interest or importance, for example, an additional action required only in certain circumstances.
The tip icon indicates an idea that could be useful, for example, a way to apply the information provided in the current section to achieve a specific result.
The warning icon indicates the potential for a damaging situation, for example, data loss or corruption if certain steps are taken or not taken.
Table 1 General Typographical Conventions (Cont’d) Convention Use
Table 2 Syntax Typographical Conventions Convention Use
[ ] An optional item in a command or code syntax.
For example:
MyCommand [optional_parameter] required_parameter
| A logical OR that separates multiple items of which only one may be chosen.
For example, you can select only one of the following parameters:
MyCommand para1 | param2 | param3
{ } A logical group of items in a command. Other syntax notations may appear within each logical group.
For example, the following command requires two parameters, which can be either the pair param1 and param2, or the pair param3 and param4.
MyCommand {param1 param2} | {param3 param4}
In the next example, the command requires two parameters. The first parameter can be either param1 or param2 and the second can be either param3 or param4:
MyCommand {param1 | param2} {param3 | param4}
In the next example, the command can accept either two or three parameters.
The first parameter must be param1. You can optionally include param2 as the second parameter. And the last parameter is either param3 or param4.
MyCommand param1 [param2] {param3 | param4}
Table 2 Syntax Typographical Conventions (Cont’d) Convention Use
Preface
|
xxiConnecting with TIBCO Resources
How to Join TIBCOmmunity
TIBCOmmunity is an online destination for TIBCO customers, partners, and resident experts; a place to share and access the collective experience of the TIBCO community. TIBCOmmunity offers forums, blogs, and access to a variety of resources. To register, go to http://www.tibcommunity.com.
How to Access TIBCO Documentation
You can access TIBCO documentation here:
http://docs.tibco.com
How to Contact TIBCO Support
For comments or problems with this manual or the software it addresses, contact TIBCO Support as follows:
• For an overview of TIBCO Support, and information about getting started with TIBCO Support, visit this site:
http://www.tibco.com/services/support
• If you already have a valid maintenance or support contract, visit this site:
https://support.tibco.com
Entry to this site requires a user name and password. If you do not have a user name, you can request one.
|
1Chapter 1 Participants
This chapter provides both conceptual and procedural information to help you configure participants for TIBCO BusinessConnect hosts and trading partners.
For general information about this product and its architecture, components, and various usage and deployment scenarios, see TIBCO BusinessConnect Concepts.
To install and configure the BusinessConnect server, see TIBCO BusinessConnect Installation and Configuration Guide.
Topics
• Participants Overview, page 2
• Managing Participants, page 2
• Editing Participant Data, page 8
• General Tab for Participants, page 9
• Business Locations Tab for Participants, page 10
• Credentials Tab for Participants, page 12
• Protocols Tab for Participants, page 25
• Proxy Settings Tab for Partners, page 27
• User Access Tab for Participants, page 29
• Visibility Tab for Participants, page 31
Participants Overview
Participants store a variety of information about trading partners, from the very general (for example the location of the company headquarters) to the detailed (for example, security credentials and available protocols).
Hosts and Partners
TIBCO BusinessConnect defines two types of participants that can exchange electronic documents:
• Hosts A host is a participant in a business agreement and an organizational entity within your company. Hosts participate in the electronic documents exchange using the TIBCO BusinessConnect B2B gateway. There may be one host or multiple hosts whose private keys are stored by TIBCO
BusinessConnect.
• Partners A partner participant is outside of your company and typically has its own B2B gateway, either TIBCO BusinessConnect or some other solution.
Your BusinessConnect installation stores public keys for your partners.
There is little difference between hosts and partners because much of the same information is required to configure both types of participants. An agreement has to be established between a host and a partner.
Managing Participants
You can manage participants as follows:
• Create a new participant Create a new participant as explained in Creating a New Participant, page 4.
• Export or import a participant Export an existing participants’ data for use in another BusinessConnect installation and/or import a participant from
Participants Overview
|
3• Search for a participant Use the Search function to search for participant. See Searching for a Participant, page 7 for more information.
Creating a New Participant
To create a new participant:
1. Click BusinessConnect > Participants.
2. Click New.
3. Type the name in the Participant Name field 4. Select Host or Partner from the list.
Select Host if this participant is internal to your enterprise; select Partner if this participant is external to your enterprise.
5. Click OK.
A new dialog appears allowing you to provide detailed information about the participant.
6. Select the Active check box if you want to activate this participant right away.
Otherwise, you can activate this participant later.
Before you start creating any participants, you must have at least one protocol installed.
Default Host: The first host that you create automatically becomes the default host. If you have created multiple host participants, you can assign any one of them as the default host in System Settings > General. You cannot delete the default host; therefore, if you have only one host participant, you cannot delete it.
To delete a default host, first assign a different host participant as the default host, creating a new host participant if necessary.
If the participant is activated, all grammar rules associated with this participant are validated. No validation is performed for an inactive participant. This allows the user to provide only a partial information while the participant is still inactive,
Creating a New Participant
|
5Exporting Participant Data
To export participant data from one BusinessConnect installation to another, perform these steps:
1. Expand BusinessConnect > Participants.
2. Select the check box next to the participant(s) that you want to export.
3. Click Export.
4. In the Export Participants dialog, set the password if needed.
5. Click Export Configuration Data.
This creates the .csx file with the compressed data of the exported participant.
6. Save the file to the desired location.
Import this .csx file into another BusinessConnect installation.
7. Click Done.
Importing Participant Data
To import participant data, perform these steps:
1. Expand BusinessConnect > Participants.
2. Click Import and then click the link change to identify the .csx file that contains the participants for import.
3. Click Browse, then navigate to and select the .csx file that was created during the export of participant data.
4. Enter the password, if it was used to secure the data during the export.
5. Click Import Participants.
6. Click Done.
Copying a Participant
To copy a participant, perform these steps:
1. Expand BusinessConnect > Participants.
2. Select the check box next to the participant you wish to copy.
Before importing participant data into a BusinessConnect installation, first install and activate all protocols associated with the participants and import all
operations associated with the participants.
3. Click Copy.
4. In the next dialog, enter the name for the new participant.
If you open the new participant, you will see that most of its general, business, credentials, protocols, and proxy data has been transferred from the
participant it was copied from.
Deleting a Participant
Deleting a Host
1. Expand BusinessConnect > System Settings > General.
2. Make sure that the host selected in the Default Host list is not the one you wish to delete.
When you create a new participant using the Copy function, any unique constraints such as domain IDs, AS transport IDs, and name of the trading partner will not be copied. This data must be later entered for the new trading partner using the steps as explained in Editing Participant Data, page 8.
Default Host: The first host that you create automatically becomes the default host. If you have created multiple host participants, you can assign any one of them as the default host in System Settings > General.
You cannot delete the default host; therefore, if you have only one host participant, you cannot delete it unless you add a replacement host.
You must first add at least one new host (following the steps described in
Creating a New Participant, page 4 and then remove the host you do not need any more.
You cannot select None as the default host. Select an actual host for the default.
Creating a New Participant
|
7Deleting a Partner
To delete a partner, perform these steps:
1. Expand BusinessConnect > Participants.
2. Select the check box next to the participant you wish to delete.
3. Click Delete.
Searching for a Participant
In addition to entering the participant’s name or selecting it from the list, you can use the Search function to find a specific participant. This allows you to use a wildcard and search for a participant’s name when you do not know the exact (full) name.
1. Enter the search string by using the wild card to substitute any characters before, after, or before and after the string you are entering.
2. Click Search.
3. The participant name(s) that correspond to the search criteria will be displayed in the Name list, while the others will be removed
4. To view all participants, click the Show All link.
Editing Participant Data
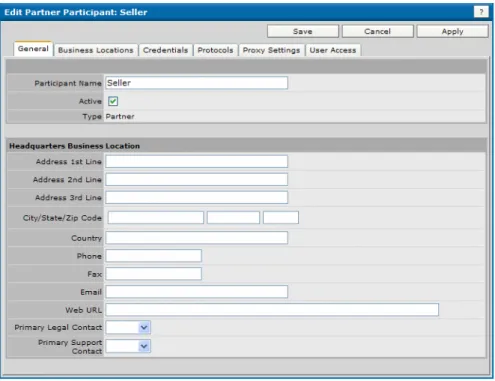
To edit participant’s data, click the participant whose information you wish to edit. The Edit Participant dialog appears.
Figure 1 Editing a Participant
There are five tabs available for managing participants:
• General Tab for Participants, page 9
• Business Locations Tab for Participants, page 10
General Tab for Participants
|
9General Tab for Participants
The General tab allows you to add or change the participant’s data such as address and email.
Most of these fields are optional, except for the following:
• Participant Name
• Active check box (select to activate the participant)
For the following fields, you need to pay attention while entering data:
• Primary Legal Contact and
• Primary Support Contact These contacts can also be entered using the Business Location tab.
Once you enter all contacts using the Business Location tab, you will come back to the General tab and select the appropriate contacts from the lists that will have the contact entries.
Business Locations Tab for Participants
A business location is simply the address and other identifying information for a participant. One participant often has multiple departments or other distinct groups at various locations. You can set up multiple locations for one participant to simplify shipping and billing procedures.
A business location can include contacts. A contact is the name, phone number, and email address of a person associated with a particular location of a
participant. Each business location can have multiple contacts.
To add a business location for a participant, perform these steps:
1. Expand BusinessConnect > Participants and then click the name of the participant you are editing.
2. Select the Business Locations tab.
3. Click New.
The New dialog appears.
Provide values for each of the appropriate text fields as explained in Table 3.
Table 3 Business Location, New Dialog
Field Enter
Name (required) Only the Name field is required as it identifies the participant.
You cannot leave “unnamed” in this field.
Address 1st Line Address 2nd Line Address 3rd Line
Enter the participant’s address.
City/State/Zip Code
Enter the participant’s data.
Business Locations Tab for Participants
|
114. To assign primary legal and/or support contacts to this business location, or if you want to add contacts to this participant, create these contacts as follows:
a. Click New.
The New Contact screen appears:
b. Once you finish entering data and click Save, your contact will appear in the section Contacts.
c. To delete this contact at any time, select the check box next to the contact’s name and click Delete.
5. Click Save.
Table 4 Business Location, New Contact
Field Enter
First Name, Last Name Enter the participant’s data.
Contact Type Select a contact type from the list. Only contacts designated as type Legal or Support will be available from the Primary Legal Contact and Primary Support Contact lists in the business location.
Email, Phone, Fax, Pager Enter the participant’s data.
Credentials Tab for Participants
BusinessConnect uses two methods of public key cryptography:
PKI (Public Key Infrastructure)
This method uses a hierarchical key management system that includes a certification authority (CA). The CA issues digital certificates by binding the identity of a user or a system to a public key with a digital signature. The host can use the trading partner’s public key to authenticate a sender, enable
non-repudiation, encrypt a transport, or encrypt a message.
PGP (Pretty Good Privacy)
PGP does not use Certificate Authorities and instead each public key is bound to a user name and/or an e-mail address. A "web of trust" is used to establish the authenticity of the binding between a public key and its owner. In
BusinessConnect, PGP keys are used for message signatures and encryption on the FTP, FTPS, SSHFTP transports.
Managing Host Credentials
There are several credentials available for a host that can be uploaded using the Credentials tab:
• New Private Key, page 12
• New SSH Private Key, page 13
To learn how to work with keys, you can use the samples provided with this program in the directory BC_HOME/samples/keys. Keep in mind that the chosen password is Password1.
Credentials Tab for Participants
|
132. Click New Private Key.
3. Type the name of the key in the Alias field.
4. In the Current Credential line click change.
Browse and navigate to the file containing the private key and click OK.
5. Click set next to Password.
Type the password (required for private keys) in the Enter Password and Enter Password Again fields.
If you are using any of the sample keys provided in the directory BC_HOME\samples\keys, the password is "Password1".
6. Click OK and Save.
The new private key for the host is now listed in the Credential Name list.
New SSH Private Key
SSH keys are used to support the SSHFTP transport in BusinessConnect.
To upload a SSH private key, perform these steps:
1. Expand BusinessConnect > Participants > host > Credentials tab.
2. Click New SSH Private Key.
Type the name of the key in the Alias field.
3. In the Current Credential line click change.
Browse and navigate to the file containing the SSH private key and click OK.
4. Click set next to Password.
Type the password (required for private keys) in the Enter Password and Enter Password Again fields.
5. Click OK and Save.
The new SSH key for the host is now listed in the Credential Name list.
Generating New PGP Key Pairs
TIBCO BusinessConnect can create new PGP key pairs for users and store them in the certificate store. These key pairs contain a private and a public key and can have a key size of 1024 or 2048 bytes. The key types are DSA and ElGamal or RSA and allows both for encryption and signing. These key pairs also contain the name of the private key owner, as well as an email address of that owner.
The new PGP key are automatically imported into the TIBCO BusinessConnect configuration store and associated with the host.
1. Expand BusinessConnect > Participants > host > Credentials tab.
2. Click New PGP Private Key.
3. Select the mode by which the new key will be generated and click OK:
• Generating a New Key Pair, page 14
• Uploading from a File, page 15
• Importing from ASCII Armor, page 15
Generating a New Key Pair
This option generates both a private and a public key. When a key pair generated this way is exported either in form of binary files or in the ASCII Armor format, both keys will be exported at the same time.
Table 5 Generating a New PGP Key Pair
Alias Name for the new PGP key pair
Password Password associated with the private key Expiry Date A date by which the key pair will be valid Key Size Size of the new key in bytes: 1024 or 2048
Key Type For the new PGP key pairs there are two selections available:
• DSA and ElGamal Both created keys, private and public, support signing using the DSA algorithm and encryption using the ElGamal algorithm.
Credentials Tab for Participants
|
15Uploading from a File
When exporting an uploaded private key for the host, it will only have the option of exporting this private key, without the public part.
Importing from ASCII Armor
Users can import a PGP key pair for the host partner in two ways:
• Import a set of files, with one file for each key part. Content of the file for a key part can be in binary or in ASCII armor format
• Import by pasting the ASCII armor private and public key parts into a screen Uploading from a file supports only the private PGP key for the host.
Importing from the ASCII armor allows you to import both the private and public PGP key. In the Import from ASCII Armor window, enter data as explained in Table 7.
The local_policy.jar and US_export_policy.jar files in the
TIBCO_HOME\tibcojre\version_number\lib\security directory are need to be replaced by Java Cryptography Extension (JCE) Unlimited Strength Jurisdiction Policy Files before uploading a PGP private key.
Table 6 Uploading a Private PGP Key from a File
Field Description
Alias Name of the uploaded key
Current Credential Browse to the location where a PGP private key that you want to use is located and upload a PGP private key.
Password Supply a password that corresponds to the key.
Table 7 Importing a PGP Key Pair from the ASCII Armor
Field Description
Alias Name of the imported key pair.
Password Supply a password that corresponds to the private PGP key.
• Click Save.
All PGP keys, generated or uploaded/imported, will be available in the Edit Host Participant window.
Assigning a Shadow Key for the Host ASCII
Formatted Text (Private)
Paste the text in ASCII armor format, where the private key is base64 encoded and wrapped with a PGP specific header and footer such as:
---BEGIN PGP PRIVATE KEY BLOCK--- Version: BCPG v1.46
lQO0BE2cttgDCACO4PRiKPLFNheitPoyNvnuNTghwjNNmSB7BMprzQ3vMeV1XMUg aAW7/qH3YxT3UbHdXkyP9oH/A47pFNoMCvsIgae9mqZoKKWoKCWHRpishTtv5rXV
…
0hRVJ7VW6Eu3h8dKH/TCC8yzvPrKbLTh2vzm+Y2q1oo5CBZazw==
=2IyA
---END PGP PRIVATE KEY BLOCK---
ASCII
Formatted Text (Public)
Paste the text in ASCII armor format, where the public key is base64 encoded and wrapped with a PGP specific header and footer such as:
---BEGIN PGP PUBLIC KEY BLOCK--- Version: BCPG v1.46
mQENBE2cttgDCACO4PRiKPLFNheitPoyNvnuNTghwjNNmSB7BMprzQ3vMeV1XMUg aAW7/qH3YxT3UbHdXkyP9oH/A47pFNoMCvsIgae9mqZoKKWoKCWHRpishTtv5rXV P2O/KhUqjgBCd3HZ1qjnDJEVHwOm37H6Iqyd66tRTsW57Wztxy9hRdftM77aaKJl ...
AwKMfdaQnd1ntV6BXFM6GXdl5HJhjjY/HVJtRb498Rjba9IUVSe1VuhLt4fHSh/0 wgvMs7z6ymy04dr85vmNqtaKOQgWWs8=
=Fd6T
---END PGP PUBLIC KEY BLOCK---
Table 7 Importing a PGP Key Pair from the ASCII Armor (Cont’d)
Field Description
Credentials Tab for Participants
|
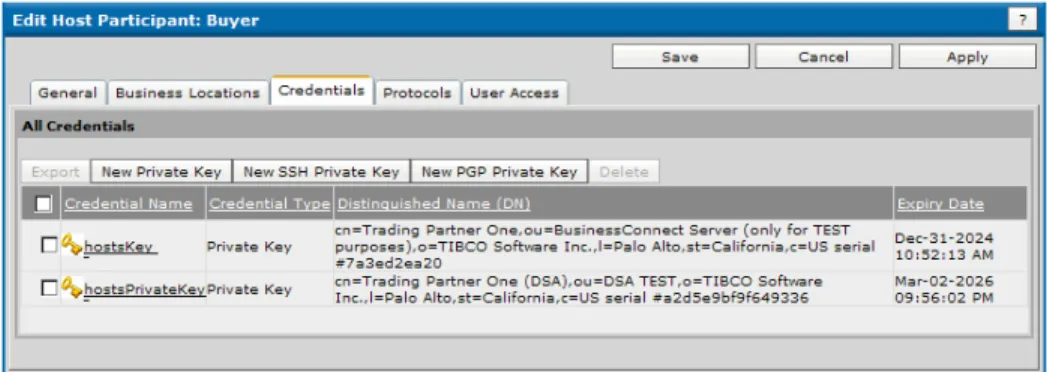
17Figure 2 Editing Host Participant: Credentials Tab
2. Click the private key that will expire first, such as hostsKey.
The Edit Private Key dialog appears.
3. In the Shadow Settings area, select the Activation date for shadow key using the three menus. This date has to be chosen before the first key is about to expire. From the Shadow Key list, select the key you would like to use as replacement, such as hostsPrivateKey.
4. Click Save.
After the shadow key takes effect, it is still a shadow key. You need to remove or update the original credential and remove or promote the shadow key.
Managing Partner Credentials
There are several credentials available for a partners that can be uploaded using the Credentials tab:
• New Certificate, page 17
• New SSH Public Key, page 18
• New PGP Public Key, page 18
• Assigning a Shadow Certificate for the Partner, page 19
• Exporting PGP Keys, page 20
New Certificate
To upload a new certificate key for the partner, perform these steps:
1. Expand BusinessConnect > Participants > partner > Credentials tab.
2. Click New Certificate.
Type the name of the key in the Alias field.
3. In the Current Credential line click change.
Browse and navigate to the file containing the certificate and click OK.
4. Click Save.
The new certificate for the partner is now listed in the Credential Name list.
New SSH Public Key
SSH keys are used to support the SSHFTP transport in BusinessConnect.
To upload a SSH public key, perform these steps:
1. Expand BusinessConnect > Participants > partner > Credentials tab.
2. Click New SSH Public Key.
Type the name of the key in the Alias field.
3. In the Current Credential line click change.
Browse and navigate to the file containing the SSH private key and click OK.
4. Click Save.
The new SSH key for the partner is now listed in the Credential Name list.
New PGP Public Key
When a user creates a PGP key pair for a host, it is automatically imported into the TIBCO BusinessConnect configuration store as a Server PGP key pair and is associated with the host. For the partner, users can only upload or import the public portion of a PGP key pair, which is normally received from the trading partner.
5. Expand BusinessConnect > Participants > partner > Credentials tab.
6. Click New PGP Public Key.
Credentials Tab for Participants
|
197. Select the mode by which the key will be uploaded or imported and click OK.
— Uploading from File, page 19
— Importing from ASCII Armor, page 19
8. Click Save.
Assigning a Shadow Certificate for the Partner
To assign a shadow certificate:
1. Expand BusinessConnect > Participants > partner > Credentials tab.
Table 8 Uploading from File
Alias Name of the uploaded key Current
Credential
Browse to the location where a PGP public key that you want to use is located.
Table 9 Importing from ASCII Armor
Alias Name of the imported key ASCII
Formatted Text
Paste the text of a PGP public key in ASCII Armor format, where the key is base64 encoded and wrapped with a PGP specific header and footer such as:
---BEGIN PGP PUBLIC KEY BLOCK--- Version: BCPG v1.46
mQENBE2cttgDCACO4PRiKPLFNheitPoyNvnuNTghwjNNmSB7BMprzQ3vMeV1XMUg aAW7/qH3YxT3UbHdXkyP9oH/A47pFNoMCvsIgae9mqZoKKWoKCWHRpishTtv5rXV P2O/KhUqjgBCd3HZ1qjnDJEVHwOm37H6Iqyd66tRTsW57Wztxy9hRdftM77aaKJl ...
AwKMfdaQnd1ntV6BXFM6GXdl5HJhjjY/HVJtRb498Rjba9IUVSe1VuhLt4fHSh/0 wgvMs7z6ymy04dr85vmNqtaKOQgWWs8=
=Fd6T
---END PGP PUBLIC KEY BLOCK---
Shadow PGP certificates are currently not supported.
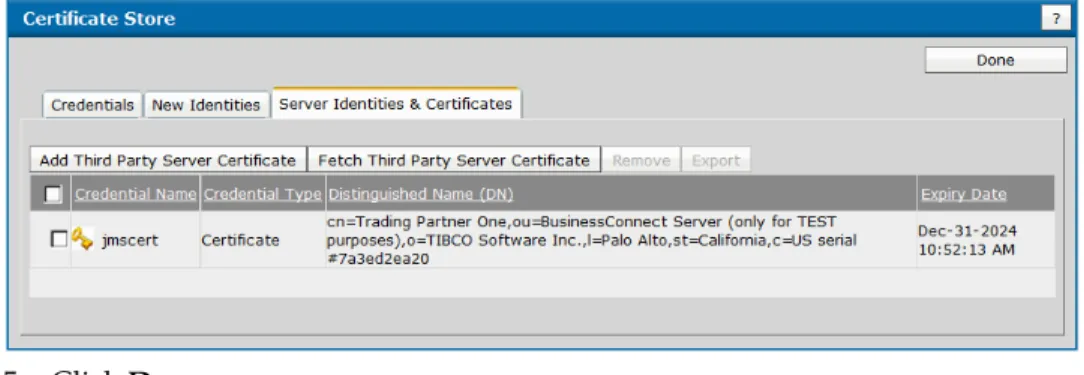
Figure 3 Editing Partner Participant, Credentials Tab
2. Click the certificate that’s about to expire first.
The Edit Certificate dialog appears.
3. In the Shadow Settings area, select Activation date for shadow Certificate using the three menus. This date has to be chosen before the first certificate is about to expire.
4. From the Shadow Certificate list, select the certificate you would like to use as replacement.
5. Click Save.
After the shadow certificate takes effect, it is still a shadow certificate. You need to remove or update the original certificate and remove or promote the shadow certificate.
Exporting PGP Keys
PGP keys can be exported in two formats:
Credentials Tab for Participants
|
21Users can export either the public or private portions of the PGP key pair, but these two portions of a key pair are always exported separately. When users also have an option to copy the contents of the public key in ASCII armor format from a screen.
Exporting the Host’s PGP Key Pair in a Binary Format To export a PGP key pair in a binary format:
1. In the BusinessConnect > Participants > Host > Credentials tab, select the check box next to the PGP private key you want to export.
2. Click Export.
3. In the Export PGP Private Key window:
a. Click set next to the Private Key Password.
b. Enter the new password for export two times.
4. In the Private Key section, click Export Binary File.
5. Save the file key_name_pgp.priv on a desired location.
6. In the Public Key section, click Export Binary File.
7. Save the file key_name_pgp.pub on a desired location.
Exporting the Partner’s PGP Public Key in a Binary Format To export an uploaded public PGP Key in a binary format:
1. In the BusinessConnect > Participants > Partner > Credentials tab, select the check box next to the PGP public key you want to export.
2. Click Export.
3. In the Export PGP Public Key window, click Export Binary File.
4. Save the file key_name_pgp.pub on a desired location.
Exporting the Host’s PGP Key Pair in the ASCII Armor Format To export the host’s PGP key pair in the ASCII Armor format:
If a PGP private key was generated, or imported from ASCII Armor format where both the private key part and the public key part are available, then both the private key and the public key can be exported; otherwise, if the PGP private key was uploaded from a file where only the private key part is available, then only the private key can be exported.
1. In the BusinessConnect > Participants > Host > Credentials tab, click the link for the PGP private key you want to export.
2. In the Edit PGP Private Key window, copy the text block for ASCII Armor formatted text (private), and ASCII Armor formatted text (public).
These text blocks can be pasted in order to export the key pair to another location. Users can copy the public key from the PGP Public Key text box, copy it into an email message, and send to their trading partners.
The text boxes that contain key parts are editable. An example of the private PGP key exported in the ASCII Armor format looks as follows:
---BEGIN PGP PRIVATE KEY BLOCK--- Version: BCPG v1.46
lQH0BE6Djw4DBADAW6JewR3W60WZXfqjo5zKb2I+FYMFOUFsQ4P0kXM2/iorTX0h RZm2uVGq6hi5YwxaCiNOFv+KZV1MhPXVlhq3j/yWQ6ylzE/SRvtTQmFsSw3uzLDS BU+UsIREVbZOuXl/8Hl1eVLwS6iL+T06RMeCtzf7tJvGM9mynNcN0vs68QARAQAB /wkDArjX6KnITRqiYPPjbsIZhhxTWb0YnBSEXRyhSpk3bPVBhFcC+BTWnq4vtRd0 qcHQwNQAYuvq94zJhI69tT+L15PTj4geixZvID/ZxCUoBzGywOJC4SEaZYGEPrV+
nIzN2zYZvf266ZApjNv+gWYhvCRI7r8YPCQo2rD2sx2IRl7/bnHcn6W9UgVAN4Vl VESIbKvrODd0+XUZbqVZl5Jg91QZFNvO/fnmdvx6tBZXuw6WT2OIJFTe0oLl6S/z h0MvB2OjMgqMofhhw8Oji2zqmr/Py4gMKSVOblLD7YvTGKL1TX8/YtmjoTTFo6Qk 53mwQrQNh+CCO1TIEd86dsT5ZbFRZByWcPfmEfU5yWKRVsHxFbueeySNLevXARbe px5yQHFkbW5lKorfEE5BUoMwnRUvqe9XZ47GU3Lf4PDmT7+IOXWReCbeL7TPn7lu 69mfJ7azHQsMfe4VBJCLTzZcu8/Qkxq0GEpvaG4gRG9lIDxqb2huQGFjbWUuY29t Poi3BBMDAgAhBQJOg48OBQkB49Z/BwsJCAcCAwQDFgECBRUCAQMFAoQBAAoJEBt2 dzrZM3bEtVQD/2mJadc79xdkrJteQBGiipitEnpsiTvbgJk4V8pPX5jH5rBls/Q3 axcL7jmkADdSrlKGNZhOEZ2d2UYBiGIztLH6iednTKH5K+SO+DVJfJp9CkFRQzyX /4ZsQK8Lva20v/QrVNcTKRGtMPOS+WteEle5Atj0z8G+pX+KfSMI2QkOnQH0BE6D jw4CBACaRqi7rKuEnyQcHbZ+Kx0RWS5uyFUyHLhZWV4xizU7HXgdUwdB8vIKLJwF pT1ayC2mHDveJl1RDqv/iN8GmUW5SX5rzz7XdCz03ZEcLJDwryqV83lVW0GKc3bU ujtIxVQUcNY7uJXbS/EAQrJjzPTT11vqCXkqbBWfkYJ9WmGU6wARAQAB/wkDAhvZ cI9XQ3aqYFxMsgyWIwDxypGugz7U/f4ioRXn4i1EnPm5Q9YoMh7nhzIZxJU1CAHS uqpB5W/tsp2RGMmhnO+j6Zo0/QB5htiNuLi5/eu1qDIjHLtEVFhylvV4cwET2lVZ r6HOVV94B1hqDS3kgHSwGHmGZoMpd7cTAYjTJ8g4BXz6xIrlUJFwAnyKUcZ7uMl0 t6O7Q07yPrckA3UmzYNKrffZwRzXoOaeNy3uc24XLngxVIYTaEm7VShwOyHKOTD/
o4ZBU48XEEmmW/VWhHz3RJadABjHqwkWd1h0YG3gCr7byTY+mIoab2Be+i2nXXxz 60Zv8tAqqERUj51T011CRpIeskjBJKAlvlW2WmCyb+Ma+FXu53eihmBOw078oaR1
Credentials Tab for Participants
|
23---BEGIN PGP PUBLIC KEY BLOCK--- Version: BCPG v1.46
mI0EToOPDgMEAMBbol7BHdbrRZld+qOjnMpvYj4VgwU5QWxDg/SRczb+KitNfSFF mba5UarqGLljDFoKI04W/4plXUyE9dWWGreP/JZDrKXMT9JG+1NCYWxLDe7MsNIF T5SwhERVtk65eX/weXV5UvBLqIv5PTpEx4K3N/u0m8Yz2bKc1w3S+zrxABEBAAG0 GEpvaG4gRG9lIDxqb2huQGFjbWUuY29tPoi3BBMDAgAhBQJOg48OBQkB49Z/BwsJ CAcCAwQDFgECBRUCAQMFAoQBAAoJEBt2dzrZM3bEtVQD/2mJadc79xdkrJteQBGi ipitEnpsiTvbgJk4V8pPX5jH5rBls/Q3axcL7jmkADdSrlKGNZhOEZ2d2UYBiGIz tLH6iednTKH5K+SO+DVJfJp9CkFRQzyX/4ZsQK8Lva20v/QrVNcTKRGtMPOS+Wte Ele5Atj0z8G+pX+KfSMI2QkOuI0EToOPDgIEAJpGqLusq4SfJBwdtn4rHRFZLm7I VTIcuFlZXjGLNTsdeB1TB0Hy8gosnAWlPVrILaYcO94mXVEOq/+I3waZRblJfmvP Ptd0LPTdkRwskPCvKpXzeVVbQYpzdtS6O0jFVBRw1ju4ldtL8QBCsmPM9NPXW+oJ eSpsFZ+Rgn1aYZTrABEBAAGItwQYAwIAIQUCToOPDgUJAePWfwcLCQgHAgMEAxYB AgUVAgEDBQKEAQAKCRAbdnc62TN2xK8sBACb7knDY1HTZUw4dzr0K5JPAkylyzSS 3G6ml7/cmqyJbOWPmGXNLO9AE565FAQ7/6jFpMrH9C9SuoayjDD57Z7qTKqdDDzr aSpuU9vTEbS0ku55BZNO/goSZn1Ml2XSNVbnWgoXbINGY3J2WIwQcVZc5eZp8DBA BAb8xKvrAwvAsA==
=QoV7
---END PGP PUBLIC KEY BLOCK---
Exporting the Partner’s PGP Public Key in the ASCII Armor Format To export the partner’s PGP public key in the ASCII Armor format:
1. In the BusinessConnect > Participants > Partner > Credentials tab, click the link for the PGP public key you want to export.
2. In the Edit PGP Public Key window, copy the text block for ASCII Armor formatted text (public).
Users can copy the public key from the PGP Public Key text box, copy it into an email message, and send to their trading partners.
The text boxes that contain key parts are editable. An example of the public PGP key exported in the ASCII Armor format looks as follows:
---BEGIN PGP PUBLIC KEY BLOCK--- Version: BCPG v1.46
mI0EToOPDgMEAMBbol7BHdbrRZld+qOjnMpvYj4VgwU5QWxDg/SRczb+KitNfSFF mba5UarqGLljDFoKI04W/4plXUyE9dWWGreP/JZDrKXMT9JG+1NCYWxLDe7MsNIF T5SwhERVtk65eX/weXV5UvBLqIv5PTpEx4K3N/u0m8Yz2bKc1w3S+zrxABEBAAG0 GEpvaG4gRG9lIDxqb2huQGFjbWUuY29tPoi3BBMDAgAhBQJOg48OBQkB49Z/BwsJ CAcCAwQDFgECBRUCAQMFAoQBAAoJEBt2dzrZM3bEtVQD/2mJadc79xdkrJteQBGi ipitEnpsiTvbgJk4V8pPX5jH5rBls/Q3axcL7jmkADdSrlKGNZhOEZ2d2UYBiGIz tLH6iednTKH5K+SO+DVJfJp9CkFRQzyX/4ZsQK8Lva20v/QrVNcTKRGtMPOS+Wte Ele5Atj0z8G+pX+KfSMI2QkOuI0EToOPDgIEAJpGqLusq4SfJBwdtn4rHRFZLm7I VTIcuFlZXjGLNTsdeB1TB0Hy8gosnAWlPVrILaYcO94mXVEOq/+I3waZRblJfmvP Ptd0LPTdkRwskPCvKpXzeVVbQYpzdtS6O0jFVBRw1ju4ldtL8QBCsmPM9NPXW+oJ
eSpsFZ+Rgn1aYZTrABEBAAGItwQYAwIAIQUCToOPDgUJAePWfwcLCQgHAgMEAxYB AgUVAgEDBQKEAQAKCRAbdnc62TN2xK8sBACb7knDY1HTZUw4dzr0K5JPAkylyzSS 3G6ml7/cmqyJbOWPmGXNLO9AE565FAQ7/6jFpMrH9C9SuoayjDD57Z7qTKqdDDzr aSpuU9vTEbS0ku55BZNO/goSZn1Ml2XSNVbnWgoXbINGY3J2WIwQcVZc5eZp8DBA BAb8xKvrAwvAsA==
=QoV7
---END PGP PUBLIC KEY BLOCK---
Protocols Tab for Participants
|
25Protocols Tab for Participants
All protocols need to be installed following the appropriate installation instructions provided for each of the protocols.
To learn more, see also TIBCO BusinessConnect Concepts, Protocols.
Enabling a Protocol
To enable a protocol for a participant, perform these steps:
1. Expand BusinessConnect > Participants and click the participant’s name.
2. In the window Edit Host (or Partner) Participant, select the Protocols tab.
3. To enable a protocol a protocol that’s not present in the Protocol Name list, click Enable.
In the Enable dialog, select the appropriate available protocol.
4. Click OK.
Back in the Edit Participant dialog, you will see the list of protocols. Each of these enabled protocols must be edited before it can be used for transactions.
5. Proceed with steps described in Configuring a Protocol, page 26.
Disabling a Protocol
To disable a business protocol for a participant, perform these steps:
1. Expand BusinessConnect > Participants and then click the participant’s name.
2. In the window Edit Host (or Partner) Participant, select the Protocols tab 3. Select the check box next to each protocol you want to disable.
4. Click Disable.
5. Click Save.
s You cannot disable a protocol that is used by a current business agreement. You first need to delete the business agreement using the protocol, and then to remove the protocol itself. To remove a business agreement, see Deleting a Business Agreement, page 42.
Configuring a Protocol
Each protocol and participant type provides a unique set of configuration tabs.
All protocols and participant types have the General tab, which allows you to configure identity information for the participant, among other properties.
Protocols that support the AS1 and AS2 transports provide the AS2 Identifier and Valid Email Address List properties on the General tab.
A General tab for the installed TIBCO BusinessConnect Services Plug-in is presented in , Add New HTTP/S Transport, on page 196.
To learn how to configure different protocols, see the appropriate documentation for the specific protocol.
Managing Transports for Participants
To make an outbound public transport available for a participant, you need to do the following:
Task A Configure an appropriate transport for the participant
Each of the public transports is covered in a separate chapter in this manual, and the appropriate sections that are explaining transports for participants are as follows:
• Setting Up HTTP/S for a Trading Partner, page 195
• Setting Up AS2-HTTP/S for a Trading Partner, page 209
• Setting Up AS1 Email for a Trading Partner, page 222
Email addresses entered in the Valid Email Address List box must be separated either by a semicolon or by a comma.
Proxy Settings Tab for Partners
|
27Proxy Settings Tab for Partners
This tab is available only if you are configuring a partner participant. It is used to activate the proxy that BusinessConnect will use as a default connection for any outgoing traffic with a specific trading partner.
1. Expand BusinessConnect > Participants > partner_participant.
2. Click the Proxy Settings tab.
The Edit Partner Participant: Proxy Settings dialog appears.
3. Select proxies using the information from Table 10.
Table 10 Selecting Proxy Settings for the Partner
Field Description
Proxy Alias This section shows the proxies that were previously configured.
Connection Defaults
Use Proxies • If the check box Use Proxies is cleared, no proxy will be used regardless of any selections in the proxy list or in the BusinessConnect > System Settings >
Outbound HTTP/FTP Proxy and Mail SMTP Servers.
Note: Due to the SMTP nature, even if a TIBCO BusinessConnect user disables the use of proxy for a specific trading partner, the system level SMTP proxy will still be used to send email.
• If the check box Use Proxies is selected and a proxy is selected from the list, the selected proxies for this partner will be used: the default system settings will be overridden.
Using the Default Name from the list means that BusinessConnect will use the proxy defined under BusinessConnect > System Settings > Outbound
HTTP/FTP Proxy and Mail SMTP Servers. Therefore, if the proxy is not specified on the partner level, the TIBCO BusinessConnect user is indicating that there is no preference, and whatever is defined on the system level should be used for this trading partner.
HTTP Proxy Select the previously configured HTTP proxy.
Available HTTP proxy and SOCKS4/SOCKS5 proxy servers are displayed for selection. Only HTTP 1.1 is supported for the HTTP Proxy.
See Adding a Proxy for a Host, page 63.
4. Click Done.
FTP Proxy Select the previously configured FTP proxy.
Available FTP and SOCKS4/SOCKS5 proxy servers are displayed for selection.
See Adding a Proxy for a Host, page 63.
SMTP Server Select the previously configured SMTP server.
Available SMTP proxy servers are displayed for selection.
See Adding a Proxy for a Host, page 63.
Table 10 Selecting Proxy Settings for the Partner (Cont’d)
Field Description
User Access Tab for Participants
|
29User Access Tab for Participants
The access rights of users can be restricted by participant and business agreement.
For participants (host or partner), users can be assigned access rights to all participants or to particular participants: access rights can be fine tuned with respect to trading partner access. To read more about user access management in TIBCO BusinessConnect, see TIBCO BusinessConnect Concepts, TIBCO
BusinessConnect User Management.
You can define the access rights of specific users to the TIBCO BusinessConnect partners also using the User Management option by expanding
BusinessConnect > User Management > Users. See Permissions Tab for Administrative and Super Users, page 117 for more details. You can also define user access rights to certain participants in the TIBCO BusinessConnect
installation using the User Access tab in the Edit Partner dialog.
All Authorized Users
Find out who are the authorized users for which you can edit access rights.
• Click View All Authorized Users link to see the list.
Figure 4 All Authorized Users
Using Add Users and Add Groups, you can fine tune these access rights.