Amazon Keyspaces (for Apache Cassandra)
Developer Guide
Amazon Keyspaces (for Apache Cassandra): Developer Guide
Copyright © Amazon Web Services, Inc. and/or its affiliates. All rights reserved.
Amazon's trademarks and trade dress may not be used in connection with any product or service that is not Amazon's, in any manner that is likely to cause confusion among customers, or in any manner that disparages or discredits Amazon. All other trademarks not owned by Amazon are the property of their respective owners, who may or may not be affiliated with, connected to, or sponsored by Amazon.
Table of Contents
What is Amazon Keyspaces? ... 1
How it works ... 1
High-level architecture ... 1
Cassandra data model ... 3
Accessing Amazon Keyspaces ... 4
Use cases ... 4
What is CQL? ... 5
Compare Amazon Keyspaces with Cassandra ... 6
Functional differences with Apache Cassandra ... 6
Apache Cassandra APIs, operations, and data types ... 7
Asynchronous creation and deletion of keyspaces and tables ... 7
Authentication and authorization ... 7
Batch ... 7
Cluster configuration ... 7
CQL query throughput tuning ... 7
Empty strings ... 8
Lightweight transactions ... 8
Load balancing ... 8
Pagination ... 8
Prepared statements ... 8
Range delete ... 8
System tables ... 8
Supported Cassandra APIs, operations, and data types ... 9
Cassandra API support ... 9
Cassandra control plane API support ... 10
Cassandra data plane API support ... 10
Cassandra data type support ... 11
Supported Cassandra consistency levels ... 12
Write consistency levels ... 12
Read consistency levels ... 12
Unsupported consistency levels ... 12
Accessing Amazon Keyspaces ... 14
Signing up for AWS ... 14
Setting up AWS Identity and Access Management ... 14
Using the console ... 15
Connecting programmatically ... 15
Creating credentials ... 16
Service endpoints ... 22
Using cqlsh ... 25
Using the AWS CLI ... 27
Using the API ... 31
Using a Cassandra client driver ... 31
Getting started ... 50
Prerequisites ... 50
Step 1: Create a keyspace and a table ... 51
Creating a keyspace ... 51
Creating a table ... 52
Step 2: CRUD operations ... 55
Create ... 55
Read ... 56
Update ... 58
Delete ... 59
Step 3: Clean up (optional) ... 60
Deleting a table ... 60
Deleting a keyspace ... 61
Migrating to Amazon Keyspaces ... 63
Loading data using cqlsh ... 63
Prerequisites ... 64
Step 1: Create source and target ... 64
Step 2: Prepare the data ... 65
Step 3: Set throughput capacity for the table ... 66
Step 4: Configure cqlsh COPY FROM settings ... 67
Step 5: Run the cqlsh COPY FROM command ... 69
Troubleshooting ... 70
Loading data using DSBulk ... 71
Prerequisites ... 71
Step 1: Create source and target ... 73
Step 2: Prepare the data ... 74
Step 3: Set throughput capacity for the table ... 75
Step 4: Configure DSBulk settings ... 76
Step 5: Run the DSBulk load command ... 78
Troubleshooting ... 79
Connections ... 79
Errors connecting to an Amazon Keyspaces endpoint ... 79
Capacity management ... 84
Serverless capacity errors ... 85
Data definition language ... 88
Data definition language errors ... 88
Code examples and tools ... 92
Libraries and examples ... 92
Amazon Keyspaces (for Apache Cassandra) developer toolkit ... 92
Amazon Keyspaces (for Apache Cassandra) examples ... 92
AWS Signature Version 4 (SigV4) authentication plugins ... 92
Highlighted sample and developer tool repos ... 93
AWS CloudFormation template to create Amazon CloudWatch dashboard for Amazon Keyspaces (for Apache Cassandra) metrics ... 93
Using Amazon Keyspaces (for Apache Cassandra) with AWS Lambda ... 93
Using Amazon Keyspaces (for Apache Cassandra) with Spring ... 93
Using Amazon Keyspaces (for Apache Cassandra) with Scala ... 93
Amazon Keyspaces (for Apache Cassandra) Cassandra query language (CQL) to AWS CloudFormation converter ... 94
Amazon Keyspaces (for Apache Cassandra) helpers for Apache Cassandra driver for Java ... 94
Amazon Keyspaces (for Apache Cassandra) snappy compression demo ... 94
Amazon Keyspaces (for Apache Cassandra) and Amazon S3 codec demo ... 94
Serverless resource management ... 95
Storage ... 95
Read/write capacity modes ... 95
On-demand capacity mode ... 96
Provisioned throughput capacity mode ... 97
Managing and viewing capacity modes ... 98
Considerations when changing capacity modes ... 99
Managing throughput capacity with Application Auto Scaling ... 99
How Amazon Keyspaces automatic scaling works ... 100
Usage notes ... 101
Using the console ... 101
Managing programmatically ... 104
Working with Amazon Keyspaces ... 110
Working with keyspaces ... 110
Creating keyspaces ... 110
Working with tables ... 111
Creating tables ... 111
Static columns ... 111
Working with rows ... 114
Calculating row size ... 114
Working with queries ... 116
Ordering results ... 116
Paginating results ... 116
Data modeling ... 118
Partition key design ... 118
Write sharding ... 118
NoSQL Workbench ... 120
Download ... 120
Getting started ... 121
Data modeler ... 122
Creating a data model ... 122
Editing a data model ... 124
Data visualizer ... 125
Visualizing a Data Model ... 125
Aggregate View ... 127
Committing a data model ... 128
Before you begin ... 129
Connecting with service-specific credentials ... 130
Connecting with IAM credentials ... 131
Using a saved connection ... 133
Apache Cassandra ... 134
Sample data models ... 135
Employee data model ... 136
Credit card transactions data model ... 136
Airline operations data model ... 136
Release history ... 136
Point-in-time recovery ... 138
How it works ... 138
Enabling PITR ... 138
Restore Permissions ... 140
Continuous backups ... 141
Restore settings ... 142
PITR and encrypted tables ... 142
Table restore time ... 143
Integration with AWS services ... 143
Restoring a table to a point in time ... 144
Before you begin ... 144
Restoring a table to a point in time (console) ... 144
Restoring a table to a point in time with CQL ... 145
Restoring a deleted table with CQL ... 146
Expiring data with Time to Live ... 148
How it works ... 148
Default TTL value ... 149
Custom TTL values ... 149
Enabling TTL ... 149
Integration with AWS services ... 150
How to use Time to Live ... 150
To create a new table with default Time to Live (TTL) settings enabled (console) ... 150
To update default Time to Live (TTL) settings on existing tables (console) ... 151
To disable default Time to Live (TTL) settings on existing tables (console) ... 151
To create a new table with default Time to Live (TTL) settings enabled using CQL ... 151
To use ALTER TABLE to edit default Time to Live (TTL) settings using CQL ... 152
How to enable Time to Live (TTL) on new tables using custom properties ... 152
How to enable Time to Live (TTL) on existing tables using custom properties ... 152
To use INSERT to edit custom Time to Live (TTL) settings using CQL ... 152
To use UPDATE to edit custom Time to Live (TTL) settings using CQL ... 153
AWS CloudFormation resources ... 154
Amazon Keyspaces and AWS CloudFormation templates ... 154
Learn more about AWS CloudFormation ... 154
Tagging resources ... 155
Tagging restrictions ... 155
Tagging operations ... 156
Adding tags to new or existing keyspaces and tables using the console ... 156
Adding tags to new or existing keyspaces and tables using the AWS CLI ... 157
Adding tags to new or existing keyspaces and tables using CQL ... 157
Cost allocation reports for Amazon Keyspaces ... 159
Security ... 160
Data protection ... 160
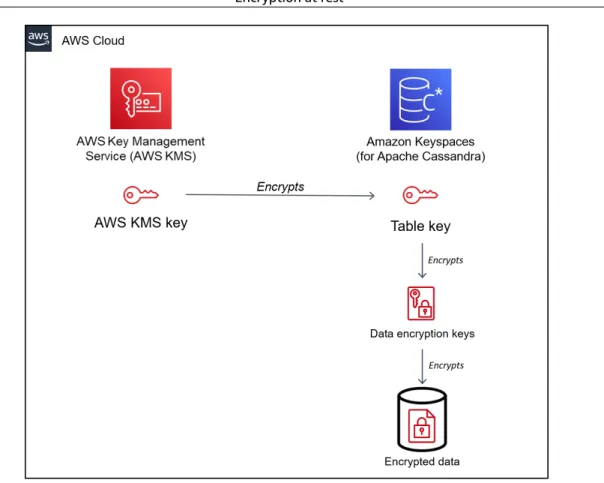
Encryption at rest ... 161
Encryption in transit ... 174
Internetwork traffic privacy ... 175
AWS Identity and Access Management ... 175
Audience ... 176
Authenticating with identities ... 176
Managing access using policies ... 178
How Amazon Keyspaces works with IAM ... 180
Identity-based policy examples ... 183
AWS managed policies ... 189
Troubleshooting ... 192
Using service-linked roles ... 195
Logging and monitoring ... 196
Monitoring tools ... 197
Monitoring with CloudWatch ... 198
Logging Amazon Keyspaces API calls with AWS CloudTrail ... 209
Compliance validation ... 214
Resilience ... 215
Infrastructure security ... 215
Using interface VPC endpoints ... 216
Configuration and vulnerability analysis for Amazon Keyspaces ... 219
Security best practices ... 220
Preventative security best practices ... 220
Detective security best practices ... 221
CQL language reference ... 223
Language elements ... 223
Identifiers ... 223
Constants ... 223
Terms ... 224
Data types ... 224
JSON encoding of Amazon Keyspaces data types ... 226
DDL statements ... 227
Keyspaces ... 228
Tables ... 229
DML statements ... 235
SELECT ... 235
INSERT ... 236
UPDATE ... 237
DELETE ... 237
Built-in functions ... 238
Scalar functions ... 238
Quotas ... 240
Amazon Keyspaces service quotas ... 240
Increasing or decreasing throughput (for provisioned tables) ... 242
Increasing provisioned throughput ... 242
Decreasing provisioned throughput ... 242
Amazon Keyspaces encryption at rest ... 242
Document history ... 243
What is Amazon Keyspaces (for Apache Cassandra)?
Amazon Keyspaces (for Apache Cassandra) is a scalable, highly available, and managed Apache
Cassandra–compatible database service. With Amazon Keyspaces, you don’t have to provision, patch, or manage servers, and you don’t have to install, maintain, or operate software.
Amazon Keyspaces is serverless, so you pay for only the resources that you use, and the service automatically scales tables up and down in response to application traffic. You can build applications that serve thousands of requests per second with virtually unlimited throughput and storage.
NoteApache Cassandra is an open-source, wide-column datastore that is designed to handle large amounts of data. For more information, see Apache Cassandra.
Amazon Keyspaces makes it easy to migrate, run, and scale Cassandra workloads in the AWS Cloud. With just a few clicks on the AWS Management Console or a few lines of code, you can create keyspaces and tables in Amazon Keyspaces, without deploying any infrastructure or installing software.
With Amazon Keyspaces, you can run your existing Cassandra workloads on AWS using the same Cassandra application code and developer tools that you use today.
For a list of available AWS Regions and endpoints, see Service endpoints for Amazon Keyspaces.
We recommend that you start by reading the following sections:
Topics
• Amazon Keyspaces: How it works (p. 1)
• Amazon Keyspaces use cases (p. 4)
• What is Cassandra Query Language (CQL)? (p. 5)
Amazon Keyspaces: How it works
Amazon Keyspaces removes the administrative overhead of managing Cassandra. To understand why, it's helpful to begin with Cassandra architecture and then compare it to Amazon Keyspaces.
Topics
• High-level architecture: Apache Cassandra vs. Amazon Keyspaces (p. 1)
• Cassandra data model (p. 3)
• Accessing Amazon Keyspaces from an application (p. 4)
High-level architecture: Apache Cassandra vs.
Amazon Keyspaces
Traditional Apache Cassandra is deployed in a cluster made up of one or more nodes. You are responsible for managing each node and adding and removing nodes as your cluster scales.
A client program accesses Cassandra by connecting to one of the nodes and issuing Cassandra Query Language (CQL) statements. CQL is similar to SQL, the popular language used in relational databases.
Even though Cassandra is not a relational database, CQL provides a familiar interface for querying and manipulating data in Cassandra.
The following diagram shows a simple Apache Cassandra cluster, consisting of four nodes.
A production Cassandra deployment might consist of hundreds of nodes, running on hundreds of physical computers across one or more physical data centers. This can cause an operational burden for application developers who need to provision, patch, and manage servers in addition to installing, maintaining, and operating software.
With Amazon Keyspaces (for Apache Cassandra), you don’t need to provision, patch, or manage servers, so you can focus on building better applications. Amazon Keyspaces offers two throughput capacity modes for reads and writes: on-demand and provisioned. You can choose your table’s throughput capacity mode to optimize the price of reads and writes based on the predictability and variability of your workload.
With on-demand mode, you pay for only the reads and writes that your application actually
performs. You do not need to specify your table’s throughput capacity in advance. Amazon Keyspaces accommodates your application traffic almost instantly as it ramps up or down, making it a good option for applications with unpredictable traffic.
Provisioned capacity mode helps you optimize the price of throughput if you have predictable application traffic and can forecast your table’s capacity requirements in advance. With provisioned capacity mode, you specify the number of reads and writes per second that you expect your application to perform. You can increase and decrease the provisioned capacity for your table automatically by enabling automatic scaling.
You can change the capacity mode of your table once per day as you learn more about your workload’s traffic patterns, or if you expect to have a large burst in traffic, such as from a major event that you anticipate will drive a lot of table traffic. For more information about read and write capacity provisioning, see the section called “Read/write capacity modes” (p. 95).
Amazon Keyspaces (for Apache Cassandra) stores three copies of your data in multiple Availability Zones for durability and high availability. In addition, you benefit from a data center and network architecture that is built to meet the requirements of the most security-sensitive organizations. Encryption at rest is
automatically enabled when you create a new Amazon Keyspaces table and all client connections require Transport Layer Security (TLS). Additional AWS security features include monitoring, AWS Identity and Access Management, and virtual private cloud (VPC) endpoints. For an overview of all available security features, see Security (p. 160).
The following diagram shows the architecture of Amazon Keyspaces.
A client program accesses Amazon Keyspaces by connecting to a predetermined endpoint (hostname and port number) and issuing CQL statements. For a list of available endpoints, see the section called
“Service endpoints” (p. 22).
Cassandra data model
How you model your data for your business case is critical to achieving optimal performance from Amazon Keyspaces. A poor data model can significantly degrade performance.
Even though CQL looks similar to SQL, the backends of Cassandra and relational databases are very different and must be approached differently. The following are some of the more significant issues to consider:
Storage
You can visualize your Cassandra data in tables, with each row representing a record and each column a field within that record.
Table design: Query first
There are no JOINs in CQL. Therefore, you should design your tables with the shape of your data and how you need to access it for your business use cases. This might result in de-normalization with duplicated data. You should design each of your tables specifically for a particular access pattern.
Partitions
Your data is stored in partitions on disk. The number of partitions your data is stored in and how it is distributed across the partitions is determined by your partition key. How you define your partition key can have a significant impact upon the performance of your queries.
Primary key
In Cassandra, data is stored as a key-value pair. To that end, every Cassandra table must have a primary key, which is the key to each row in the table. The primary key is the composite of a required partition key and optional clustering columns. The data that comprises the primary key must be unique across all records in a table.
• Partition key – The partition key portion of the primary key is required and determines which partition of your cluster the data is stored in. The partition key can be a single column, or it can be a compound value composed of two or more columns. You would use a compound partition key if a single column partition key would result in a single partition or a very few partitions having most of the data and thus bearing the majority of the disk I/O operations.
• Clustering column – The optional clustering column portion of your primary key determines how the data is clustered and sorted within each partition. If you include a clustering column in your primary key, the clustering column can have one or more columns. If there are multiple columns in the clustering column, the sorting order is determined by the order that the columns are listed in the clustering column, from left to right.
Accessing Amazon Keyspaces from an application
Amazon Keyspaces (for Apache Cassandra) implements the Apache Cassandra Query Language (CQL) API, so you can use CQL and Cassandra drivers that you already use. Updating your application is as easy as updating your Cassandra driver or cqlsh configuration to point to the Amazon Keyspaces service endpoint.
NoteTo help you get started, you can find end-to-end code samples of connecting to Amazon Keyspaces by using various Cassandra client drivers in the Amazon Keyspaces code example repository on GitHub.
Consider the following Python program, which connects to a Cassandra cluster and queries a table.
from cassandra.cluster import Cluster
#TLS/SSL configuration goes here ksp = 'MyKeyspace'
tbl = 'WeatherData'
cluster = Cluster(['NNN.NNN.NNN.NNN'], port=NNNN) session = cluster.connect(ksp)
session.execute('USE ' + ksp)
rows = session.execute('SELECT * FROM ' + tbl) for row in rows:
print(row)
To run the same program against Amazon Keyspaces, you need to:
• Add the cluster endpoint and port: For example, the host can be replaced with a service endpoint, such as cassandra.us-east-2.amazonaws.com and the port number with: 9142.
• Add the TLS/SSL configuration: For more information on adding the TLS/SSL configuration to connect to Amazon Keyspaces by using a Cassandra client Python driver, see Using a Cassandra Python client driver to access Amazon Keyspaces programmatically (p. 38).
Amazon Keyspaces use cases
The following are just some of the ways in which you can use Amazon Keyspaces:
• Build applications that require low latency – Process data at high speeds for applications that require single-digit-millisecond latency, such as industrial equipment maintenance, trade monitoring, fleet management, and route optimization.
• Build applications using open-source technologies – Build applications on AWS using open-source Cassandra APIs and drivers that are available for a wide range of programming languages, such as Java, Python, Ruby, Microsoft .NET, Node.js, PHP, C++, Perl, and Go. For code examples, see Code examples and tools (p. 92).
• Move your Cassandra workloads to the cloud – Managing Cassandra tables yourself is time-
consuming and expensive. With Amazon Keyspaces, you can set up, secure, and scale Cassandra tables in the AWS Cloud without managing infrastructure. For more information, see Serverless resource management (p. 95).
What is Cassandra Query Language (CQL)?
Cassandra Query Language (CQL) is the primary language for communicating with Apache Cassandra.
Amazon Keyspaces (for Apache Cassandra) is compatible with the CQL 3.x API (backward-compatible with version 2.x).
To run CQL queries, you can do one of the following:
• Use the CQL editor on the AWS Management Console.
• Run them on the cqlsh client.
• Run them programmatically using an Apache 2.0 licensed Cassandra client driver.
For more information about using these methods to access Amazon Keyspaces, see Accessing Amazon Keyspaces (for Apache Cassandra) (p. 14).
For more information about CQL, see CQL language reference for Amazon Keyspaces (for Apache Cassandra) (p. 223).
How does Amazon Keyspaces (for Apache Cassandra) compare to
Apache Cassandra?
Amazon Keyspaces (for Apache Cassandra) appears as a nine-node, Apache Cassandra 3.11.2 cluster to clients and supports drivers and clients that are compatible with Apache Cassandra 3.11.2. Amazon Keyspaces supports the 3.x Cassandra Query Language (CQL) API and is backward-compatible with version 2.x. With Amazon Keyspaces, you can run your Cassandra workloads on AWS using the same Cassandra application code, Apache 2.0–licensed drivers, and tools that you use today.
Amazon Keyspaces supports all commonly used Cassandra data-plane operations, such as creating keyspaces and tables, reading data, and writing data. Amazon Keyspaces is serverless, so you don’t have to provision, patch, or manage servers. You also don’t have to install, maintain, or operate software. As a result, the Cassandra control plane API operations to manage cluster and node settings are not required to use Amazon Keyspaces.
Settings such as replication factor and consistency level are configured automatically to provide you with high availability, durability, and single-digit-millisecond performance.
Topics
• Functional differences: Amazon Keyspaces vs. Apache Cassandra (p. 6)
• Supported Cassandra APIs, operations, and data types in Amazon Keyspaces (p. 9)
• Supported Apache Cassandra consistency levels in Amazon Keyspaces (p. 12)
Functional differences: Amazon Keyspaces vs.
Apache Cassandra
The following are the functional differences between Amazon Keyspaces and Apache Cassandra.
Topics
• Apache Cassandra APIs, operations, and data types (p. 7)
• Asynchronous creation and deletion of keyspaces and tables (p. 7)
• Authentication and authorization (p. 7)
• Batch (p. 7)
• Cluster configuration (p. 7)
• CQL query throughput tuning (p. 7)
• Empty strings (p. 8)
• Lightweight transactions (p. 8)
• Load balancing (p. 8)
• Pagination (p. 8)
• Prepared statements (p. 8)
• Range delete (p. 8)
• System tables (p. 8)
Apache Cassandra APIs, operations, and data types
Amazon Keyspaces supports all commonly used Cassandra data-plane operations, such as creating keyspaces and tables, reading data, and writing data. To see what is currently supported, see Supported Cassandra APIs, operations, and data types in Amazon Keyspaces (p. 9).
Asynchronous creation and deletion of keyspaces and tables
Amazon Keyspaces performs data definition language (DDL) operations, such as creating and deleting keyspaces and tables, asynchronously. To learn how to monitor the creation status of resources, see the section called “Creating keyspaces” (p. 110) and the section called “Creating tables” (p. 111). For a list of DDL statements in the CQL language reference, see the section called “DDL statements” (p. 227).
Authentication and authorization
Amazon Keyspaces (for Apache Cassandra) uses AWS Identity and Access Management (IAM) for user authentication and authorization, and supports the equivalent authorization policies as Apache Cassandra. As such, Amazon Keyspaces does not support Apache Cassandra's security configuration commands.
Batch
Amazon Keyspaces supports unlogged batch commands with up to 30 commands in the batch. Only unconditional INSERT, UPDATE, or DELETE commands are permitted in a batch. Logged batches are not supported.
Cluster configuration
Amazon Keyspaces is serverless, so there are no clusters, hosts, or Java virtual machines (JVMs) to configure. Cassandra’s settings for compaction, compression, caching, garbage collection, and bloom filtering are not applicable to Amazon Keyspaces and are ignored if specified.
CQL query throughput tuning
Amazon Keyspaces supports up to 3,000 CQL queries per TCP connection per second, but there is no limit on the number of connections a driver can establish.
Most open-source Cassandra drivers establish a connection pool to Cassandra and load balance queries over that pool of connections. Amazon Keyspaces exposes 9 peer IP addresses to drivers, and the default behavior of most drivers is to establish a single connection to each peer IP address. Therefore, the maximum CQL query throughput of a driver using the default settings will be 27,000 CQL queries per second.
To increase this number, we recommend increasing the number of connections per IP address your driver is maintaining in its connection pool. For example, setting the maximum connections per IP address to 2 will double the maximum throughput of your driver to 54,000 CQL queries per second.
Empty strings
Amazon Keyspaces supports empty strings and blob values. However, empty strings and blobs are not supported as clustering column values.
Lightweight transactions
Amazon Keyspaces (for Apache Cassandra) fully supports compare and set functionality on INSERT, UPDATE, and DELETE commands, which are known as lightweight transactions (LWTs) in Apache Cassandra. As a serverless offering, Amazon Keyspaces (for Apache Cassandra) provides consistent performance at any scale, including for lightweight transactions. With Amazon Keyspaces, there is no performance penalty for using lightweight transactions.
Load balancing
The system.peers table entries correspond to Amazon Keyspaces load balancers. For best results, we recommend using a round robin load-balancing policy and tuning the number of connections per IP to suit your application's needs.
Pagination
Amazon Keyspaces paginates results based on the number of rows that it reads to process a request, not the number of rows returned in the result set. As a result, some pages might contain fewer rows than you specify in PAGE SIZE for filtered queries. In addition, Amazon Keyspaces paginates results automatically after reading 1 MBof data to provide customers with consistent, single-digit millisecond read performance. For more information, see the section called “Paginating results” (p. 116).
Prepared statements
Amazon Keyspaces supports the use of prepared statements for data manipulation language (DML) operations, such as reading and writing data. Amazon Keyspaces does not currently support the use of prepared statements for data definition language (DDL) operations, such as creating tables and keyspaces. DDL operations must be run outside of prepared statements.
Range delete
Amazon Keyspaces supports deleting rows in range. A range is a contiguous set of rows within a
partition. You specify a range in a DELETE operation by using a WHERE clause. You can specify the range to be an entire partition.
Furthermore, you can specify a range to be a subset of contiguous rows within a partition by using relational operators (for example, '>', '<'), or by including the partition key and omitting one or more clustering columns. With Amazon Keyspaces, you can delete up to 1,000 rows within a range in a single operation. Additionally, range deletes are atomic, but not isolated.
System tables
Amazon Keyspaces populates the system tables required by Apache 2.0 open source Cassandra drivers.
The system tables visible to a client contain information unique to the authenticated user. The system tables are fully controlled by Amazon Keyspaces and are read-only.
Read-only access to system tables is required and can be controlled with IAM access policies. For more information, see the section called “Managing access using policies” (p. 178). Tag-based access control policies for system tables must be defined differently depending on whether the AWS SDK or Cassandra Query Language (CQL) API calls via Cassandra drivers and developer tools are used. To learn more about
tag-based access control for system tables, see the section called “ Amazon Keyspaces resource access based on tags” (p. 188).
Supported Cassandra APIs, operations, and data types in Amazon Keyspaces
Amazon Keyspaces (for Apache Cassandra) is compatible with Cassandra Query Language (CQL) 3.11 API (backward-compatible with version 2.x).
Amazon Keyspaces supports all commonly used Cassandra data-plane operations, such as creating keyspaces and tables, reading data, and writing data.
The following sections list the supported functionality.
Topics
• Cassandra API support (p. 9)
• Cassandra control plane API support (p. 10)
• Cassandra data plane API support (p. 10)
• Cassandra data type support (p. 11)
Cassandra API support
API operation Supported
CREATE KEYSPACE Yes
ALTER KEYSPACE Yes
DROP KEYSPACE Yes
CREATE TABLE Yes
ALTER TABLE Yes
DROP TABLE Yes
CREATE INDEX No
DROP INDEX No
UNLOGGED BATCH Yes
LOGGED BATCH No
SELECT Yes
INSERT Yes
DELETE Yes
UPDATE Yes
USE Yes
CREATE TYPE No
API operation Supported
ALTER TYPE No
DROP TYPE No
CREATE TRIGGER No
DROP TRIGGER No
CREATE FUNCTION No
DROP FUNCTION No
CREATE AGGREGATE No
DROP AGGREGATE No
CREATE MATERIALIZED VIEW No
ALTER MATERIALIZED VIEW No
DROP MATERIALIZED VIEW No
TRUNCATE No
Cassandra control plane API support
Because Amazon Keyspaces is managed, the Cassandra control plane API operations to manage cluster and node settings are not required. As a result, the following Cassandra features are not applicable.
Feature Reason
Durable writes toggle All writes are durable
Read repair settings Not applicable
GC grace seconds Not applicable
Bloom filter settings Not applicable
Compaction settings Not applicable
Compression settings Not applicable
Caching settings Not applicable
Security settings Replaced by IAM
Cassandra data plane API support
Feature Supported
Static columns Yes
Time to Live (TTL) Yes
Feature Supported
JSON support for SELECT and INSERT statements Yes
Cassandra data type support
Data type Supported
ascii Yes
bigint Yes
blob Yes
boolean Yes
counter Yes
date Yes
decimal Yes
double Yes
float Yes
frozen No
inet Yes
int Yes
list Yes
map Yes
set Yes
smallint Yes
text Yes
time Yes
timestamp Yes
timeuuid Yes
tinyint Yes
tuple Yes
user-defined types (UDT) No
uuid Yes
varchar Yes
varint Yes
Supported Apache Cassandra consistency levels in Amazon Keyspaces
The topics in this section describe which Apache Cassandra consistency levels are supported for read and write operations in Amazon Keyspaces (for Apache Cassandra).
Topics
• Write consistency levels (p. 12)
• Read consistency levels (p. 12)
• Unsupported consistency levels (p. 12)
Write consistency levels
Amazon Keyspaces replicates all write operations three times across multiple Availability Zones for durability and high availability. Writes are durably stored before they are acknowledged using the LOCAL_QUORUM consistency level. For each 1 KB write, you are billed 1 write capacity unit (WCU) for tables using provisioned capacity mode or 1 write request unit (WRU) for tables using on-demand mode.
Read consistency levels
Amazon Keyspaces supports three read consistency levels: ONE, LOCAL_ONE, and LOCAL_QUORUM. During a LOCAL_QUORUM read, Amazon Keyspaces returns a response reflecting the most recent updates from all prior successful write operations. Using the consistency level ONE or LOCAL_ONE can improve the performance and availability of your read requests, but the response might not reflect the results of a recently completed write.
For each 4 KB read using ONE or LOCAL_ONE consistency, you are billed 0.5 read capacity units (RCUs) for tables using provisioned capacity mode or 0.5 read request units (RRUs) for tables using on-demand mode. For each 4 KB read using LOCAL_QUORUM consistency, you are billed 1 read capacity unit (RCU) for tables using provisioned capacity mode or 1 read request units (RRU) for tables using on-demand mode.
Billing based on read consistency and read capacity throughput mode per table for each 4 KB of reads
Consistency level Provisioned On-demand
ONE 0.5 RCUs 0.5 RRUs
LOCAL_ONE 0.5 RCUs 0.5 RRUs
LOCAL_QUORUM 1 RCU 1 RRU
Unsupported consistency levels
The following consistency levels are not supported by Amazon Keyspaces and will result in exceptions.
Unsupported consistency levels
Apache Cassandra Amazon Keyspaces
EACH_QUORUM Not supported
Apache Cassandra Amazon Keyspaces
QUORUM Not supported
ALL Not supported
TWO Not supported
THREE Not supported
ANY Not supported
SERIAL Not supported
LOCAL_SERIAL Not supported
Accessing Amazon Keyspaces (for Apache Cassandra)
You can access Amazon Keyspaces using the console, or programmatically by running a cqlsh client, or using an Apache 2.0 licensed Cassandra driver. Amazon Keyspaces supports drivers and clients that are compatible with Apache Cassandra 3.11.2. Before accessing Amazon Keyspaces, you must complete the following two steps:
1.Signing up for AWS (p. 14)
2.Setting up AWS Identity and Access Management (p. 14)
Signing up for AWS
To use the Amazon Keyspaces service, you must have an AWS account. If you don't already have an account, you are prompted to create one when you sign up. You're not charged for any AWS services that you sign up for unless you use them.
To sign up for AWS
1. Open https://portal.aws.amazon.com/billing/signup.
2. Follow the online instructions.
Part of the sign-up procedure involves receiving a phone call and entering a verification code on the phone keypad.
Setting up AWS Identity and Access Management
Access to Amazon Keyspaces resources is managed using AWS Identity and Access Management (IAM).
Using IAM, you can attach policies to IAM users, roles, and federated identities that grant read and write permissions to specific resources. For example, you can grant an IAM user read-only access to only a subset of keyspaces and tables.
The following example IAM policy grants full read and write access to your Amazon Keyspaces resources, which is only recommended for trials. For sample policies following security guidelines, see the section called “Accessing Amazon Keyspaces tables” (p. 184).
1. Create an AWS Identity and Access Management user.
2. Create and attach the following policy to the user you just created.
{
"Version":"2012-10-17", "Statement":[
{
"Effect":"Allow",
"Action":[
"cassandra:*"
],
"Resource":[
"*"
] } ]}
To access Amazon Keyspaces after you have created the AWS account and IAM policies, see the following sections:
• Using the console (p. 15)
• Connecting programmatically (p. 15)
Accessing Amazon Keyspaces using the console
You can access the console for Amazon Keyspaces at https://console.aws.amazon.com/keyspaces/home.
You can use the console to do the following in Amazon Keyspaces:
• Create, delete, describe, and list keyspaces and tables.
• Insert, update, and delete data.
• Run queries using the CQL editor.
To learn how to create an Amazon Keyspaces keyspace and table and set it up with sample application data, see Getting started with Amazon Keyspaces (for Apache Cassandra) (p. 50).
Connecting programmatically to Amazon Keyspaces
This topic outlines the steps required to connect to Amazon Keyspaces programmatically. It guides you through creating service-specific credentials and lists the available AWS service endpoints. The last section shows how to connect to Amazon Keyspaces using cqlsh. For step-by-step tutorials to connect to Amazon Keyspaces using different Apache Cassandra drivers, see the section called “Using a Cassandra client driver” (p. 31).
NoteTo help you get started, you can find end-to-end code samples of connecting to Amazon Keyspaces by using various Cassandra client drivers in the Amazon Keyspaces code example repository on GitHub.
Amazon Keyspaces supports drivers and clients that are compatible with Apache Cassandra 3.11.2.
It assumes that you have already completed the AWS setup instructions in Accessing Amazon Keyspaces (p. 14).
If you already have an AWS account, see the following topics to learn how to access Amazon Keyspaces using cqlsh programmatically:
Topics
• Creating credentials to access Amazon Keyspaces programmatically (p. 16)
• Service endpoints for Amazon Keyspaces (p. 22)
• Using cqlsh to connect to Amazon Keyspaces (p. 25)
• Using the AWS CLI (p. 27)
• Using the API (p. 31)
• Using a Cassandra client driver to access Amazon Keyspaces programmatically (p. 31)
Creating credentials to access Amazon Keyspaces programmatically
To provide users and applications with credentials for programmatic access to Amazon Keyspaces resources, you can do either of the following:
• Create service-specific credentials that are similar to the traditional username and password that Cassandra uses for authentication and access management. AWS service-specific credentials are associated with a specific AWS Identity and Access Management (IAM) user and can only be used for the service they were created for. For more information, see Using IAM with Amazon Keyspaces (for Apache Cassandra) in the IAM User Guide.
• For enhanced security, we recommend to create IAM access keys for IAM users and roles that are used across all AWS services. The Amazon Keyspaces SigV4 authentication plugin for Cassandra client drivers enables you to authenticate calls to Amazon Keyspaces using IAM access keys instead of user name and password. To learn more about how the Amazon Keyspaces SigV4 plugin enables IAM users, roles, and federated identities to authenticate in Amazon Keyspaces API requests, see AWS Signature Version 4 process (SigV4).
You can download the SigV4 plugins from the following locations.
• Java: https://github.com/aws/aws-sigv4-auth-cassandra-java-driver-plugin.
• Node.js: https://github.com/aws/aws-sigv4-auth-cassandra-nodejs-driver-plugin.
• Python: https://github.com/aws/aws-sigv4-auth-cassandra-python-driver-plugin.
• Go: https://github.com/aws/aws-sigv4-auth-cassandra-gocql-driver-plugin.
For code samples that show how to establish connections using the SigV4 authentication plugin, see the section called “Using a Cassandra client driver” (p. 31).
Topics
• Generate service-specific credentials (p. 16)
• How to create and configure AWS credentials for Amazon Keyspaces (p. 18)
Generate service-specific credentials
Service-specific credentials are similar to the traditional username and password that Cassandra uses for authentication and access management. Service-specific credentials enable IAM users to access a specific AWS service. The credentials cannot be used to access other AWS services. They are associated with a specific IAM user and cannot be used by other IAM users.
Important
Service-specific credentials are associated with a specific IAM user and can only be used for the service they were created for. To give IAM roles or federated identities permissions to access all your AWS resources, you should create IAM access keys for AWS authentication and use the SigV4 authentication plugin.
Use one of the following procedures to generate a service-specific credential.
Generate service-specific credentials using the console To generate service-specific credentials using the console
1. Sign in to the AWS Management Console and open the AWS Identity and Access Management console at https://console.aws.amazon.com/iam/home.
2. In the navigation pane, choose Users, and then choose the user that you created earlier that has Amazon Keyspaces permissions (policy attached).
3. Choose Security Credentials. Under Credentials for Amazon Keyspaces, choose Generate credentials to generate the service-specific credentials.
Your service-specific credentials are now available. This is the only time you can download or view the password. You cannot recover it later. However, you can reset your password at any time. Save the user and password in a secure location, because you'll need them later.
Generate service-specific credentials using the AWS CLI To generate service-specific credentials using the AWS CLI
Before generating service-specific credentials, you need to download, install, and configure the AWS Command Line Interface (AWS CLI):
1. Download the AWS CLI at http://aws.amazon.com/cli.
NoteThe AWS CLI runs on Windows, macOS, or Linux.
2. Follow the instructions for Installing the AWS CLI and Configuring the AWS CLI in the AWS Command Line Interface User Guide.
3. Using the AWS CLI, run the following command to generate service-specific credentials for the user alice, so that she can access Amazon Keyspaces.
aws iam create-service-specific-credential \ --user-name alice \
--service-name cassandra.amazonaws.com
The output looks like the following.
{
"ServiceSpecificCredential": {
"CreateDate": "2019-10-09T16:12:04Z", "ServiceName": "cassandra.amazonaws.com", "ServiceUserName": "alice-at-111122223333",
"ServicePassword": "wJalrXUtnFEMI/K7MDENG/bPxRfiCYEXAMPLEKEY", "ServiceSpecificCredentialId": "ACCAYFI33SINPGJEBYESF", "UserName": "alice",
"Status": "Active"
} }
In the output, note the values for ServiceUserName and ServicePassword. Save these values in a secure location, because you'll need them later.
Important
This is the only time that the ServicePassword will be available to you.
How to create and configure AWS credentials for Amazon Keyspaces
To access Amazon Keyspaces programmatically with the AWS CLI, the AWS SDK, or with Cassandra client drivers and the SigV4 plugin, you need an IAM user or role with access keys.
When you use AWS programmatically, you provide your AWS access keys so that AWS can verify your identity in programmatic calls. Your access keys consist of an access key ID (for example, AKIAIOSFODNN7EXAMPLE) and a secret access key (for example, wJalrXUtnFEMI/K7MDENG/
bPxRfiCYEXAMPLEKEY). This topic walks you through the required steps in this process.
Topics
• Credentials required by the AWS CLI, the AWS SDK, or the Amazon Keyspaces SigV4 plugin for Cassandra client drivers (p. 18)
• Creating an IAM user for programmatic access to Amazon Keyspaces in your AWS account (p. 18)
• Creating new access keys for an IAM user (p. 20)
• How to manage access keys for IAM users (p. 21)
• Using temporary credentials to connect to Amazon Keyspaces using an IAM role and the SigV4 plugin (p. 22)
Credentials required by the AWS CLI, the AWS SDK, or the Amazon Keyspaces SigV4 plugin for Cassandra client drivers
The following credentials are required to authenticate the IAM user or role:
AWS_ACCESS_KEY_ID
Specifies an AWS access key associated with an IAM user or role.
The access key aws_access_key_id is required to connect to Amazon Keyspaces programmatically.
AWS_SECRET_ACCESS_KEY
Specifies the secret key associated with the access key. This is essentially the "password" for the access key.
The aws_secret_access_key is required to connect to Amazon Keyspaces programmatically.
AWS_SESSION_TOKEN – Optional
Specifies the session token value that is required if you are using temporary security credentials that you retrieved directly from AWS Security Token Service operations. For more information, see the section called “Using temporary credentials to connect to Amazon Keyspaces” (p. 22).
If you are connecting with an IAM user, the aws_session_token is not required.
Creating an IAM user for programmatic access to Amazon Keyspaces in your AWS account
To obtain credentials for programmatic access to Amazon Keyspaces with the AWS CLI, the AWS SDK, or the SigV4 plugin, you need to first create an IAM user or role. The process of creating a user and configuring that user to have programmatic access to Amazon Keyspaces is shown in the following steps:
1. Create the user in the AWS Management Console, the AWS CLI, Tools for Windows PowerShell, or using an AWS API operation. If you create the user in the AWS Management Console, then the credentials are created automatically.
2. If you create the user programmatically, then you must create an access key (access key ID and a secret access key) for that user in an additional step.
3. Give the user permissions to access Amazon Keyspaces.
For information about the permissions that you need in order to create a user, see Permissions required to access IAM resources.
Creating IAM users (console)
You can use the AWS Management Console to create IAM users.
To create an IAM user with programmatic access (console)
1. Sign in to the AWS Management Console and open the IAM console at https://
console.aws.amazon.com/iam/.
2. In the navigation pane, choose Users and then choose Add users.
3. Type the user name for the new user. This is the sign-in name for AWS.
NoteUser names can be a combination of up to 64 letters, digits, and these characters: plus (+), equal (=), comma (,), period (.), at sign (@), underscore (_), and hyphen (-). Names must be unique within an account. They are not distinguished by case. For example, you cannot create two users named TESTUSER and testuser.
4. Select Access key - Programmatic access to create an access key for the new user. You can view or download the access key when you get to the Final page.
Choose Next: Permissions.
5. On the Set permissions page, choose Attach existing policies directly to assign permissions to the new user.
This option displays the list of AWS managed and customer managed policies available in your account. You can enter keyspaces into the search field to display only the policies that are related to Amazon Keyspaces.
For Amazon Keyspaces, the available managed policies are AmazonKeyspacesFullAccess and AmazonKeyspacesReadOnlyAccess. For more information about each policy, see the section called “AWS managed policies” (p. 189).
For testing purposes and to follow the connection tutorials, select the
AmazonKeyspacesReadOnlyAccess policy for the new user. Note: As a best practice, we recommend that you follow the principle of least privilege and create custom policies that limit access to specific resources and only allow the required actions. For more information about IAM policies and to view example policies for Amazon Keyspaces, see the section called “Amazon Keyspaces identity-based policies” (p. 180). After you have created custom policies, attach your policies to groups and then make users members of the appropriate groups.
Choose Next: Tags.
6. On the Add tags (optional) page you can add tags for the user, or choose Next: Review.
7. On the Review page you can see all of the choices you made up to this point. When you're ready to proceed, choose Create user.
8. To view the user's access keys (access key IDs and secret access keys), choose Show next to the password and access key. To save the access keys, choose Download .csv and then save the file to a safe location.
Important
This is your only opportunity to view or download the secret access keys, and you need this information before they can use the SigV4 plugin. Save the user's new access key ID and
secret access key in a safe and secure place. You will not have access to the secret keys again after this step.
Creating IAM users (AWS CLI)
You can use the AWS CLI to create an IAM user.
To create an IAM user with programmatic access (AWS CLI) 1. Create a user.
• aws iam create-user
2. Give the user programmatic access. This requires access keys.
• aws iam create-access-key
• Tools for Windows PowerShell: New-IAMAccessKey
• IAM API: CreateAccessKey Important
This is your only opportunity to view or download the secret access keys, and you need this information before they can use the SigV4 plugin. Save the user's new access key ID and secret access key in a safe and secure place. You will not have access to the secret keys again after this step.
3. Attach the AmazonKeyspacesReadOnlyAccess policy to the user that defines the user's
permissions. Note: As a best practice, we recommend that you manage user permissions by adding the user to a group and attaching a policy to the group instead of attaching directly to a user.
• aws iam attach-user-policy
Creating new access keys for an IAM user
If you already have an IAM user, you can create new access keys at any time. For more information about key management, for example how to rotate access keys, see Managing access keys for IAM users.
To create access keys for an IAM user (console)
1. Sign in to the AWS Management Console and open the IAM console at https://
console.aws.amazon.com/iam/.
2. In the navigation pane, choose Users.
3. Choose the name of the user whose access keys you want to create.
4. On the Summary page of the user, choose the Security credentials tab.
5. In the Access keys section, choose Create access key.
To view the new access key pair, choose Show. Your credentials will look something like this:
• Access key ID: AKIAIOSFODNN7EXAMPLE
• Secret access key: wJalrXUtnFEMI/K7MDENG/bPxRfiCYEXAMPLEKEY
Note
You will not have access to the secret access key again after this dialog box closes.
6. To download the key pair, choose Download .csv file. Store the keys in a secure location.
7. After you download the .csv file, choose Close.
When you create an access key, the key pair is active by default, and you can use the pair right away.
How to manage access keys for IAM users
As a best practice, we recommend that you don't embed access keys directly into code. The AWS SDKs and the AWS Command Line Tools enable you to put access keys in known locations so that you do not have to keep them in code. Put access keys in one of the following locations:
• Environment variables – On a multitenant system, choose user environment variables, not system environment variables.
• CLI credentials file – The credentials and config file are updated when you run the command aws configure. The credentials file is located at ~/.aws/credentials on Linux, macOS, or Unix, or at C:\Users\USERNAME\.aws\credentials on Windows. This file can contain the credential details for the default profile and any named profiles.
• CLI configuration file – The credentials and config file are updated when you run the command aws configure. The config file is located at ~/.aws/config on Linux, macOS, or Unix, or at C:
\Users\USERNAME\.aws\config on Windows. This file contains the configuration settings for the default profile and any named profiles.
Storing access keys as environment variables is a pre-requisite for the the section called “Authentication plugin for Java 4.x” (p. 35). The client searches for credentials using the default credentials provider chain, and access keys stored as environment variables take precedent over all other locations, for example configuration files. For more information, see Configuration settings and precedence.
The following examples show how you can configure environment variables for the default user.
Linux, macOS, or Unix
$ export AWS_ACCESS_KEY_ID=AKIAIOSFODNN7EXAMPLE
$ export AWS_SECRET_ACCESS_KEY=wJalrXUtnFEMI/K7MDENG/bPxRfiCYEXAMPLEKEY
$ export AWS_SESSION_TOKEN=AQoDYXdzEJr...<remainder of security token>
Setting the environment variable changes the value used until the end of your shell session, or until you set the variable to a different value. You can make the variables persistent across future sessions by setting them in your shell's startup script.
Windows Command Prompt
C:\> setx AWS_ACCESS_KEY_ID AKIAIOSFODNN7EXAMPLE
C:\> setx AWS_SECRET_ACCESS_KEY wJalrXUtnFEMI/K7MDENG/bPxRfiCYEXAMPLEKEY C:\> setx AWS_SESSION_TOKEN AQoDYXdzEJr...<remainder of security token>
Using set to set an environment variable changes the value used until the end of the current command prompt session, or until you set the variable to a different value. Using setx to set an environment variable changes the value used in both the current command prompt session and all command prompt sessions that you create after running the command. It does not affect other command shells that are already running at the time you run the command.
PowerShell
PS C:\> $Env:AWS_ACCESS_KEY_ID="AKIAIOSFODNN7EXAMPLE"
PS C:\> $Env:AWS_SECRET_ACCESS_KEY="wJalrXUtnFEMI/K7MDENG/bPxRfiCYEXAMPLEKEY"
PS C:\> $Env:AWS_SESSION_TOKEN="AQoDYXdzEJr...<remainder of security token>"
If you set an environment variable at the PowerShell prompt as shown in the previous examples, it saves the value for only the duration of the current session. To make the environment variable setting persistent across all PowerShell and Command Prompt sessions, store it by using the System application in Control Panel. Alternatively, you can set the variable for all future PowerShell sessions
by adding it to your PowerShell profile. See the PowerShell documentation for more information about storing environment variables or persisting them across sessions.
Using temporary credentials to connect to Amazon Keyspaces using an IAM role and the SigV4 plugin
For enhanced security, you can use temporary credentials to authenticate with the SigV4 plugin. In many scenarios, you don't need long-term access keys that never expire (as you have with an IAM user). Instead, you can create an IAM role and generate temporary security credentials. Temporary security credentials consist of an access key ID and a secret access key, but they also include a security token that indicates when the credentials expire. To learn more about how to use IAM roles instead of long-term access keys, see Switching to an IAM role (AWS API).
To get started with temporary credentials, you first need to create an IAM role.
Create an IAM role that grants read-only access to Amazon Keyspaces 1. Sign in to the AWS Management Console and open the IAM console at https://
console.aws.amazon.com/iam/.
2. In the navigation pane, choose Roles, then Create role.
3. On the Create role page, under Select type of trusted entity, choose AWS service. Under Choose a use case, choose Amazon EC2, then choose Next: Permissions.
4. On the Attach permissions policy page, choose Amazon Keyspaces Read Only Access from the policy list, then choose Next: Tags.
5. On the Add tags (optional) page you can add tags for the role, or choose Next: Review.
6. On the Review page, enter a name for the role, then select Create role. Remember this name because you’ll need it when you launch your Amazon EC2 instance.
To use temporary security credentials in code, you programmatically call an AWS Security Token Service API like AssumeRole and extract the resulting credentials and session token from your IAM role that you created in the previous step. You then use those values as credentials for subsequent calls to AWS. The following example shows pseudocode for how to use temporary security credentials:
assumeRoleResult = AssumeRole(role-arn);
tempCredentials = new SessionAWSCredentials(
assumeRoleResult.AccessKeyId, assumeRoleResult.SecretAccessKey, assumeRoleResult.SessionToken);
cassandraRequest = CreateAmazoncassandraClient(tempCredentials);
For an example that implements temporary credentials using the Python driver to access Amazon Keyspaces, see ??? (p. 40).
For details about how to call AssumeRole, GetFederationToken, and other API operations, see the AWS Security Token Service API Reference. For information on getting the temporary security credentials and session token from the result, see the documentation for the SDK that you're working with. You can find the documentation for all the AWS SDKs on the main AWS documentation page, in the SDKs and Toolkits section.
Service endpoints for Amazon Keyspaces
Topics
• Global endpoints (p. 23)
• China Regions endpoints (p. 24)
• FIPS endpoints (p. 24)
• Port (p. 25)
Global endpoints
Amazon Keyspaces is available in the following AWS Regions. The table shows the service endpoint for each Region.
Region
Name Region Endpoint Protocol
US East
(Ohio) us-east-2 cassandra.us-east-2.amazonaws.com TLS US East (N.
Virginia) us-east-1 cassandra.us-east-1.amazonaws.com TLS US
West (N.
California)
us-west-1 cassandra.us-west-1.amazonaws.com TLS
US West
(Oregon) us-west-2 cassandra.us-west-2.amazonaws.com TLS AsiaPacific
(Hong Kong)
ap-east-1 cassandra.ap-east-1.amazonaws.com TLS
AsiaPacific (Mumbai)
ap-south-1 cassandra.ap-south-1.amazonaws.com TLS
Asia Pacific (Seoul)
ap-
northeast-2 cassandra.ap-northeast-2.amazonaws.com TLS
AsiaPacific (Singapore)
ap-southeast-1 cassandra.ap-southeast-1.amazonaws.com TLS
Asia Pacific (Sydney)
ap-
southeast-2 cassandra.ap-southeast-2.amazonaws.com TLS
Asia Pacific (Tokyo)
ap-
northeast-1 cassandra.ap-northeast-1.amazonaws.com TLS
Canada
(Central) ca-
central-1 cassandra.ca-central-1.amazonaws.com TLS Europe
(Frankfurt) eu-
central-1 cassandra.eu-central-1.amazonaws.com TLS Europe
(Ireland) eu-west-1 cassandra.eu-west-1.amazonaws.com TLS
Region
Name Region Endpoint Protocol
Europe
(London) eu-west-2 cassandra.eu-west-2.amazonaws.com TLS Europe
(Paris) eu-west-3 cassandra.eu-west-3.amazonaws.com TLS Europe
(Stockholm) eu-north-1 cassandra.eu-north-1.amazonaws.com TLS Middle
East(Bahrain)
me-
south-1 cassandra.me-south-1.amazonaws.com TLS
South America (SãoPaulo)
sa-east-1 cassandra.sa-east-1.amazonaws.com TLS
China Regions endpoints
The following Amazon Keyspaces endpoints are available in the AWS China Regions.
To access these endpoints, you have to sign up for a separate set of account credentials unique to the China Regions. For more information, see China Signup, Accounts, and Credentials.
Region
name Region FIPS endpoint Protocol
China
(Beijing) cn-north-1 cassandra.cn-north-1.amazonaws.com.cn TLS China
(Ningxia) cn-
northwest-1 cassandra.cn-northwest-1.amazonaws.com.cn TLS
FIPS endpoints
For the following AWS Regions, FIPS endpoints are available. For more information about FIPS endpoints, see AWS General Reference FIPS endpoints.
Region
name Region FIPS endpoint Protocol
US East (N.
Virginia) us-east-1 cassandra-fips.us-east-1.amazonaws.com TLS US West
(Oregon) us-west-2 cassandra-fips.us-west-2.amazonaws.com TLS
Using cqlsh
Port
The following table shows the authentication mechanism to use for the port. Amazon Keyspaces uses TLS to authenticate the server against the Starfield CA.
Port Authentication mechanism
9142 TLS
Using cqlsh to connect to Amazon Keyspaces
The following section describes how to use cqlsh to connect to Amazon Keyspaces (for Apache Cassandra).
For information about cqlsh, see cqlsh: the CQL shell. Topics
• Installing and using cqlsh to connect to Amazon Keyspaces (for Apache Cassandra) (p. 25)
Installing and using cqlsh to connect to Amazon Keyspaces (for Apache Cassandra)
To install and use cqlsh, you must do the following:
1.Install Python 2.7 (p. 25).
2.Install the cqlsh client (p. 25).
3.Encrypt cqlsh connections using TLS (p. 26).
NoteTo make cqlsh connections to Amazon Keyspaces for functional testing, light operations, and migrations you can use a preconfigured Docker container that includes all prerequisites and configuration settings optimized for Amazon Keyspaces. The toolkit is available on the GitHub website.
Install Python 2.7
To determine whether you have Python installed on your computer and which version, run the following operation.
python --version
If you have Python 2.7 installed, you should see something like the following for output.
Python 2.7.16
If you need to install Python 2.7, follow the instructions at Python downloads.
Install and configure the CQL client
cqlsh is bundled with Apache Cassandra. To get it, install Apache Cassandra by following the
instructions in Downloading and installing Apache Cassandra. Amazon Keyspaces supports drivers and
Using cqlsh
clients that are compatible with Apache Cassandra 3.11.2. The currently recommended version of cqlsh can be downloaded from Apache.
After installing Cassandra, verify that cqlsh is installed by running the following command.
cqlsh --version
You should see something like the following for output.
cqlsh 5.0.1
If you are using Windows, replace all instances of cqlsh with cqlsh.bat. For example, to check the version of cqlsh in Windows, run the following command.
cqlsh.bat --version
Download the template of the configuration file cqlshrc optimized for Amazon Keyspaces from Github.
Save the downloaded cqlshrc_template file as cqlshrc to the Cassandra directory.
${HOME}/.cassandra/cqlshrc
Encrypting cqlsh connections using TLS
Amazon Keyspaces only accepts secure connections using Transport Layer Security (TLS).
Before you can connect using SSL/TLS, you must do the following:
1. Download the Starfield digital certificate using the following command and save sf-class2- root.crt locally or in your home directory.
curl https://certs.secureserver.net/repository/sf-class2-root.crt -O
NoteYou can also use the Amazon digital certificate to connect to Amazon Keyspaces and can continue to do so if your client is connecting to Amazon Keyspaces successfully. The Starfield certificate provides additional backwards compatibility for clients using older certificate authorities.
2. Connect to Amazon Keyspaces with the following command.
Important
The ServiceUserName and ServicePassword should match the ones obtained when you generated the service-specific credentials by following the steps in Generate service-specific credentials (p. 16).
You can also manage Amazon Keyspaces cqlsh access through AWS IAM users and roles by using the AWS authentication plugin expansion for cqlsh. To learn more, see Amazon Keyspaces (for Apache Cassandra) developer toolkit on Github.
cqlsh host 9142 -u ServiceUserName -p ServicePassword --ssl
Note that 9142 is the secure port.
The following is an example.
cqlsh cassandra.us-east-2.amazonaws.com 9142 -u "alice-at-111122223333" - p "wJalrXUtnFEMI/K7MDENG/bPxRfiCYEXAMPLEKEY" --ssl
After connecting, you see something like the following for output. The currently supported version of Apache Cassandra is 3.11.2.
Connected to Amazon Keyspaces at cassandra.us-east-2.amazonaws.com:9142.
[cqlsh 5.0.1 | Cassandra 3.11.2 | CQL spec 3.4.4 | Native protocol v4]
Use HELP for help.
alice-at-111122223333@cqlsh>
Updating an existing configuration file for cqlsh connections
If you want to edit an existing configuration file to support TLS connections, open the configuration file in the Cassandra home directory, for example ${HOME}/.cassandra/cqlshrc and add the following lines.
[connection]
port = 9142
factory = cqlshlib.ssl.ssl_transport_factory [ssl]
validate = true
certfile = path_to_file/sf-class2-root.crt
You can configure cqlsh COPY settings to ensure cqlsh stays within the Amazon Keyspaces the section called “CQL query throughput tuning” (p. 7) guidelines.
Modify the default for the COPY FROM option in the configuration file ${HOME}/.cassandra/cqlshrc and add the following lines.
[copy-from]
CHUNKSIZE=50
This setting for CHUNKSIZE works well to get started with a newly created table and should be changed to support larger workloads. For more information on how to optimize cqlsh COPY configuration settings for Amazon Keyspaces, see the section called “Step 4: Configure cqlsh COPY FROM settings” (p. 67) in the data migration tutorial.
Using the AWS CLI
You can use the AWS Command Line Interface (AWS CLI) to control multiple AWS services from the command line and automate them through scripts. With Amazon Keyspaces you can use the AWS CLI for data definition language (DDL) operations, such as creating a table.
Before you can use the AWS CLI with Amazon Keyspaces, you must get an access key ID and secret access key. For more information, see the section called “IAM credentials for AWS authentication” (p. 18).
For a complete listing of all the commands available for Amazon Keyspaces in the AWS CLI, see the AWS CLI Command Reference.
Topics
• Downloading and Configuring the AWS CLI (p. 28)
• Using the AWS CLI with Amazon Keyspaces (p. 28)
Downloading and Configuring the AWS CLI
The AWS CLI is available at http://aws.amazon.com/cli. It runs on Windows, macOS, or Linux. After downloading the AWS CLI, follow these steps to install and configure it:
1. Go to the AWS Command Line Interface User Guide
2. Follow the instructions for Installing the AWS CLI and Configuring the AWS CLI
Using the AWS CLI with Amazon Keyspaces
The command line format consists of a Amazon Keyspaces operation name followed by the parameters for that operation. The AWS CLI supports a shorthand syntax for the parameter values, as well as JSON.
The following Amazon Keyspaces examples use AWS CLI shorthand syntax. For more information, see Using shorthand syntax with the AWS CLI.
The following command creates a keyspace with the name catalog.
aws keyspaces create-keyspace --keyspace-name 'catalog'
The command returns the resource Amazon Resource Name (ARN) in the output.
{
"resourceArn": "arn:aws:cassandra:us-east-1:111222333444:/keyspace/catalog/"
}
To confirm that the keyspace catalog exists, you can use the following command.
aws keyspaces get-keyspace --keyspace-name 'catalog'
The output of the command returns the following values.
{ "keyspaceName": "catalog",
"resourceArn": "arn:aws:cassandra:us-east-1:111222333444:/keyspace/catalog/"
}
The following command creates a table with the name book_awards. The partition key of the table consists of the columns year and award and the clustering key consists of the columns category and rank, both clustering columns use the ascending sort order. (For easier readability, long commands in this section are broken into separate lines.)
aws keyspaces create-table --keyspace-name 'catalog' --table-name 'book_awards'
--schema-definition 'allColumns=[{name=year,type=int},{name=award,type=text}, {name=rank,type=int},
{name=category,type=text}, {name=author,type=text},{name=book_title,type=text}, {name=publisher,type=text}],
partitionKeys=[{name=year},
{name=award}],clusteringKeys=[{name=category,orderBy=ASC},{name=rank,orderBy=ASC}]'
This command results in the following output.
{
"resourceArn": "arn:aws:cassandra:us-east-1:111222333444:/keyspace/catalog/table/
book_awards"
}